For you coding nerds, you may wonder if it’s possible to convert text into an image using Python. The good news is—yes. However, those who are new to this are easy to feel lost at first.
Don't worry, though. What you need is the right libraries and a few lines of code, then you’ll be up and running in no time. We've broken down the steps to make them beginner-friendly, so even if you're new to Python, you can follow along easily. Plus, we’ll provide you with helpful recommendations to ensure you’re using the best tools for the job.

In this article
Part 1. Before You Start with Text-to-Image in Phyton
Before you start generating text to image in Python, make sure you have Python installed on your computer. Then, you’ll need to use a Python library called Pillow to add text to an image in Python. Pillow is an image-processing library that allows you to manipulate images, including drawing text onto them. You can use it to open, modify, and save images in various formats like JPEG, PNG, GIF, etc.
Installing Pillow in Python
To use Pillow on Python, you’ll need to install it first. Simply open the Command Prompt on your computer, and copy and use the following command to install the Pillow library:
pip install pillow

This command will install the library and make it available for you to use in your Python projects. Once Pillow is installed, you’ll have everything you need to follow along with this guide.
Part 2. How to Convert Text to Image with Phyton
Now that you have Pillow installed, let’s walk through the process of converting text to an image using Python. The guide here will show you a very basic and simple way to generate an image with text on it.
The first step in any Python script is to import the libraries you’ll need. In this case, we need to import the Image, ImageDraw, and ImageFont modules from Pillow using this code:
from PIL import Image, ImageDraw, ImageFont
These three modules will help us create a blank image, draw text on it, and use fonts to customize the appearance of that text.

Once the modules are imported, the next step is to create a blank image. In this example, we’re creating a 600x200 pixel image with a blue background. You can specify the color using an HTML color code, which you can take reference on this website. For example:
# Create a blank image with a specific RGB blue background
img = Image.new('RGB', (600, 200), color=(80, 202, 250))
Next, create an object that will allow us to draw on the image. We do this by initializing the ImageDraw.Draw() object:
d = ImageDraw.Draw(img)
With this object, you can now add shapes, text, and other elements to the image.

Now it’s time to add text to the image. To do this, we first need to specify the font and text properties. You can use the default font provided by Pillow, or if you want to use a custom font, you can specify the path to it.
font = ImageFont.load_default() # Using the default font
d.text((10, 40), "Hello, I’m using Python to create this image!", font=font, fill='white')
In this code, (10, 40) is the position where the text will be placed, and fill='white' defines the color of the text.

Once you’ve added the text, it’s time to save your new image. You can save it as a PNG file or in any other format supported by Pillow by using this line of code:
img.save('text_image.png')
If you want to specify where you want to save the image, you can replace the code to:
# Save the image
img.save('/Users/YourUsername/Downloads/text_image.png')
Replace "YourUsername" with your actual username on your computer to save the image to your Downloads folder. You can also modify this path to save the image to a different location if you prefer.

This code saves the image with the file name text_image.png. You’ve now successfully converted text into an image using Python! Here’s the result of the code above:

Part 3. Limitations and Considerations
Although using Python to write text on an image is possible, there are a few limitations to keep in mind. Understanding these limitations ahead of time can help you plan more effectively before deciding to implement your text-to-image solution.
- Font Compatibility
Not all fonts are supported by Pillow by default. You may need to manually specify the path to your font file, especially if you're using custom fonts. This can add complexity, especially if the font file is missing or corrupted.
- Handling Multiline Text
If you want to add more than one line of text, it gets a little trickier. You’ll need to manually handle line breaks and text positioning. This requires extra logic to calculate where each line of text should appear in the image.
- Image Resolution
The size and resolution of the image you create are determined by the dimensions you specify. If you choose a size that’s too small, your text may look cramped or pixelated. You’ll need to experiment with the dimensions to ensure everything fits well.
- Complex Image Generation
While you can write text on images using Python through Pillow, the program is not well-suited for generating complex images that require detailed designs, intricate graphics, or advanced image effects. For complex visuals, you may need more specialized software or image-generation tools.
Part 4. How to Convert Text to Image Easily Without Phyton
Converting text to images with Python may only require a few lines of code. However, if you're not well-versed in programming or need advanced visual effects and customization beyond what basic libraries like Pillow can provide, you can still convert text into an image without Python in a simpler, code-free way.
One recommended solution for generating images from text is Wondershare Filmora. Filmora is primarily a video editing software, but it also offers a powerful AI Image feature that allows you to easily create high-quality images from text, without needing to write a single line of code.

- Vast video/audio effects and creative assets.
- Powerful AI for effortless content creation.
- Intuitive, professional yet beginner-friendly.
- Works on Mac, Windows, iOS, and Android.

Therefore, besides generating images, you can also take advantage of its built-in video editing tools to incorporate other media elements into your generated image, such as music or texts. Some of the available features in Filmora include:
- Text and Titles: Customize your text with various fonts, sizes, and colors, along with dynamic animations
- Audio Editing: Add music or voiceovers to accompany your images
- AI Music: Utilize Filmora's AI music generator to create custom background music that fits the mood of your content
- Filters and Effects:Apply filters and visual effects to enhance your images and videos
How to use AI Image Generator on Filmora
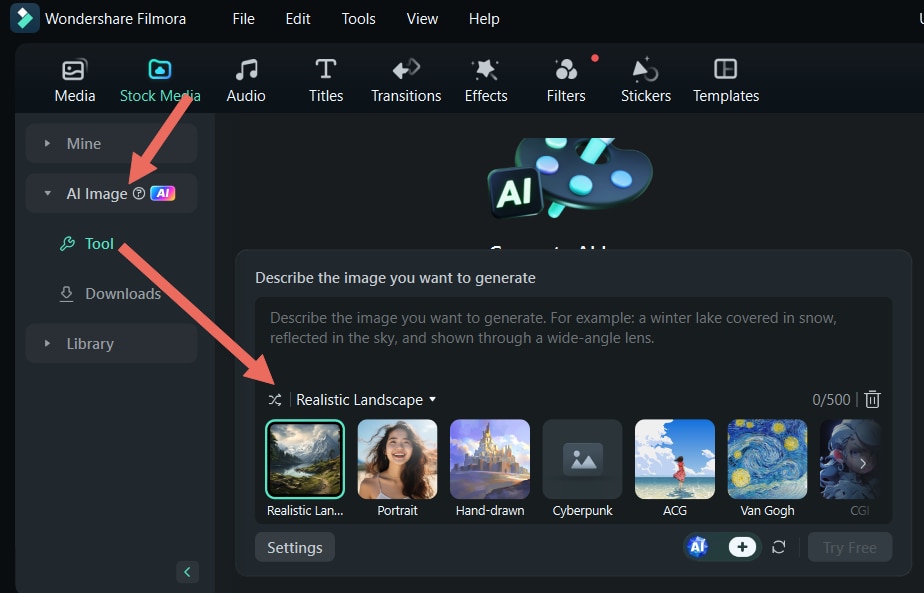
Make sure that you have the latest version of Filmora installed. Once you launch the program, navigate to the Stock Media panel. From there, locate and select the AI Image option. Then, choose the style you want to use for your image.

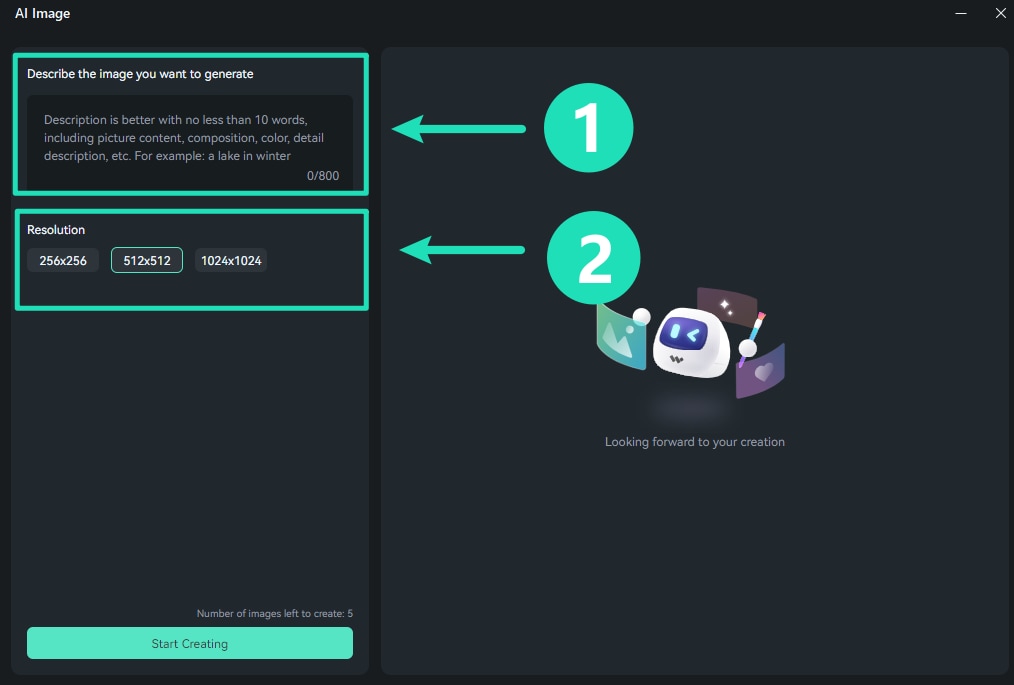
After that, you can enter a detailed description of the image you wish to create in the provided input box. Select your desired resolution and click Start Creating to generate your image.

Once your images are ready, you can easily add them to your media panel by clicking the download icon located in the bottom right corner of each image. To edit, simply drag and drop the image onto the timeline.

If you want to save the generated image as JPG or PNG, you can click the Snapshot button.

Then, choose the desired format and select the folder where you want to save the image. Click OK to save the image. It will be stored in the location you selected.

To enhance your AI-generated image, start by navigating to the menu at the top of the screen. If you want to add music, select Music and choose from the available options to download a track that suits your project.

If you prefer, you can also generate AI music within Filmora by selecting AI Music from the left panel. Simply type in your prompt to create a custom music track. Then, adjust the parameters as you’d like.

To incorporate animated text, navigate to the Titles menu and download a style that complements your project. You can then add it to the timeline and adjust the size in the preview window.

Click “Advanced” on the property panel to open more settings. Here, you can modify the text and apply any animations you like. Select Apply once done.

Conclusion
Thanks to the Pillow library, you can convert text to images using Python with ease. This image-processing library equips you with the tools to customize fonts, sizes, colors, and layouts that cater to your needs.
But for those who prefer a more intuitive approach without coding, Filmora offers an excellent alternative with its AI Image feature. This user-friendly software allows you to generate high-quality images from text in just a few clicks, along with robust editing capabilities to enhance your visuals further.


