Let's say you have a great idea or some funny or creative scene that's stuck in your head, but you wouldn't know how to begin drawing it or describing the details to someone. Some ten years ago, you'd be out of luck, and it would just be a funny story you remember, but with AI image generator apps, you can turn that idea into a hilarious picture.
A cat riding a horse at the Battle of Waterloo, an astronaut in an Old West saloon, a frog prince in full plate armor posing for a portrait – the possibilities are endless, and it's a great laugh.
If you want to try it out for yourself, here are some of the best tools for the job.
In this article
Top 5 AI Image Generators Apps for 2025 and Beyond
| AI Image Generator Apps | Compatibility | User Rating | Best Reason to Pick |
| Leonardo.AI | iOS, Windows, Android. | Mostly 5-star, some 1-star. | Have more complex prompts or need a wider variety of art styles. |
| Monet | iOS 13 or later, Android. | Around 4.5 stars average, and plenty of 1 and 2 stars. | Don't mind spending a few bucks for cool anime or realistic images. |
| Wonder | iOS, Android, Windows. | 3.7 stars on Google Play and 4.3 on the App Store. | Need a quick and free option for a few decent images. |
| Text2Pixel | iOS 14 or later. | 4.6 stars average | You're an iPhone or iPad user. |
| Imagine Art | iOS 13 or later, Android, Windows. | 4.6 stars on average | Movie-like images and photos of protagonists in different angles and poses. |
Leonardo.AI - Best AI Image Generator Apps for Professionals
This particular AI image generator has been all the rage recently, and for a good reason – it's fairly quick, provides great results with four images for each prompt, and has a free version.
Now, you only get 150 tokens every 12 hours with the free version, and it takes 40 tokens to get four images based on your prompt. However, upgrading to a higher tier will only set you back $ 1 per month for 8500 tokens or $24 for the unlimited version.
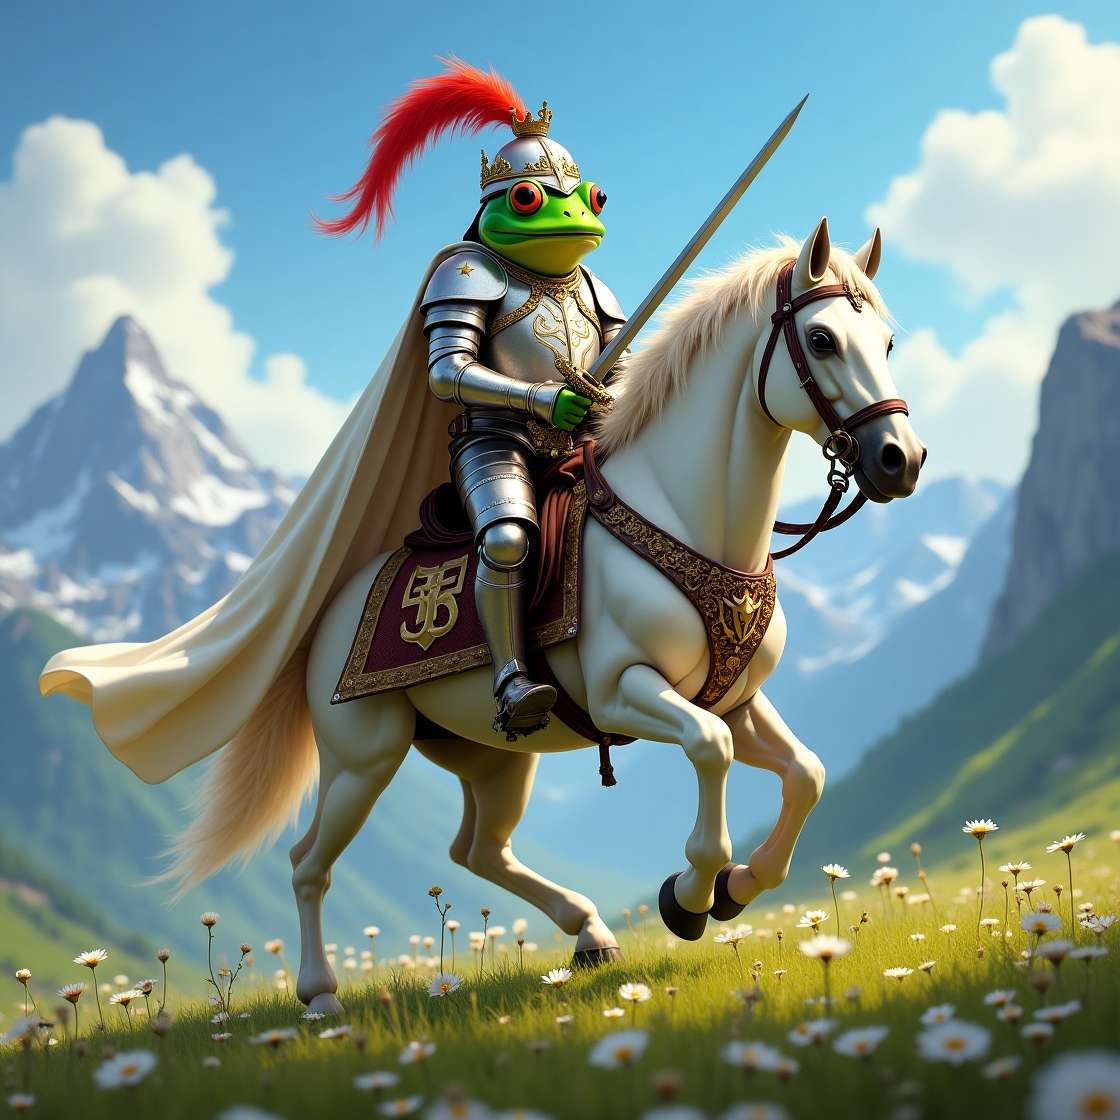
Here's an example of a creative image made by Leonardi.AI.
Prompt: "A frog prince in full late 15th century German plate armor, with a sword in hand, riding a horse into battle on a grassy field with mountains far in the distance."
Monet - Best Image Generating Apps for Arts
Named after another famous painter, this AI image generator app for Android and iOS offers several styles, from anime to realistic, and even a tattoo design feature. There is supposedly a free version, which you can upgrade to Pro at any time to gain access to more advanced features.
While the free version is somewhat limited, as expected, the real problem is that you can't even get the most basic features to work unless you sign up for the paid tier, with either weekly or monthly payments.
The images are decent enough, though, and they don't take a lot of time to generate.
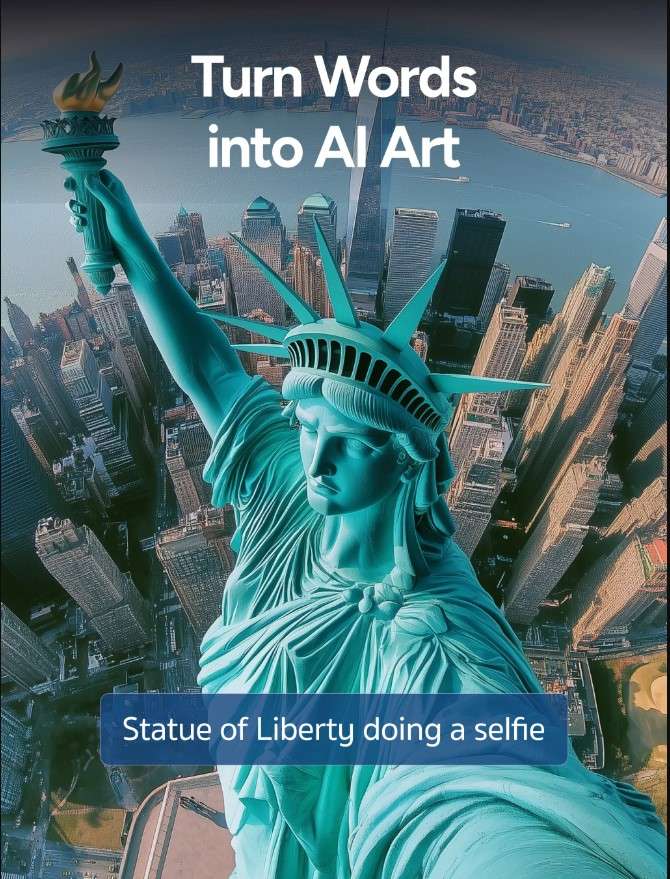
Let's look at an example from its Google Play Store page.
Prompt: "The Statue of Liberty doing a selfie."
Wonder - Best AI Photo Generator Apps for Fun
At first glance, the Wonder website design looks clean and intuitive, making it easy to start creating fun images. You'll have to sign up, but you can do so with your Google account fairly quickly. The free version gives you a limited amount of credits per day, so you can make about five images this way, and there are also apps for iOS and Android.
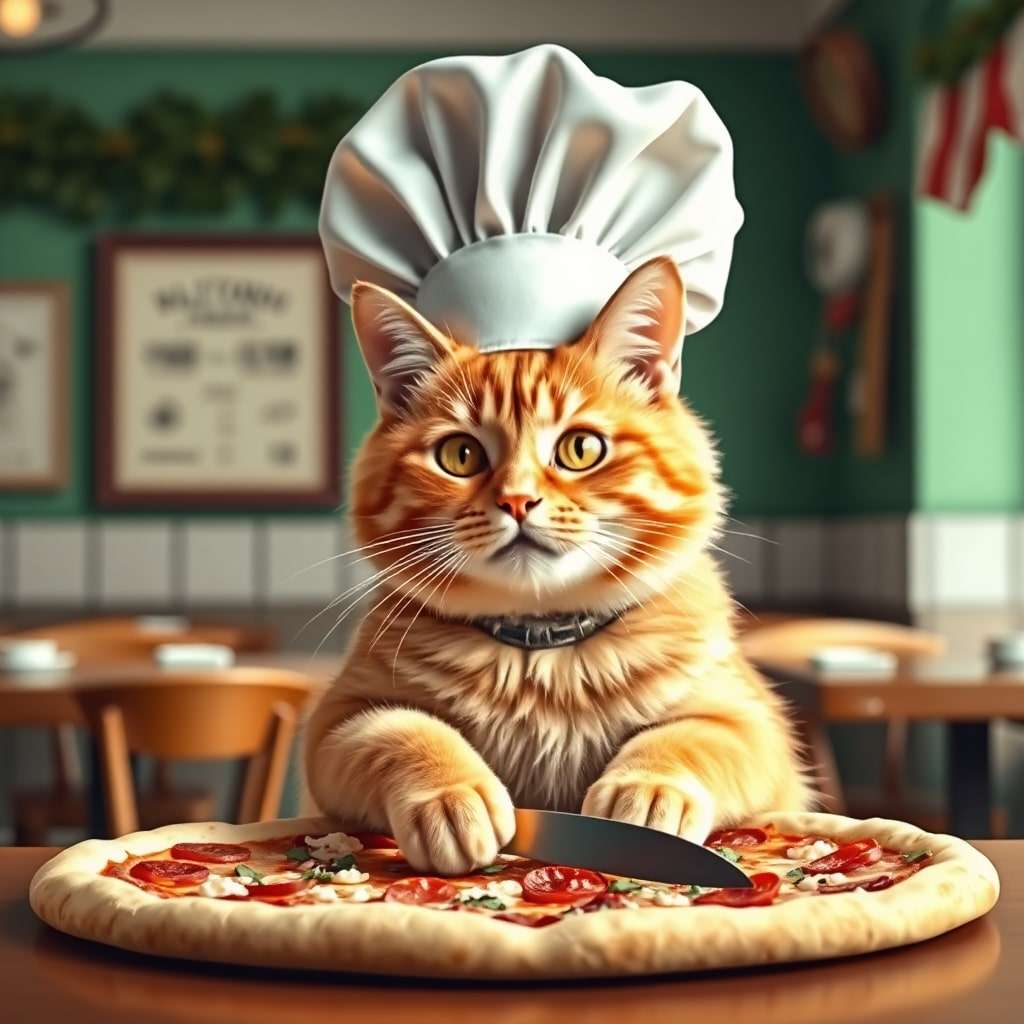
This is the type of quality you can expect.
Prompt: "Orange cat wearing a chef's hat making pizza in an Italian restaurant."
Text2Pixel: Best AI Image Generator Apps for Artists and Designers
A nice little AI image generator app for Apple users, formerly known as FontSnap, with an intuitive interface and quick results. As with a lot of the other AI image generators on this list, the free version is quite limited – you get two pictures for free before being asked to upgrade.
The pro version is only $40 per year with unlimited prompts, which is a fair deal, and the images look nice. The customer service is also on point, with a lot of the negative reviews being answered cordially and the issues resolved in later updates.
Let's look at an example image.
Prompt: "Astronaut decorating a Christmas tree in space station."

Imagine Art - Best AI Image Generator Apps without Watermarks
Imagine Art is a new AI image generator app for both Android and iPhone devices, and it is also compatible with browsers. The site looks polished, and it's easy enough to find your way around and get the results you want. There are a few available styles, though fewer than with Leonardo.AI, and the tool interprets most prompts fairly well without you having to be too specific.
You also get to choose from one to four variations per prompt, so you can really hone in on what you like, but with the free version, you only get a few credits – enough for about 10 images in total, counting all the variations.
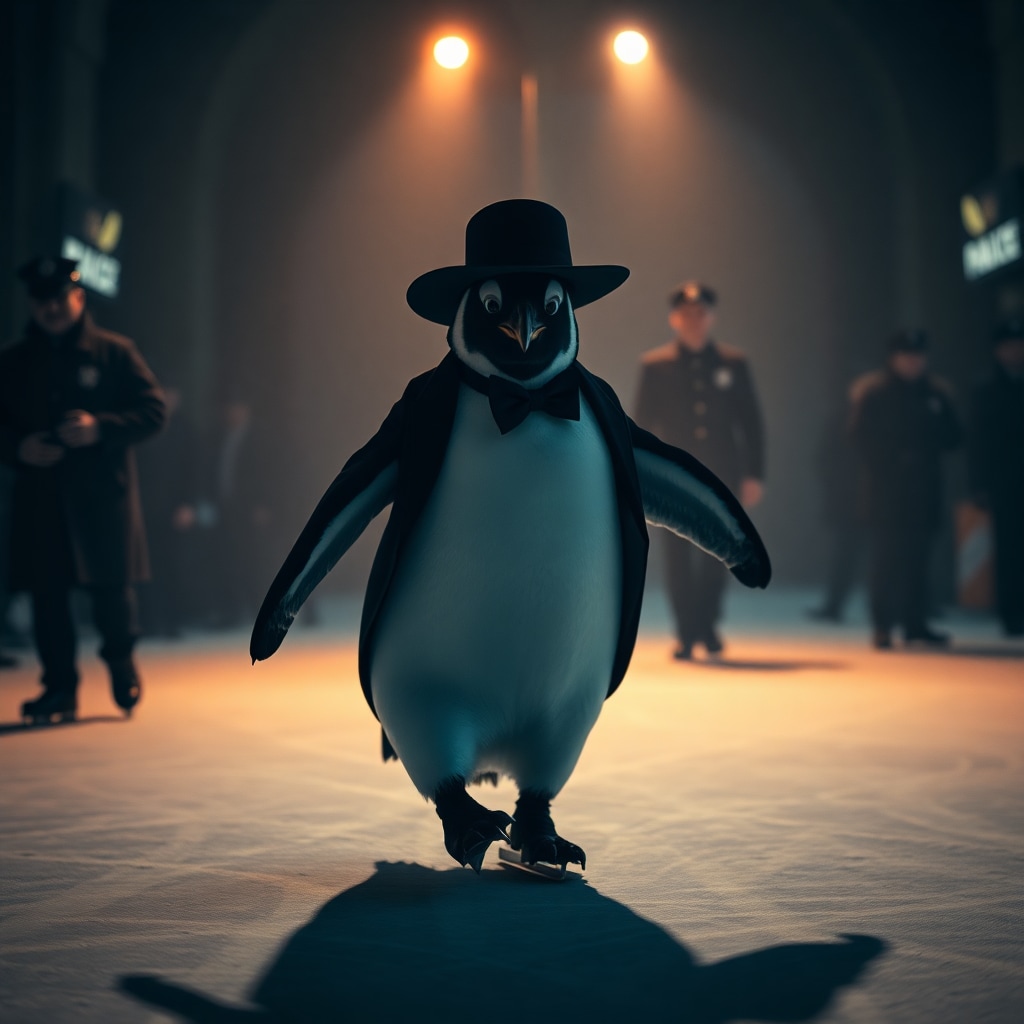
Here is what you can get with a bit of ingenuity.
Prompt: "Penguin in fancy suit and wide-brimmed hat ice skating with police in the background." (in the cinematic style)
Best AI Image Generator for PC
As you can see, there are quite a few AI image generator apps on the market, and they give you a fast and easy way to generate some cool images on your smartphone. However, a full desktop version will often offer more options in terms of style, picture size, and number of images generated per prompt, even the ability to create short AI clips.
The best option for anyone looking for a powerful AI photo generator from texts is definitely Filmora. It's a robust video and image editing tool that can do a lot more; as a new image generator, it allows you to type in your description, choose from 15 styles like portrait, ACG, clay, and others before generating, set the aspect ratio from 7 preset templates, and generate four images at the same time.
Here's how it works.
- Fire up Filmora and start a New Project.
- In the media panel on the left, click AI Image > Tool to open the AI pop-up window.
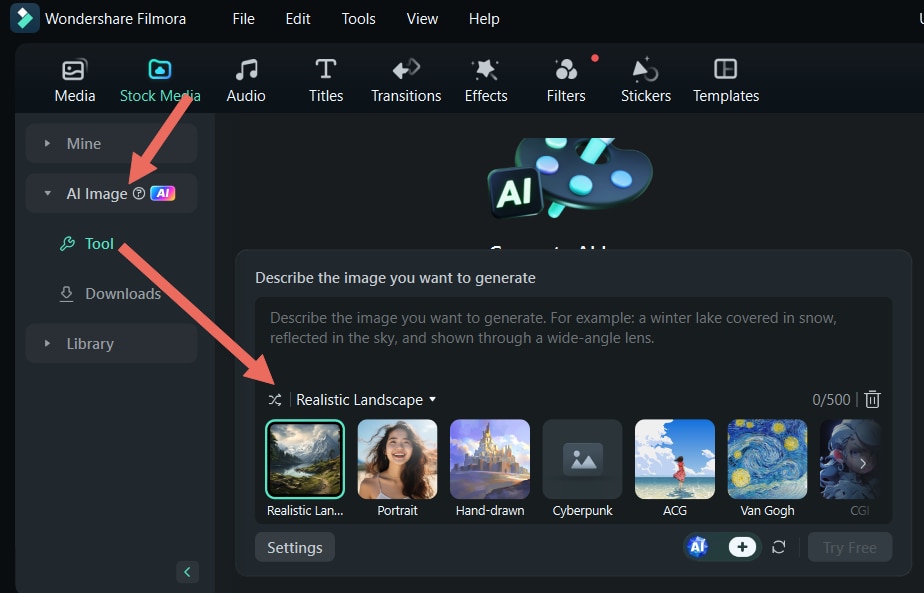
- Click the settings button to set an aspect ratio for the images.
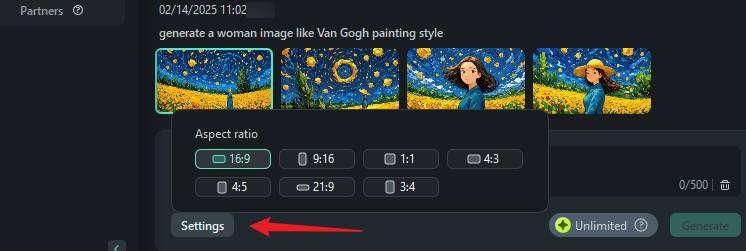
- Click the dropdown button to choose an image style from 15+ templates.
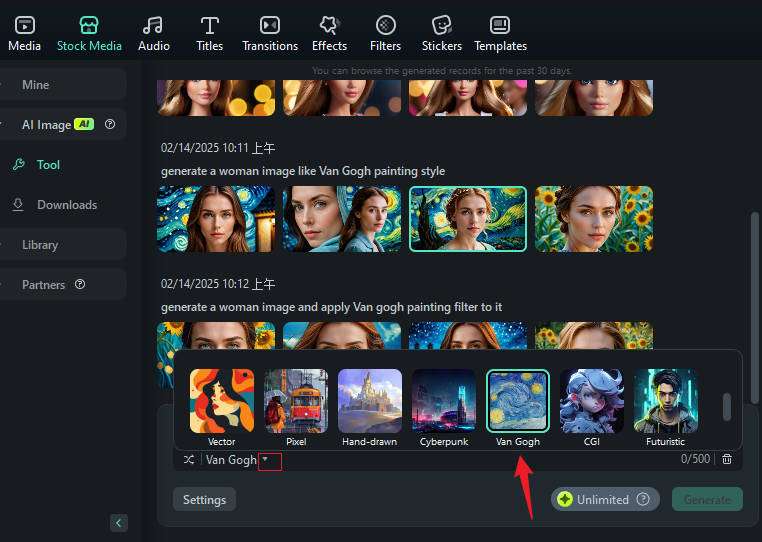
- Describe what you want the tool to generate.
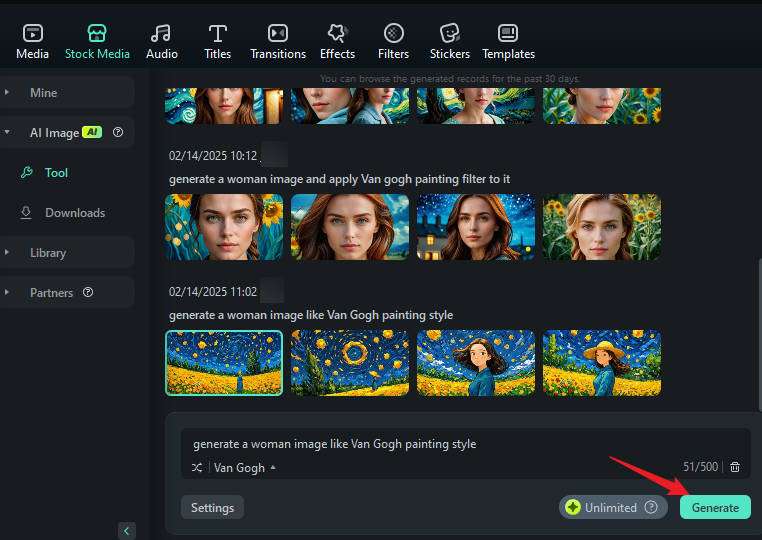
- Click the Download Icon to add the image to the media panel.
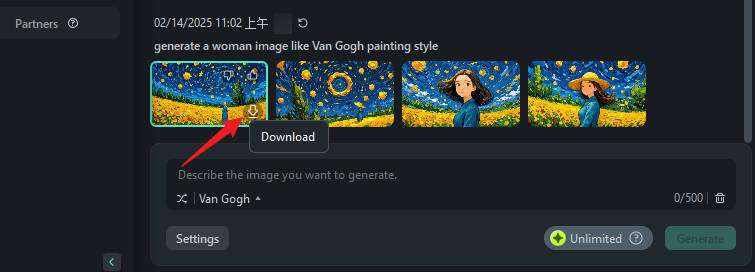
- Drag the image down to the timeline for further editing if needed.
- When you're done, click Snapshot or Export to save the image on your computer.
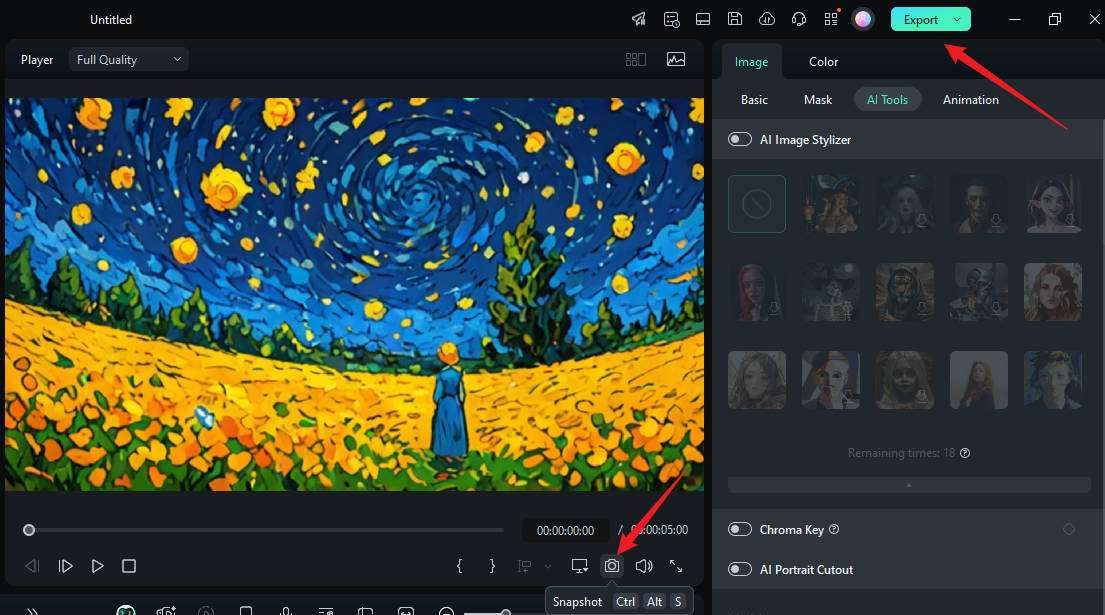
Bonus: Change the Styles of Generated Images with AI
You can also change the style of any images you've generated or your regular images using Filmora's AI Image Stylizer feature. It supports cartooning the images, applying anime filters, witch filters, clowns, and others. Let's go over the steps.
- Click on Import > Import Media Files and choose a picture you want to transform.
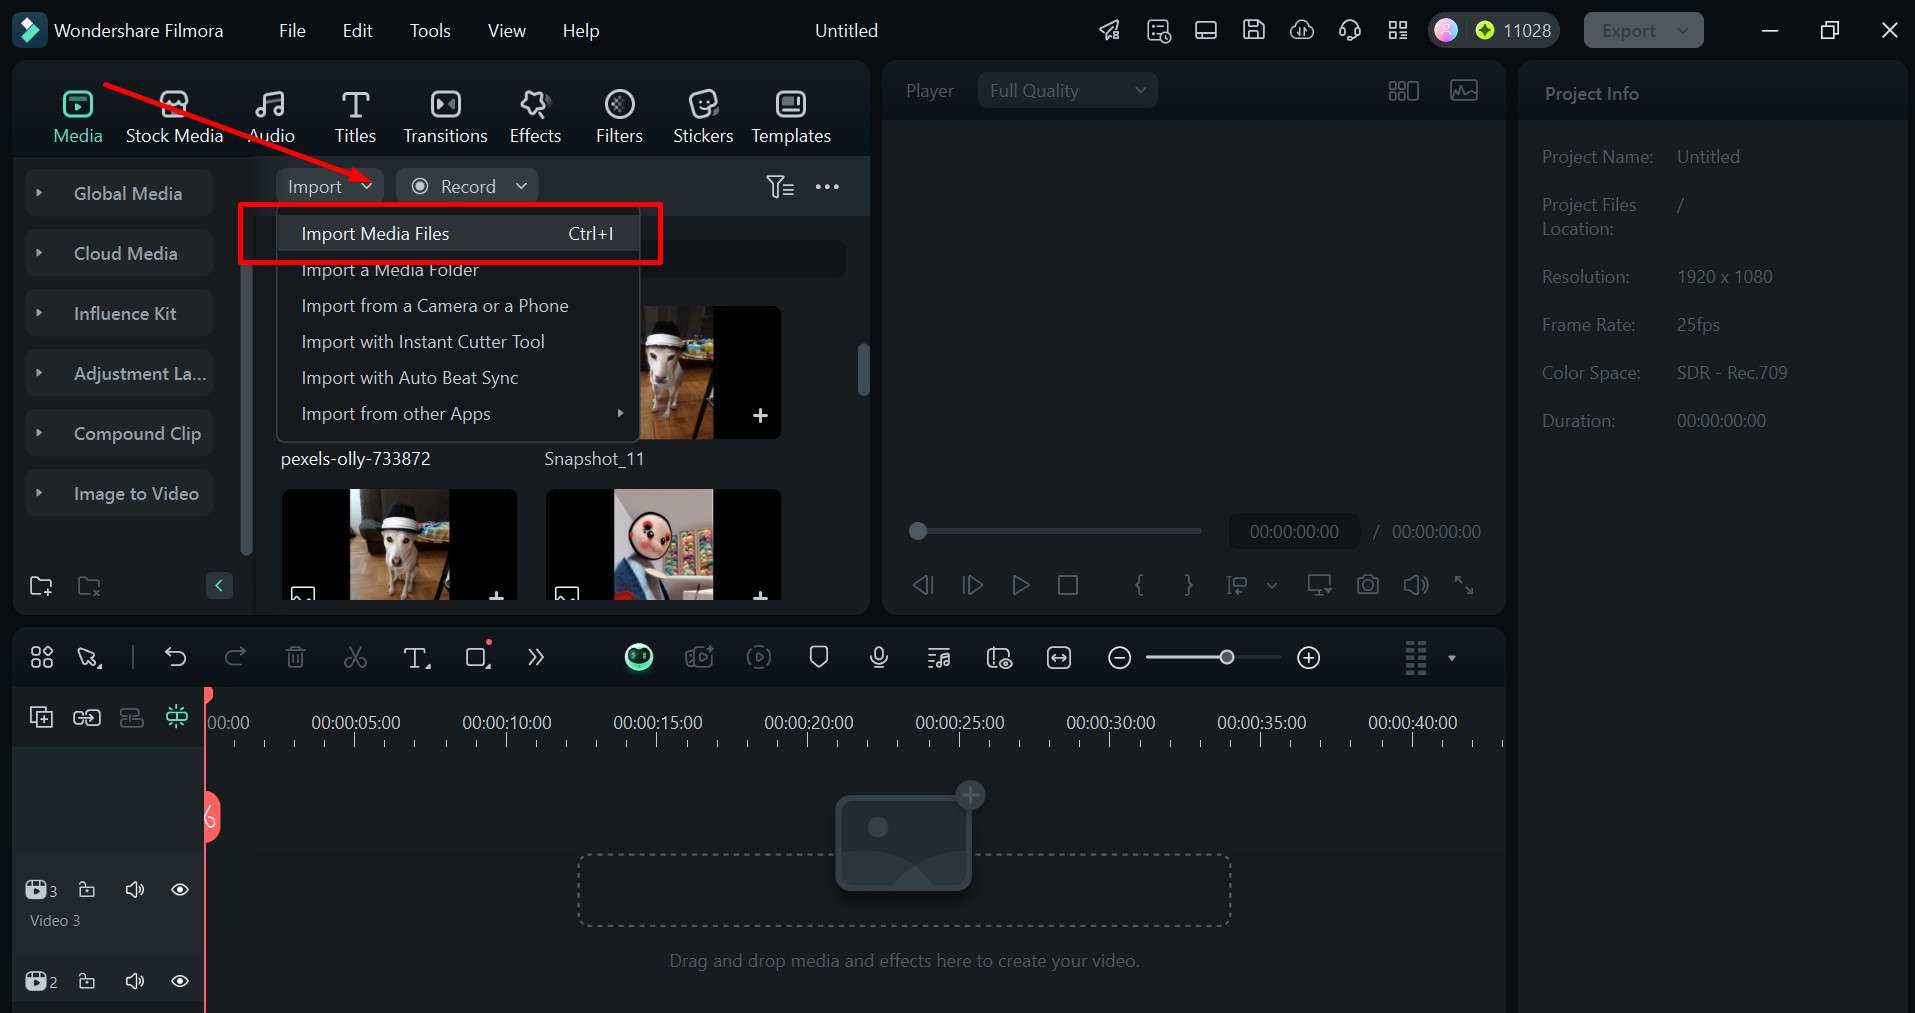
- Click the picture and drag it down to the timeline.
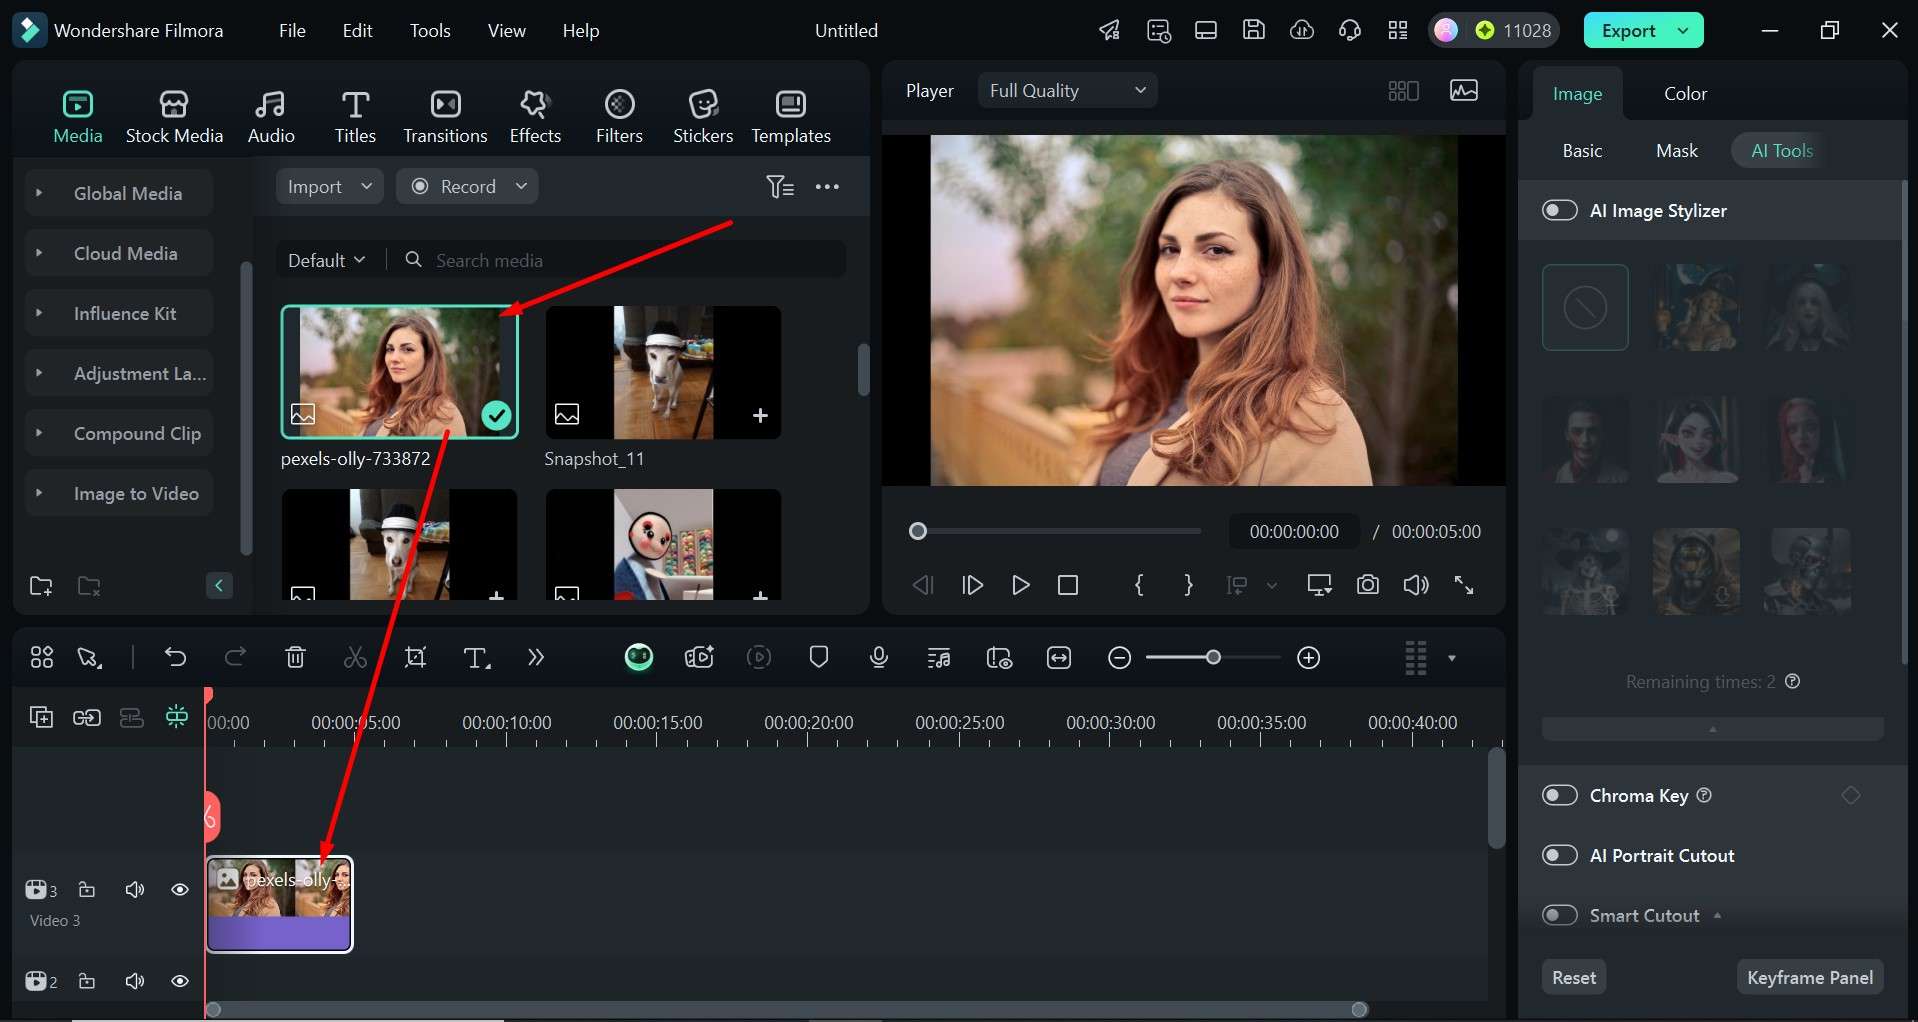
- In AI Tools, click the AI Image Stylizer.
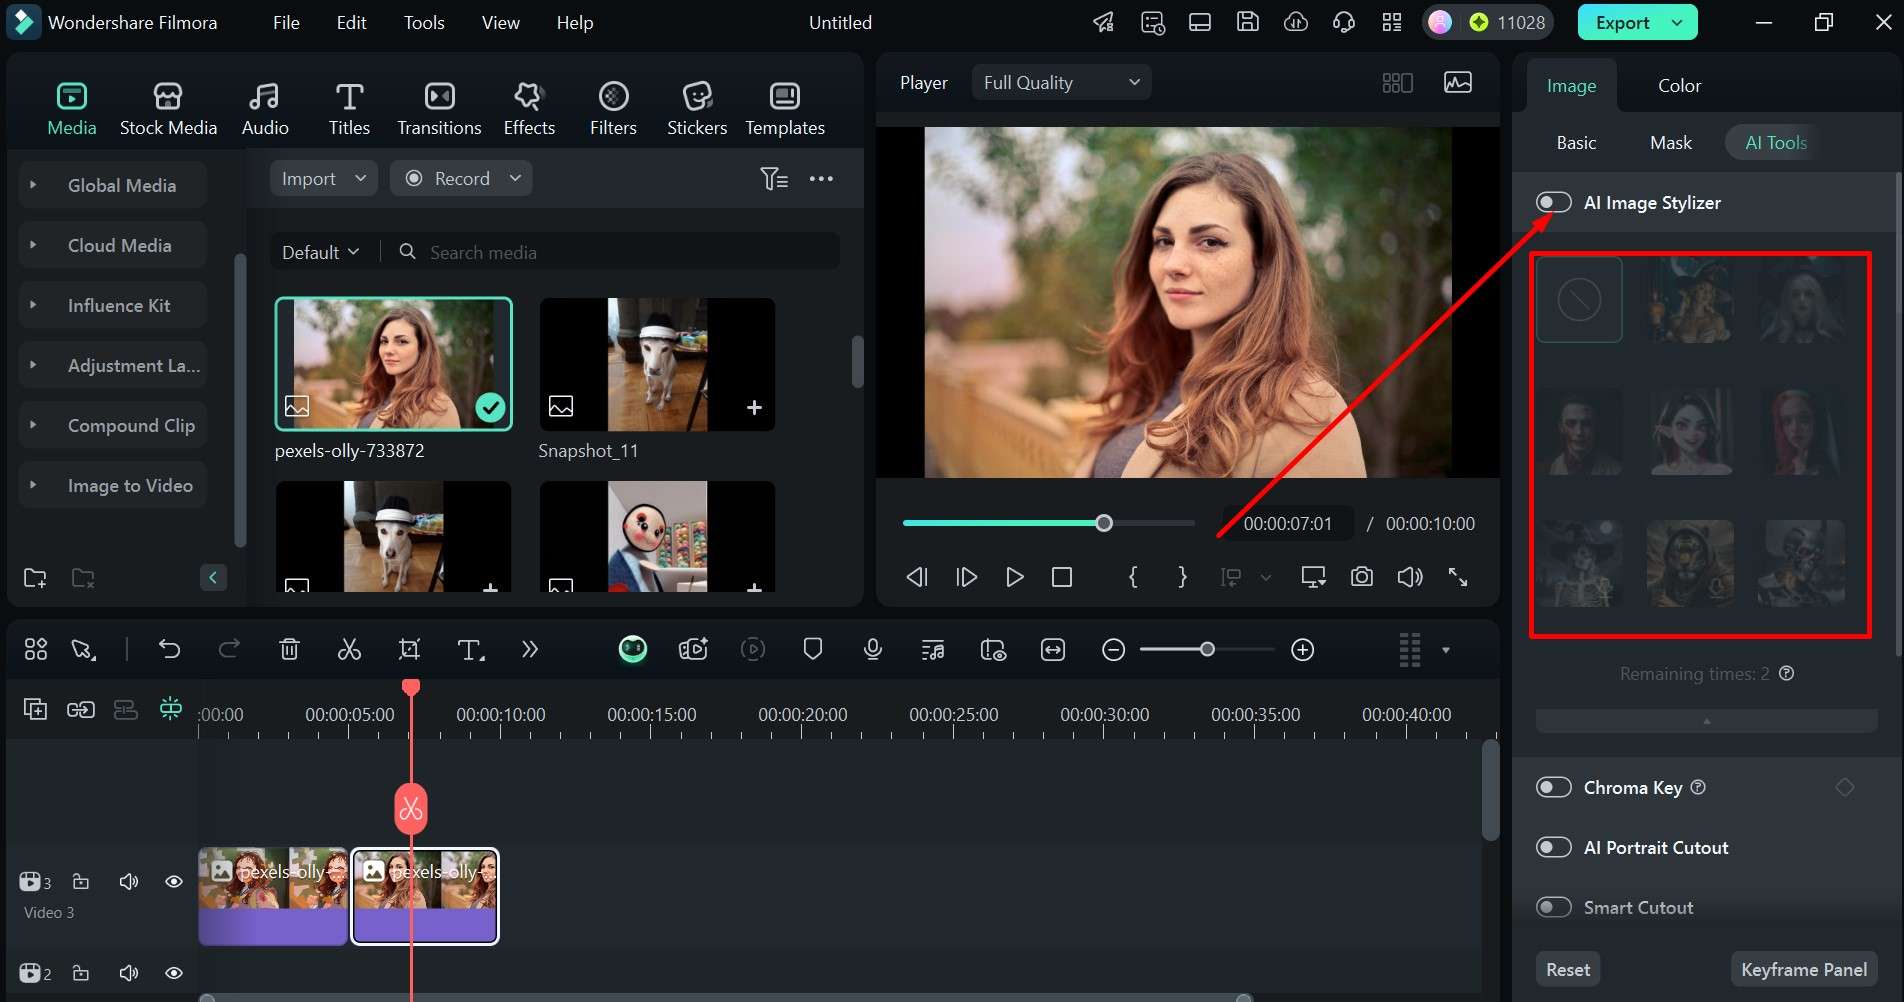
- Choose an effect and give it a couple of seconds to generate the new image.
- When you're satisfied, Export the image.
You can also use Filmora Mobile on iOS or Android, where you'll find even more cool styles and effects.
Conclusion
Making all sorts of uniquely creative images can be heaps of fun – if you have the right tool, that is. We've covered the most popular AI photo generator apps, but if you are looking for a new AI image generator that gives you more options, then Wondershare Filmora is the perfect choice.
Not only can you use its powerful AI features to generate all kinds of images and even change their style further, but you can also create a collage of short clips, edit other details, add effects and stickers, and much more.


 100% Security Verified | No Subscription Required | No Malware


