
 100% Security Verified | No Subscription Required | No Malware


 ChatGPT
 Perplexity
 Gemini
 Claude
 Grok
Grok
As they say, silence is golden, but in the world of audio editing, most of us can only dream of this. Interference can be quite a nuisance, especially when working on a particular task or project like editing video or audio, hence reducing the quality of audio. But worry not, your music lovers! In this detailed article, we will demonstrate how the application Audacity removes background noise from audio.
Just follow our uncomplicated and straightforward methods that will turn your distorted tracks into crystal clear masterpieces, which will surely leave your audiences breathless with admiration!
Well, without further ado, here’s what you need to know about mastering noiseless and exceptional audio!
In this article
Part 1: The "WHY" Behind Removing Background Hum from the Audio!
You must be aware that background noise reduction audacity is not just icing on the cake but a necessity since only clean audio files leave the intended message to the target audience correctly.

Getting rid of the background hum in your audio is crucial for the following reasons:
Improved Audio Quality
Ambient noise can be annoying and give your audio a more unprofessional feel. Taking it off helps in making your audio clear, understandable, and not heavy on the listener's ears.
Enhanced Clarity
Interference that occurs in the background reduces the possibility of grasping all the information being said. Removing it improves the overall sound quality and makes it simpler for listeners to understand what is being said.
Increased Focus
If there is a lot of background noise, it becomes impossible to fully concentrate on the content of the audio. By taking it away, you stand to gain a more intimate look into your listeners as well as make them more engaged.
Better Communication
It is important, however, to avoid background noise because it may cause confusion or failure to communicate properly. By doing this, you can avoid unnecessary distractions in the communication process and be guaranteed to pass your message as intended.
Part 2: How Does Audacity Eliminate Background Noise from the Audio?
Now, let us introduce to you the tool known as Audacity, which is the most popular free and open-source audio editing software that is widely used by audio freaks, podcasters, and video makers. In fact, this tool is easy to use and is equipped with a high-performance function, which makes it possible to erase the background sounds when recording audio.
Audacity's Key Features
- Noise Reduction: This is one of the filters that appear on the Audacity interface and it defines the reduction of noise formulas to the lowest integer values to prevent the noise from being part of the resultant signal.
- Spectrogram View: The spectrogram view format gives a graphical depiction of the audio signal, which is more appropriate when identifying and eliminating the noise with reference to frequency.
- Noise Profile: The Noise Profile button comes with an option for creating a new profile for the particular audio file, which can help in the next processes of noise elimination.

But how does Audacity get this done? Okay, let us get deeper into it.
Step1After installing Audacity, if you are working on a new audio file, go to the File option. click on New, and then select the WAV or MP3 file that needs the background noise to be removed. Choose the part of the audio that is quiet and only contains noise. Click the noise removal tab after finding the effects menu and scrolling down to access it.

Step2You will then be prompted for a 'Get noise profile' option to complete the proceeding part. This makes it possible for Audacity to identify what must be stripped from the recording. Well, it primarily collects what is considered to be noise in a signal, so it has a notion of what kind of noise to filter from your sound file.

Step3Select and highlight all the audio you want to remove background noise from. Then click on the effects tab and select noise removal from the list of options available. Modify the settings to your preference, then click OK.

Last of all, you should listen to your audio and check it is correct. If you are okay with the audio, you can proceed with exporting it. To export your clip, click File Export > Choose the file format.
We hope now you are well familiarized with how Audacity remove background hum from the audio.
Part 3: Give a Smooth Touch to Your Audio - AI Audio Deniose Feature of Filmora!
If you are looking for a more comprehensive solution that provides functionality beyond basic noise removal in Audacity, Wondershare Filmora is the right tool for you. This all-in-one multimedia tool offers an extensive set of functionalities to fine-tune your media for generating high-quality content. The AI Denoise feature lets you remove the noise from the audio automatically, while specifying the level of quality for the noise reduction.
Apart from automated noise reduction, the tool also offers the Normal Denoise feature for real-time noise reduction. You can adjust the intensity of the reduction according to your preferences. For easier edits and denoising, you can also use this platform on your phone, which is available in the form of Filmora App.
Audio Enhancement Features Offered By Filmora
- Multiple Audio Format Support: Filmora supports a wide range of audio formats, including MP3, WAV, AAC, M4A, and others, allowing users to import and work with nearly all commonly used audio files.
- Audio Detachment: The tool offers an easy Detach Audio feature that lets users separate audio tracks from video clips. Once detached, the audio can be edited independently, enabling precise audio control.
- Sound Equalizer: This platform includes a built-in sound equalizer with preset profiles such as Pop, Rock, Jazz, and Classic. You can apply the profiles as it is or customize the range according to your needs and preferences.
- Volume Adjustment: If you want to lower the volume or make it more audible, the tool allows you to adjust it by simply dragging the slider. You can also mute the audio in the video to add another audio track to the video.
- Audio Beats: The Filmora App lets you add different beats, such as drums and melodies, depending on the audio. The tool uses AI to detect the genre of the audio and apply a beat to it automatically.
Comprehensive Steps to Reduce Noise With Filmora Desktop
Having discussed the background noise feature offered by Filmora, let us have a look at the steps for removing noise using the desktop version:
Step1Import Video after Creating Project.
Initiate the process by clicking the "New Project" tab on the homepage of the tool. Insert the video for background noise removal and drag it to the timeline to perform the process.

Step2Select the Audio Adjust Option.
Access the video track from the timeline and right-click on it to enable the list of options. Now locate the "Adjust Audio" option and tap on it to proceed with the audio enhancement process.

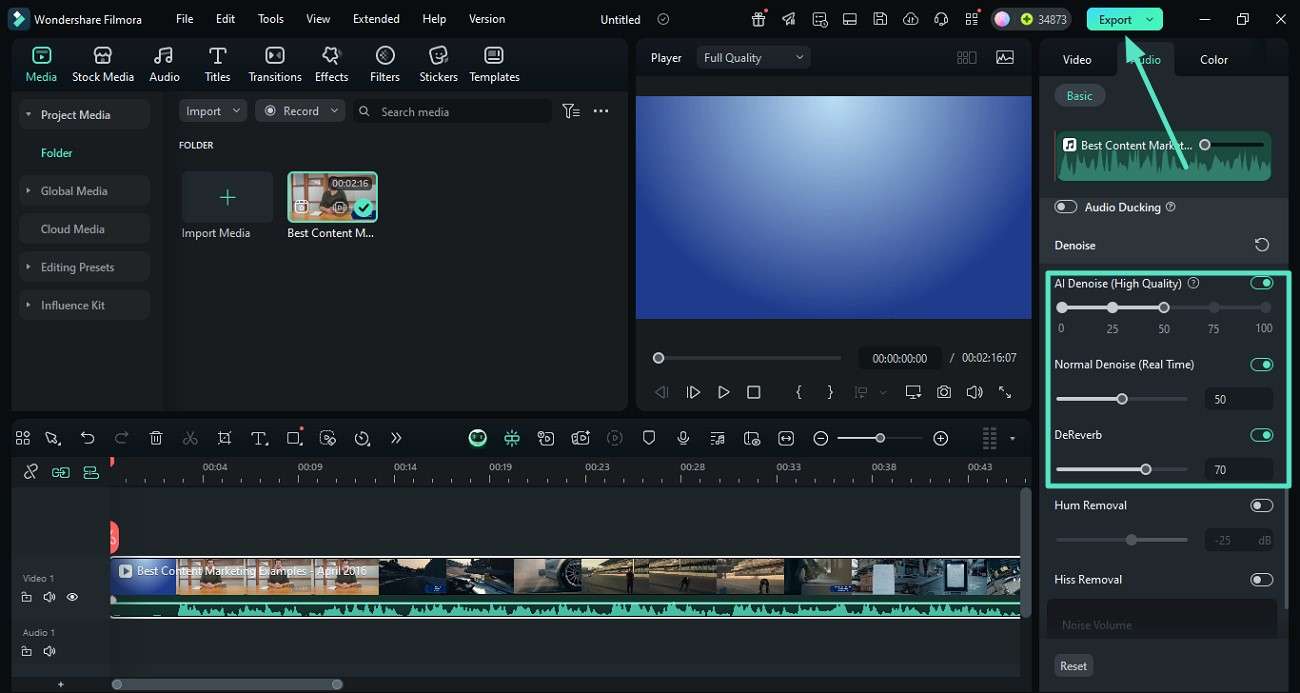
Step3Enable Audio Section and Remove Noise.
On the "Audio" panel on the right, enable the "AI Denoise" function and select the quality level from its slider. Conversely, turn the toggle on for "Normal Denoise" to enable noise reduction while recording a voiceover. Next, remove the reverb from the background by dragging the "Reverb" slider according to your preferences. Finally, hit the "Export" button once the background noise is removed.
Step-by-step Guide to Reduce Noise With Filmora App
As discussed, the Filmora App [iOS/Android] provides the ability to seamlessly remove background noise from your video's audio. To learn how to execute this process, consider the steps mentioned below:
 secure download

Step1Extract Audio and Enable Noise Reduction.
Begin by launching the app and tapping on the "New Project" option. Next, import the video and tap on the "Extract Audio" option to detach it. Locate the "Noise Reduction" option and press it to automatically remove the background noise.

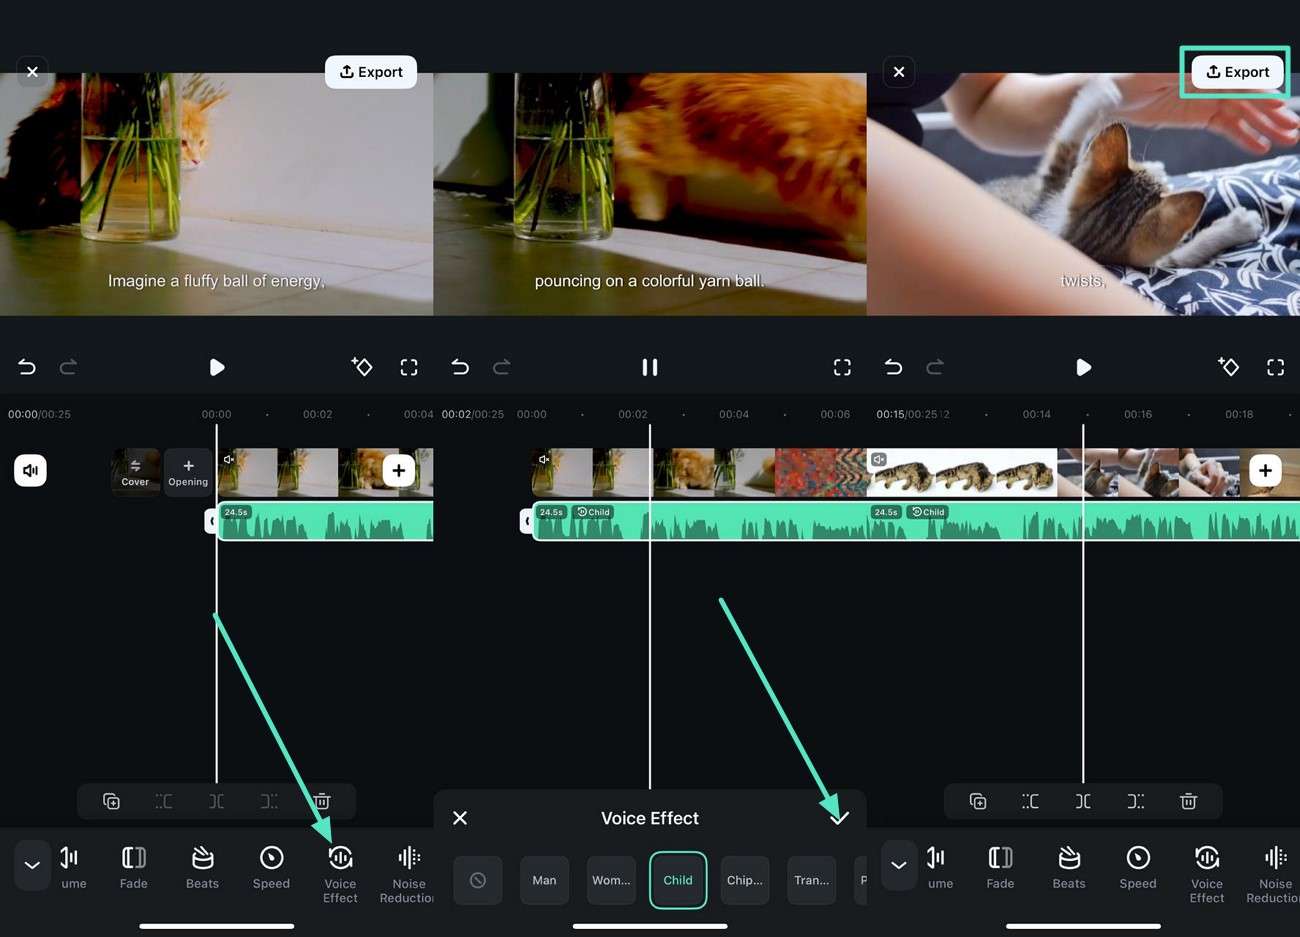
Step2Add Sound Effect and Export.
Enhance the audio by adding "Voice Effect" from the toolbar and choosing the effect from the different options provided. Apply it to the video by pressing the "Tick" icon on the right. Once you are satisfied with the results, tap on the "Export" button to save the generated results.
Conclusion
In conclusion, by so doing, you can be able to remove background noise from audio audacity and come up with a cleaner audio file of professional quality, as highlighted in this guide. Especially for those who record audio in some form, whether as a musician, podcaster, or videographer, sound control, particularly in relation to background noise, is very important.
However, with the help of an excellent noise reduction tool — Wondershare Filmora — and the directions listed above, which you read, you will be able to do this in a very short time. The end of low-fidelity and hard-to-listen background noise; hello to clear sounds!
FAQs
-
Q1: Will removing background noise affect the quality of my audio file?
When done properly, eliminating background noise shouldn't have a big impact on the audio file's quality. -
Q2: Can I remove background noise from all types of audio files?
Yes, the Wondershare Filmora tool described in this article can be used to remove background noise from most types of audio files, including WAV, MP3, and more. -
Q3: What is background noise?
Unwanted hums or sounds that are present in an audio recording and interfere with hearing or editing the intended audio are referred to as background noise.
