Adjusting audio levels is a crucial aspect of video editing that can significantly impact the overall viewer experience. Proper audio levels ensure that dialogue is clear, background music complements the visuals, and sound effects enhance the narrative without overpowering other elements. Poorly calibrated audio levels may generate disinterest or erode the understanding of the audience regarding the information being relayed. In this guide, we will focus on the optimal audio levels, their effects on the audience, and present Filmura as an effective program that allows the users to conduct accurate sound editing.
In this article
Part 1: Understanding Audio Levels and Their Importance
What Are Audio Levels?
Audio levels refer to the amplitude of sound signals in a given audio track. These levels dictate how loud or soft the listener perceives the sound. In the field of video editing, audio levels are controlled by audio parameters such as gain, volume, or normalization to provide a good balance and enhance the output of the production as a whole.
Key Concepts
For successful editing, it is important to comprehend key audio concepts associated with audio levels. Gain is the amplification of an audio signal that can increase the loudness. But volume is the strength of the audio signal during its playback through speakers or earphones. Normalization, a term in audio engineering, is a process that increases the loudest parts of an audio piece to a common level, while keeping the underlying dynamic range unchanged. Understanding these terms will help editors make constructive changes to enhance the audio as intended.
Effects on Video Quality
Improperly adjusted audio levels can detract from video quality in several ways. For example, if the speech in a video is too faint in comparison to the soundtrack or sound effects, the audience could have difficulties comprehending the words being uttered. On the other hand, if there is too much loudness applied, the sound becomes distorted or clipped and is not nice to listen to. Getting all the elements’ levels right and making sure that they’re clear is essential for holding viewers’ interest as well as achieving a professional end product.
Part 2: How to Adjust Audio Levels Using Filmora

Filmora provides a simple solution for adjusting the volume of the audio in your video projects. Now let’s go through the process of adjusting audio levels step by step:
Step-by-Step Guide
Most Important Step:
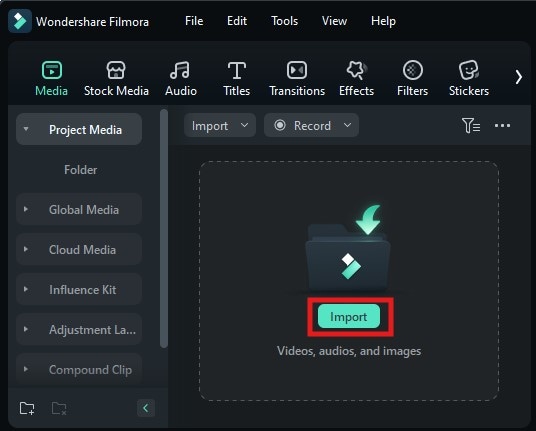
Step 1: To start getting the audio levels evened out in Filmora, start by uploading the videos that are needed into the program. Find and hit the Import button and look for the appropriate location of the files from Your computer that You would like to upload.

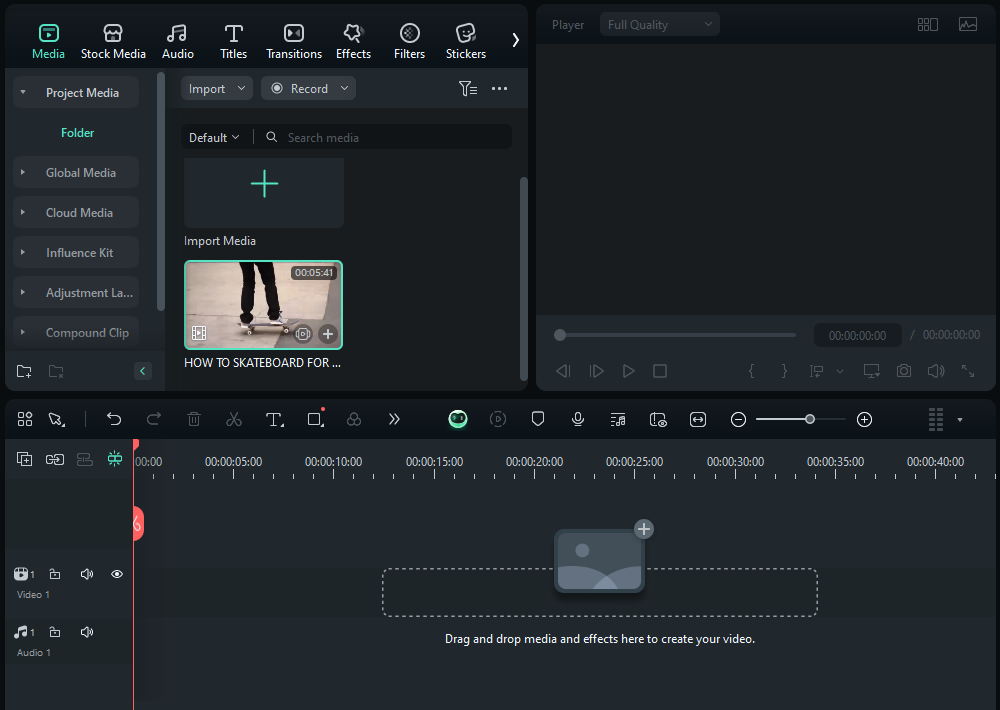
Step 2: When the files are uploaded, drag the files to where they should be on the timeline because editing them can now be done.

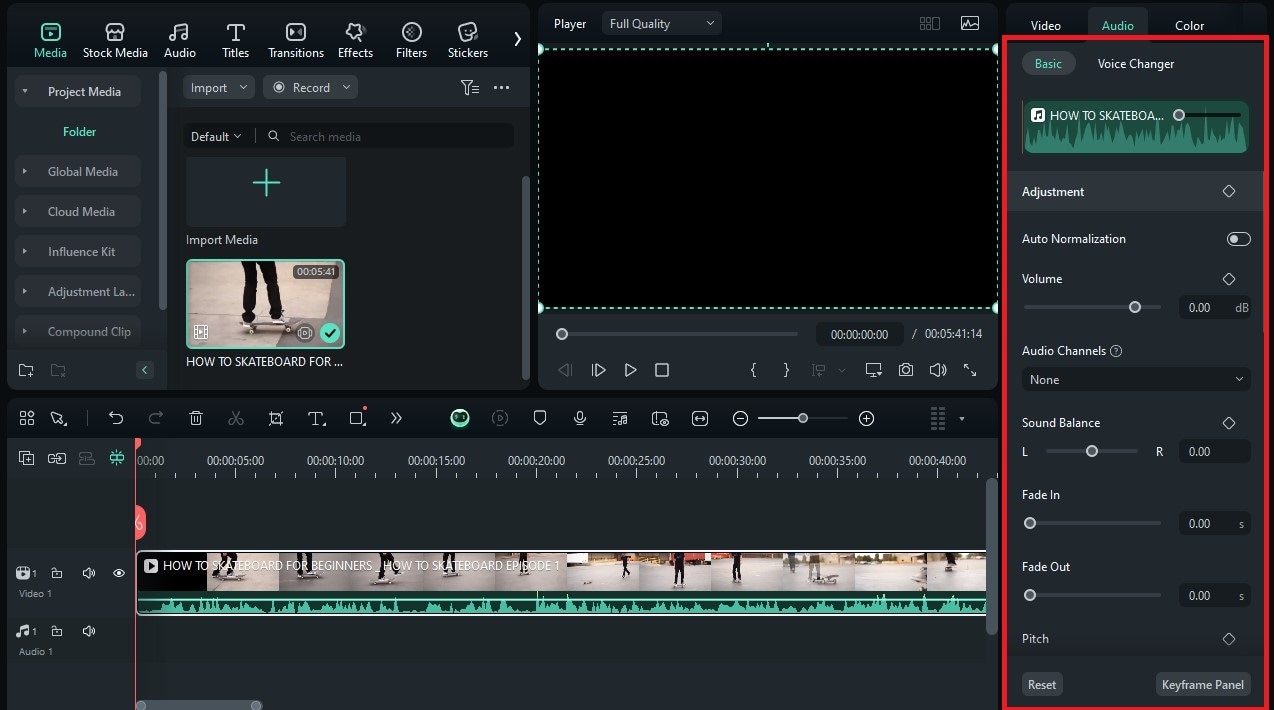
Step 3: After that, locate the audio clip you want to alter in the timeline and double-click it. This action will open an adjustment panel where you can see several sliders for controlling volume levels and other parameters.
In this panel, you will find options such as volume control, where you can easily increase or decrease the average volume of your audio by dragging the slider up or down.

Filmora also provides an equalizer feature that allows you to manipulate different frequency components in your audio signal—this is essential for achieving a balanced mix. After making adjustments to your audio clip in Filmora, you can export the adjusted audio for use in other projects by clicking on the export button at the top right corner of the interface. Choose your desired format and quality settings before finalizing your export.
Part 3: Alternative Software for Adjusting Audio Levels
Though Filmora has its advantages for most users, some may search for another software for their needs in this area. There are different types of options for modifying sounds, and each alternative brings its strengths in a particular area.
Adobe Premiere Pro

Adobe Premiere Pro is one of the most popular choices for a video editing software program which is relatively easy and practical. This program integrates powerful editing features along with basic visualization solutions, so that users can enhance sound inputs throughout the workflow efficiently. Premiere Pro provides multiple methods for adjusting audio volume—users can manipulate volume directly on the timeline by dragging up or down on the volume line associated with each clip. Additionally, users can access detailed controls via the Effects Control panel where they can fine-tune volume settings with precision.
iMovie

iMovie helps Mac users with basic video audio editing by providing an easy-to-use interface and some essential capabilities that are useful in modifying audio levels. When users have a project timeline and select a clip, they can go into the inspector window and use sliders to change clip volume as necessary. iMovie includes easy audio editing for simple projects for Mac users. It has a very easy interface and some basic yet useful functions like modifying audio levels. If a user has a timeline with a particular clip selected, they can click into the inspector window and use the appropriate volume sliders to adjust the clip volume if necessary.
Final Cut Pro

Final Cut Pro is another effective solution aimed at users of macOS who would need professional level editing and solid sound control at the same time. Users of the application are able to adjust the volume to specific levels using the program’s sophisticated system of instruments, which includes options for multi-channel mixing, and the ability to evaluate sound quality throughout the course of the tape being played. With Final Cut Pro’s advanced tools at their disposal, editors can achieve high-quality results while maintaining full control over every aspect of their projects.
Audacity

Audacity’s an audio editing application that is completely free and open-source. It's great for working with audio files on their own, away from any video editing software. While it does not provide direct video editing capabilities like Filmora or Premiere Pro, Audacity offers extensive tools for adjusting audio levels—including normalization and equalization options—making it ideal for preparing soundtracks before importing them into video projects. Users seeking detailed control over individual tracks will find Audacity invaluable when crafting polished soundscapes.
DaVinci Resolve

DaVinci Resolve has gained recognition not only for its powerful color grading tools but also for its comprehensive audio editing capabilities through its Fairlight page. This audio mixing environment is well equipped to allow for precision adjustments and even professional mixing methods during a project. With their clear user interface and powerful options, DaVinci Resolve is a great solution for film creators who strive to get crisp sound for their motion pictures and great images as well.
Part 4: Tips for Effective Audio Adjustment
Achieving optimal audio across different devices using any software tool available today requires attention to detail regarding how sounds interact with one another within compositions! Here are some best practices:
Best Practices
- Start by setting a baseline volume level before making any adjustments; this ensures consistency throughout all clips involved in editing. Regularly monitor playback levels while working—this helps identify potential issues early on and allows you to make necessary corrections before finalizing your project.
- Using keyframes effectively enables dynamic changes in volume over time; this technique allows editors to create gradual fades or sudden shifts that enhance storytelling through sound design. For instance, if there’s a need for dialogue clarity during intense action scenes where background noise might overwhelm spoken words—keyframes allow precise control over when certain sounds should rise or fall within mixes!
Finally, yet importantly—encouraging feedback from peers (whether friends/family members) who listen/view content created using these techniques provides valuable insights into areas needing improvement! Sharing experiences among peers fosters growth within creative communities while enhancing overall quality produced collectively!
Conclusion
Mastering audio levels is essential for creating engaging video content that captivates audiences across platforms! By understanding how different devices function alongside utilizing tools like Filmora effectively—anyone can achieve remarkable results regardless of skill level! Embrace experimentation with various techniques discussed here; soon enough you’ll discover new ways storytelling through captivating sounds resonates deeply within audiences everywhere! This article now incorporates all requested elements while maintaining clarity and coherence throughout each section! If you need any further modifications or additional content added in specific areas, feel free to let me know!


 100% Security Verified | No Subscription Required | No Malware

