Google Docs makes converting audio to text super easy with its text-to-speech and transcription tools. These features can save you tons of time, whether you're a student trying to turn a lecture into notes or a professional transcribing a meeting or interview. Instead of typing everything out by hand, you can use Google Docs to quickly convert audio files like MP3s into text. It will help you to finish more in less time. It's a simple yet powerful tool that can seriously boost your productivity.
Now that you know how helpful Google Docs can be for converting audio to text, let’s dive into the specifics. In the next section, we’ll walk you through everything you need to know about this tool. You can learn the exact steps to use the text-to-speech and transcription features in Google Docs. You will also find the best alternative to Google Docs if you need advanced features.
In this article
Part 1. What is the Text-to-Speech Feature on Google Docs
The text-to-speech feature in Google Docs lets you turn spoken words into text directly in a document. You can use your device’s microphone to speak, and Google Docs will instantly transcribe your speech. This removes the need for typing. It is especially useful for saving time, boosting productivity, or if you prefer speaking over typing. It’s great for writing long reports, taking quick notes, or drafting documents without manually typing everything.
Besides real-time dictation, Google Docs can also convert pre-recorded audio files into text. You can upload files like MP3s, WAVs, or other audio formats, and Google Docs will transcribe them for you. This is helpful for transcribing interviews, lectures, meetings, or any spoken content, without having to do it manually.
The goal of these tools is to make writing faster, easier, and more accessible. Students often use it to turn lectures into notes quickly. Meanwhile, professionals may transcribe meetings or interviews for reports. It’s also an excellent tool for people with disabilities or those who find speaking easier than typing.
Text-to-Speech for Mobile Text-to-Speech for Mobile Text-to-Speech for Mobile Text-to-Speech for Mobile Text-to-Speech for Mobile
Edit Videos on Your Mobile Phone with 1-Click!
- • Powerful Brand New AI Features.
- • User-friendly video editing for beginners.
- • Full-featured video editing for professional.
Part 2. Get Started with Text-to-speech on Google Docs
To get started with using text-to-speech features on Google Docs, there are three main methods you can choose from. Each method offers a different approach depending on your needs. Let’s dive into each method.
1. Voice Typing
Voice Typing is the built-in speech-to-text feature within Google Docs. It allows you to dictate your words directly into the document. This method is perfect for anyone who prefers speaking over typing or wants to save time on manual writing.
Follow this guide to use Voice Typing:
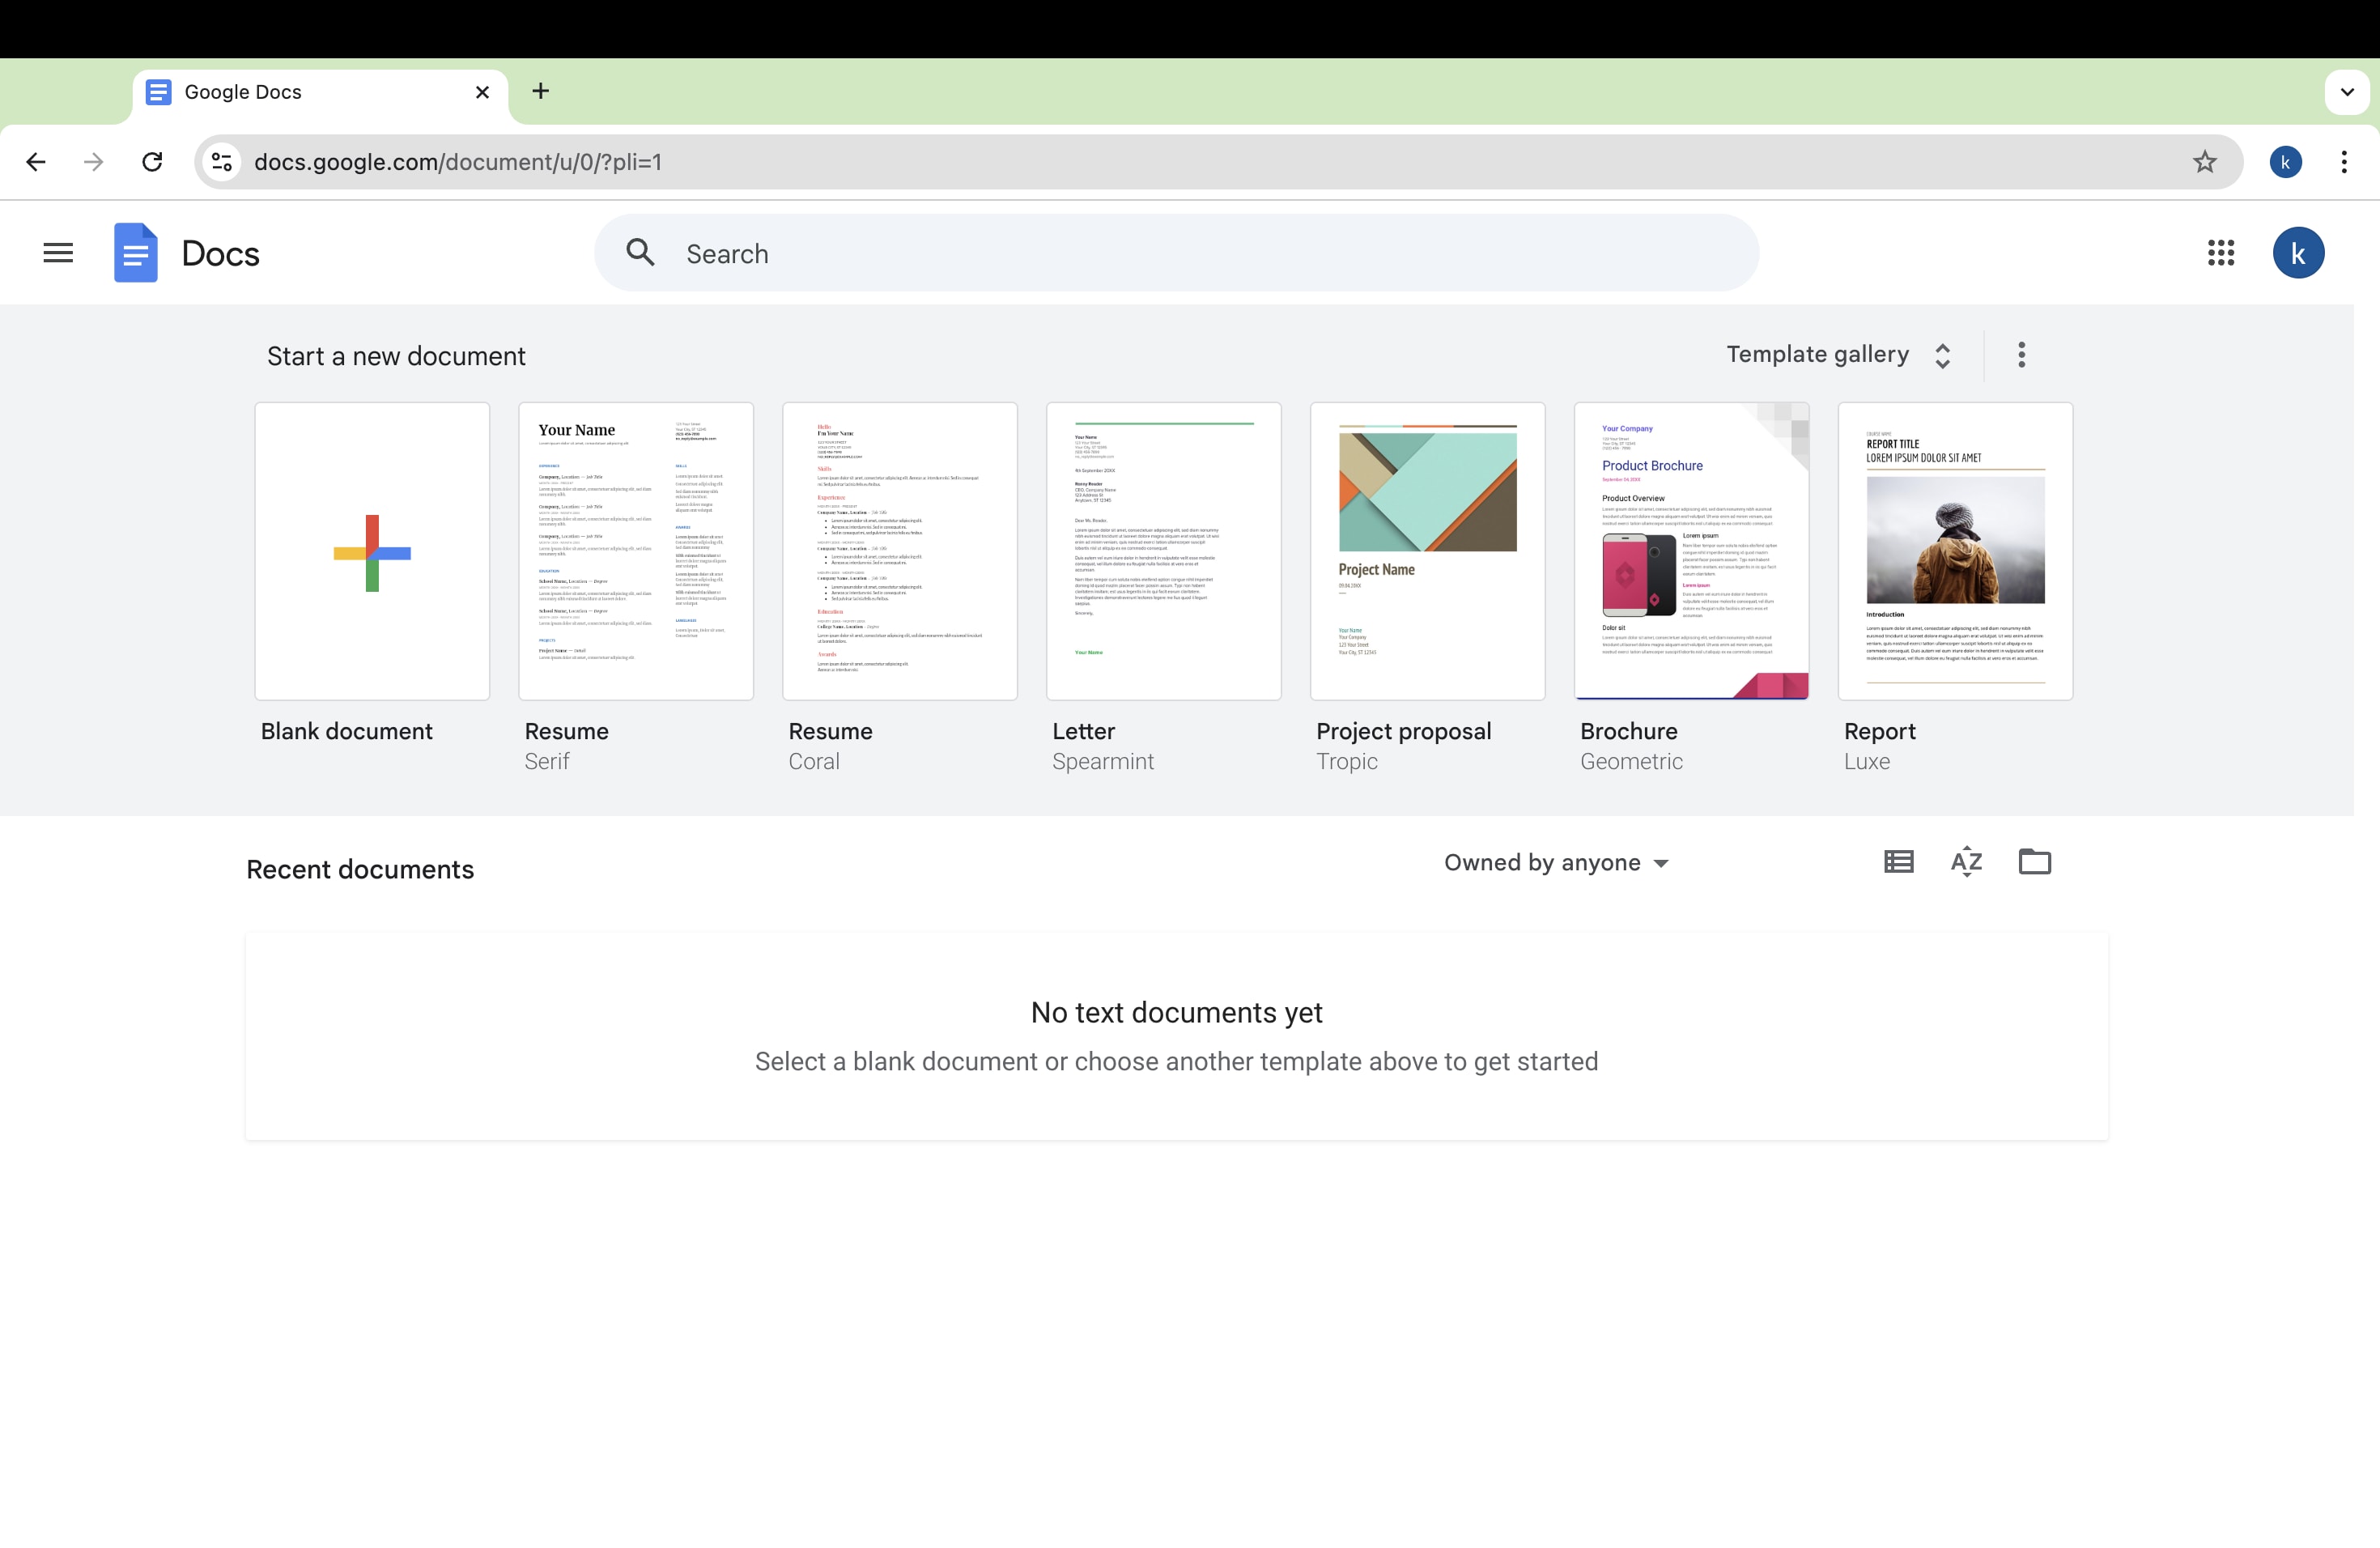
Step 1. Open your Google Docs document.
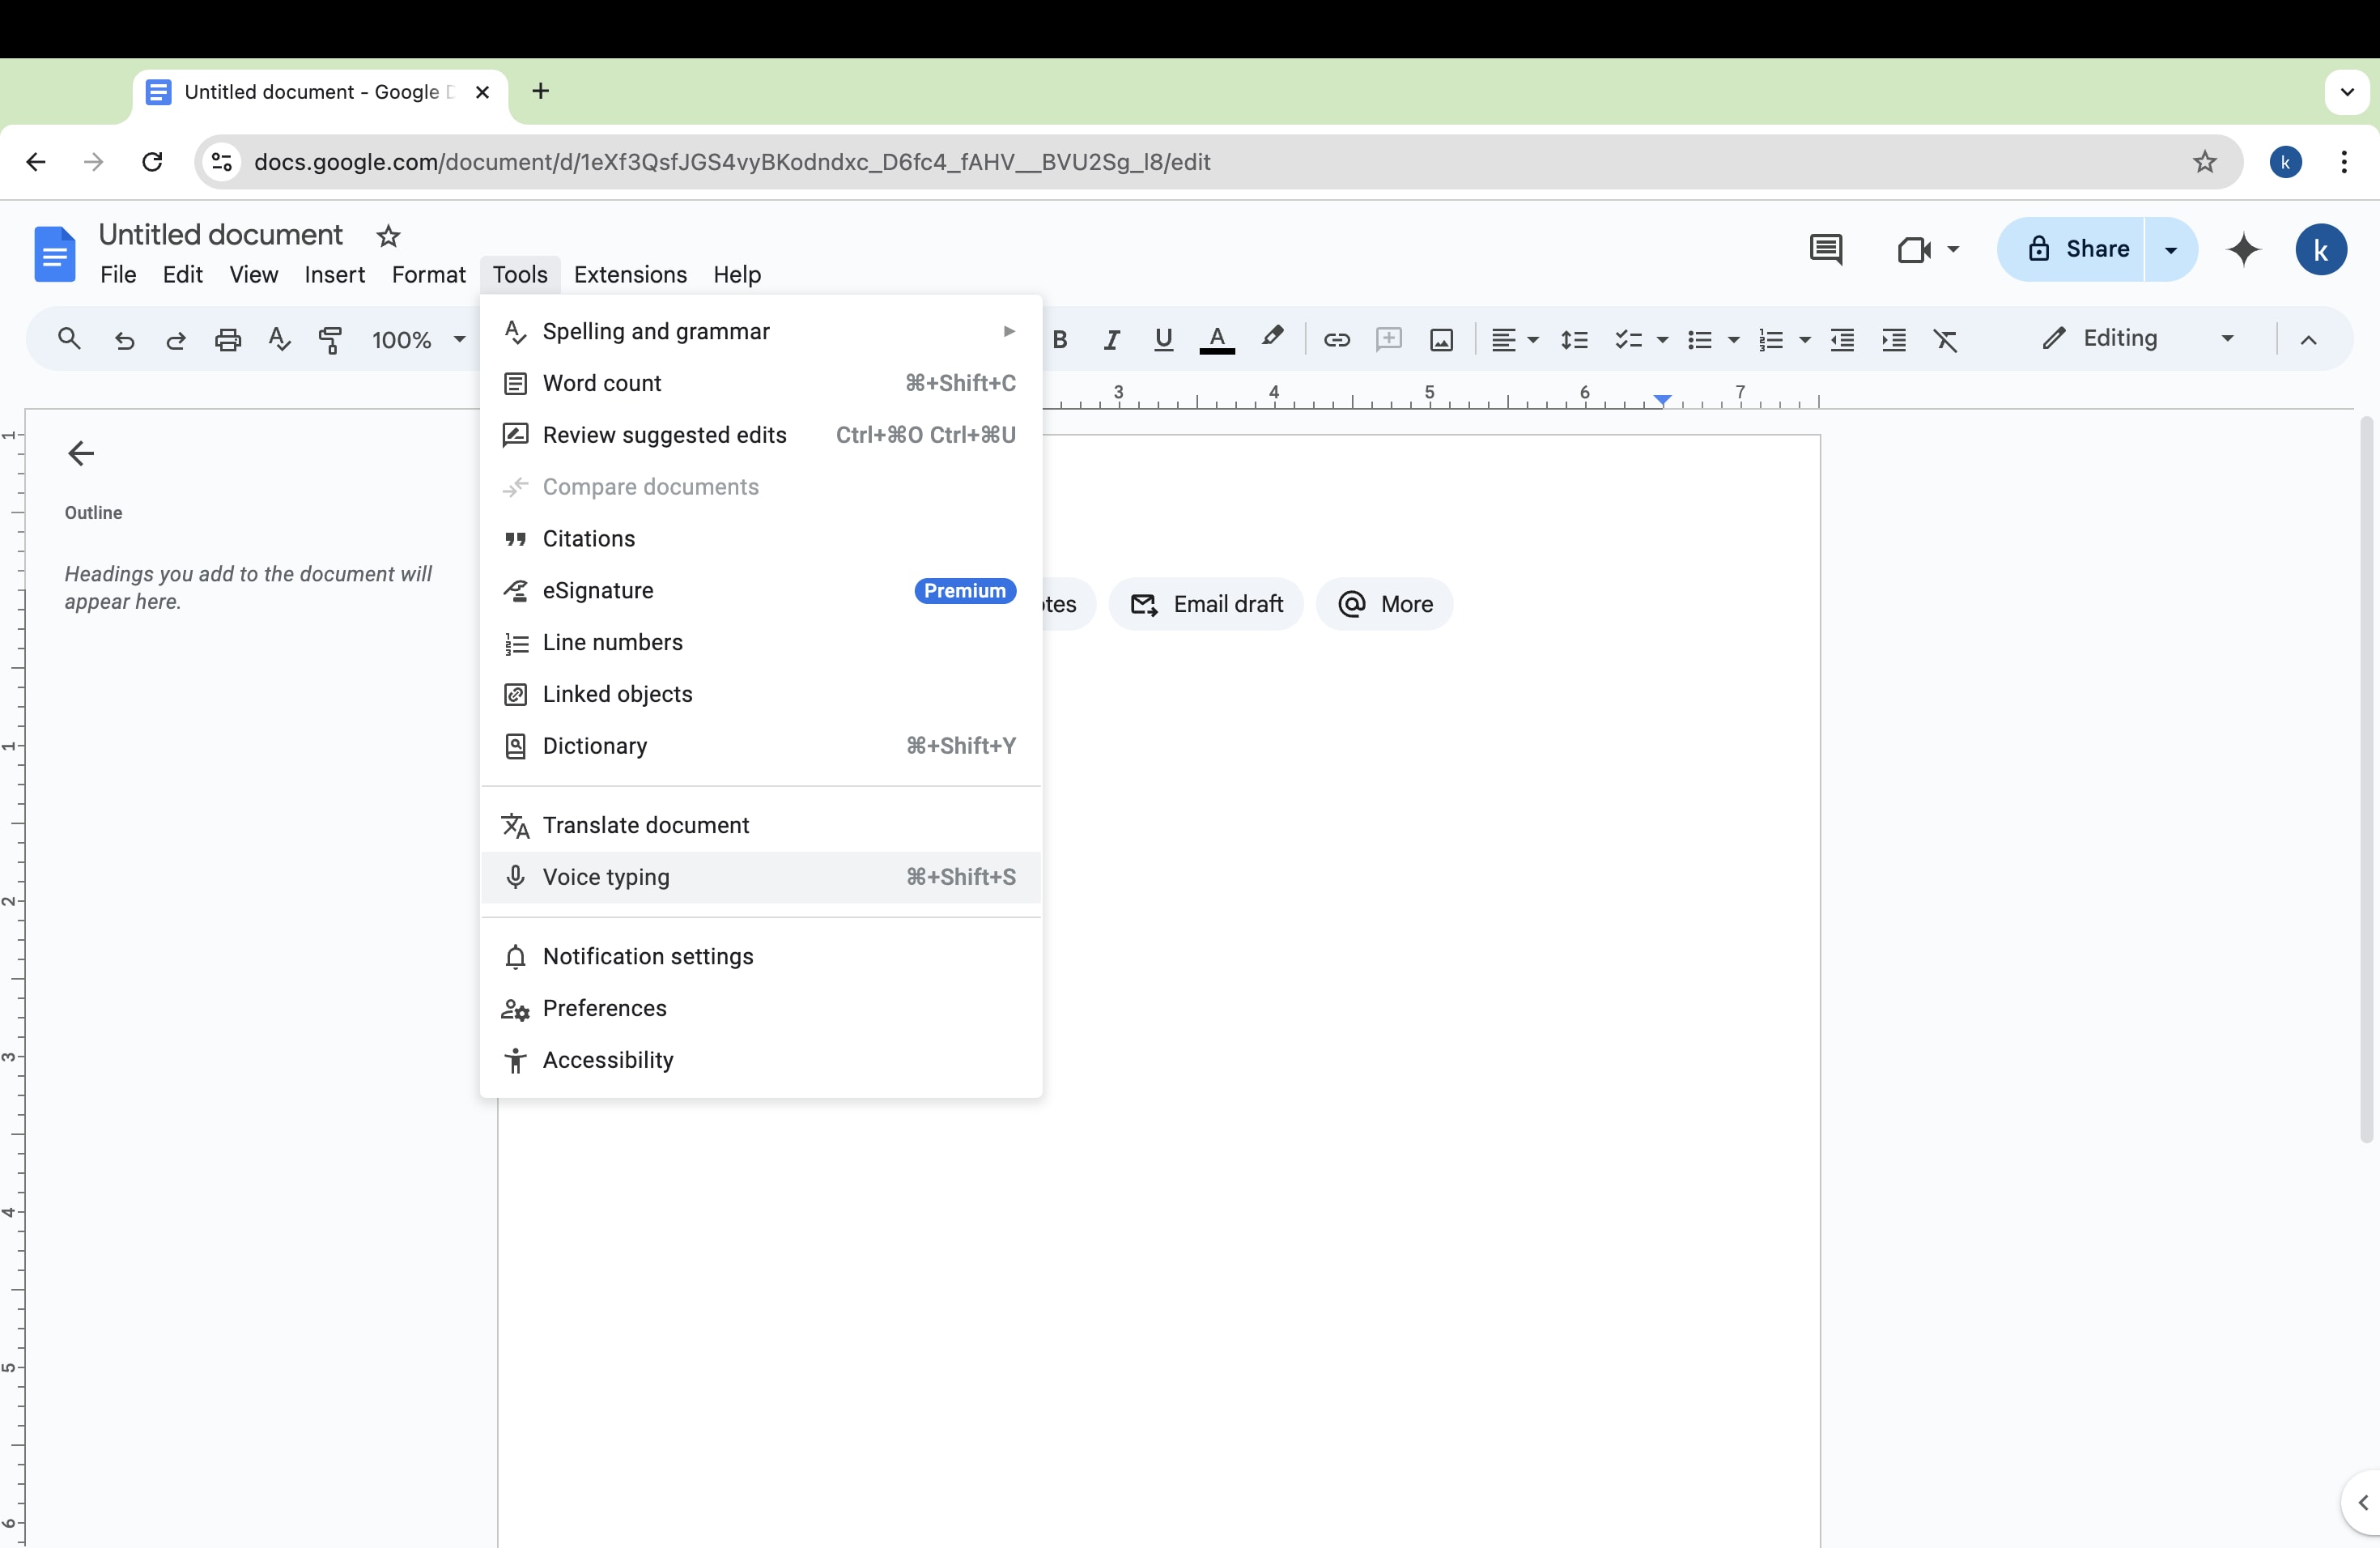
Step 2. Go to the "Tools" menu at the top of the page and click on "Voice Typing" (or use the shortcut: Ctrl + Shift + S).
Step 3.microphone icon will appear on your screen. Allow Google Docs to use your microphone for voice input.
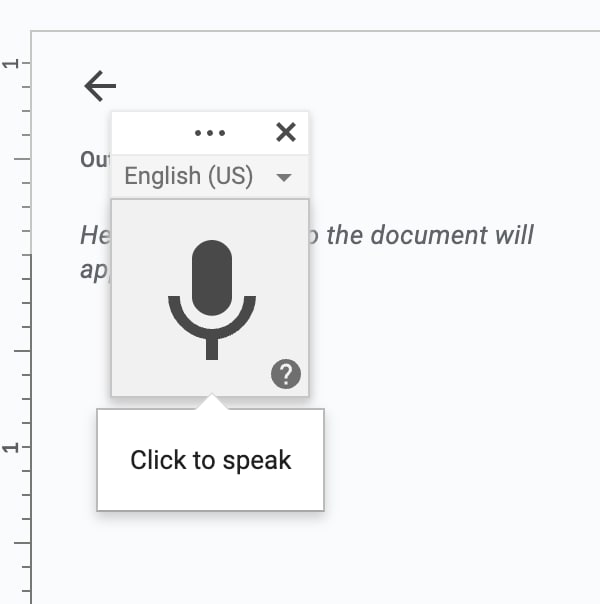
Once everything is set up, simply click the microphone icon and start speaking. Google Docs will automatically transcribe your words into the document.
This method is great for students taking notes, professionals transcribing meetings, or anyone who prefers speaking to writing.
2. Using Text To Speech Generator
If you want to convert written text into spoken words, using a text-to-speech (TTS) generator is an excellent option. Google Docs allows integration with free AI voice generators that can read your document aloud.
Here’s how to use a TTS generator in Google Docs:
Step 1. Open your Google Docs document and highlight the text you want to convert to speech. Go to the "Tools" menu and select the “TTS AI voice generator.”
Step 2. The generator will take your highlighted text and read it aloud for you, giving you the option to choose from various AI voices and languages to customize the experience.
This method is especially useful for those who want to listen to their written content. It helps with proofreading, multitasking, or improving comprehension. It also provides a way to create audio versions of documents, which can be handy for accessibility purposes.
3. Use a TTS Chrome extension
For a more seamless experience, you can install a free text-to-speech Chrome extension to use directly in your browser. These extensions let you turn written text into spoken words right in your browser. So, you can easily use Google Docs while doing other online tasks.
To get started, follow these steps:
Step 1. Install a TTS Chrome extension of your choice from the Chrome Web Store.
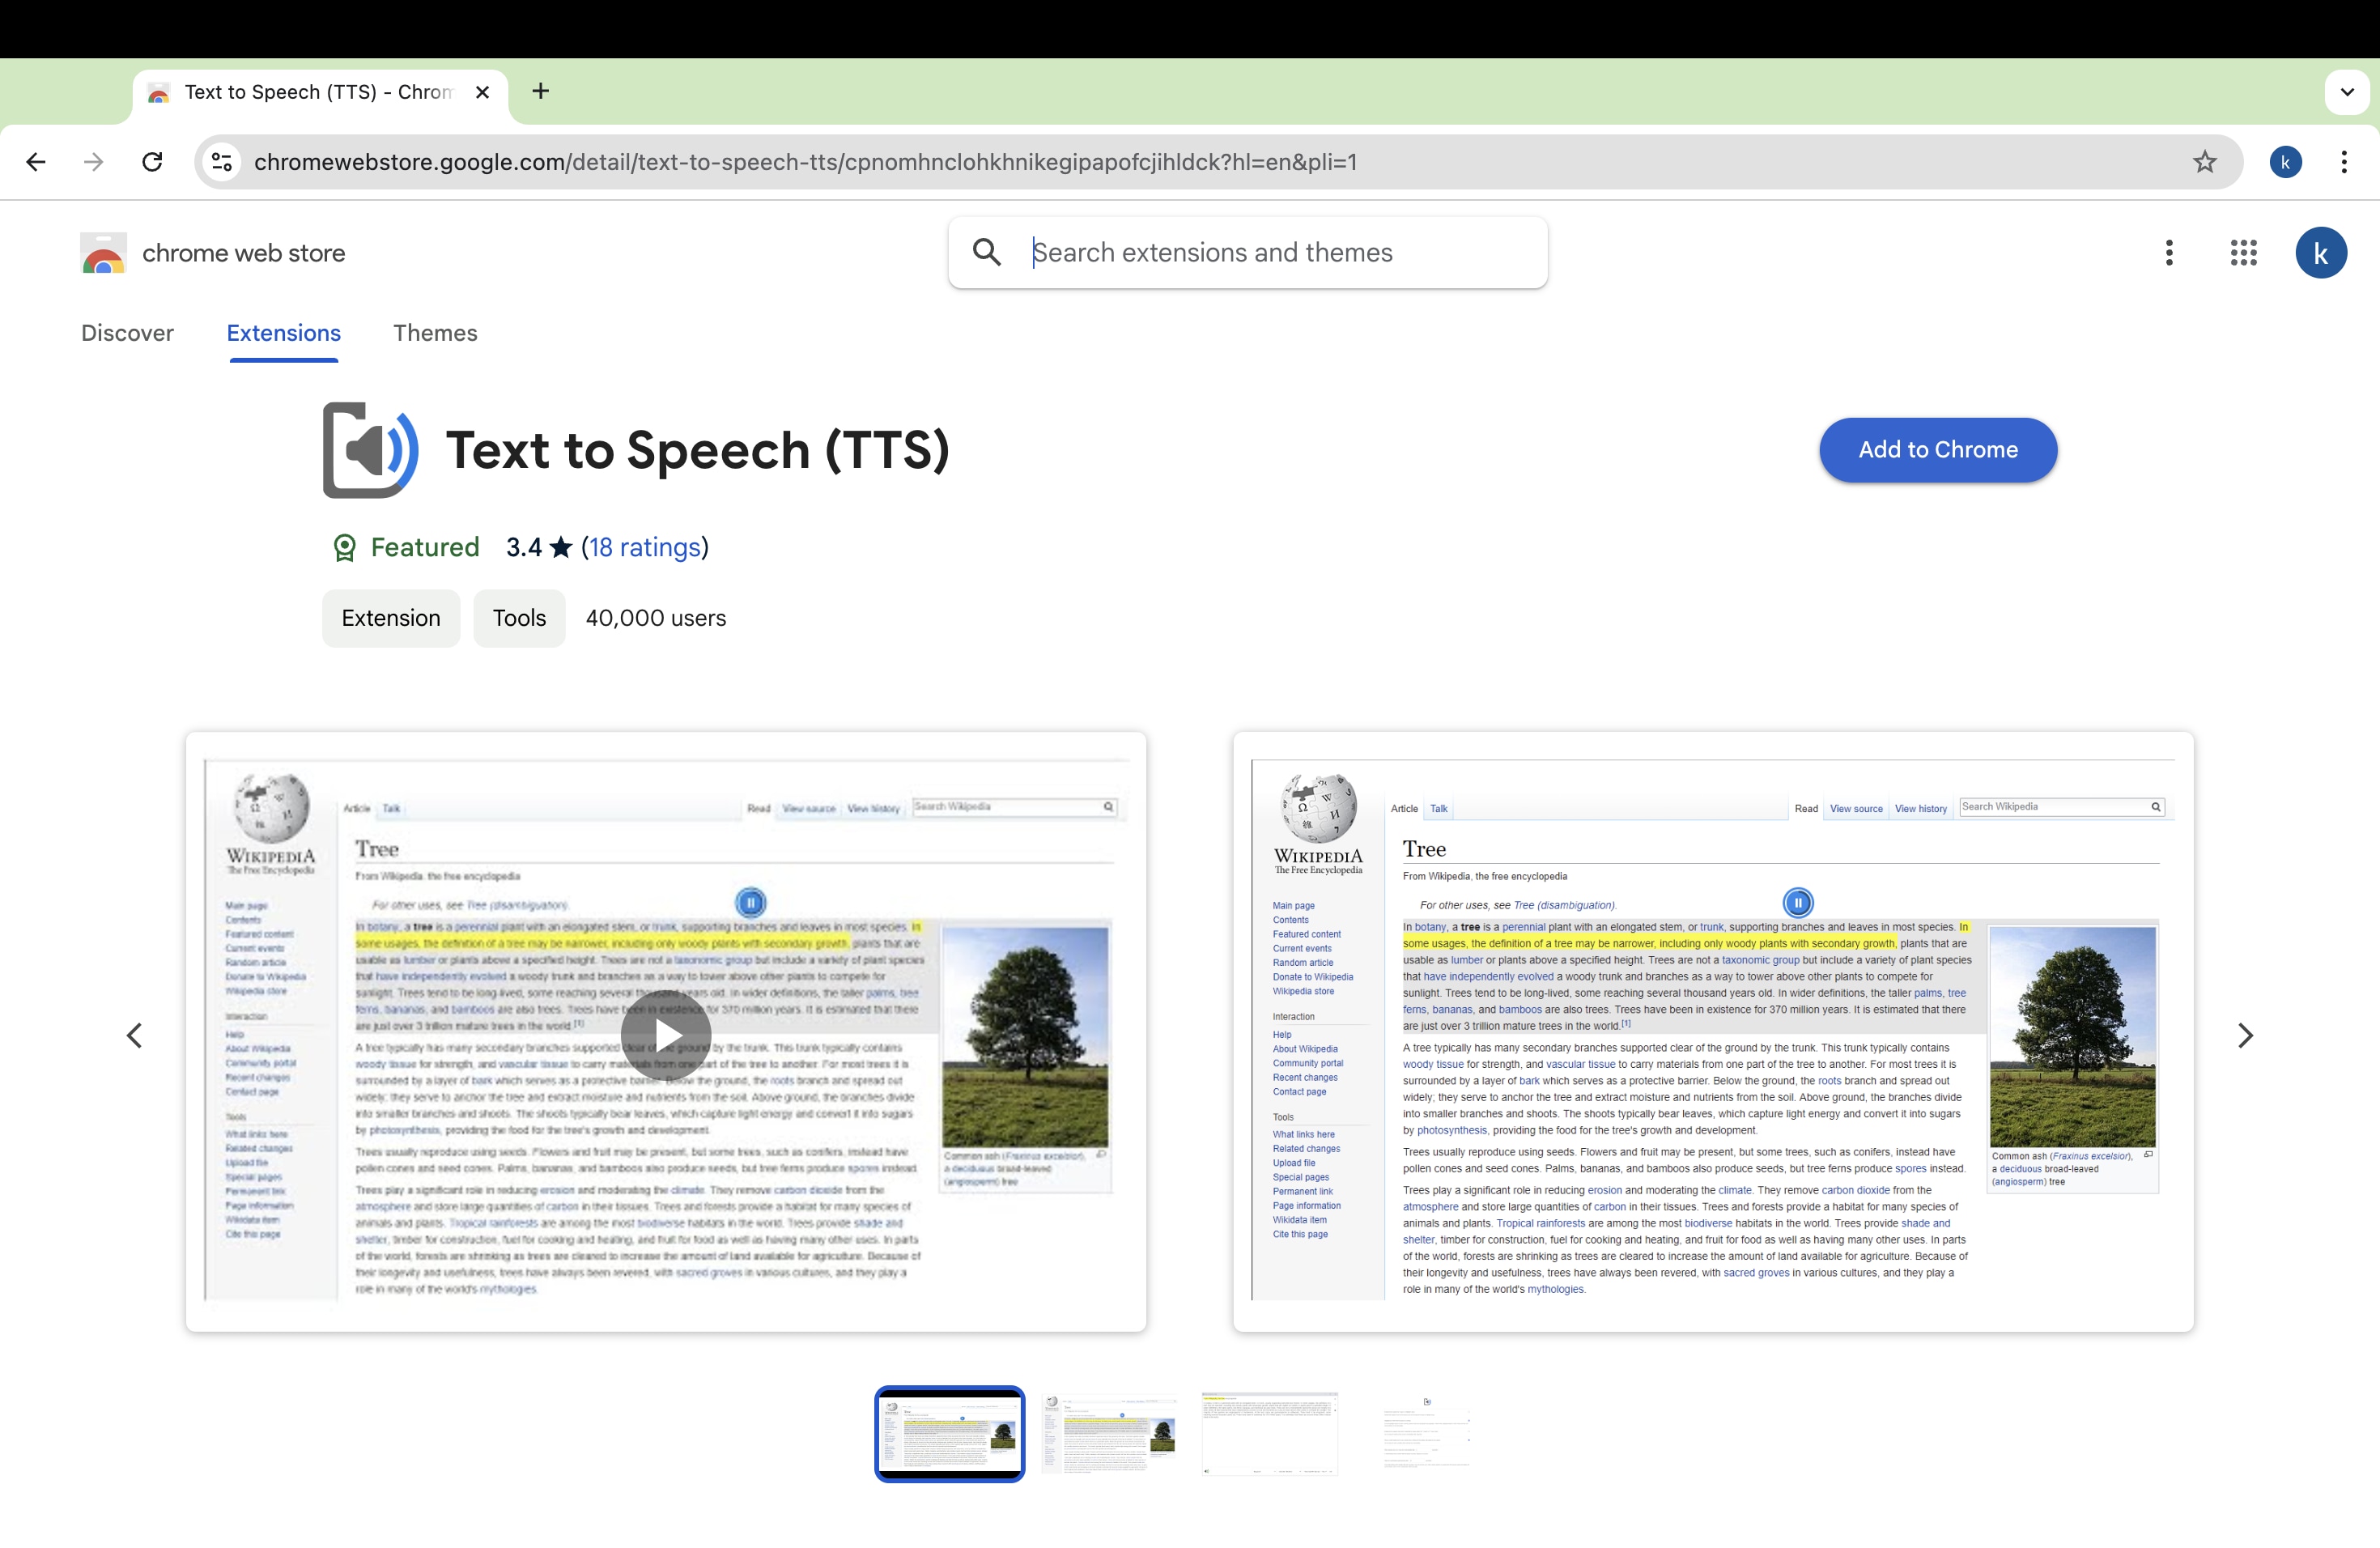
Step 2. Once installed, open Google Docs in your browser and activate the extension.
Step 3. Highlight the text you want to convert to speech and click the extension’s icon. The text will be read aloud immediately.
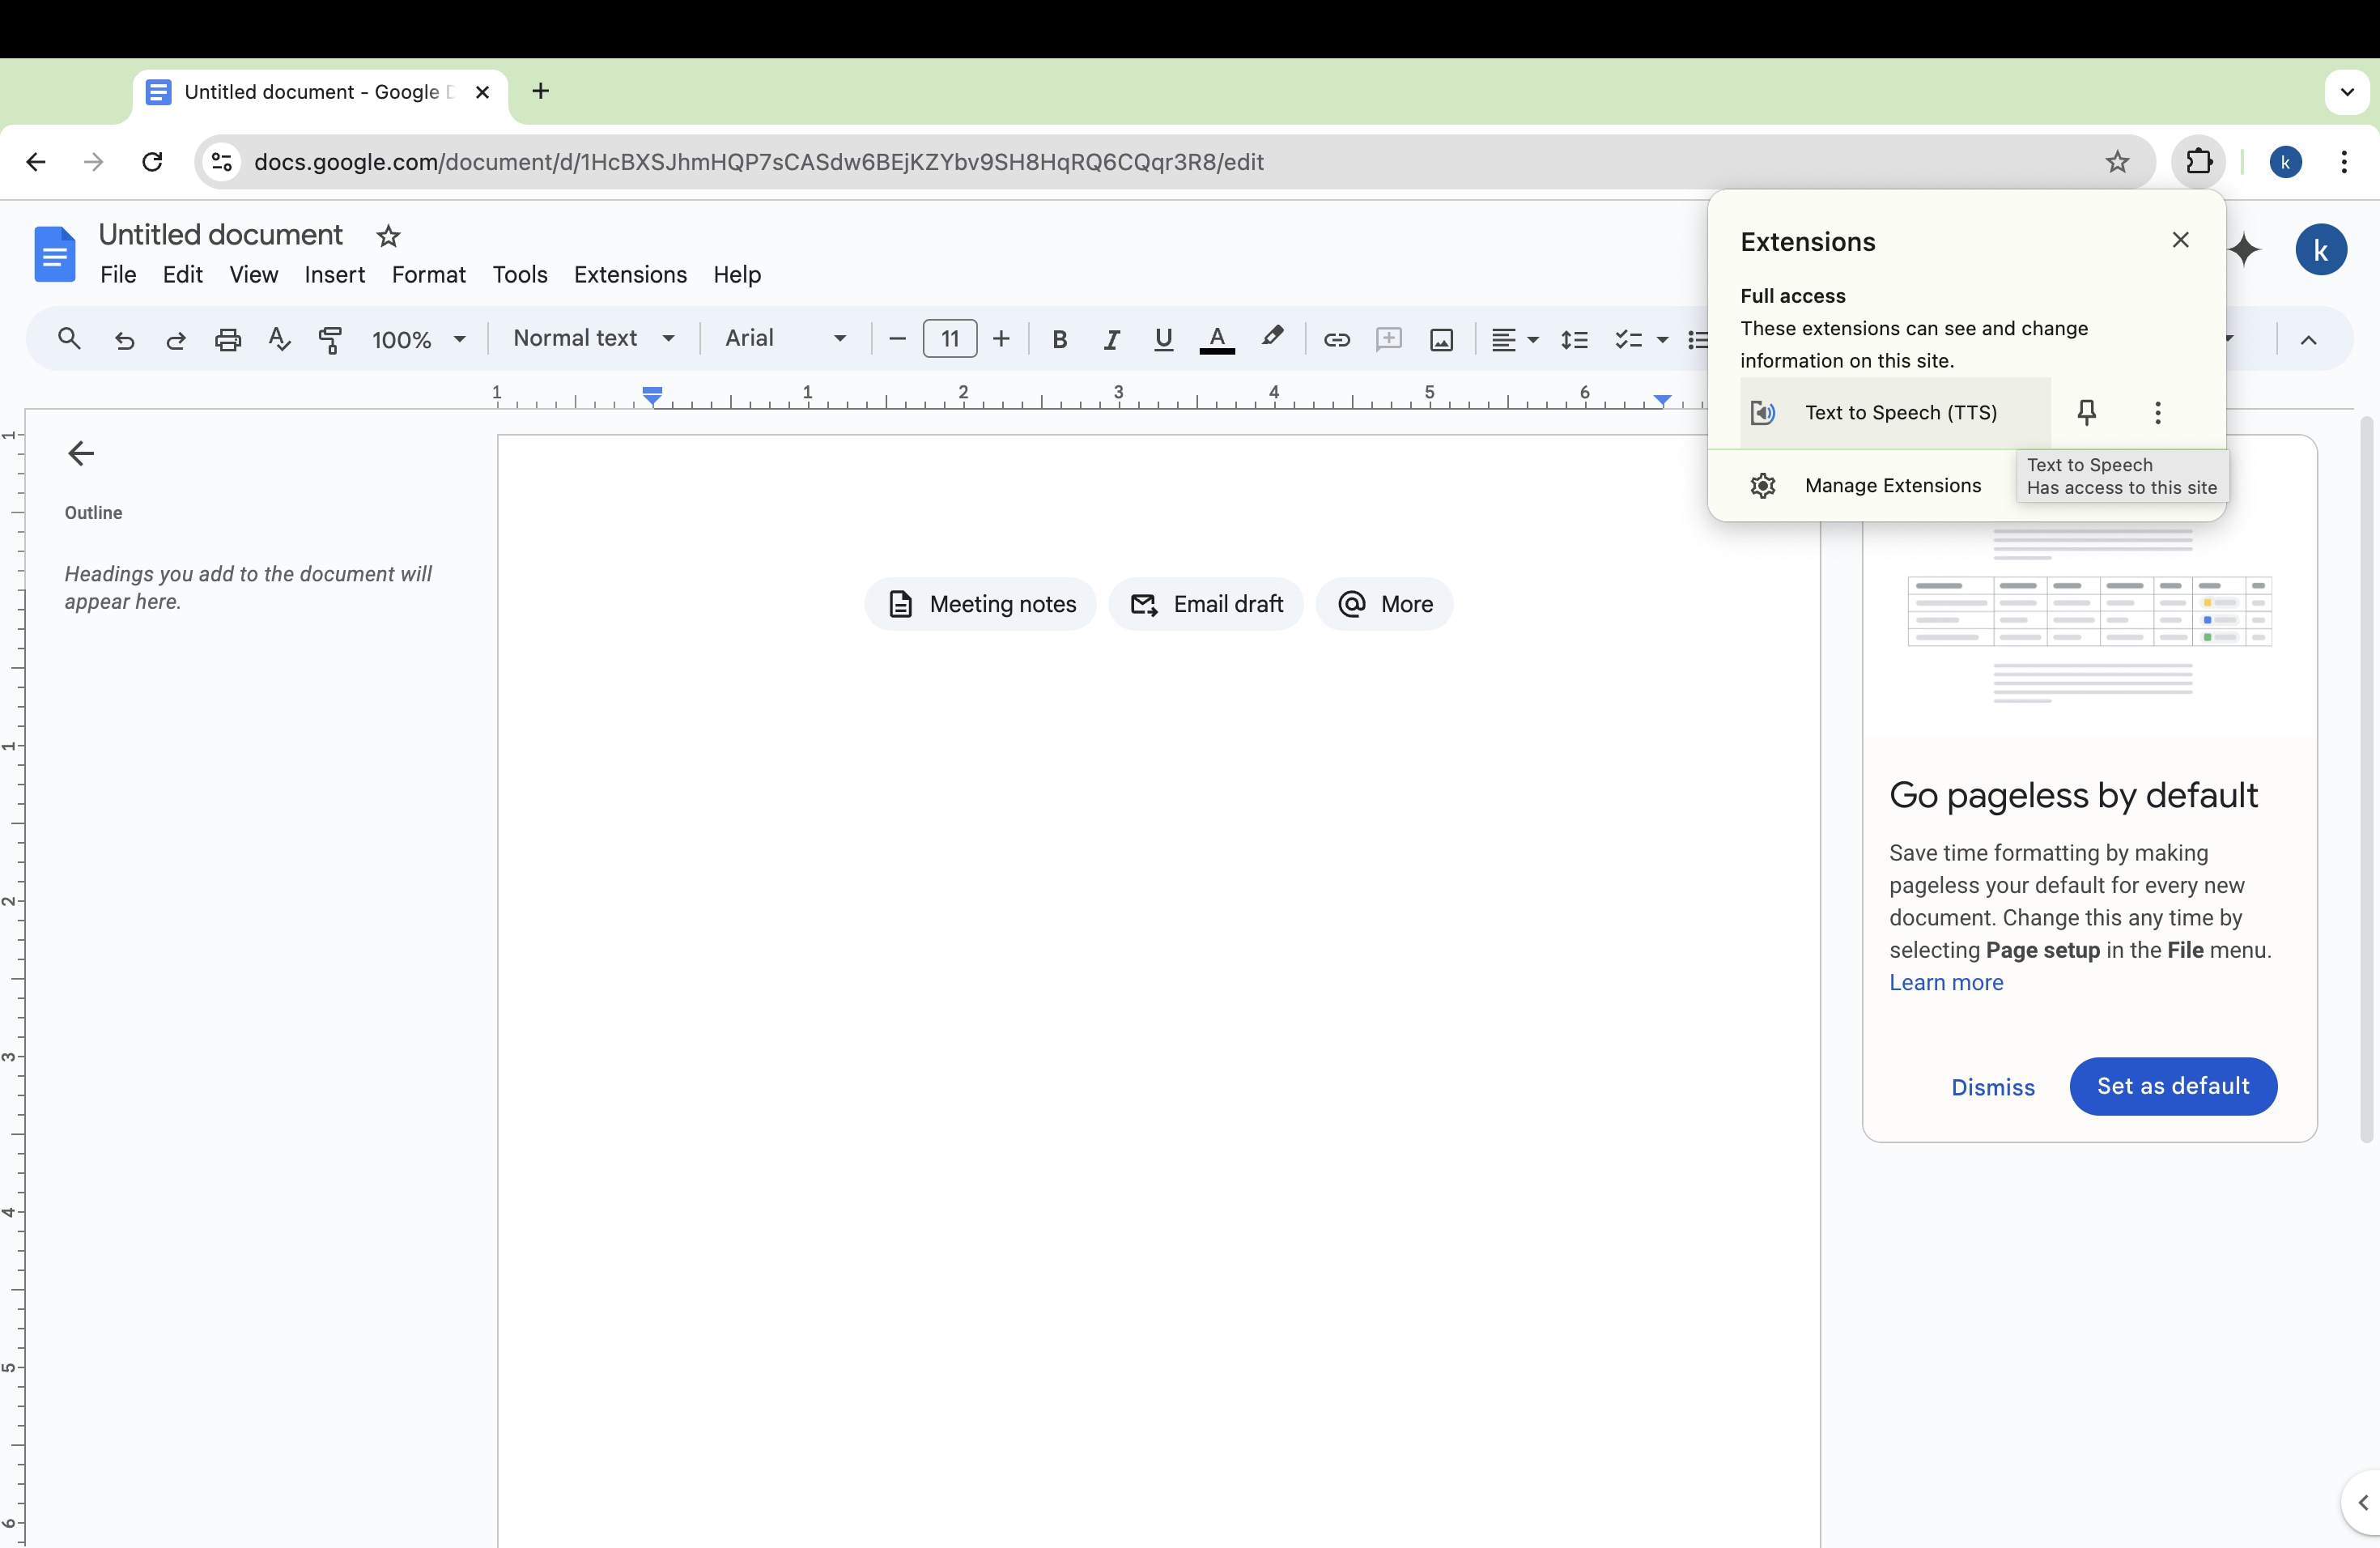
Chrome extensions typically come with additional customization options such as voice selection, playback speed control, and even multilingual support. This method is great for multitasking, proofreading, or for users who prefer a browser-based solution for text-to-speech.
Part 3. Google Docs Text-to-Speech Limitations
While Google Docs offers powerful text-to-speech and speech-to-text features, there are some limitations to be aware of. Understanding these limitations can help you decide when and how to use the tool for your specific needs.
1. No Support for Video-to-Text Conversion
One significant limitation of Google Docs’ text-to-speech feature is that it doesn’t support converting video to text. This means you can’t use it to generate captions or transcriptions from video files, which would be essential for tasks like creating subtitles for YouTube videos or transcribing video interviews. For this functionality, you'll need to rely on third-party tools or video transcription software designed specifically for video-to-text conversion.
2. Limited Control Over Voice Options
While Google Docs offers basic voice customization for text-to-speech, the options are somewhat limited compared to standalone TTS software or extensions. You can select from a few voices and languages, but the variety of accents, tones, and pitch adjustments is restricted. This may not provide enough flexibility for users who need more personalization in their text-to-speech output.
3. Requires Internet Connection
Another limitation is that Google Docs’ text-to-speech and voice typing features require an active internet connection to function. This can be a drawback for users who need to work offline or in areas with unreliable internet access. Unlike some other speech-to-text software that offers offline functionality, Google Docs relies on cloud-based services for speech recognition and transcription.
4. Accuracy Varies with Audio Quality and Accents
The accuracy of Google Docs’ speech-to-text can vary depending on the clarity of your audio input. Poor-quality microphones, background noise, or strong accents may result in inaccurate transcriptions.
5. Limited Formatting Capabilities During Voice Typing
When using the Voice Typing feature, Google Docs primarily focuses on converting speech to text. However, it doesn't offer advanced formatting commands for tasks like inserting bullet points, tables, or specific document styles. Users would need to manually format the document after dictating the content, which can be a time-consuming extra step.
Despite these limitations, Google Docs remains a useful tool for basic text-to-speech and voice typing tasks, especially for those seeking a free and convenient solution for converting audio into written text. However, if you require more advanced features, such as video-to-text conversion or offline functionality, you might need to explore alternative tools.
Part 4. Alternative Solution to Convert Audio to Text in A Video
If you need a more advanced way to convert audio to text in videos, tools like Wondershare Filmora are a great alternative to Google Docs. Filmora isn’t just for video editing—it also has AI-powered transcription and automatic caption features. This makes it perfect for vloggers, teachers, podcasters, journalists, and business professionals. Filmora makes the process easy and saves you time.
Why Choose Wondershare Filmora?
Wondershare Filmora stands out as a robust solution for several reasons:
- High Accuracy in Speech Recognition: Filmora’s AI-powered transcription tool delivers a high level of accuracy, reducing the need for manual editing.
- Saves Time with Automation: The automatic transcription process lets you quickly convert audio to text, cutting down the time spent on manual transcriptions.
- Supports 27 Languages: With Filmora, you can transcribe in 27 different languages, making it a perfect choice for multilingual projects.
- One-Click Speech-to-Text Conversion: Filmora makes it easy with just one click to convert your audio into text, streamlining the entire workflow.
- Import External SRT Files: You can import SRT files into Filmora for easy subtitle editing, making the captioning process even more flexible.
- Advanced Audio Tools: For poorly recorded audio, Filmora offers advanced audio tools to enhance the quality before transcribing, ensuring more accurate text output.
Now, let's look at how to use Filmora's speech-to-text feature to generate captions for your videos.
Step-by-Step Guide: How to Transcribe Speech to Text with Filmora
Step 1. Open Wondershare Filmora and import your video or audio file into the timeline. This is where you’ll be working with the media you want to transcribe.
Step 2. Highlight the audio track from the timeline that you want to transcribe. If it’s part of a video, make sure the correct track is selected.
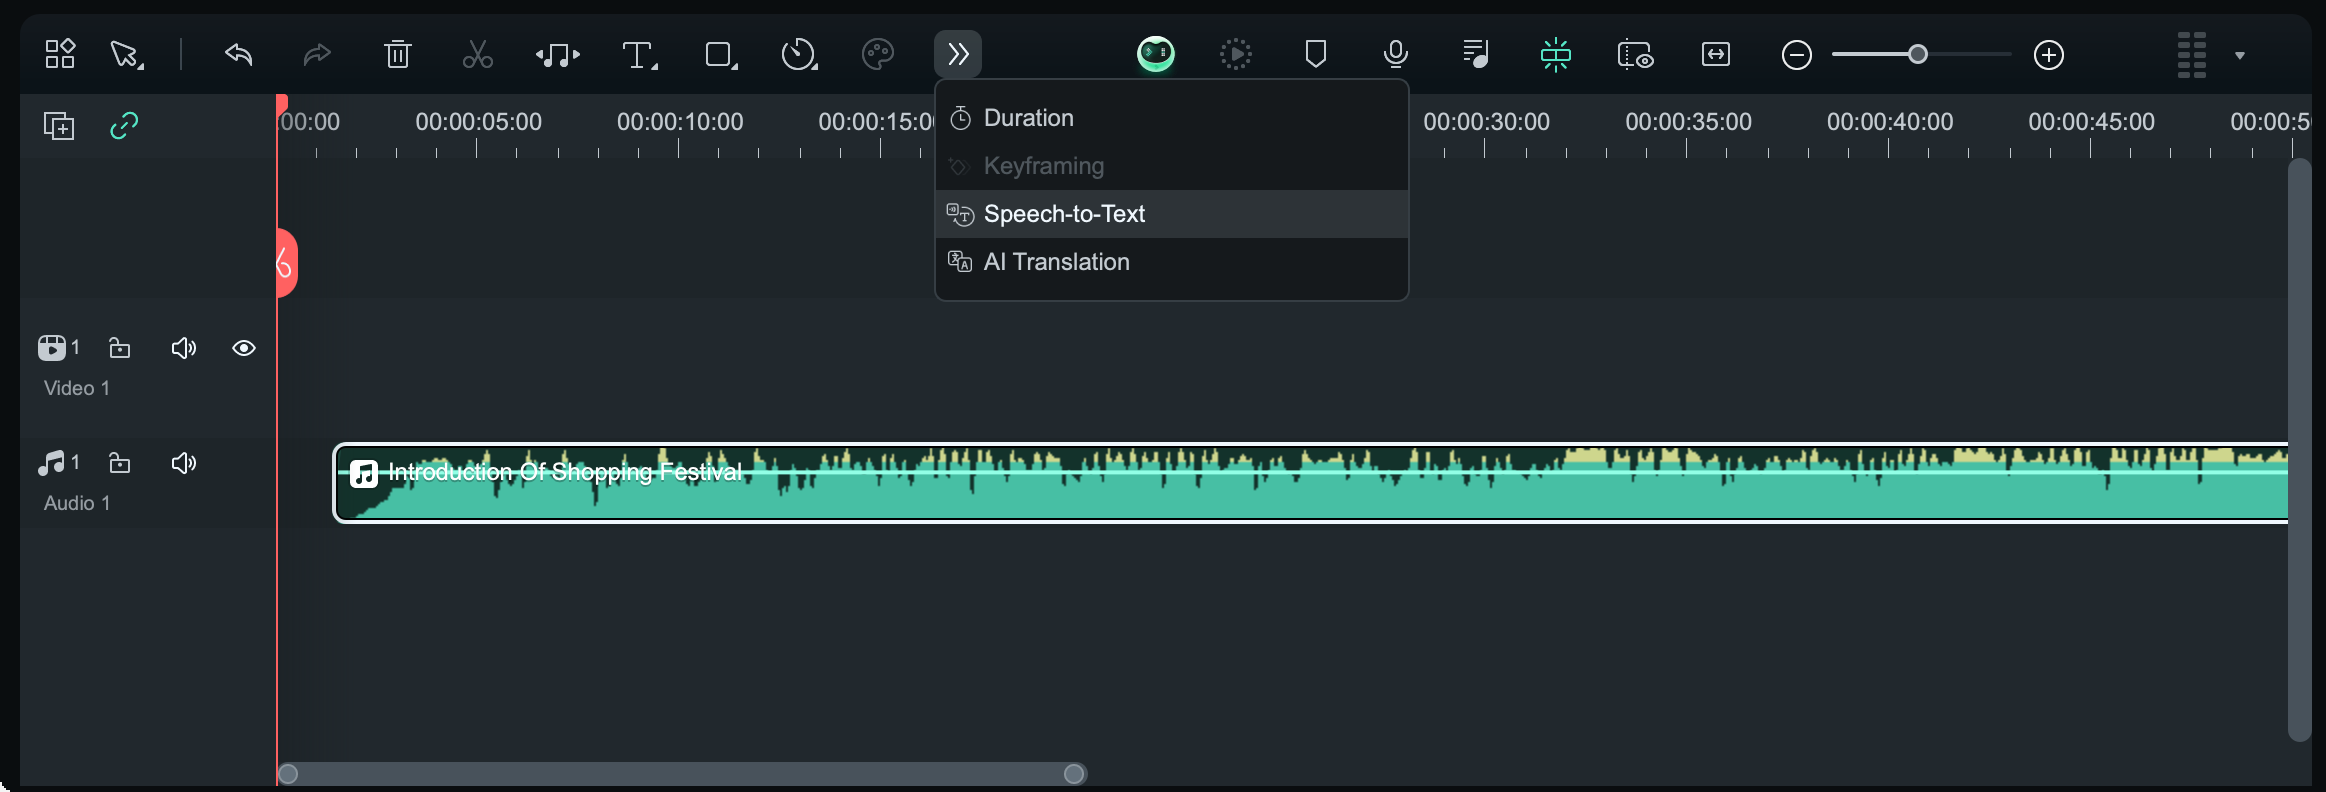
Step 3. Choose a transcription method. Filmora offers multiple ways to access the speech-to-text feature:
Method 1: Go to the Tools menu at the top, click on Audio, and select Speech to Text.
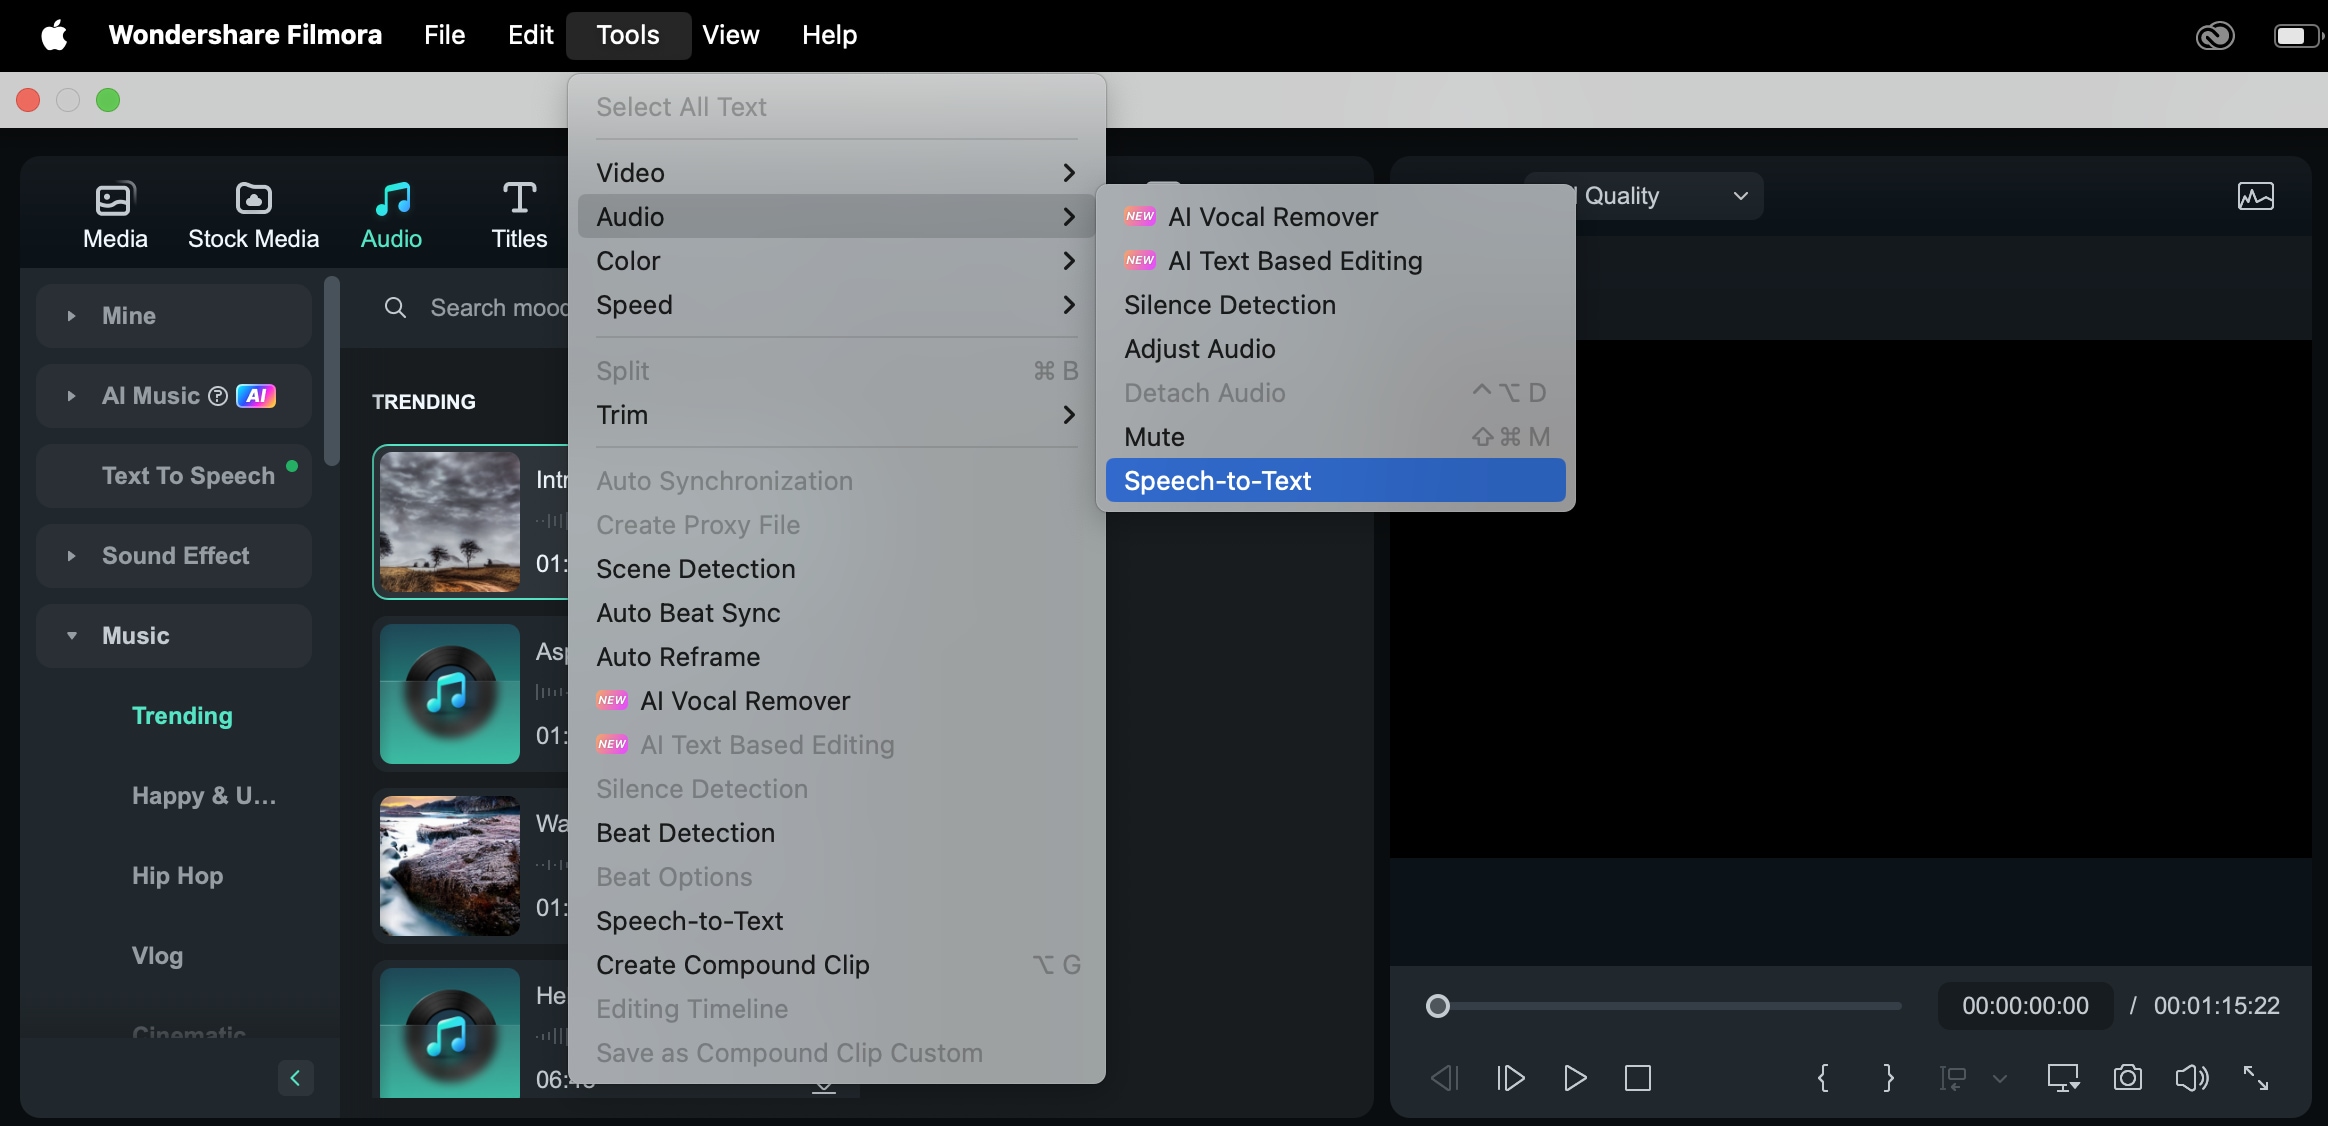
Method 2: On the toolbar, click the Speech to Text icon. If the file type isn’t supported, the icon will be grayed out.
Method 3: Right-click on the audio asset in the timeline, then choose Speech to Text.
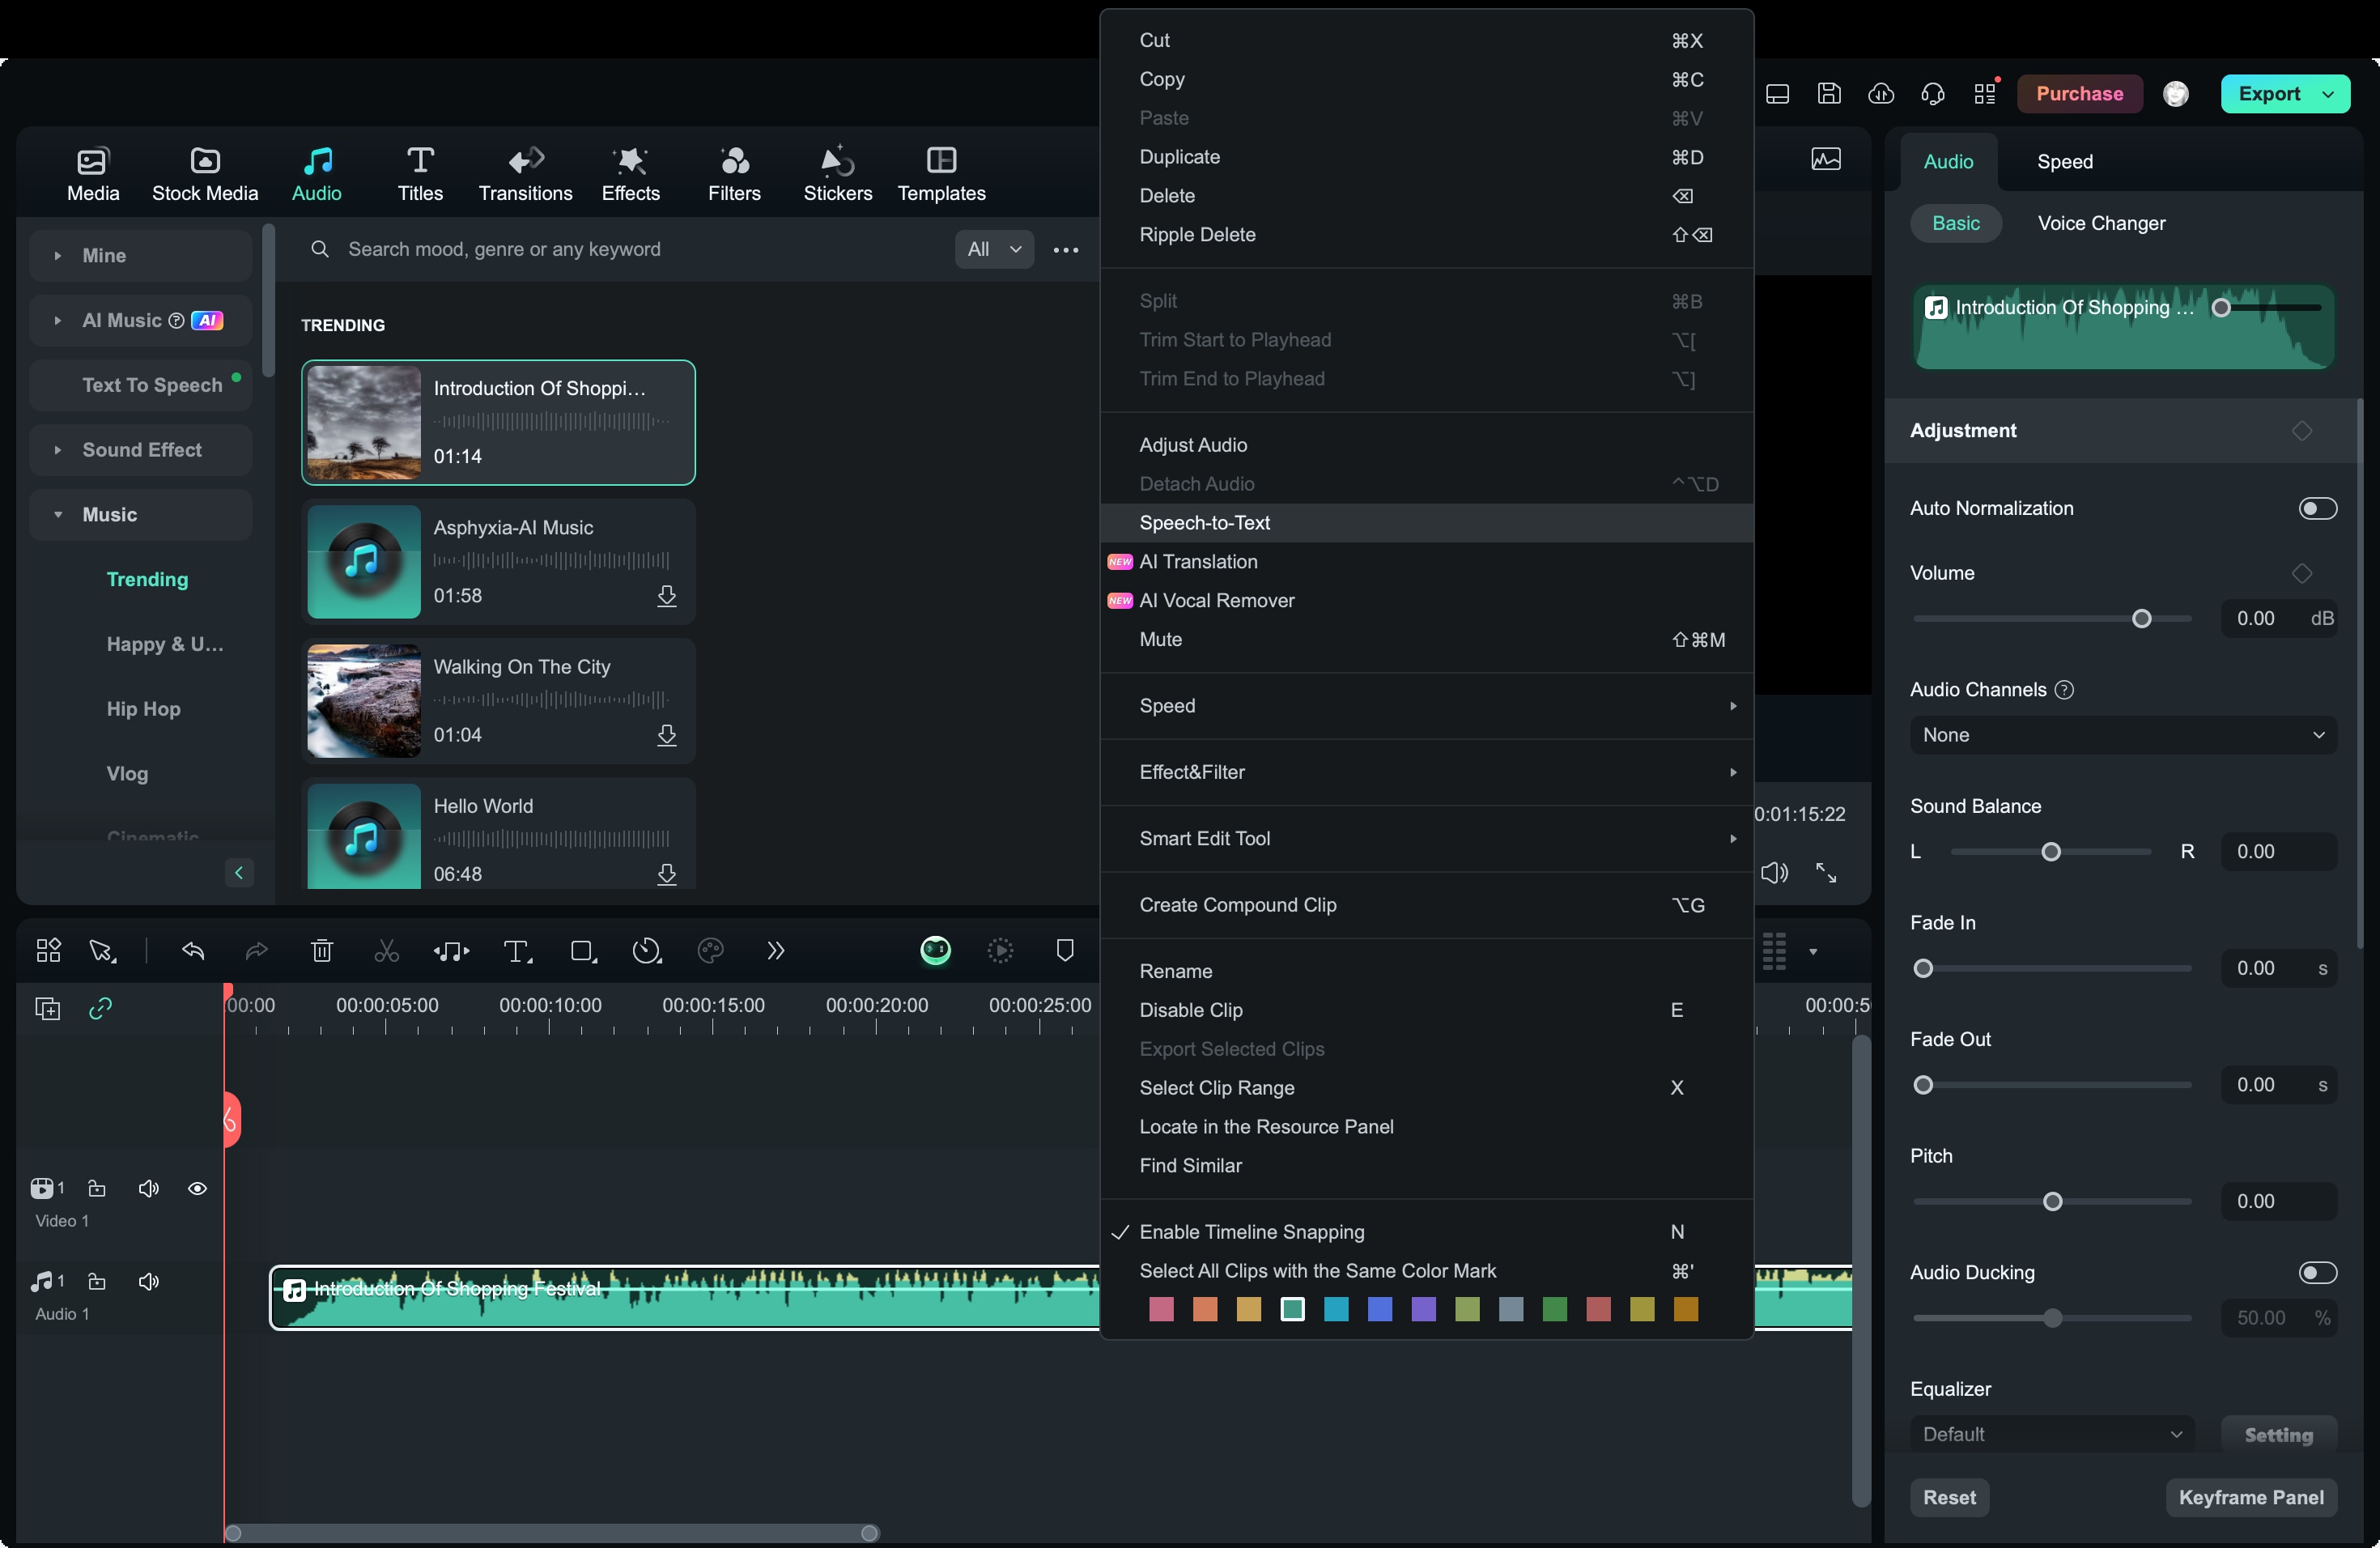
Method 4: If your audio file is in the project media, right-click and select Speech to Text.
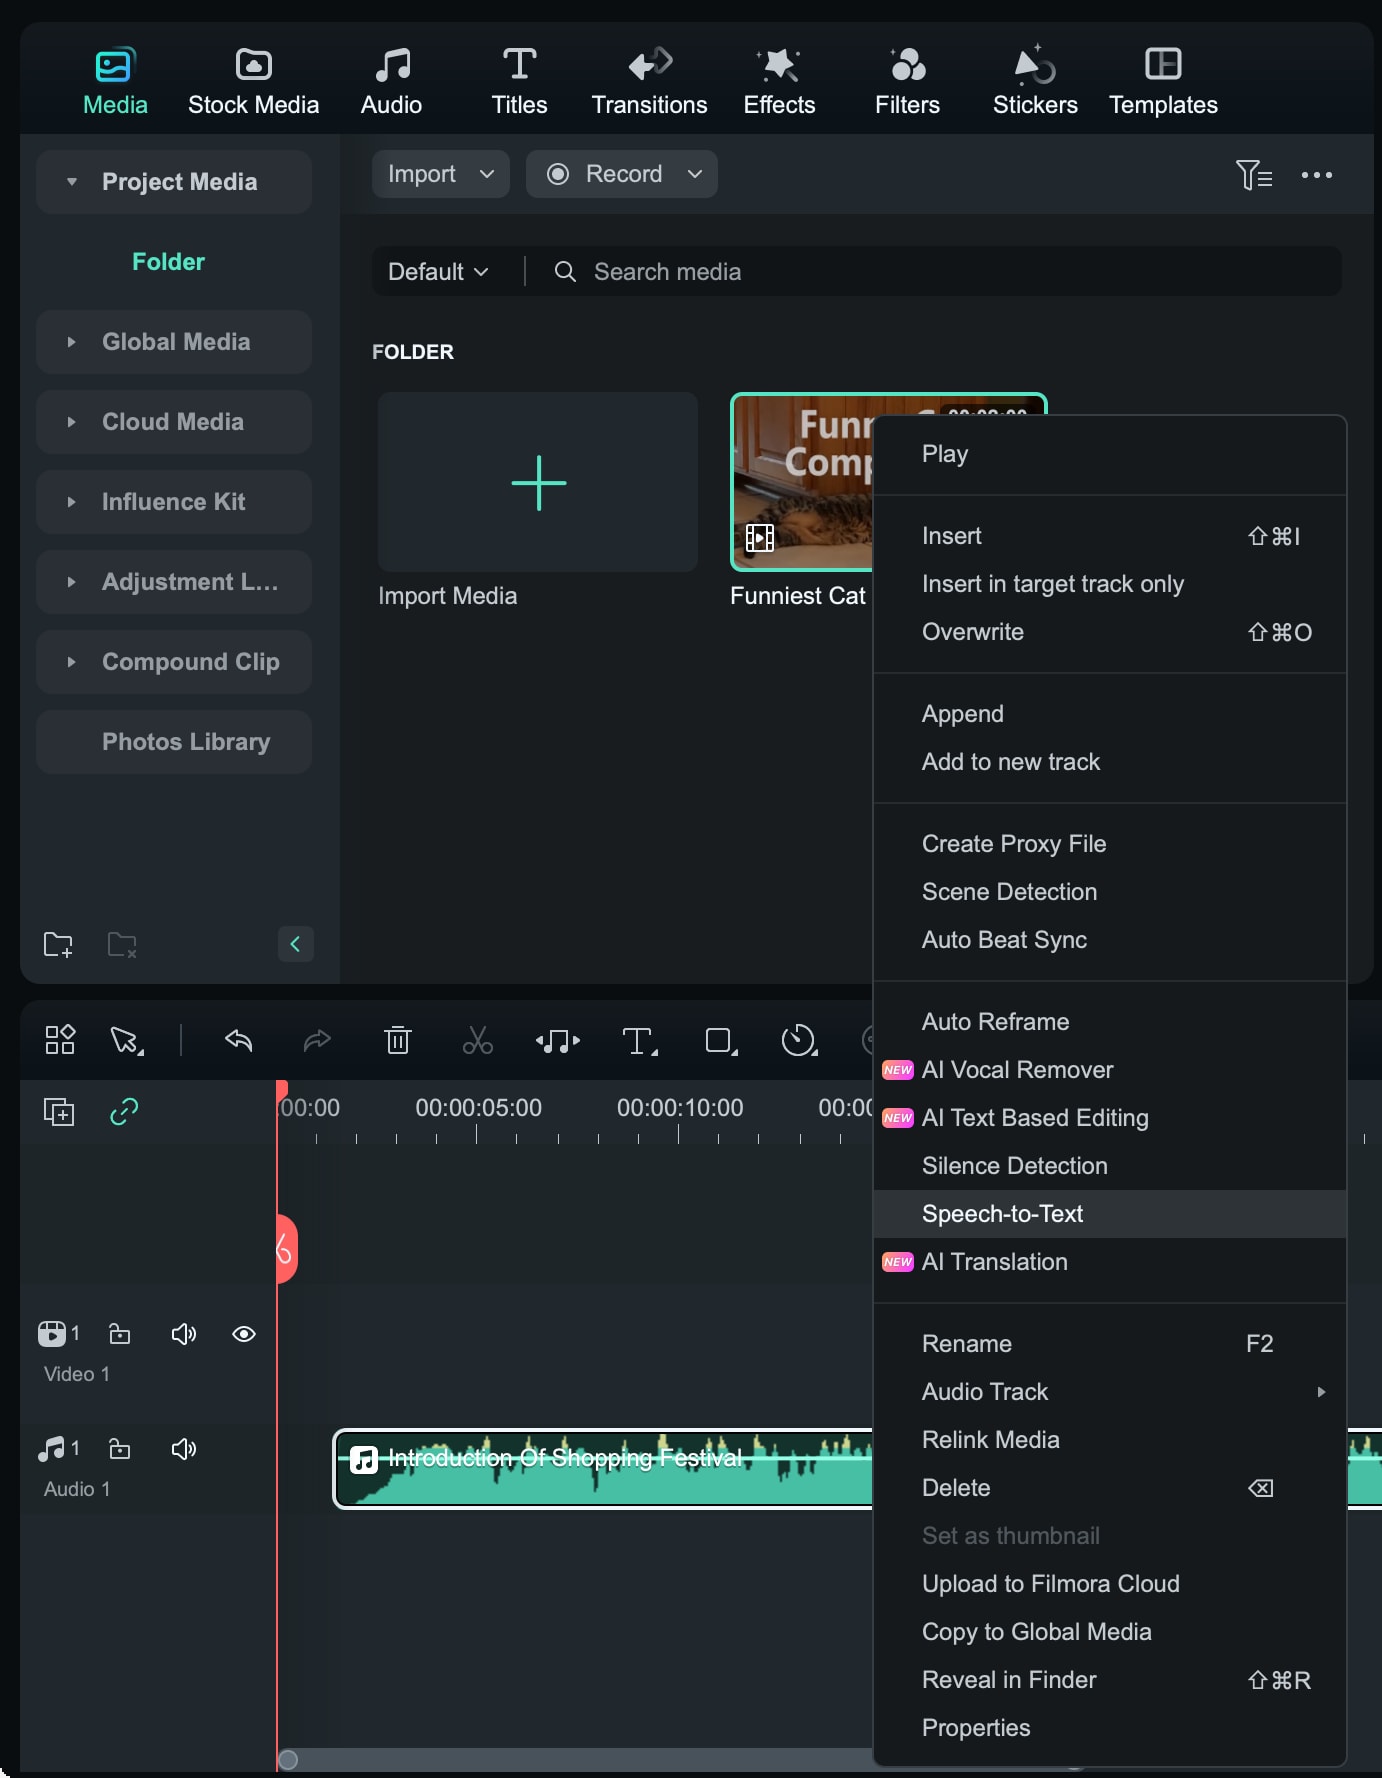
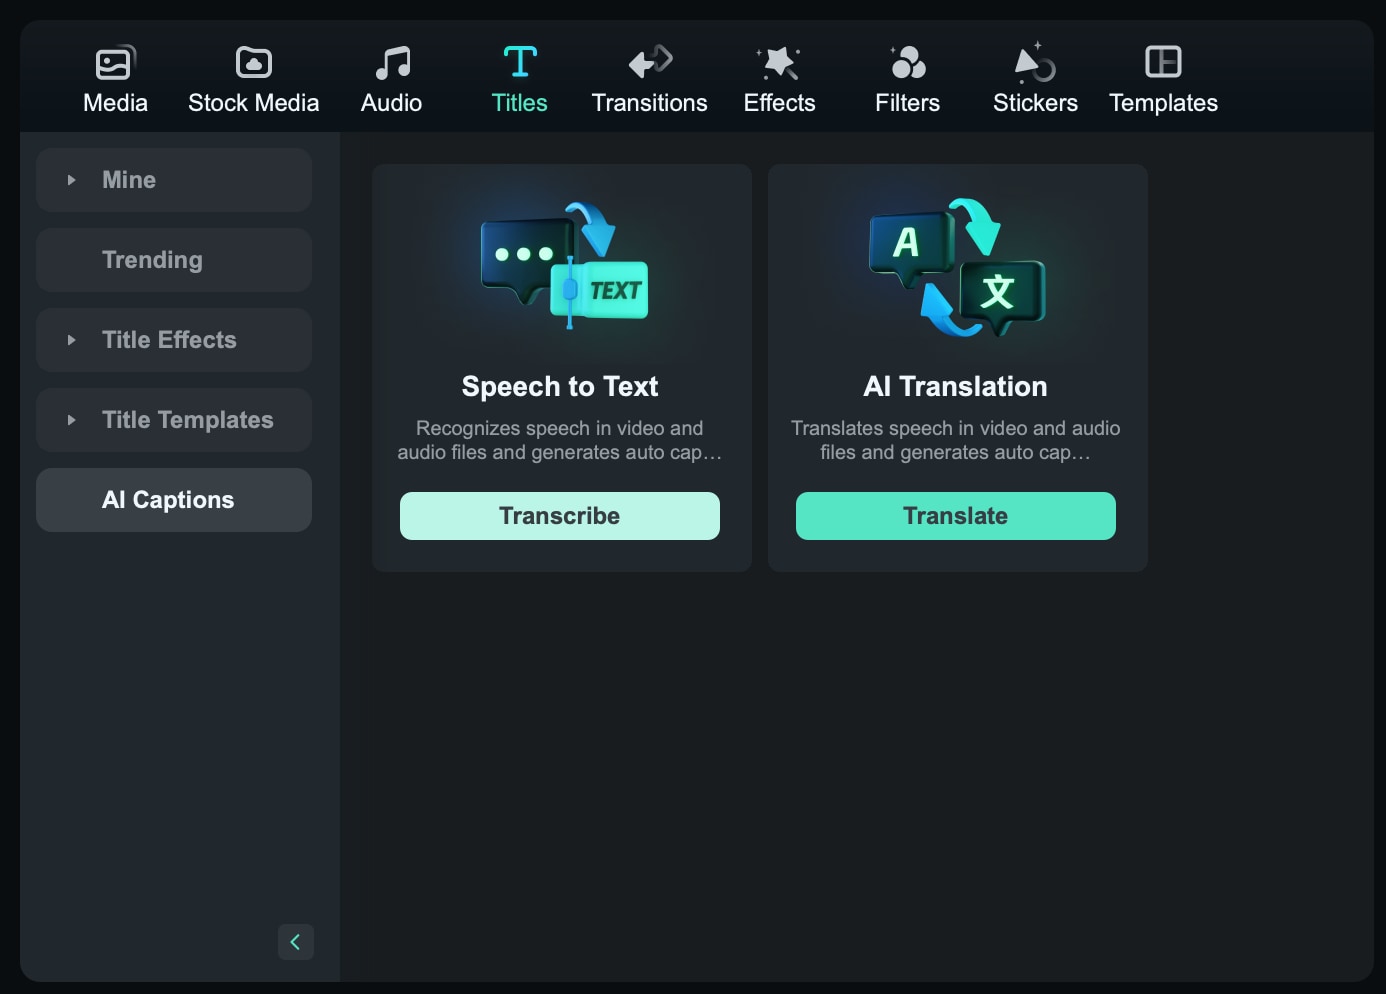
Method 5: You can also click on the audio asset in the project media, go to the Titles tab at the top, then choose AI Captions and select Speech to Text.
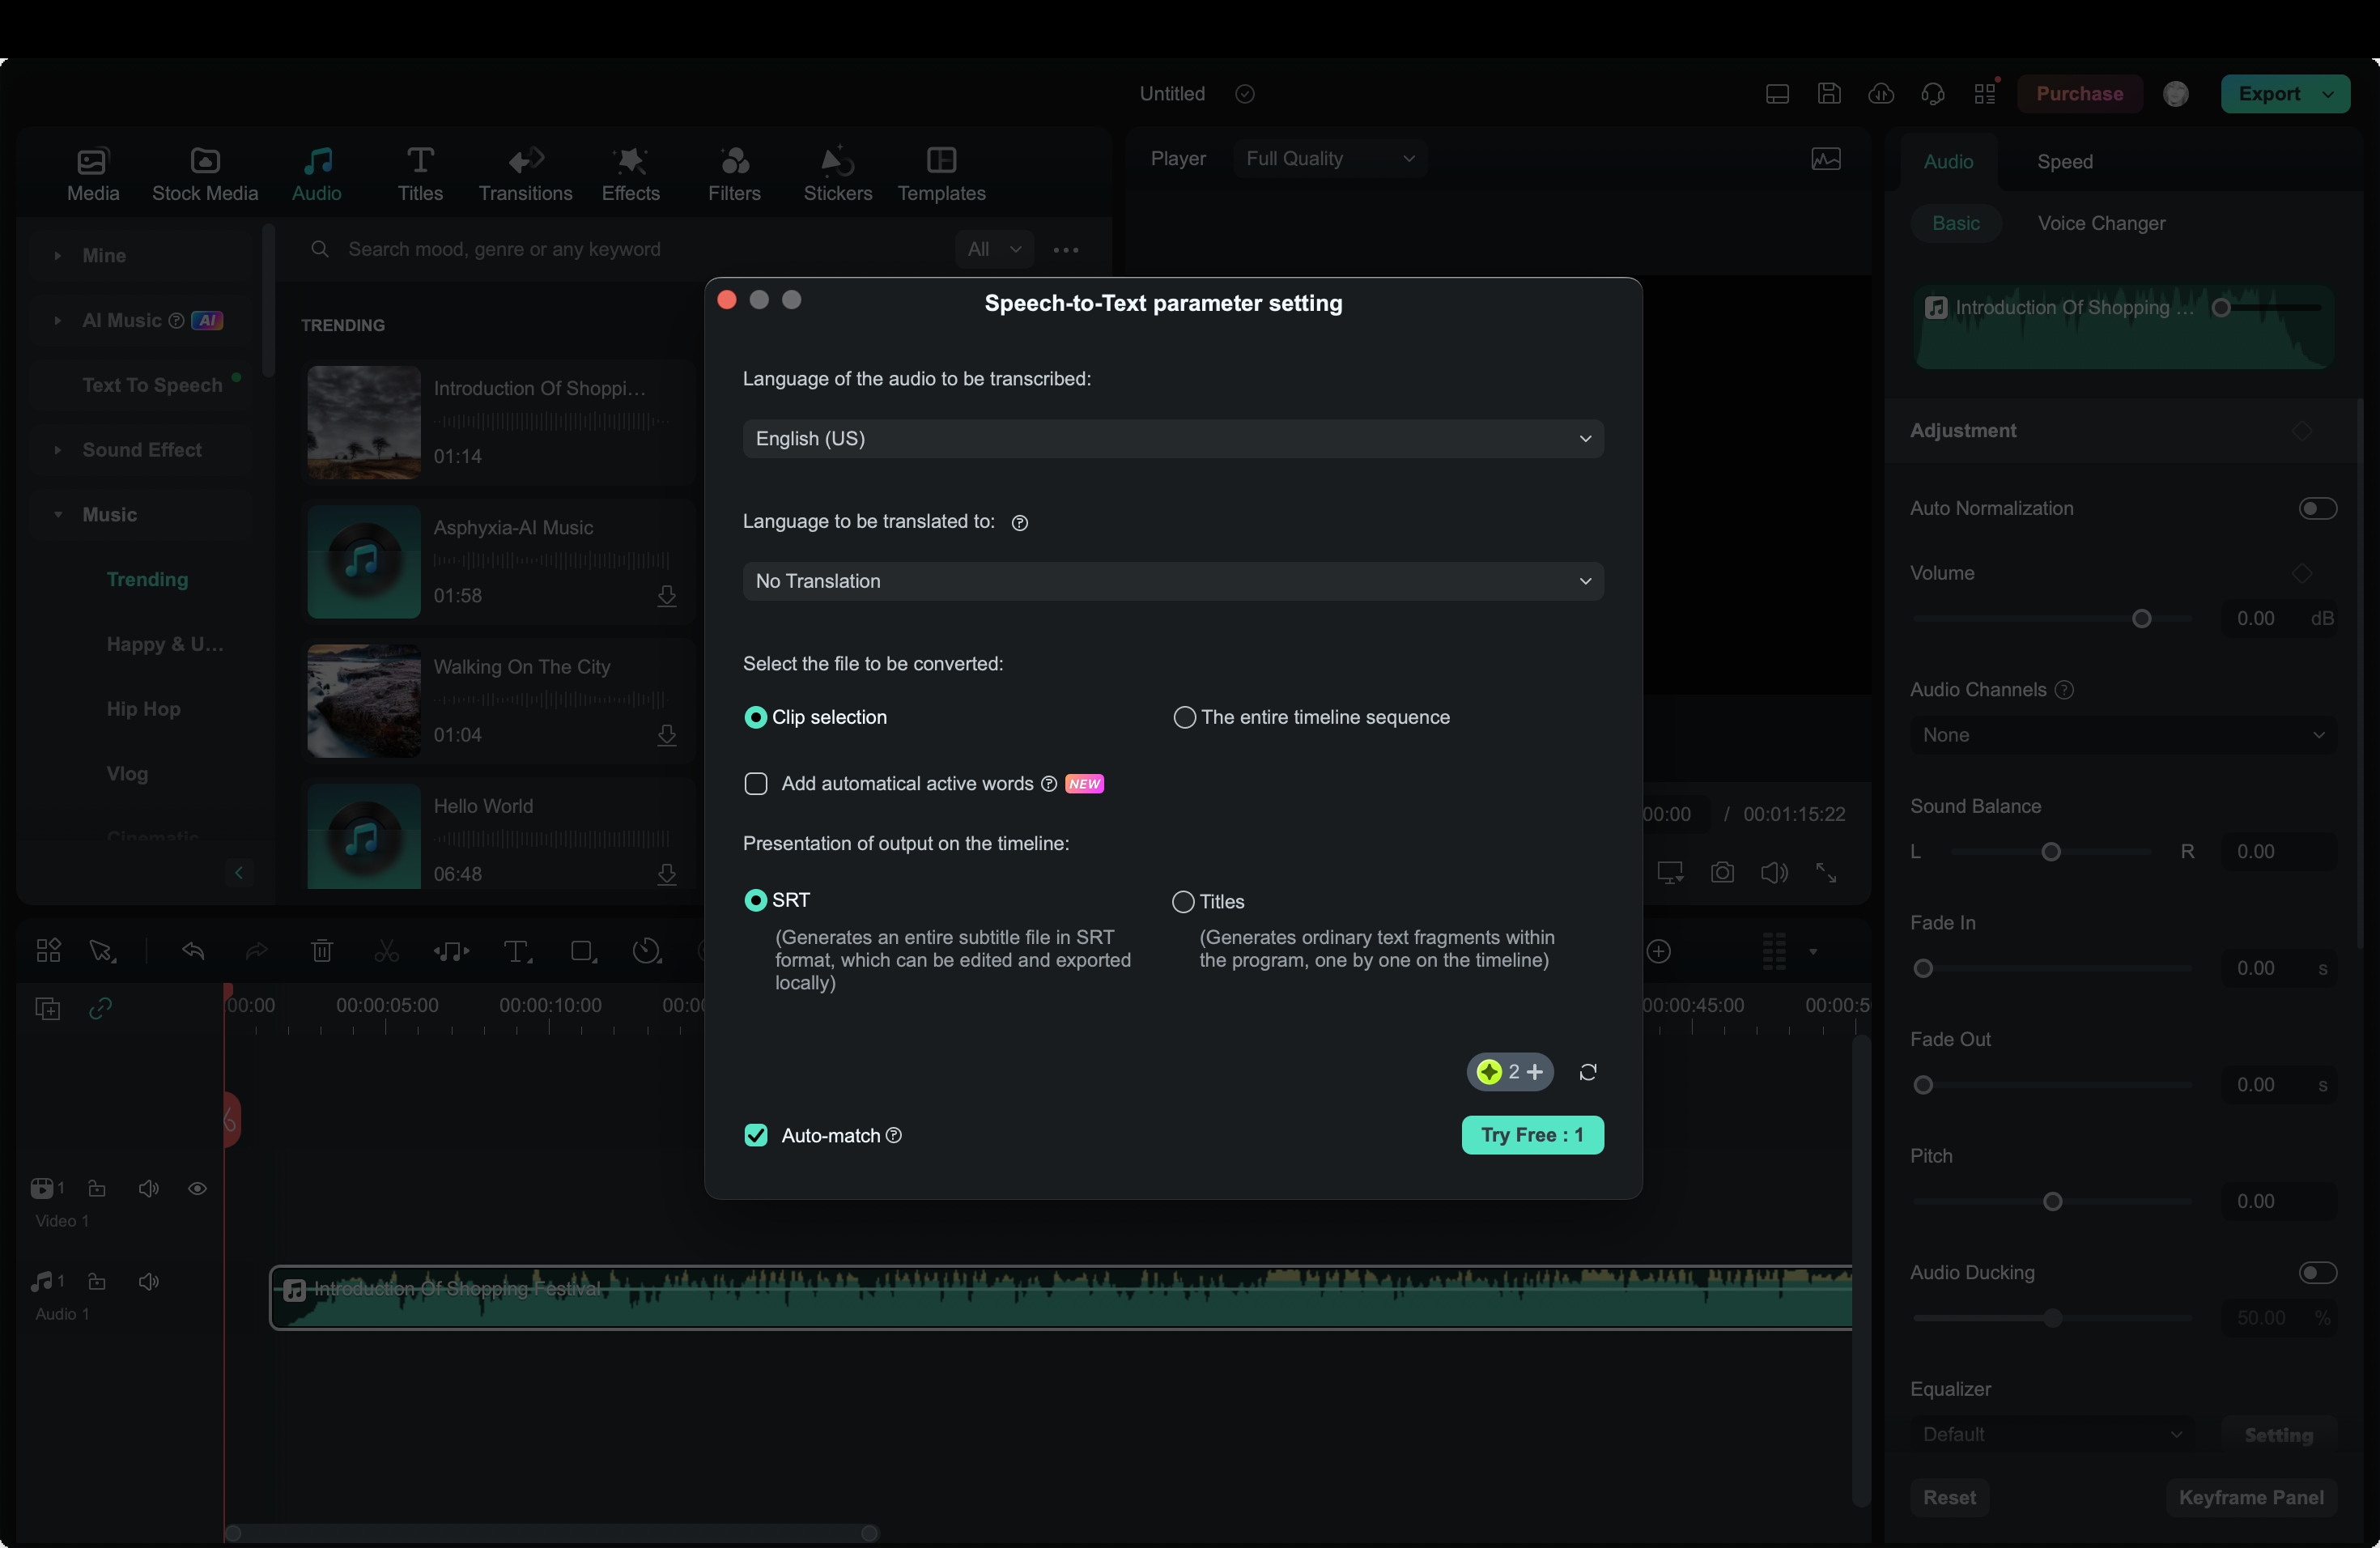
Step 4. Once you’ve selected the speech-to-text option, a settings window will appear. Here you can:
- Choose the language of the audio file for accurate transcription.
- Enable the option to automatically sync the transcribed text with the timeline, ensuring your captions or subtitles are perfectly aligned with the spoken words.
- For multilingual projects, you can even enable bilingual subtitle transcription.
Step 5. Monitor the transcription progress. Filmora provides a task list where you can track the status of your transcription. The list shows each file you’re transcribing, and you can scroll through it to monitor the progress of your tasks.
Step 6. Once the transcription is complete, Filmora will save the file in SRT format—a common format for subtitles and captions. You can now add these captions to your video or export the text for other purposes.
Conclusion
Google Docs' text-to-speech and audio transcription features offer a simple, time-saving solution for converting speech to text. Whether you need to transcribe lectures, meetings, or create subtitles, it's a great tool for students and professionals alike. However, it does have limitations, such as lacking support for video-to-text conversion. For more advanced needs, Wondershare Filmora is an excellent alternative, offering AI-powered transcription, automatic caption generation, and support for multiple languages, making it ideal for video creators and professionals seeking efficiency.


 100% Security Verified | No Subscription Required | No Malware


