

 100% Security Verified | No Subscription Required | No Malware

Ever created a document that looks a little too plain and wanted to add some design without going overboard? WordArt can be a simple way to give your text some extra style. And if you usually work in Google Docs, you can create WordArt without switching to another word processor.
Google Docs is already a popular choice for online work, with Exploding Topics reporting that the platform has more than 1 billion monthly active users. For those who prefer working online or collaborating on the same project, WordArt in Google Docs can be a handy option for making titles, headings, and other text stand out. To help you out, we'll show you how to make WordArt in Google Docs and customize it to fit your document.
In this article
Part 1. What Is WordArt and What Makes It Interesting?
WordArt is one of those simple features that can make a document feel a little less plain. It lets you turn regular words into decorative text and gives you several ways to change how they look. You can pick a different font, change the fill and outline colors, and adjust the style to make your text stand out.
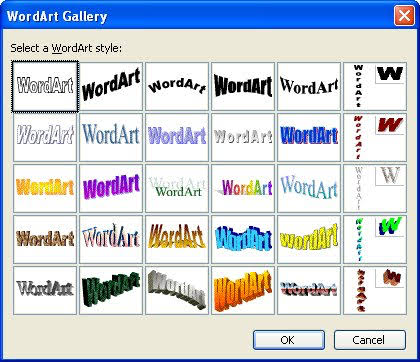
WordArt is often associated with Microsoft Word, but you can also create WordArt in Google Docs. So, why do people look for ways on how to use WordArt in Google Docs?
- Fits Your Style: WordArt gives you room to play around with fonts and colors, so you can make the text fit your document's theme. You can keep it simple or go for something more colorful and decorative.
- Simple to Set Up: All you need is the text you want to use. Most of the customization only takes a few clicks.
- Good for Creative and Practical Uses: WordArt can work well for creative projects such as posters, invitations, and flyers. But you can also use it in presentations, worksheets, and school projects.
Want to Create WordArt in Microsoft Word?
Explore our guide to how to use WordArt in Microsoft Word to learn how to add and customize decorative text in your document. →
Part 2. How to Add WordArt in Google Docs (Step-by-Step)
Rather than wondering how to insert WordArt in Google Docs, why not try it yourself? The process is pretty simple. Once you know where to find the feature, you can add your text and customize it however you like.
Step1Open the Drawing Tool
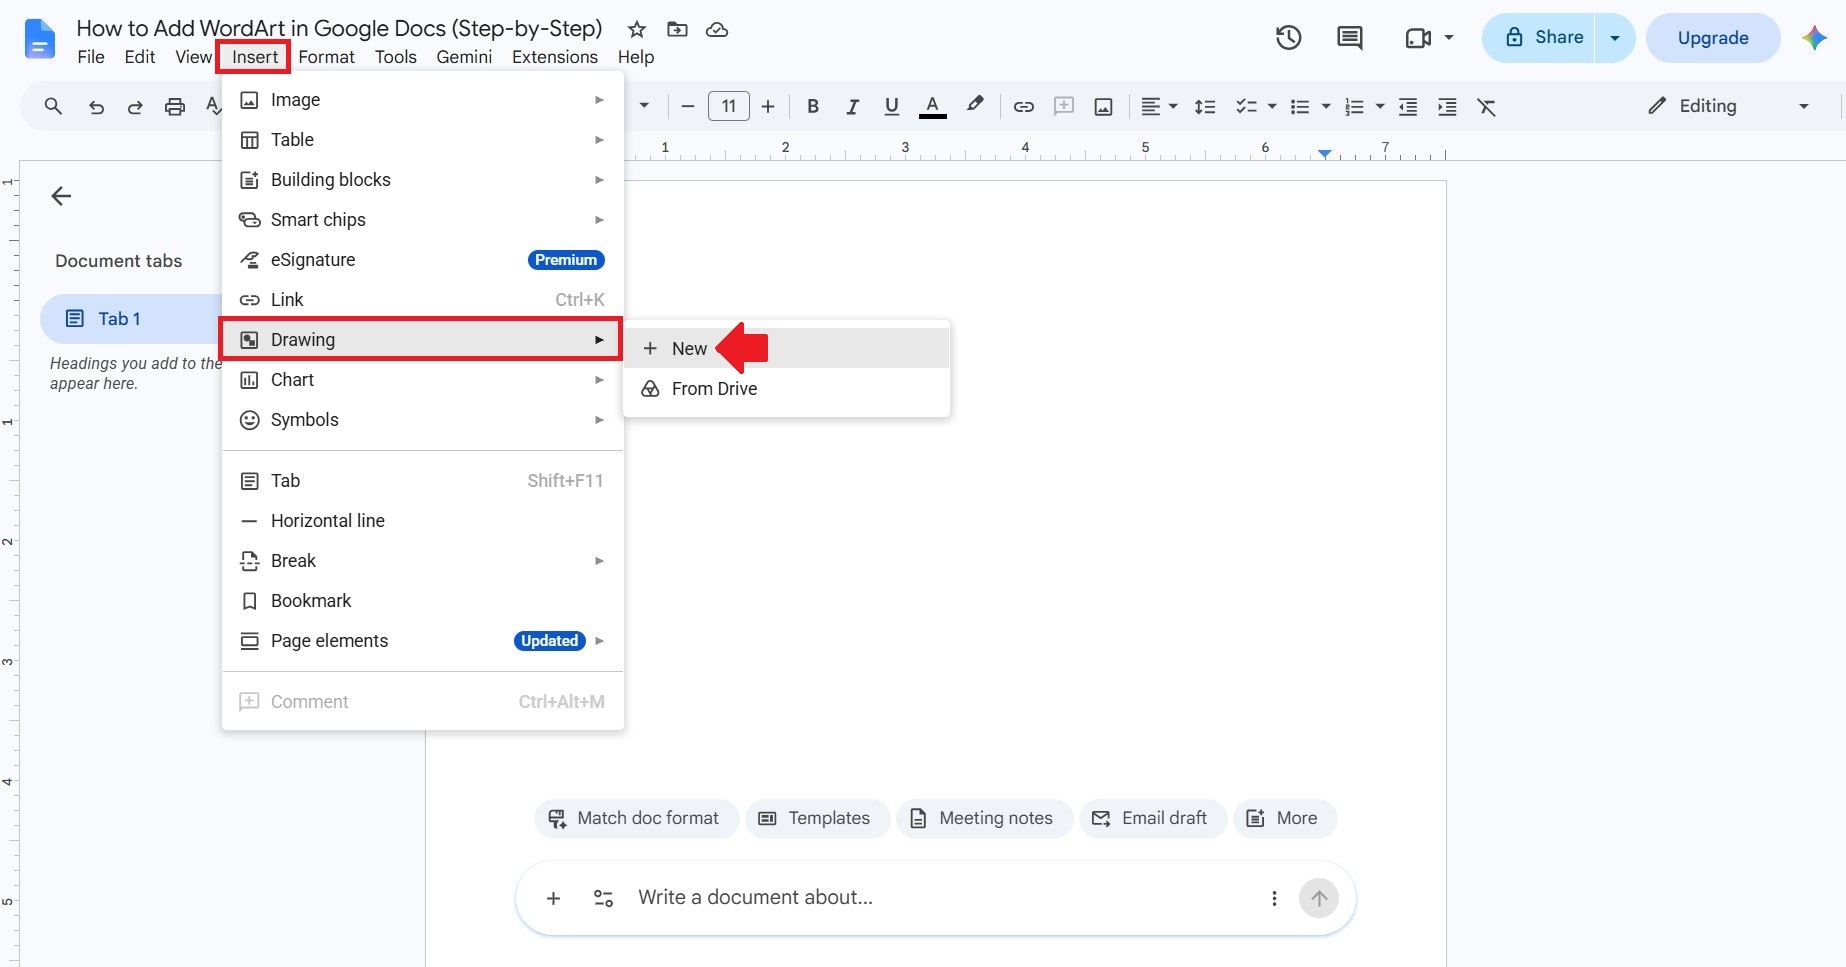
Open Google Docs and create a new document. Go to Insert > Drawing > New to open the Drawing window.
Step2Select WordArt
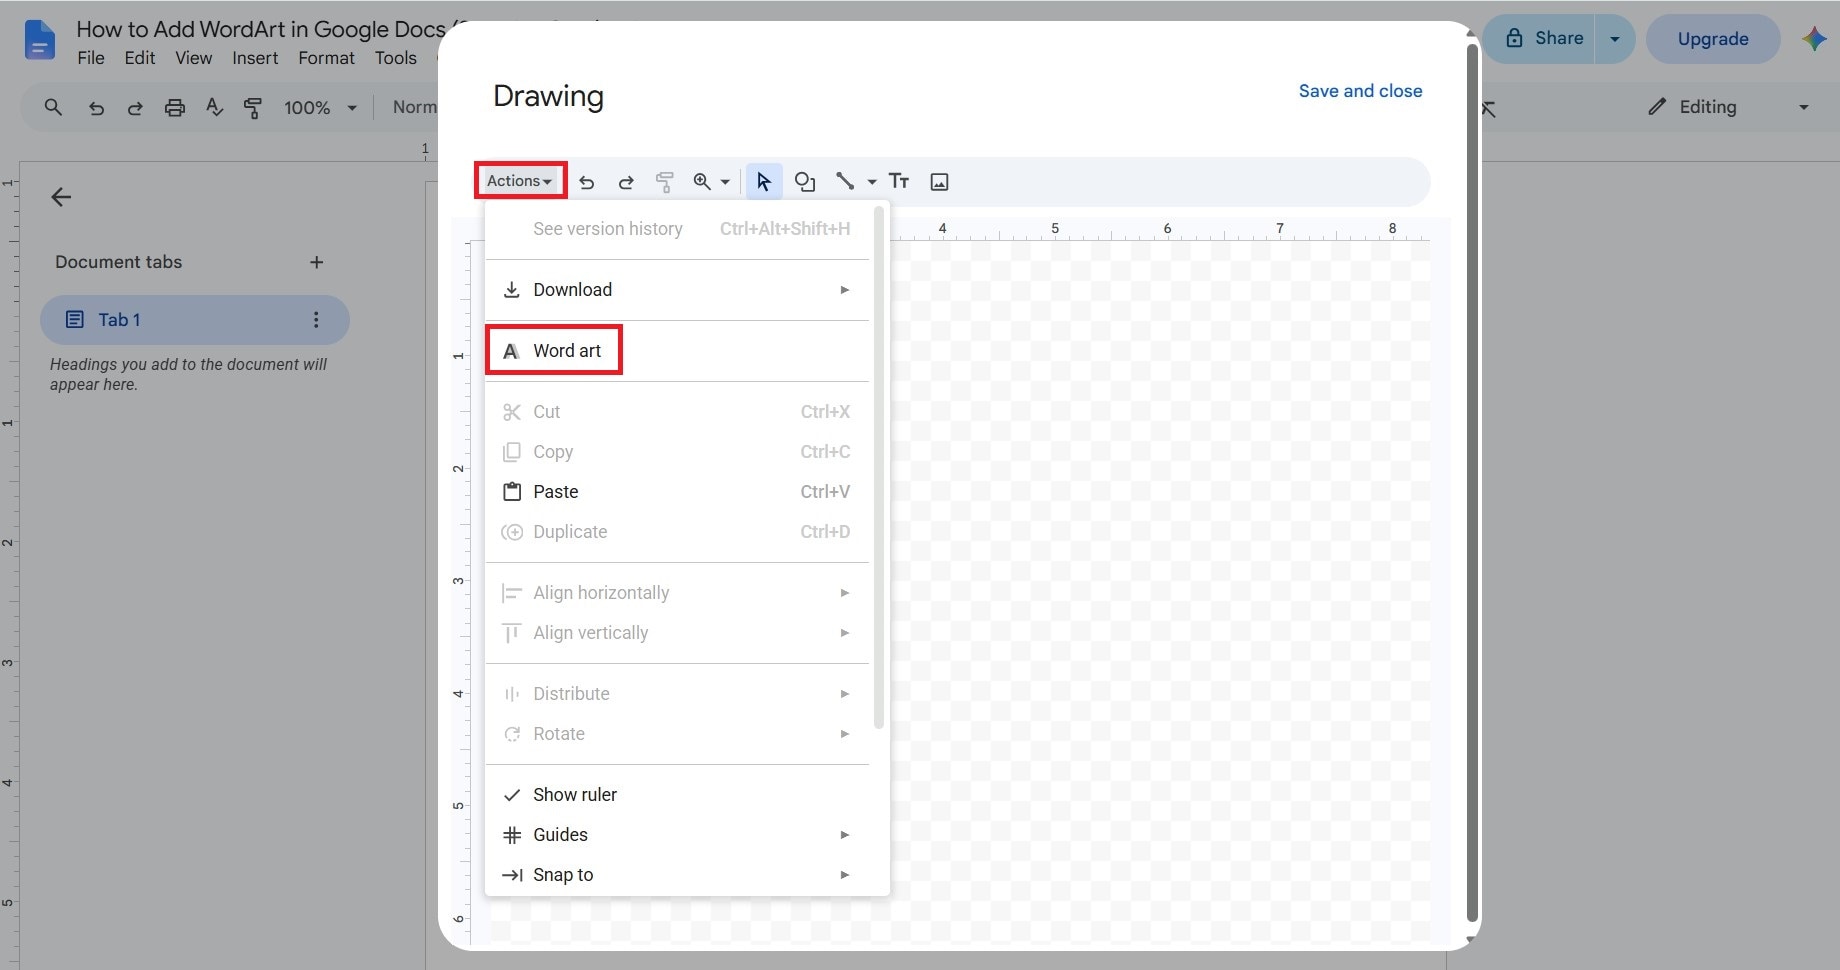
In the Drawing window, click Actions and select Word art from the menu.
Step3Type the Text
Type the word or phrase you want to turn into WordArt. If you want to split the text across multiple lines, press Shift + Enter to add a line break. Once you're done, press Enter.
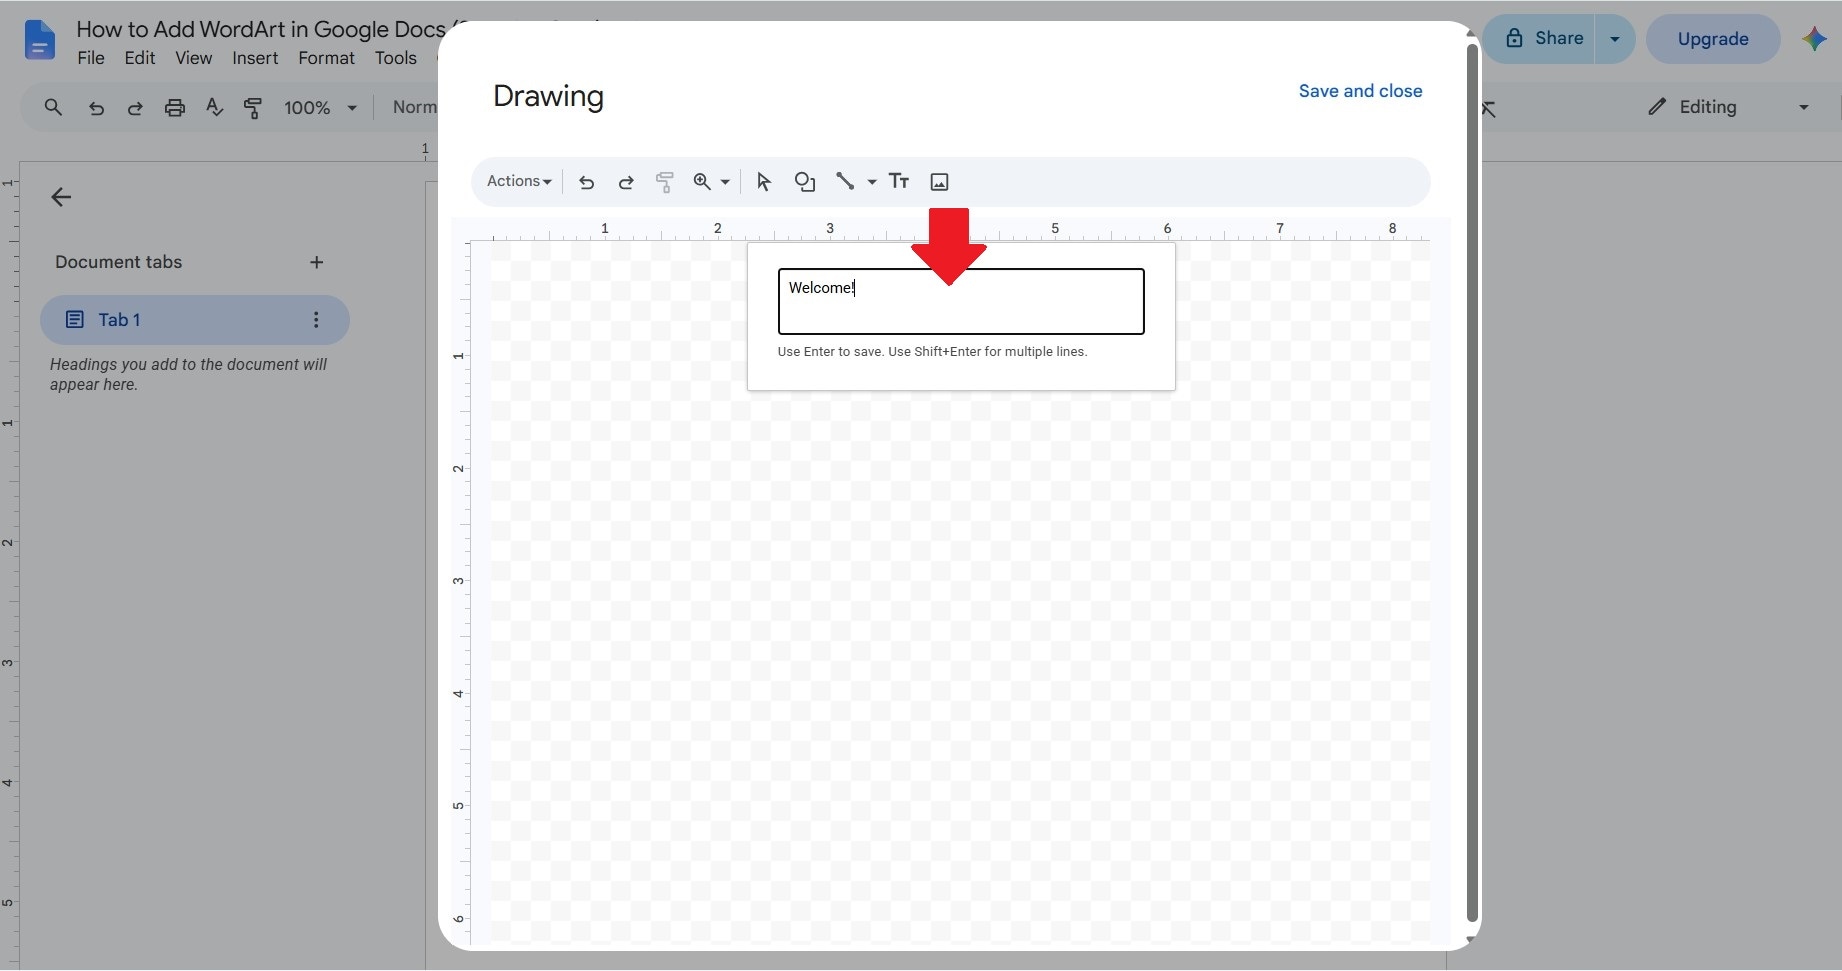
Step4Customize Your WordArt
Change the font, apply bold or italic formatting, adjust the text and fill colors, and explore other available options. When you're happy with the result, click Save and close.
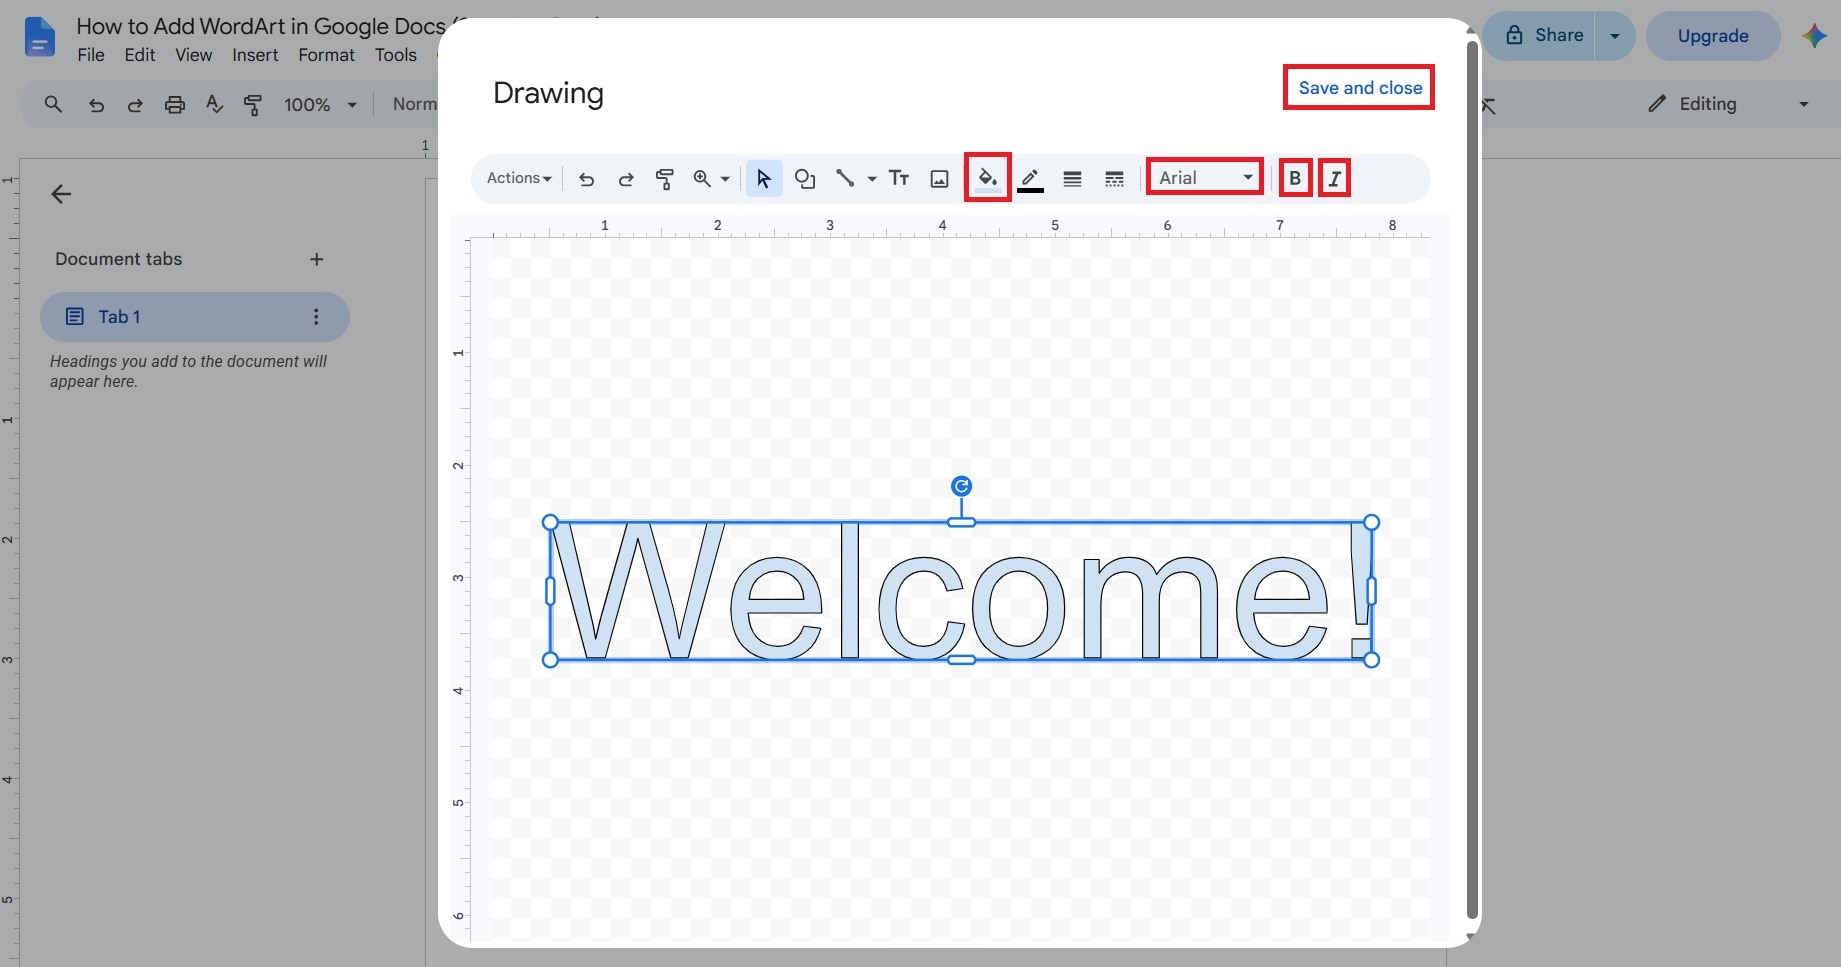
Step5Insert WordArt Into Your Document
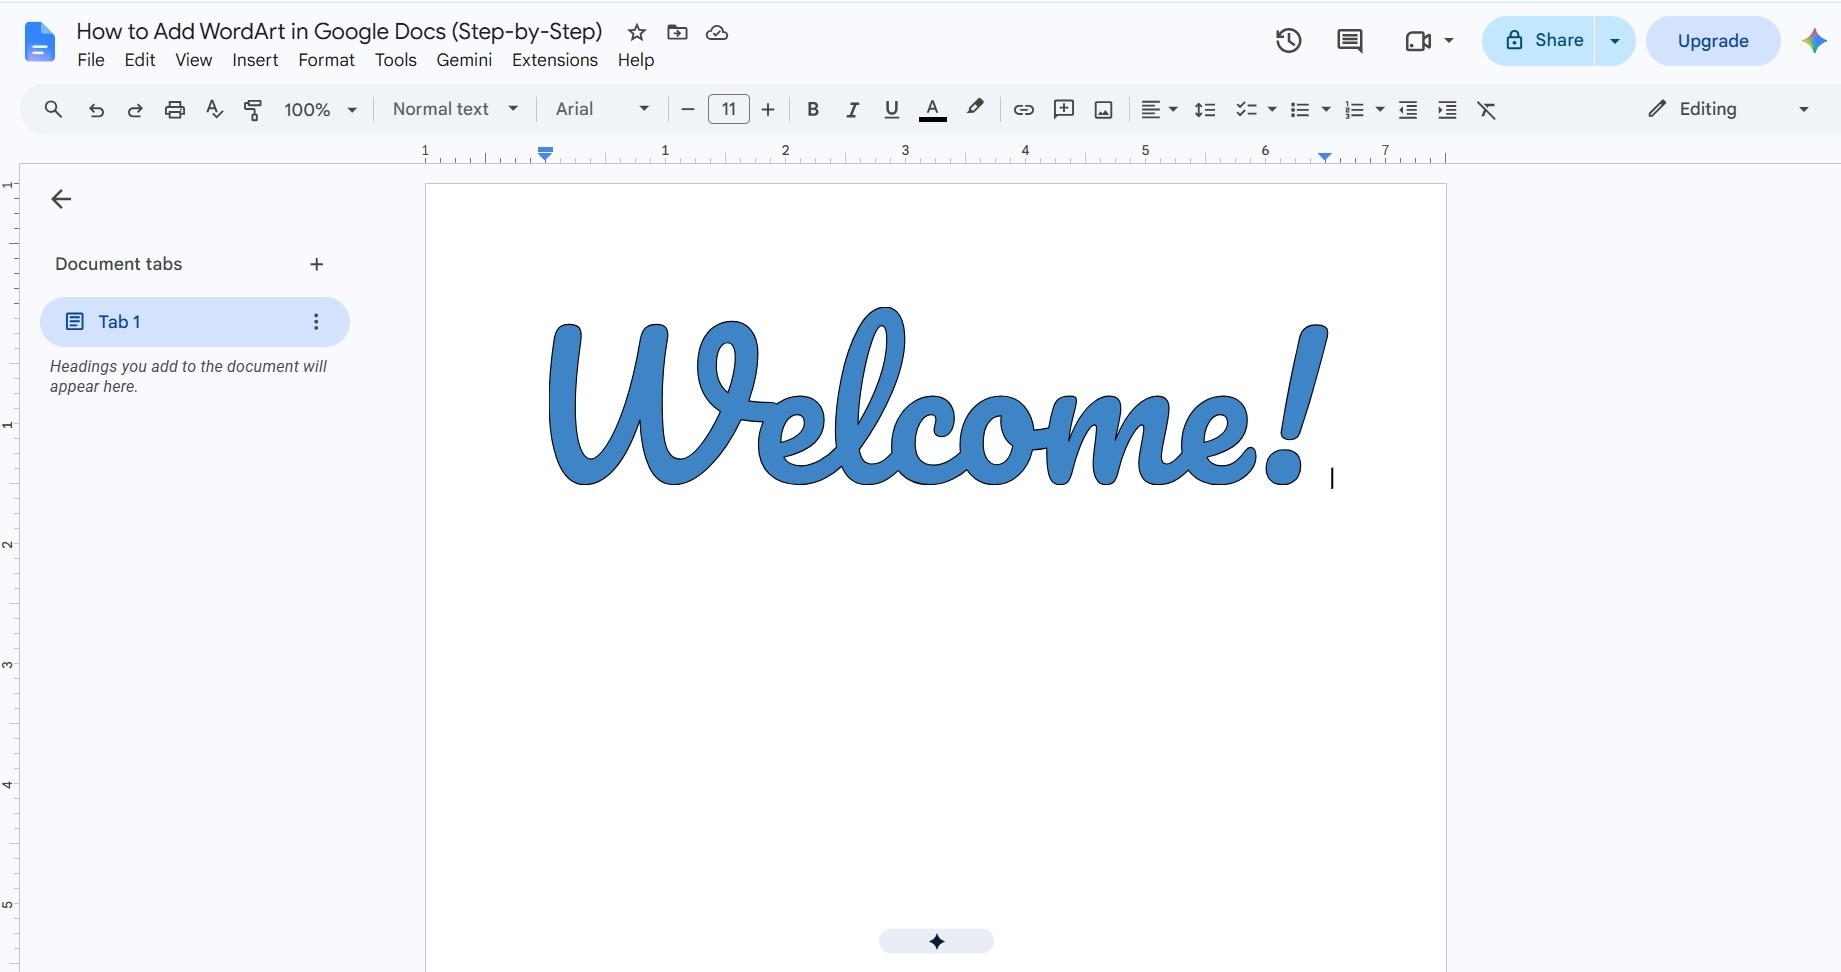
Your Google WordArt will appear directly in the document. You can then move it around and place it wherever you want.
Part 3. Limitations of WordArt in Google Docs
Now you know how to make WordArt in Google Docs. As you can see, the feature comes in handy when you want your text to stand out. It's quick to create, simple to customize, and doesn't require you to use a separate editing tool.
However, the simplicity of Google WordArt also comes with a few trade-offs. It works well for basic text styling, but you may need another tool if you want more control over the final design. Here are the main limitations to keep in mind:
1. Limited Text Effects
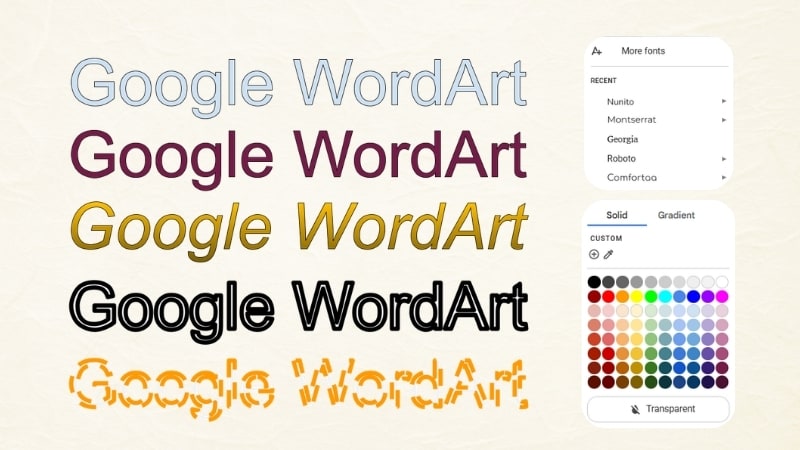
You can make your text look different with Google Docs WordArt, but the available effects are quite basic. The tool lets you play around with fonts, fill colors, and outlines, which is enough for a simple design. However, the feature doesn't offer more advanced text effects like shadows, gradients, glow, or reflections.
2. Less Control Over the Visual Content
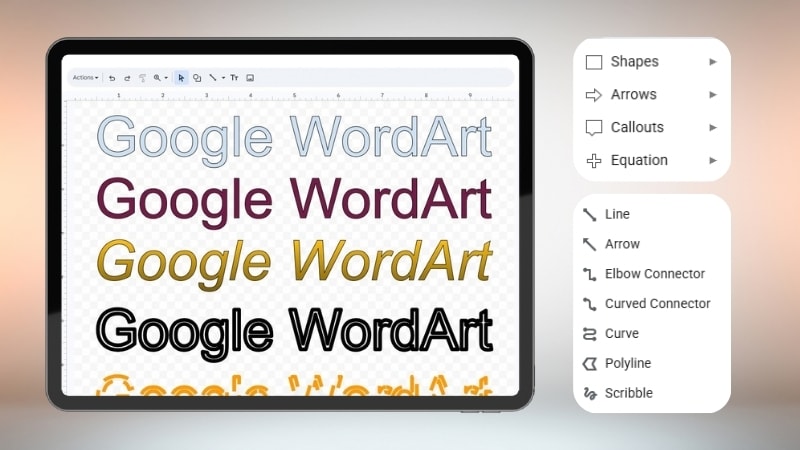
Google Docs WordArt gives you some room to build a visual around your text. You can add shapes, lines, text boxes, and even images to the drawing. That said, you have limited control over how these elements are arranged and customized compared with a dedicated design tool.
3. Flat and Static Designs
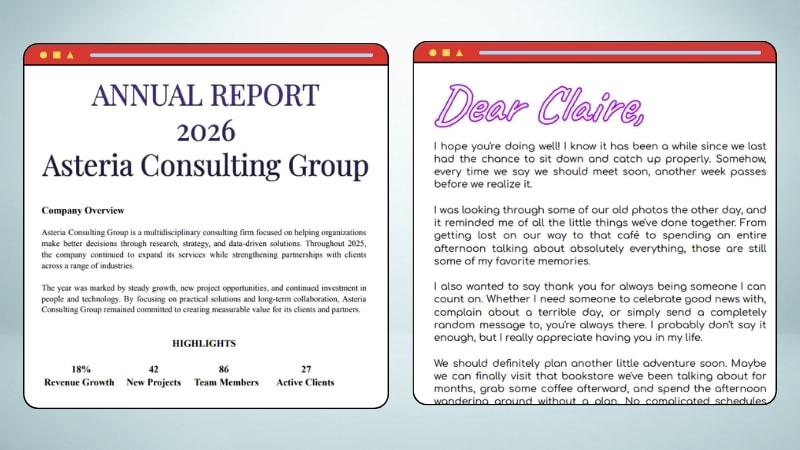
Another limitation is that Google Docs WordArt is limited to flat, static designs. You can adjust the font, colors, and basic formatting, but you can't add 3D effects or animations to your text. This means your WordArt may not be enough for projects that need more dynamic visuals.
Part 4. Try Filmora for More Creative WordArt Designs
After learning how to add WordArt in Google Docs, you may find that the feature is enough for simple titles and headings. But if you want to create something more creative with your text, especially when photos and videos are involved, you'll need more than the basic WordArt options. In this case, a dedicated editing tool can give you more control over the overall visual.
One option worth trying is Wondershare Filmora. As a video editing tool, Filmora offers a wider range of creative features for working with text and other visual elements. You can use it to create more stylized text, combine it with photos and videos, and build visuals that go beyond what Google Docs WordArt can offer.


Why Choose Filmora?
1. Explore Tons of Text Templates
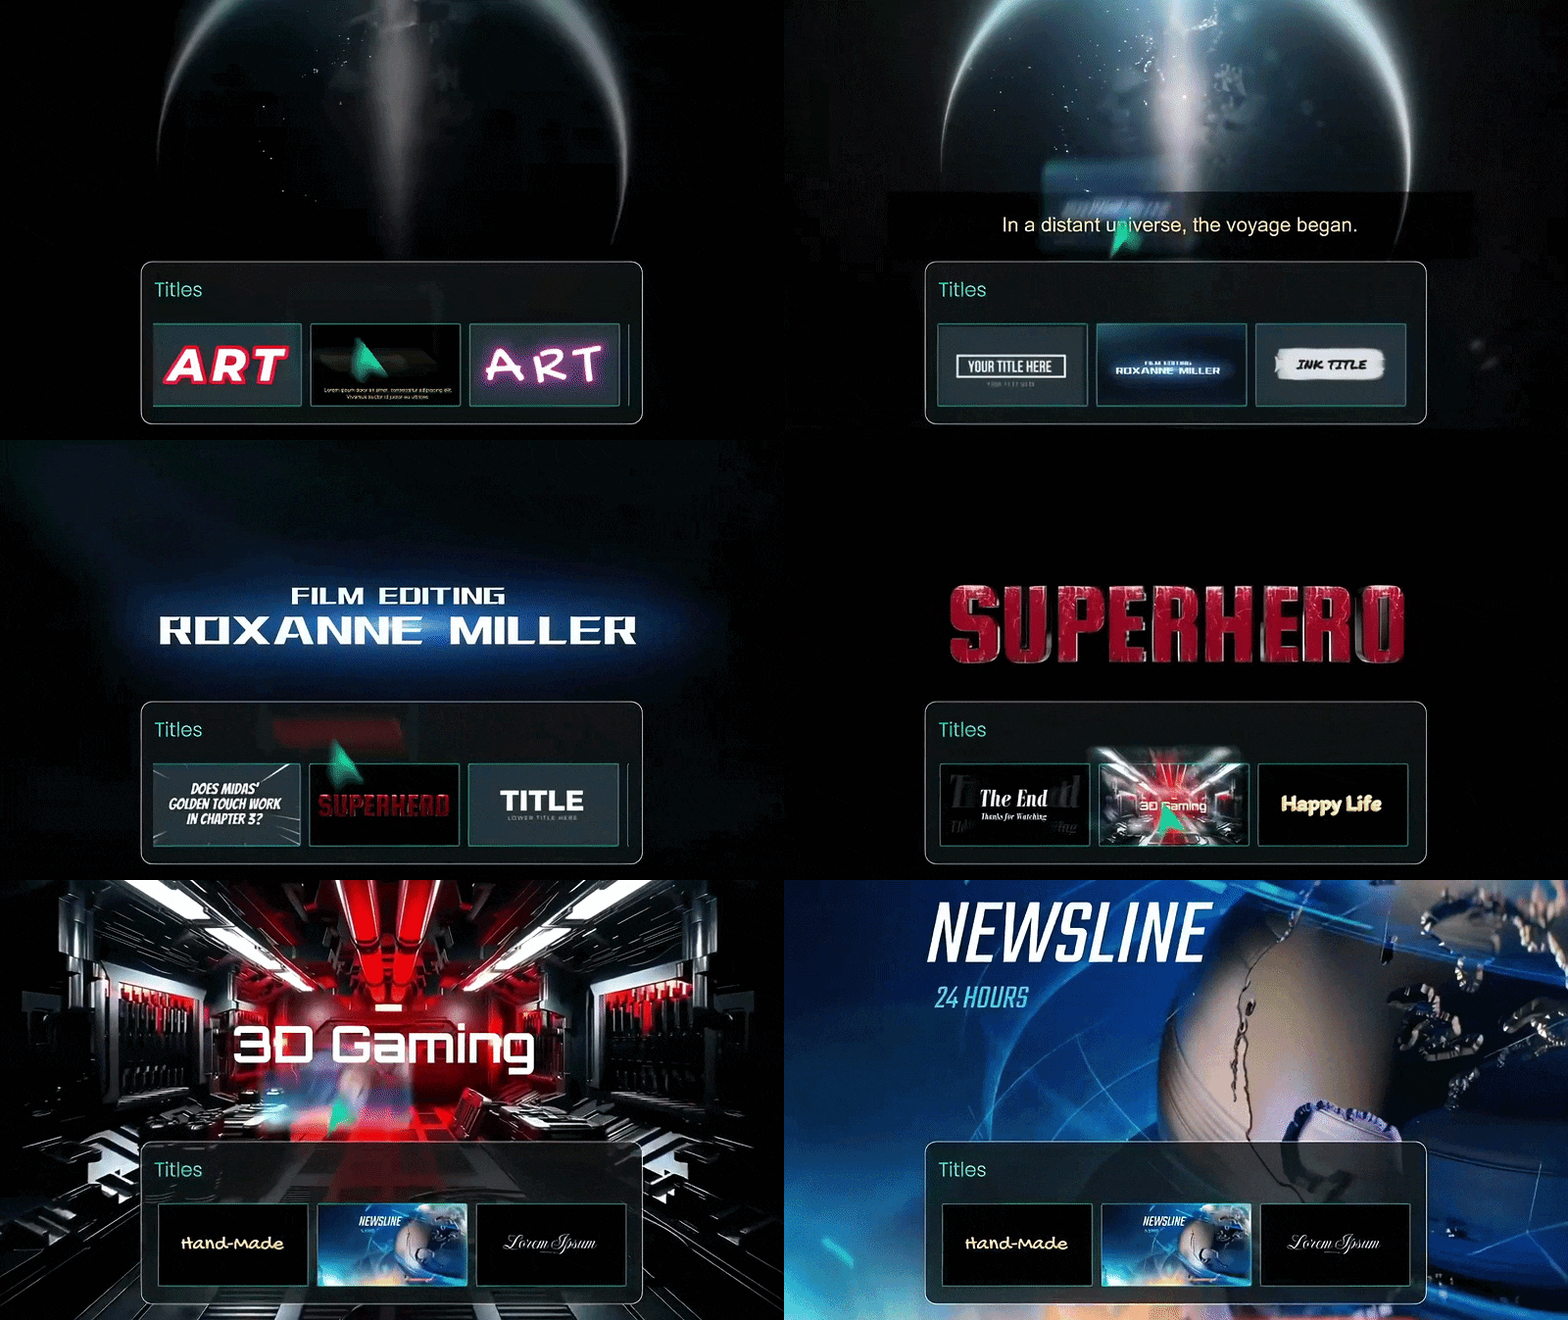
Filmora provides a wide range of text and title templates that you can use to create stylized text without designing everything from scratch. You can choose from different styles and customize the text to fit your project. This gives you more options when you want something beyond the basic fonts and colors available in Google Docs WordArt.
2. Combine Text With Other Visual Elements
Filmora lets you use text alongside photos, videos, stickers, shapes, and other visual elements in the same project. You can place your text over a video, add it to an image, or combine it with other elements to create a more complete visual. This gives you more freedom to build a layout around your WordArt instead of keeping it as a standalone element.

3. Create Animated WordArt Designs
Unlike WordArt in Google Docs, Filmora lets you animate text and control how it appears throughout a video. You can apply text animations and effects to create titles that move onto the screen, transition between scenes, or draw attention to specific moments. You can also adjust when the text appears and how long it stays on screen.

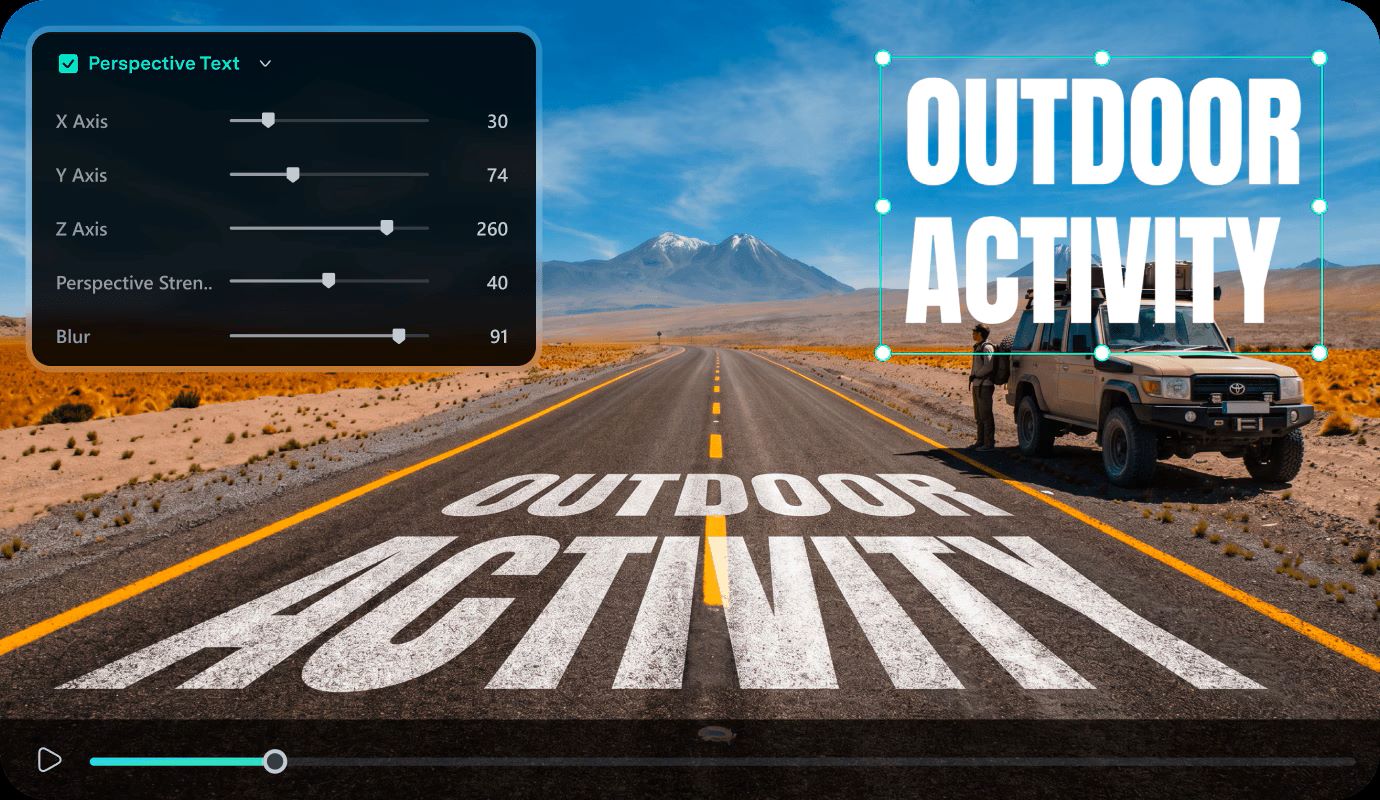
4. Add Perspective to Your Text
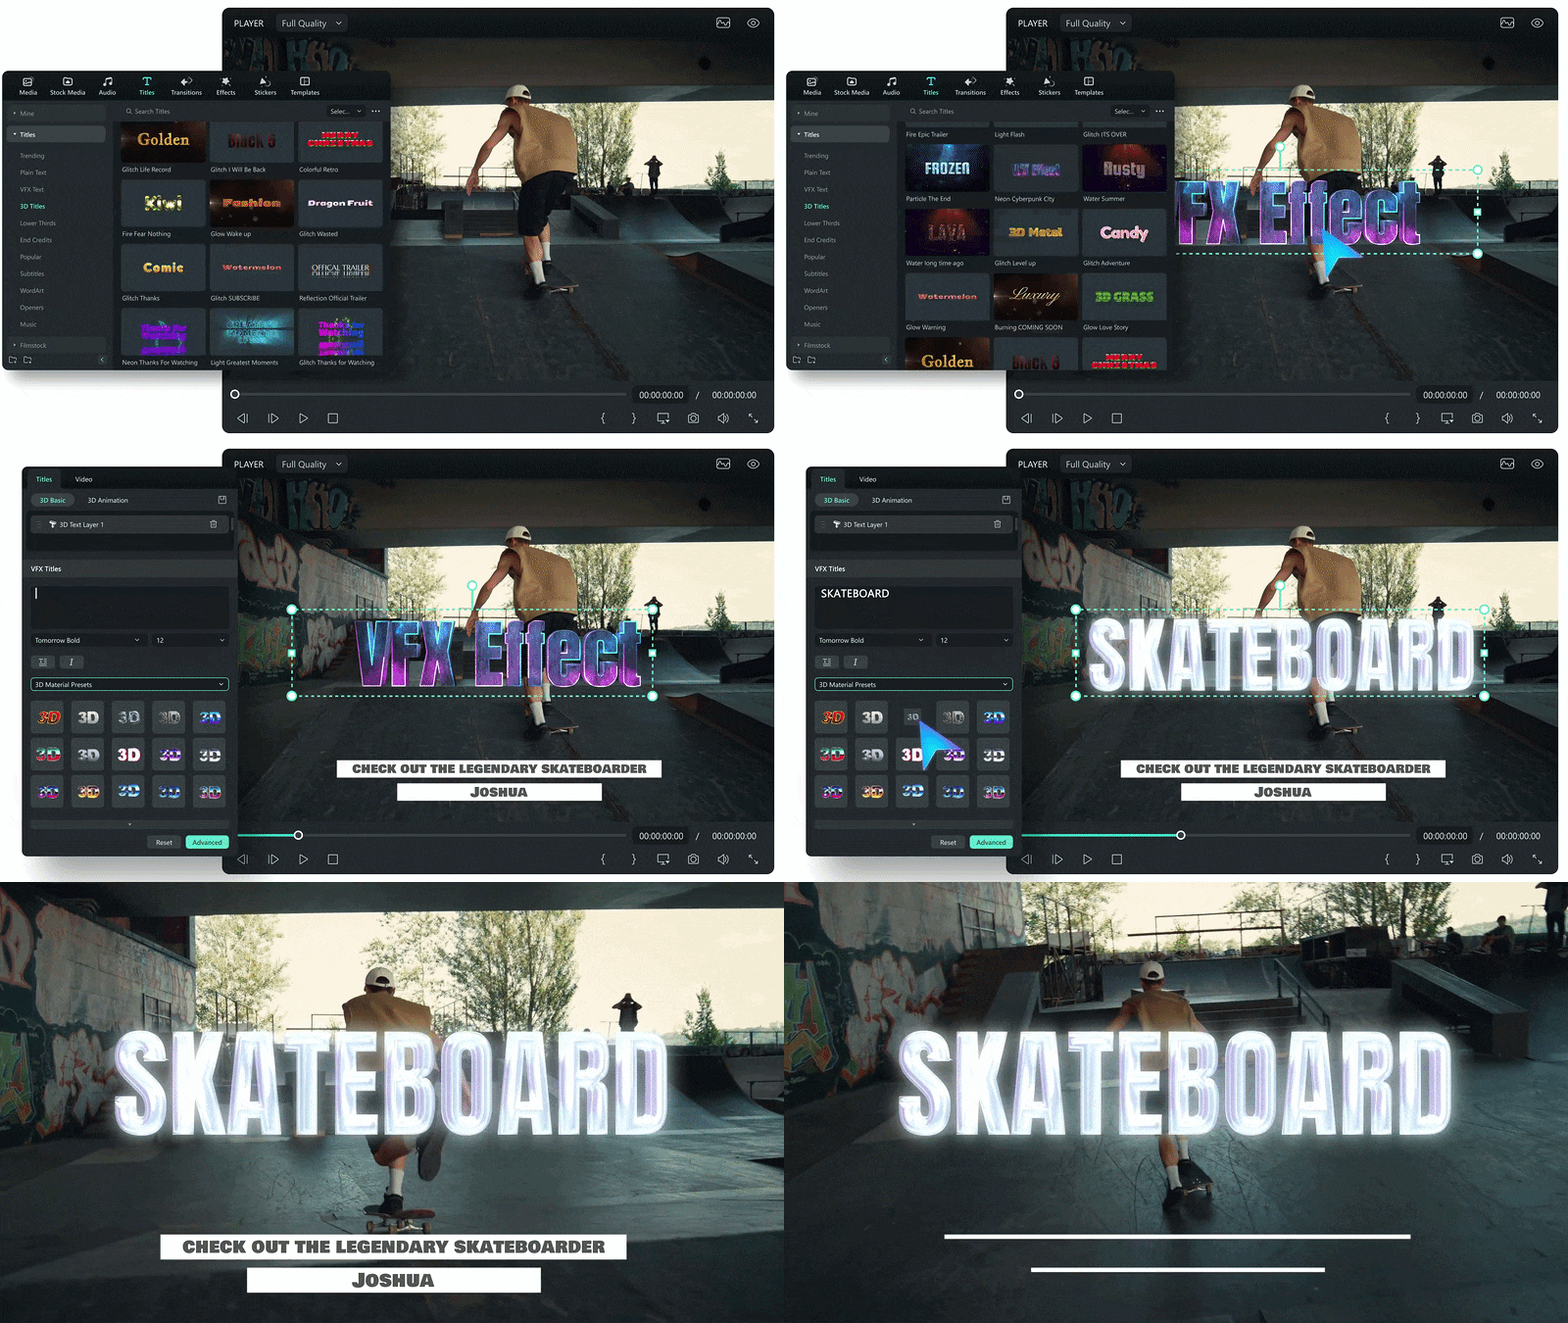
Filmora also has another interesting tool. You can play around with the perspective of your text to create a more 3D look. Adjust the angle, rotation, and vanishing point to change how the text appears on screen. This makes it easier to create perspective text that fits naturally with the depth and angle of your footage.
A Quick Guide to Creating WordArt in Filmora
Now, let's see how to create WordArt in Filmora in action. You might think using a video editor would make the process complicated, but that's not the case here. The steps are pretty simple, so let's get started.
Method 1: Use Preset WordArt
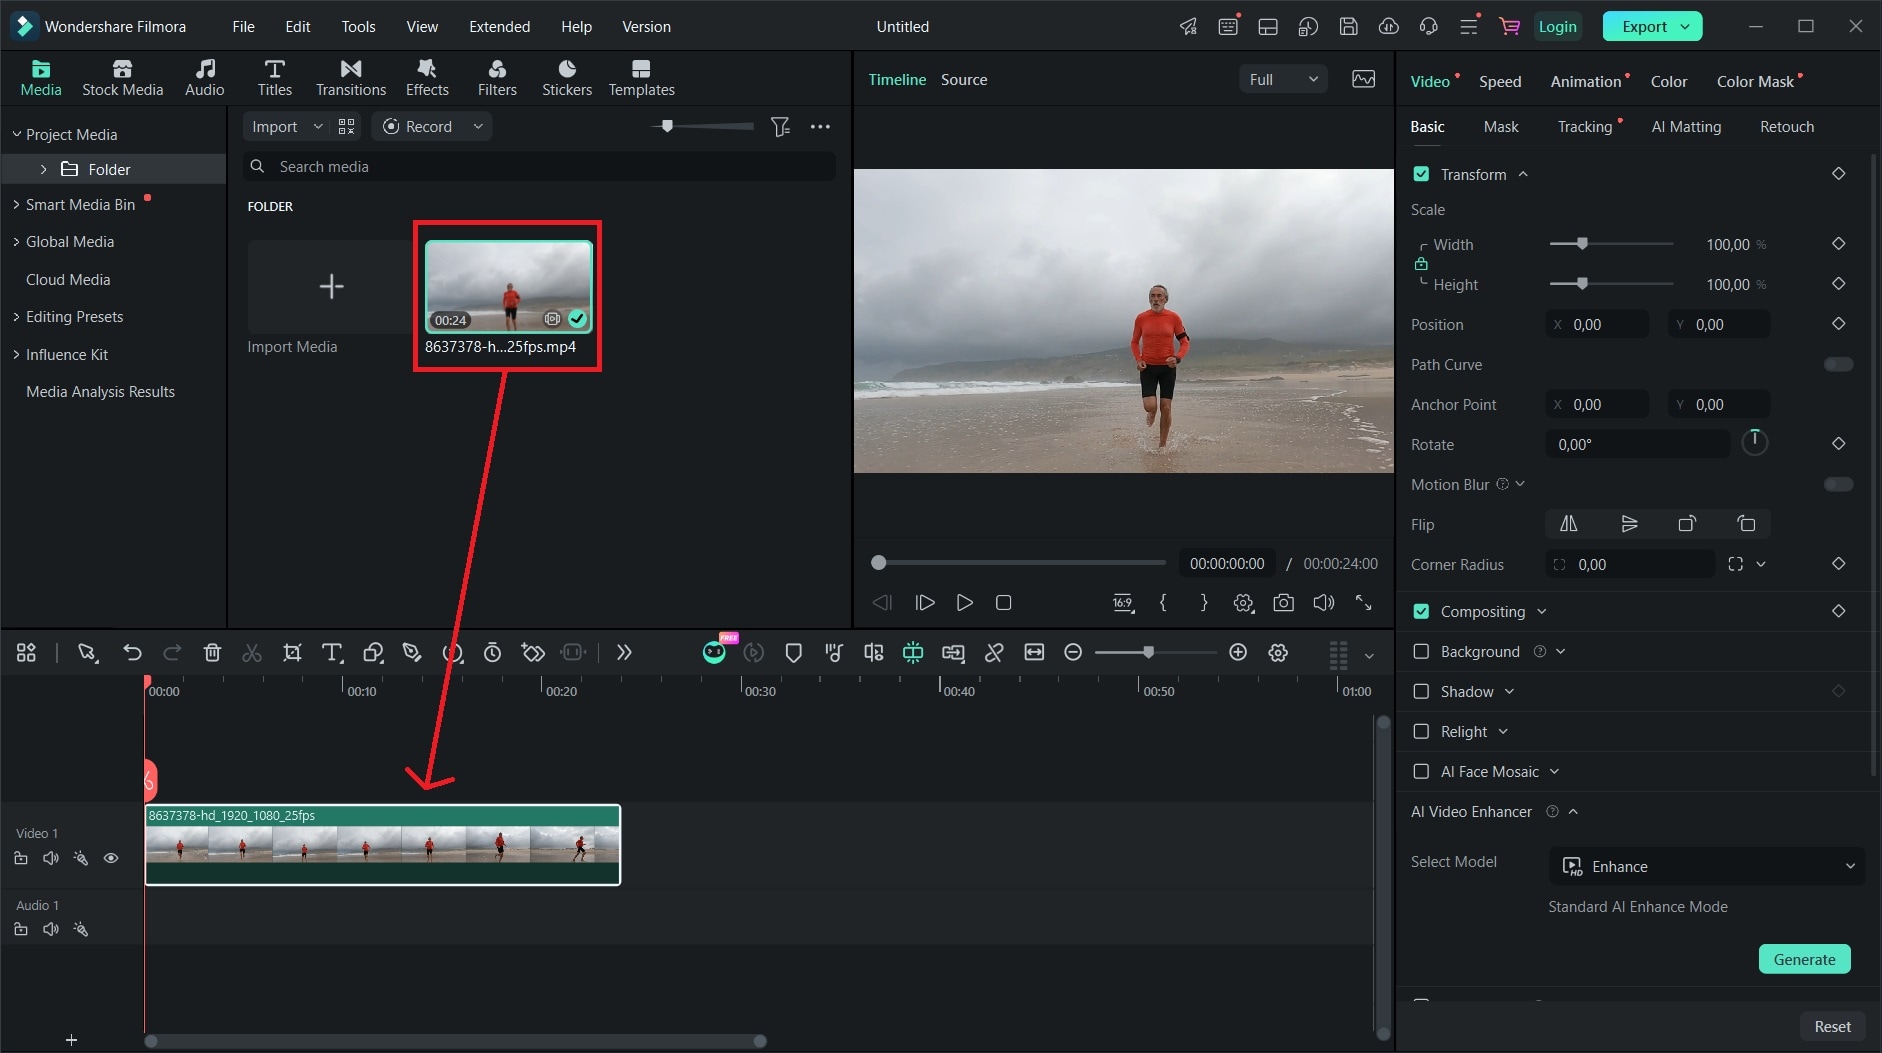
Step1Import Your Video
Open Filmora and click Create Project. Then, import your video into the editing timeline.
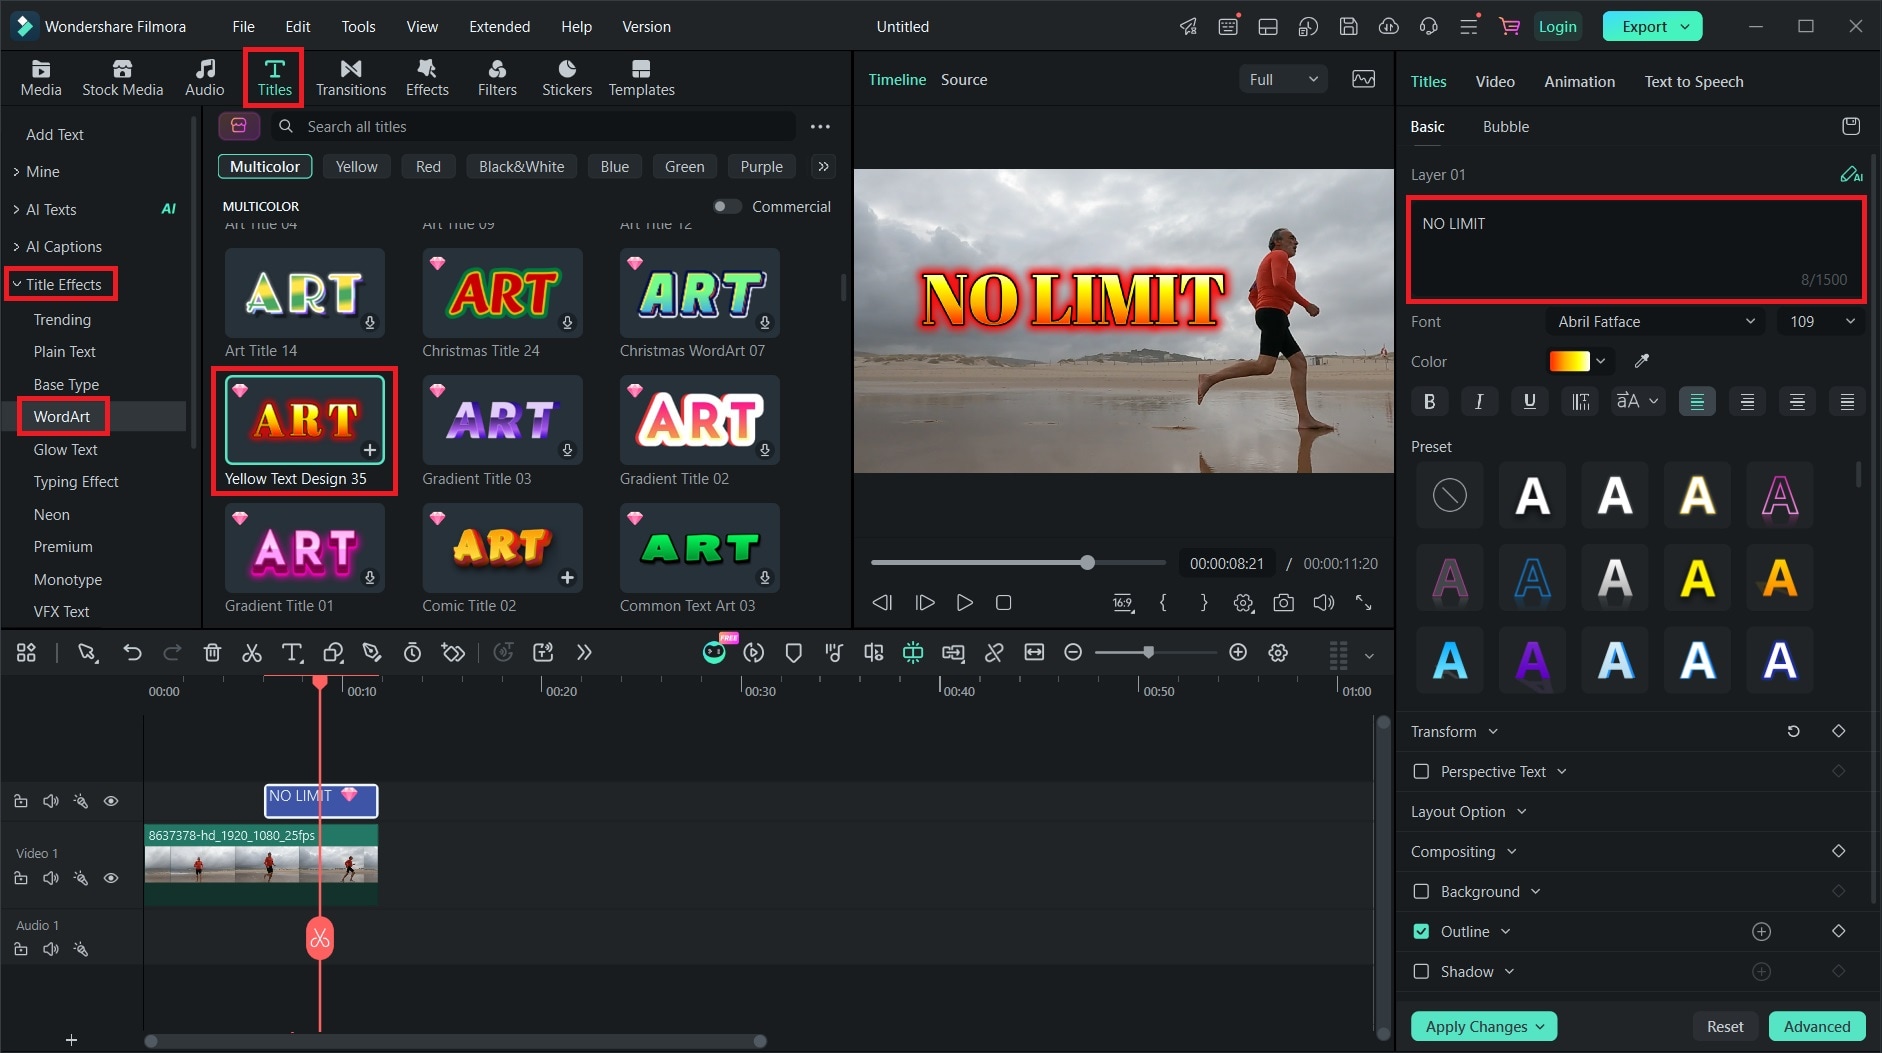
Step2Add WordArt to Your Video
Go to Titles, then select Title Styles. Find the WordArt category and choose a style you like. Apply it to your video, then replace the sample text using the text box on the right.
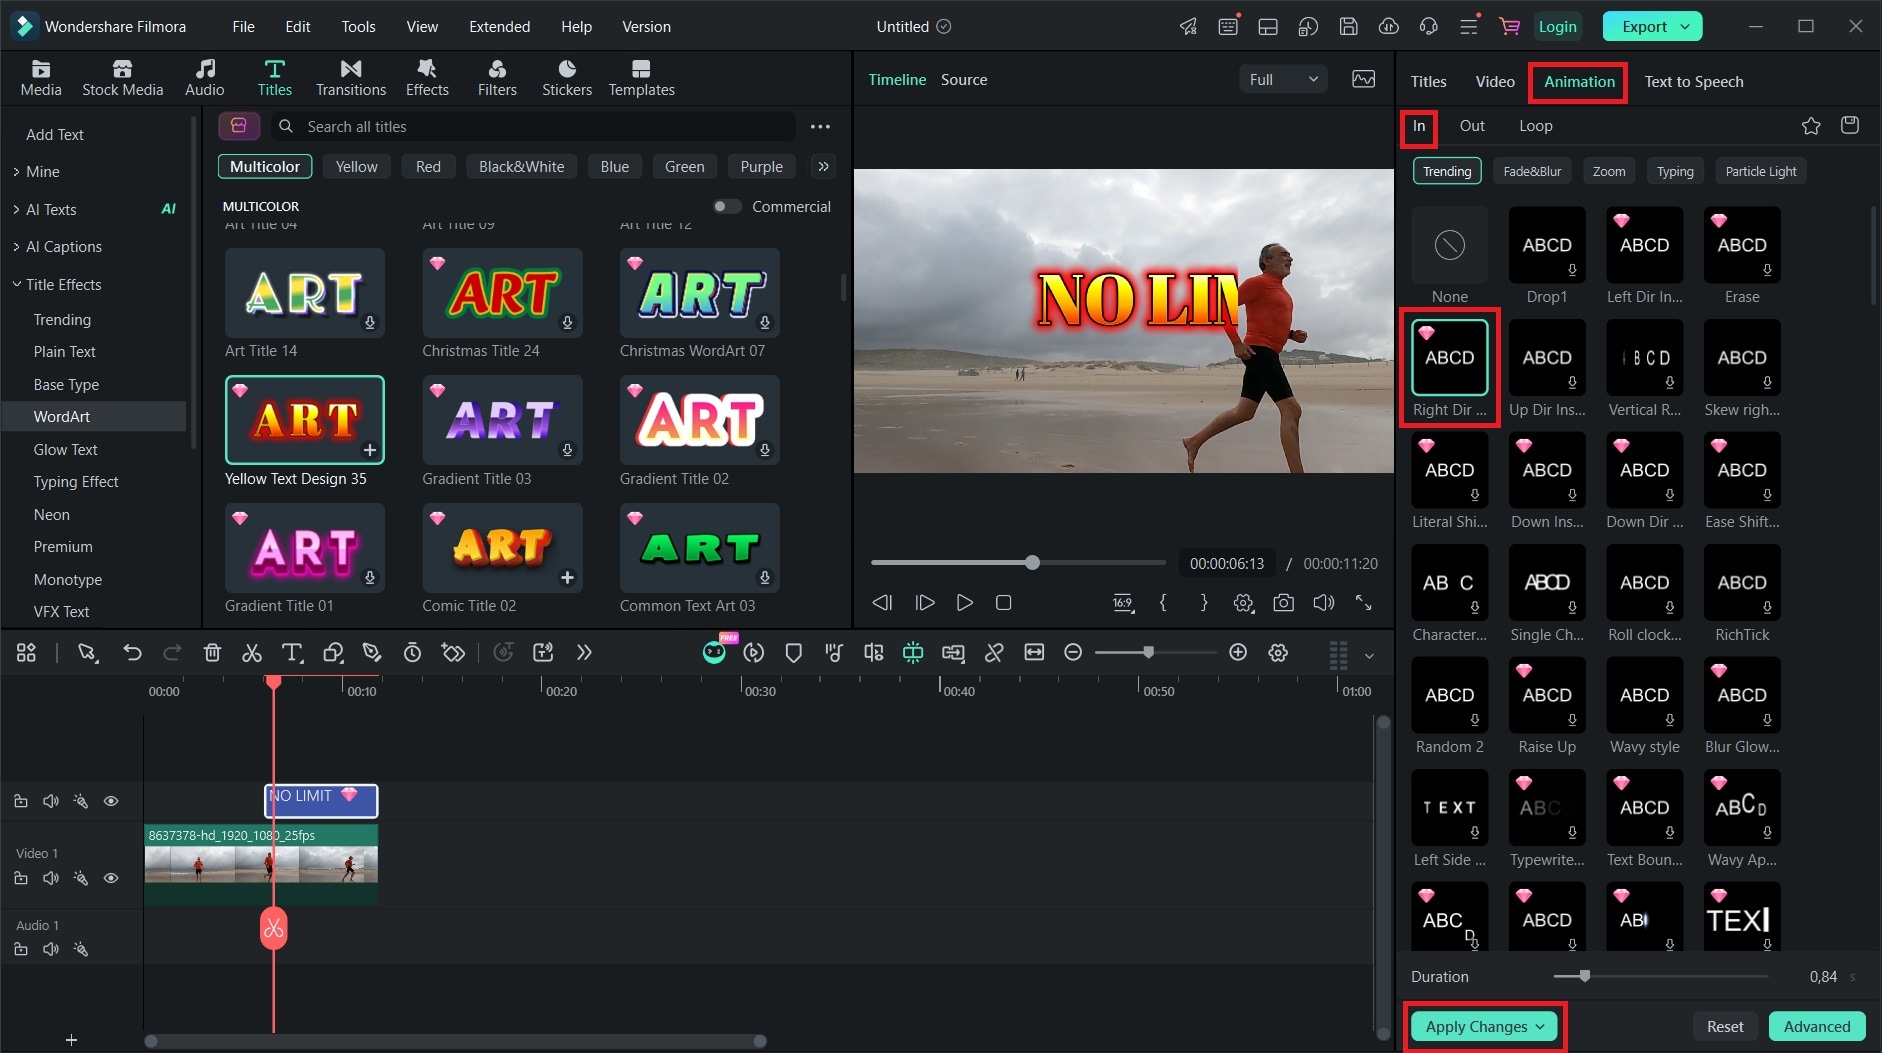
Step3Add Animation to Your WordArt
Go to Animation to add an entrance or exit animation to your text. For this example, we'll use In > Right Direction. Once you're happy with the result, click Export to save the video to your device.
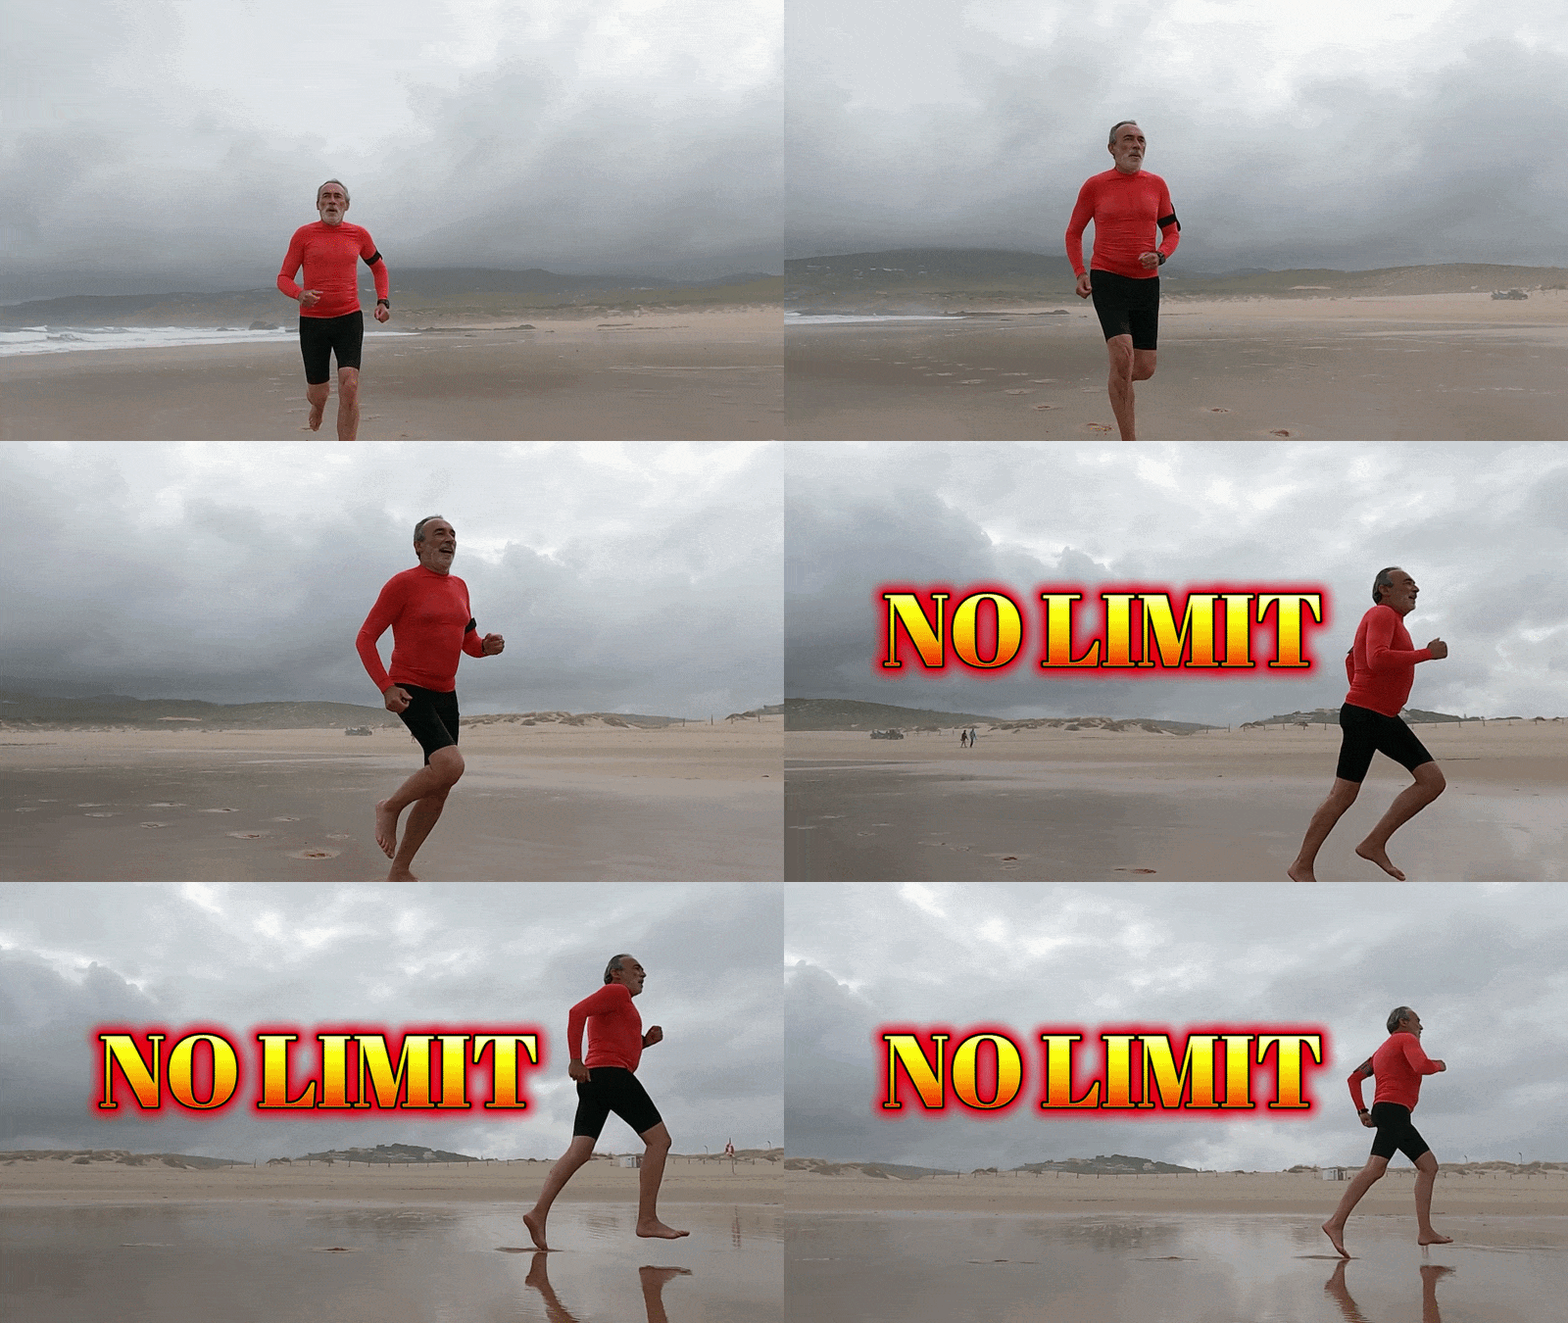
Check out the results. The WordArt appears toward the end of the video, with the animation making the text look like it emerges from behind the runner. The "No Limit" text also adds a simple message to the scene, suggesting that staying active has no age limit.
Method 2: Use Plain Text and Make Adjustments
Step1Upload Your Video
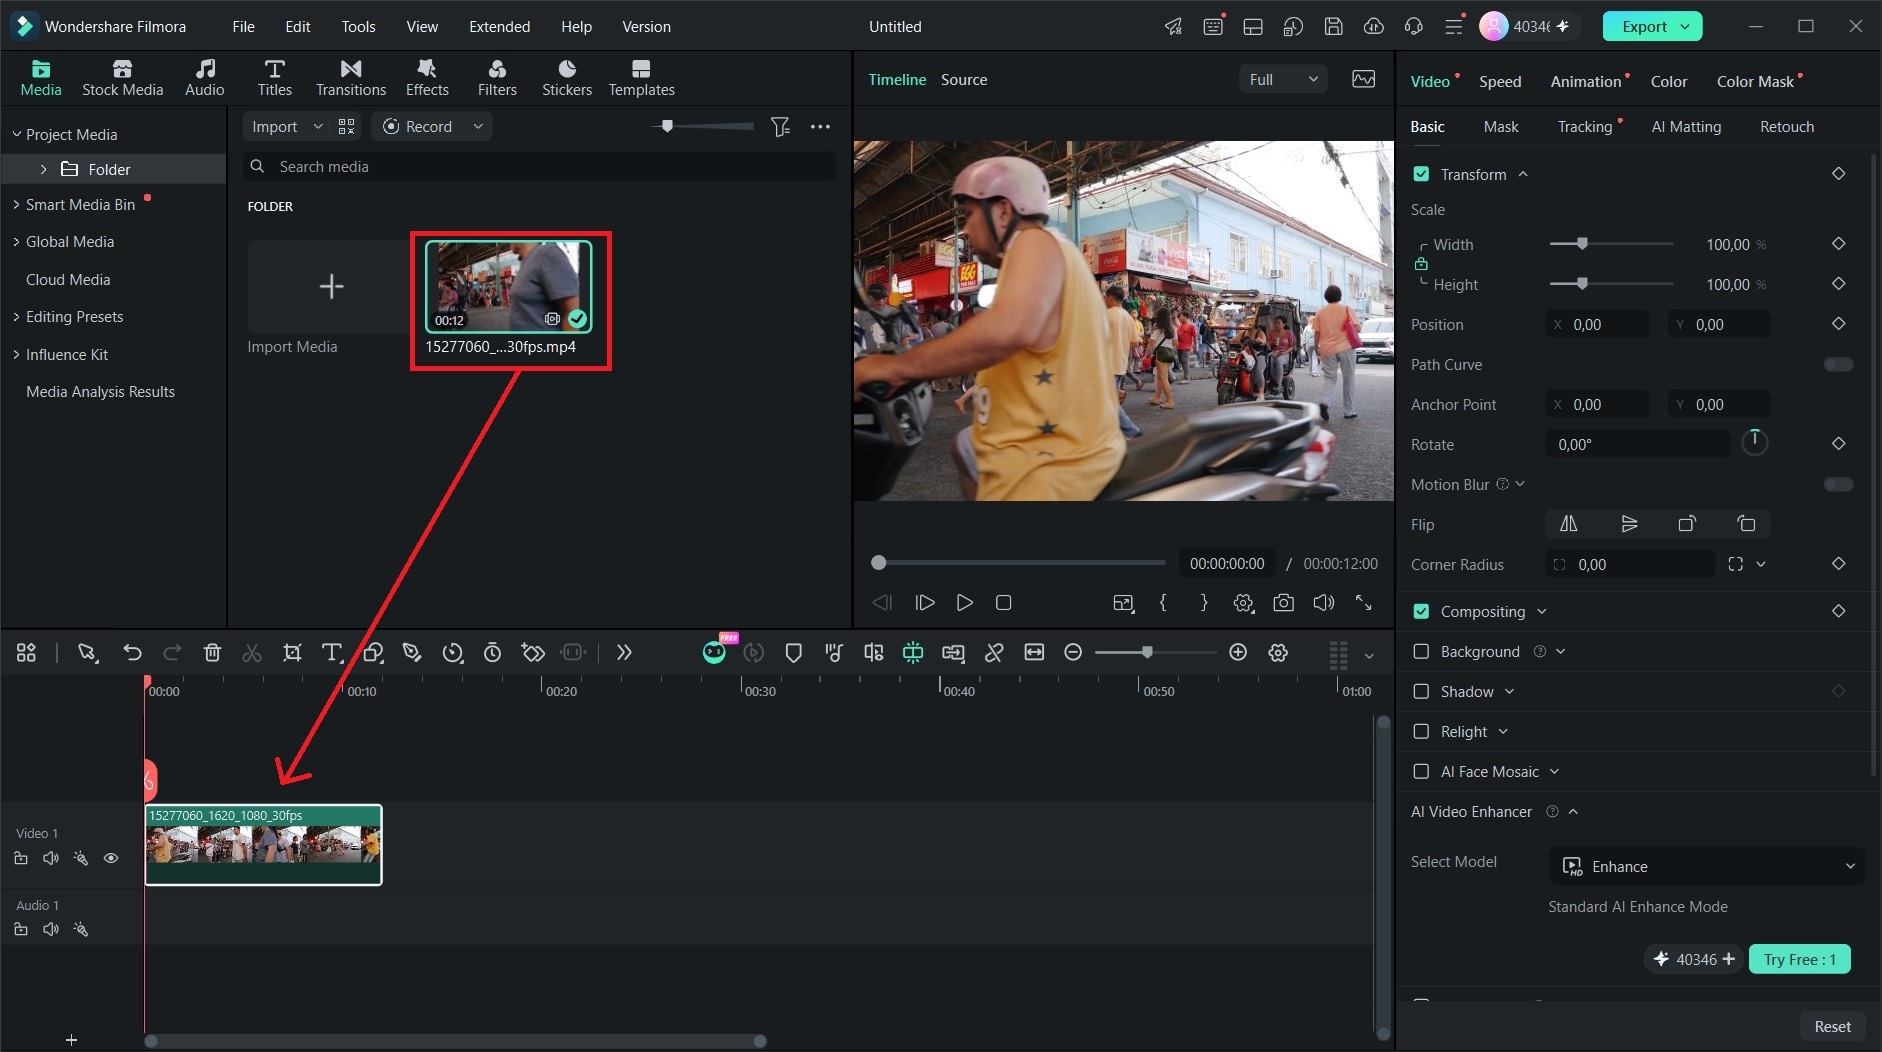
After clicking Import to upload your video, drag your clip below to the editing timeline.
Step2Choose a Text Style and Set Its Position
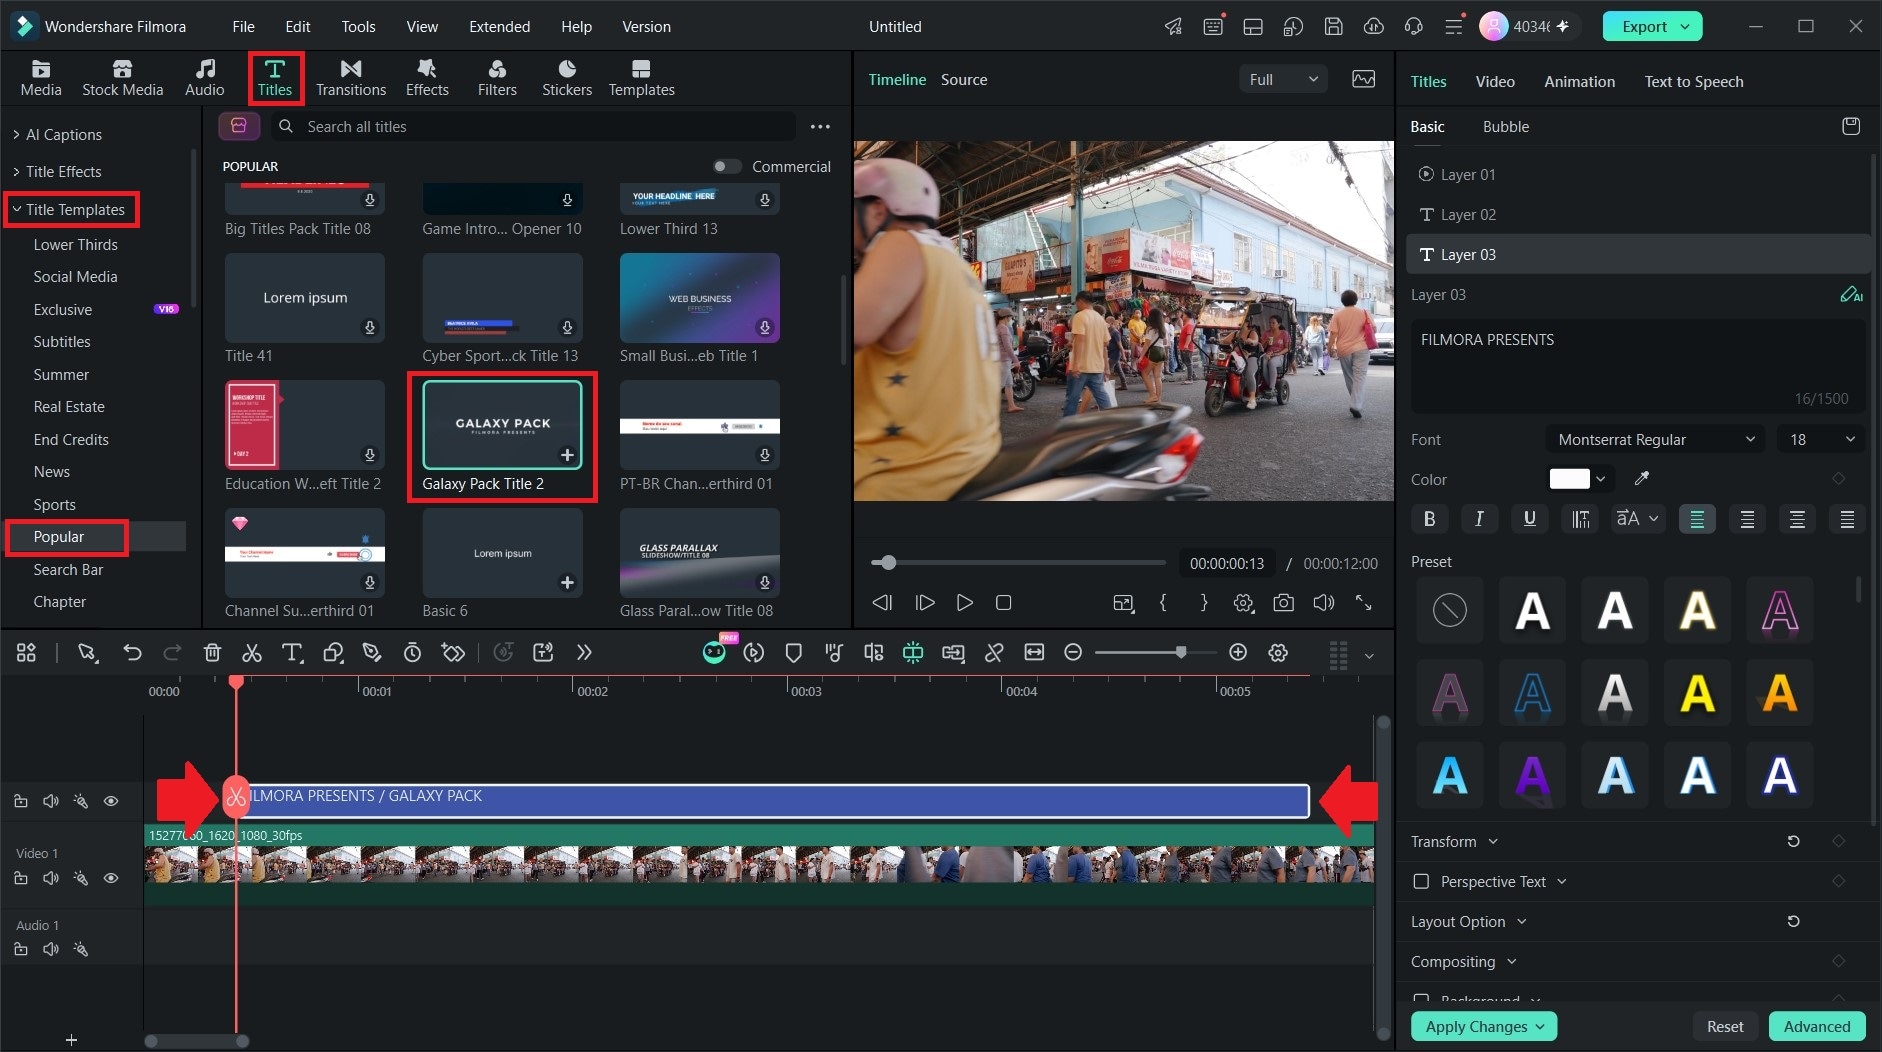
Select Titles to see the available text templates and find a style you like. Here, we'll go with Galaxy Pack Title 2. Then, adjust its position on the timeline to choose when the text appears and disappears in your video.
Step3Add Your Text and Customize It
Replace the sample text with your words. For this example, we'll use SUNDAY MARKET. You can then customize the font, size, color, style, and other settings to match your project. Click Export to save the final video.
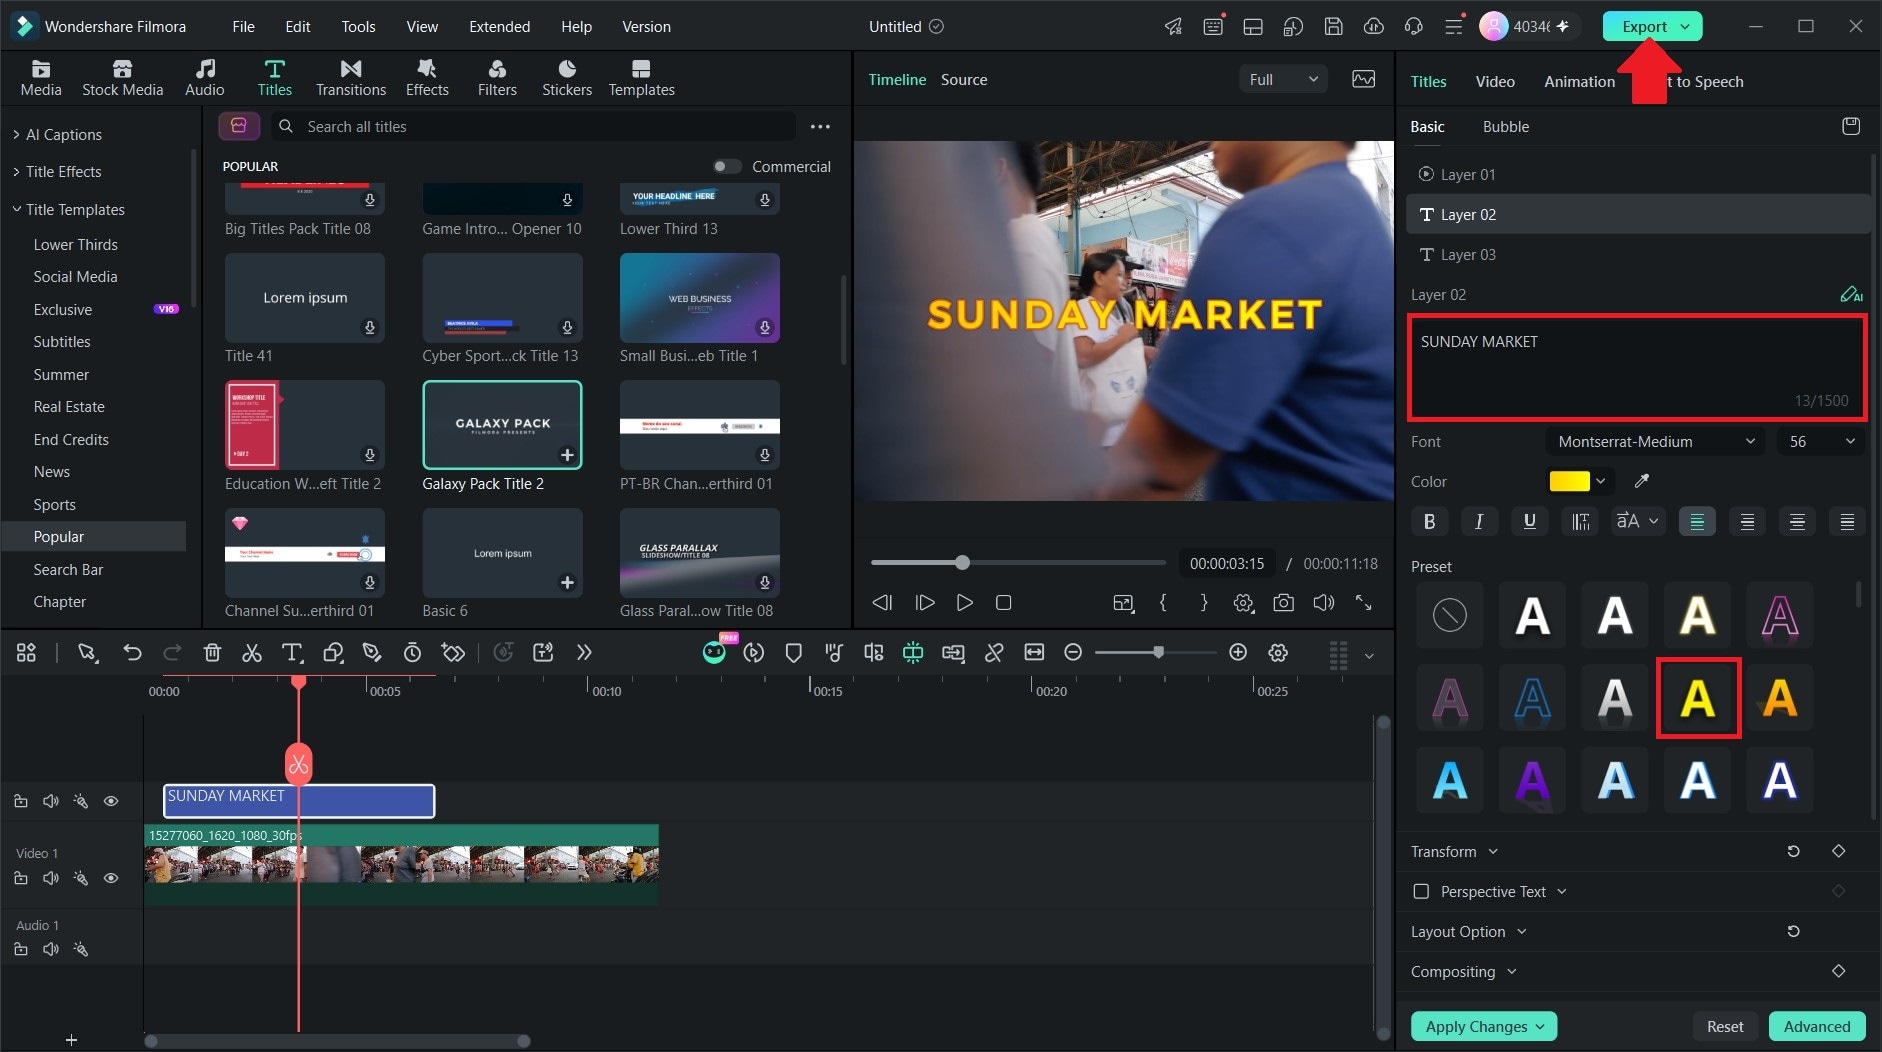
This is what the final result looks like. The template gives the text a more dynamic look and adds another visual element to the video. It also saves time since you don't have to create every text element from scratch.

Conclusion
WordArt is a practical option to add some visual style to a document. Although it is commonly associated with Microsoft Word, you can also use WordArt in Google Docs directly from your browser. As shown in our tutorial on how to add WordArt in Google Docs, you can create your own WordArt in just a few clicks and customize its basic appearance.
Explore more creative ways to use stylized text with Filmora. Combine your text with photos and videos. Filmora offers a wider range of text templates, visual elements, and animation features that let you create more dynamic designs.
FAQs
-
1. Can I animate WordArt in Google Docs?
No. Google Docs WordArt is limited to static, two-dimensional text. -
2. Can I download Google Docs WordArt as an image?
Yes. You can copy your WordArt into the drawing window and download it as an image file, such as PNG or JPG. -
3. Can I make 3D WordArt in Google Docs?
No. You can customize the fill and border colors, font, and other basic formatting options, but there is no built-in 3D effect. -
4. Can I add WordArt to Google Docs on mobile?
No. The Drawing tool and WordArt feature are available on the desktop web version of Google Docs.
