One of the most significant benefits of joining online meetings instead of in-person ones is that you can easily record them for later use. With a Teams screen recording, you can always revise the meeting, extrapolate important information you might've overlooked at the time, share meeting snippets with coworkers or teammates, and more.
But how do you screen record on Teams? Does Microsoft offer a built-in recorder? Should you install a third-party tool? How does it all work? Let's check it out.
In this article
Does Microsoft Teams Have a Built-in Screen Recording Feature?
Let's start with the basics – does Microsoft Teams have a screen recorder? Technically, yes, it does. A built-in feature lets you record video, audio, and all screen-sharing activity during your meetings. It won't capture the chat, whiteboard activity, annotations, shared notes, or any type of content shared by apps running in the background.
There's another catch – you can't record the screen in Teams without a meeting. The built-in recording option is designed for meetings only, so if you want any other type of screen capture, you'll be better off using a different tool.
Who Can Record the Screen in Microsoft Teams?

Before looking into the Microsoft Teams screen recorder, you'll need to know that the tool isn't available to everyone with an account. There are some criteria you'll have to meet.
- You'll need to have the appropriate Teams license. Applicable licenses include Office 365 Enterprise E1, E3, E5, F3, A1, A3, A5, M365 Business, Business Premium, or Business Essentials.
- You'll need your IT admin to enable recording permissions.
- You'll need to be either the meeting organizer or belong to the organization hosting the meeting.
How to Screen Record on Teams With the Built-in Recorder?
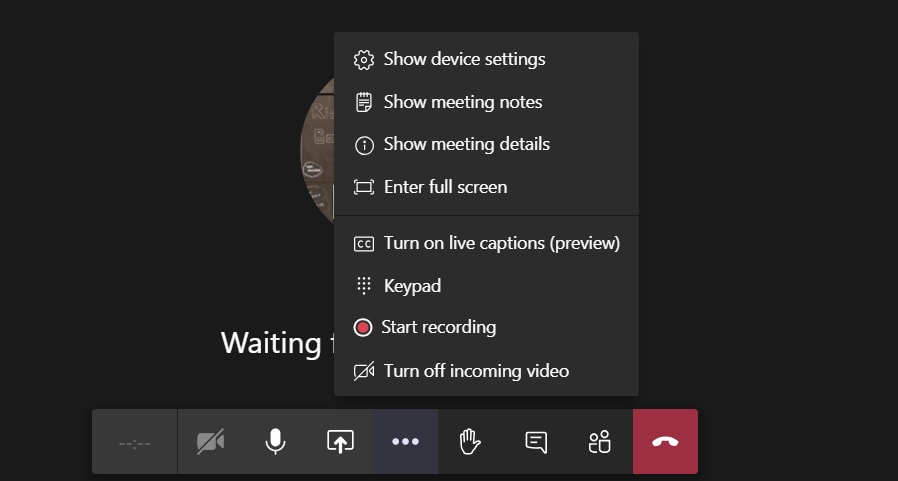
If you meet all the criteria, getting started with screen recording in Microsoft Teams is a breeze. It all takes just a few steps:
- Launch your Microsoft Teams app and join or start a meeting;
- Go to the control bar and select More actions (three dots icon);

- Click Start recording;
- To end the recording, go to More actions > Stop recording.

Advantages and Disadvantages of Using the Teams Screen Recording Feature
If you want to screen record using Teams, the built-in tool is convenient. However, it does have its shortcomings. Here's a brief overview of the major pros and cons that you should be aware of.
Using Third-party Software to Record Teams Screen Without Meeting
Although Microsoft Teams screen recording can be helpful, it leaves much to be desired. It can be highly limiting, and the fact that it notifies everyone of the recording can be somewhat awkward. It requires starting a meeting to record the team's screens.
In that case, if you want to record the team's screens without a meeting, you'll need a different solution if you want more flexibility and discretion.
Wondershare Filmora offers exceptional screen recording capabilities, allowing you to capture high-resolution videos of your screen with the utmost ease. You can seamlessly use it to record your meetings in MS Teams or any other platform, for that matter – all without notifying other attendees!
You can fully customize your recording area, capturing your entire screen, a specific window, or a specific part of the screen. Record system sounds, microphone input, and your webcam to boot. You can also enable keystroke and mouse click effects to ensure that your cursor movements are perfectly visible.
Considering this is primarily a professional editing tool, you can make your recording look flawless without worries. Enhance the video and audio quality, trim and cut your clips, add unique effects and filters, and then enrich it with background music. Create fun transitions, automatically generate captions, and turn your simple screen captures into professional-looking videos.
How to Screen Record on Teams With Filmora?
For a professional tool, Wondershare Filmora is surprisingly easy to use. It takes just a few steps to start capturing your screen:
- Launch Wondershare Filmora on your device and sign in to your account;
- From the main menu, select Screen Recorder;

- Open the app that you want to record (for MS Teams meetings, join the meeting);
- Adjust the screen area you want to record – Full Screen, Custom, Target Window, or input custom video length and width;

- Enable/disable microphone, system audio, and webcam;
- Expand Settings to adjust Recording mode, Frame Rate, Quality, Record Timer, and more;

- When you're ready, click the red Record button to start recording;
- Click the Stop button to stop recording.

When you're done, go straight to Wondershare Filmora's editor and start perfecting your screen capture. Otherwise, you'll find the complete recording in the save path you've selected.
Using Built-in Recorder vs Third-Party Software
| Features | Microsoft Teams | Wondershare Filmora |
| Discreet recording | ❌ | ✅ |
| Recording length | 4 hours | Unlimited |
| Automatically stop recording | ❌ | ✅ |
| Customizable recording area | ❌ | ✅ |
| Editing capabilities | ❌ | ✅ |
| Recording quality | ⭐⭐⭐⭐ | ⭐⭐⭐⭐⭐ |
Conclusion
Microsoft Teams screen recording can be a convenient option if all you need to record are your meetings. However, the MS Teams screen recorder can be limiting.
If you need more discretion, flexibility, and versatility, you'll need a tool like Wondershare Filmora. It can capture anything happening on your screen – be it a Microsoft Teams meeting, an online video, a video game, or simply your blank desktop background.
It provides excellent quality recordings and comes with a full-featured video editor that can enhance your screen capture for professional-looking results.


