
 100% Security Verified | No Subscription Required | No Malware


 ChatGPT
 Perplexity
 Gemini
 Claude
 Grok
Grok
Want to record your gameplay on a Mac? It's awesome for sharing epic moments, streaming live, or making cool tutorials. However, Macs can sometimes be a bit tricky in terms of performance, compatibility, or simply lacking great built-in tools.
No worries, though! This guide is designed to help you with both easy and advanced methods for recording your gameplay on a Mac.

In this article:

Part 1. How to Record Gameplay on a Mac Using Built-In Tools
Mac users don't need to look far to start recording gameplay. macOS includes two built-in tools that can help you capture your screen without installing anything: QuickTime Player and the Screenshot Toolbar. Both are easy to use and work well for casual gaming, tutorials, or short game clips. These tools are ideal for users who want to record gameplay on a Mac without the need for third-party software.
Use QuickTime Player
QuickTime Player is one of the easiest ways to record gameplay on Mac. It's already installed on every Mac and works well for basic screen recordings.
How to record gameplay on Mac using QuickTime Player:
Step 1. Launch QuickTime Player
Open QuickTime Player from your Applications folder.
Step 2. Start a new screen recording
Click the File menu at the top and select New Screen Recording.

Step 3. Select audio input and recording area
Click the dropdown next to the record button to choose your microphone. You can also select the full screen or just a portion.
Step 4. Begin recording
Click the Record button, then start your gameplay. QuickTime will capture everything on screen.

Step 5. Stop the recording
When finished, click the Stop button in the menu bar at the top of the screen. The recorded video will open in a new window, ready to save.

Best for:
- Casual gamers who want to record gameplay on a Mac with minimal effort
- Students or hobbyists making walkthroughs or game-based tutorials
Use macOS Screenshot Toolbar
Another way to record gameplay on a Mac is by using the Screenshot Toolbar. It's fast, simple, and available on macOS Mojave and newer versions.
How to record gameplay on Mac using the Screenshot Toolbar:
Step 1. Open the Screenshot Toolbar
Press Command + Shift + 5 on your keyboard. This opens the toolbar with screen recording options.
Step 2. Choose your recording type
Select whether to record the entire screen or just a selected window or area.

Step 3. Start recording
Click the Record button. Begin your gameplay session as the recording takes place in the background.
Step 4. Stop the recording
Click the Stop button in the menu bar to finish. The recording will automatically save to your desktop.
Best for:
- Mac users capturing short gameplay clips, such as puzzle or turn-based strategy games
- Content creators recording user interface walkthroughs or in-game settings
| Feature | QuickTime Player | Screenshot Toolbar |
| Ease of Use | Simple and clean interface | Quick access with keyboard shortcut |
| Audio Recording | Supports microphone input only | Supports microphone input only |
| Performance | Lightweight for casual use | Minimal system impact |
| Editing Options | No editing built-in | No editing built-in |
Part 2. Best Game Recording Software for Mac [Free & Paid Options]
Using built-in tools is a good start, but they have limitations. If you want more control over audio, video quality, webcam overlays, and editing features, you need dedicated game recording software for Mac. These tools are designed to meet different needs, from basic recording to professional content creation.
In this section, you will find the most recommended game recorders for Mac, along with step-by-step instructions and ideal use cases.
Wondershare Filmora
Wondershare Filmora offers an easy yet powerful way to record and edit gameplay on a Mac. It combines a screen recorder and a full-featured video editor, making it perfect for beginners and content creators who want an all-in-one solution.

 secure download

How to record gameplay on a Mac using Filmora:
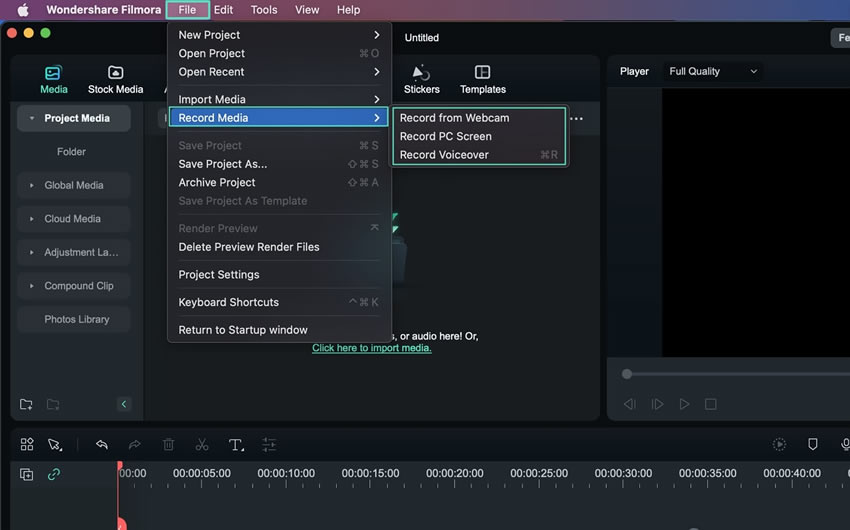
Step 1Open the Screen Recorder
- On the main screen, click the Screen Recorder tab.
- Go to the Files tab, choose Record Media, then select your recorder.
- Use the search bar under the toolbar, expand the Record option, and pick a method.
Step 2Choose the Screen Resolution
Click the Square icon to select your recording area. You can choose full screen, a custom area, or a specific window. You may also adjust the screen size manually by setting the length and width.

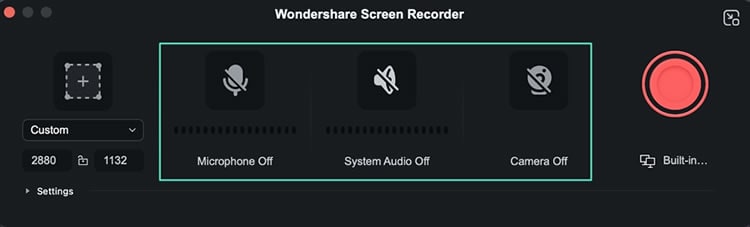
Step 3Select Your Audio and Video Sources
You can enable or disable your microphone, system audio, and webcam. Filmora allows you to record all three at once or just the ones you need.
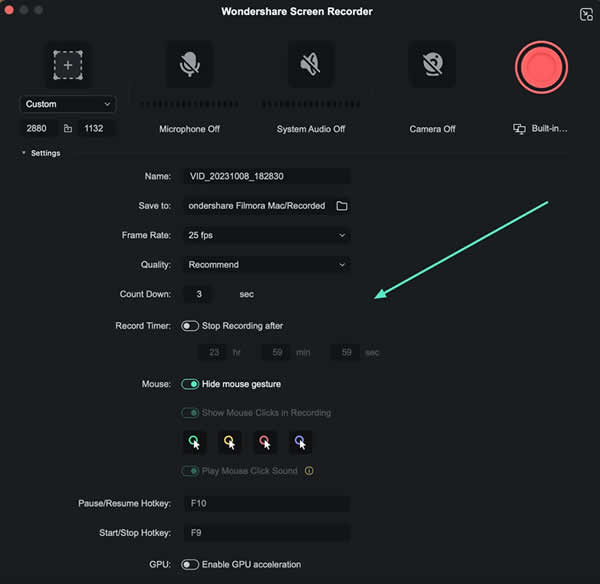
Step 4Customize Additional Settings
Click the Settings option at the bottom left. Here, you can configure resolution, frame rate, file location, and other preferences.
Step 5Start Your Gameplay Recording
Click the red Record button to begin. A countdown will appear, and you can skip it by selecting Start Directly. You will also see options to pause, stop, or re-record if needed.

🎮 Once your gameplay is recorded, Filmora helps you polish it with smart, easy-to-use editing features designed for gaming content:

- Trim and Cut Highlights - Quickly remove loading screens or uninteresting moments to keep your gaming video engaging.
- Add Overlays & Effects - Use animated elements, health bars, and pop-up text to recreate a pro gaming video style.
- Auto Subtitles (Speech-to-Text) - Instantly generate subtitles from your commentary, ideal for walkthroughs or reaction clips.
- Motion Tracking - Pin text or effects to in-game characters or objects that move, making your gameplay more dynamic.
- Split-Screen & Picture-in-Picture - Combine gameplay with webcam footage or other clips for commentary, tutorials, or reactions.
Best for:
- YouTubers and content creators who want to record and edit gameplay in one place
- Beginners looking for an intuitive game recorder for Mac with built-in editing tools
secure download OBS Studio

OBS Studio is a free and open-source game recording software for Mac. It is widely used by streamers and advanced users because of its high customization and live streaming capabilities.
How to record gameplay on Mac using OBS Studio:
Step 1. Add your game source
Open OBS and go to the Sources panel. Choose Display Capture or Window Capture to select the game you want to record.
Step 2. Set resolution and frame rate
In the settings menu, configure your preferred resolution and FPS. Common options are 1080p at 30 or 60 frames per second.
Step 3. Start recording or streaming
Click the Start Recording button. You can also choose Start Streaming if you want to broadcast your gameplay online.
Best for:
- Streamers who need custom overlays, webcam input, and real-time chat features
- Advanced users who want full control over audio sources, encoding, and video settings
ScreenFlow

ScreenFlow is a premium screen recorder with built-in editing features. It is especially useful for instructional videos and gaming tutorials.
How to record gameplay on Mac using ScreenFlow:
Step 1. Select the screen and audio input
Open the app and choose the screen, microphone, and system audio you want to capture.
Step 2. Record your gameplay session
Click the Record button. ScreenFlow will capture everything based on your selected settings.
Step 3. Edit your recording in the timeline
Once recording is done, the video opens in the editor. You can add transitions, zoom effects, voiceovers, and annotations.
Best for:
- Educators making instructional gaming content
- Tutorial creators who want high-quality visuals, annotations, and smooth voiceover sync
Capto

Capto is a lightweight recording tool for Mac that is easy to use. It includes basic editing and annotation features, making it a good fit for low-spec systems or users who need fast results.
How to record gameplay on Mac using Capto:
Step 1. Select your screen area
Launch Capto and define the part of your screen you want to capture.
Step 2. Start recording gameplay
Click the Record button. Capto will begin capturing your screen based on your selection.
Step 3. Annotate and export your video
After the recording, you can trim the clip and add annotations like text or highlights. Then export your video in the format you need.
Best for:
- Strategy game players or educators recording game analysis or walkthroughs
- Users on lower-spec Macs who need lightweight, easy-to-use tools
| Feature | Filmora | OBS Studio | ScreenFlow | Capto |
| System Audio | ✅ Built-in | ✅ With plugin (e.g., BlackHole) | ✅ Built-in | ❌ Not supported |
| Microphone | ✅ Built-in | ✅ Built-in | ✅ Built-in | ✅ Built-in |
| Game + Mic (Dual) | ✅ | ✅ | ✅ | ❌ |
| Extra Setup Needed | ❌ | ✅ Yes for system audio | ❌ | ✅ |
Key Takeaways
- Filmora and Screen Flow are the most convenient if you want to record gameplay with both game sound and mic on Mac without extra setup.
- OBS Studio is powerful, but requires you to install an additional plugin like BlackHole to capture internal audio.
- Capto is limited to microphone-only recording and does not support in-game sound.
If capturing gameplay with full sound is important to your workflow, choose software that supports dual audio recording without a complex setup.
Part 3. How to Optimize Your Mac for Smooth Gameplay Recording
Recording gameplay on a Mac can strain your system, especially during longer sessions or when running resource-heavy games. To ensure smoother performance and higher video quality, it is important to prepare your Mac before you start recording. These simple adjustments can help reduce lag, prevent dropped frames, and produce clearer audio and visuals.
Close background apps
- To improve performance while recording gameplay on Mac, reduce background processes and system load before you begin.
- Quit unused apps such as email clients, chat tools, or file sync services. These apps can consume memory and CPU resources in the background.
- Turn off visual effects like dynamic wallpapers, screen widgets, or animations to lower GPU usage during recording.
- Close browser tabs or exit the browser entirely to prevent memory overload from multiple open pages.
- If you're using macOS Sonoma or later, enable Game Mode to prioritize your game and recording software. This helps reduce input lag and keeps your frame rate more stable.
Adjust Recording Settings Smartly
- To avoid performance drops, adjust your recording resolution and frame rate based on your Mac's capabilities.
- Lower the resolution or FPS if you are using an older Mac or running a demanding game.
- A resolution of 1080p with 30 or 60 FPS is ideal for most gameplay recordings.
- Set separate audio channels for system sound and microphone input if your software allows. This makes post-editing easier and ensures clear audio capture.
Storage and Output Tips
- Recording high-quality gameplay requires sufficient storage space. Use these tips to manage your files efficiently:
- Save recordings to an external drive or SSD. This keeps your internal drive free and reduces the risk of performance drops during long sessions.
- Choose compressed video formats such as MP4 or MOV. These formats are easier to upload and edit.
- Enable automatic backups to cloud services like iCloud or Google Drive. This ensures you have a safe copy of your footage and saves local disk space.
Conclusion
Recording gameplay on a Mac can be simple and effective with the right approach. Built-in tools like QuickTime Player and the Screenshot Toolbar offer quick solutions for basic screen capture. For higher quality and more features, using game recording software for Mac, such as Filmora, OBS Studio, ScreenFlow, or Capt,o provides better control, sound recording, and editing options.
Choosing the right game recorder for Mac depends on your goals, but every tool in this guide can help you record gameplay on a Mac with clarity and confidence. Follow the tips provided to capture and create content that looks and sounds professional.
secure download 