FaceTime has become one of the most used means of communication with friends, relatives, and business partners. It has impressive features of high-quality video and audio and is one of the main applications for video calling, mainly on Apple devices.
But can you screen record FaceTime? And if so, how to record FaceTime with audio? Welcome to this ultimate guide on recording FaceTime calls.
In this article
Is It Legal to Record FaceTime Calls?
Normally, it is legal if both parties are notified to record FaceTime calls. But you need to check the laws of your state to see if it is legal.
If you just want to keep or remember the important or happy things when talking with your friends, it is a good way to record so they can be watched anytime. It is also valuable to record FaceTime conversations to document meetings, presentations, or client interactions in business settings.
How to Record FaceTime Calls on Mac/PC?
If you're using a Mac, one of the easiest ways to record a FaceTime video call is through QuickTime Player. Here, we will share steps about how to record FaceTime calls with audio on Mac using the built-in hotkey method and save the file instantly.
Method 1: Record FaceTime Calls on Mac Using Hotkeys
Step 1: Start FaceTime Call
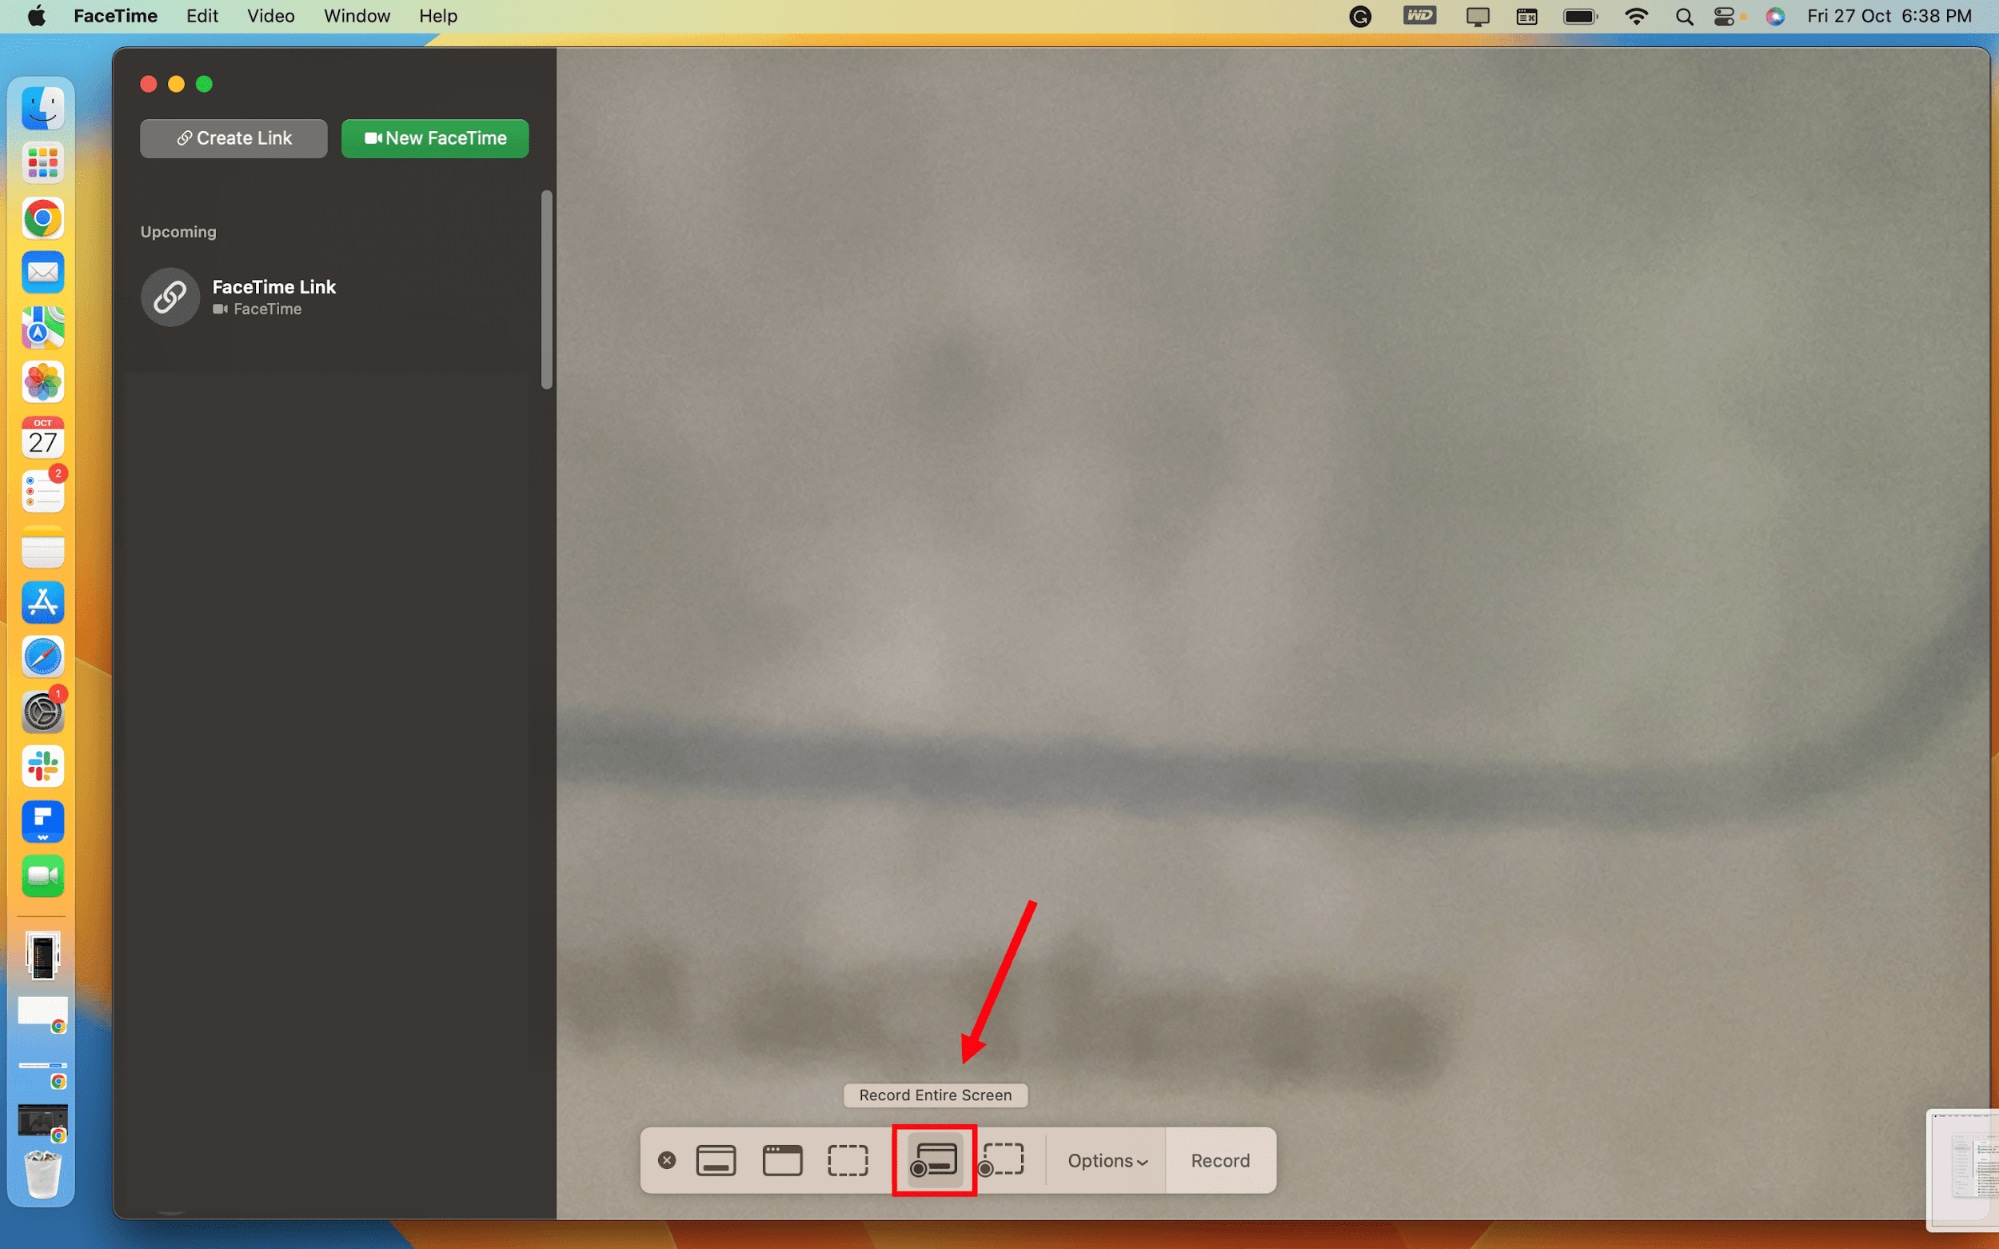
Initiate a FaceTime session on Mac and simultaneously, press the keys CMD + Shift+ 5 on the keyboard. When you click on this it will open up the screen recording utility window.
In the top menu bar, you'll find a list of options: Choose "Record Entire Screen" and then go to "FaceTime" from the list of options.
Open FaceTime and select the Record Entire Screen option
Step 2: Start the recording process
Click "Record" to start the recording process. Once you do that, the Mac built-in screen recorder will begin to record your FaceTime call.
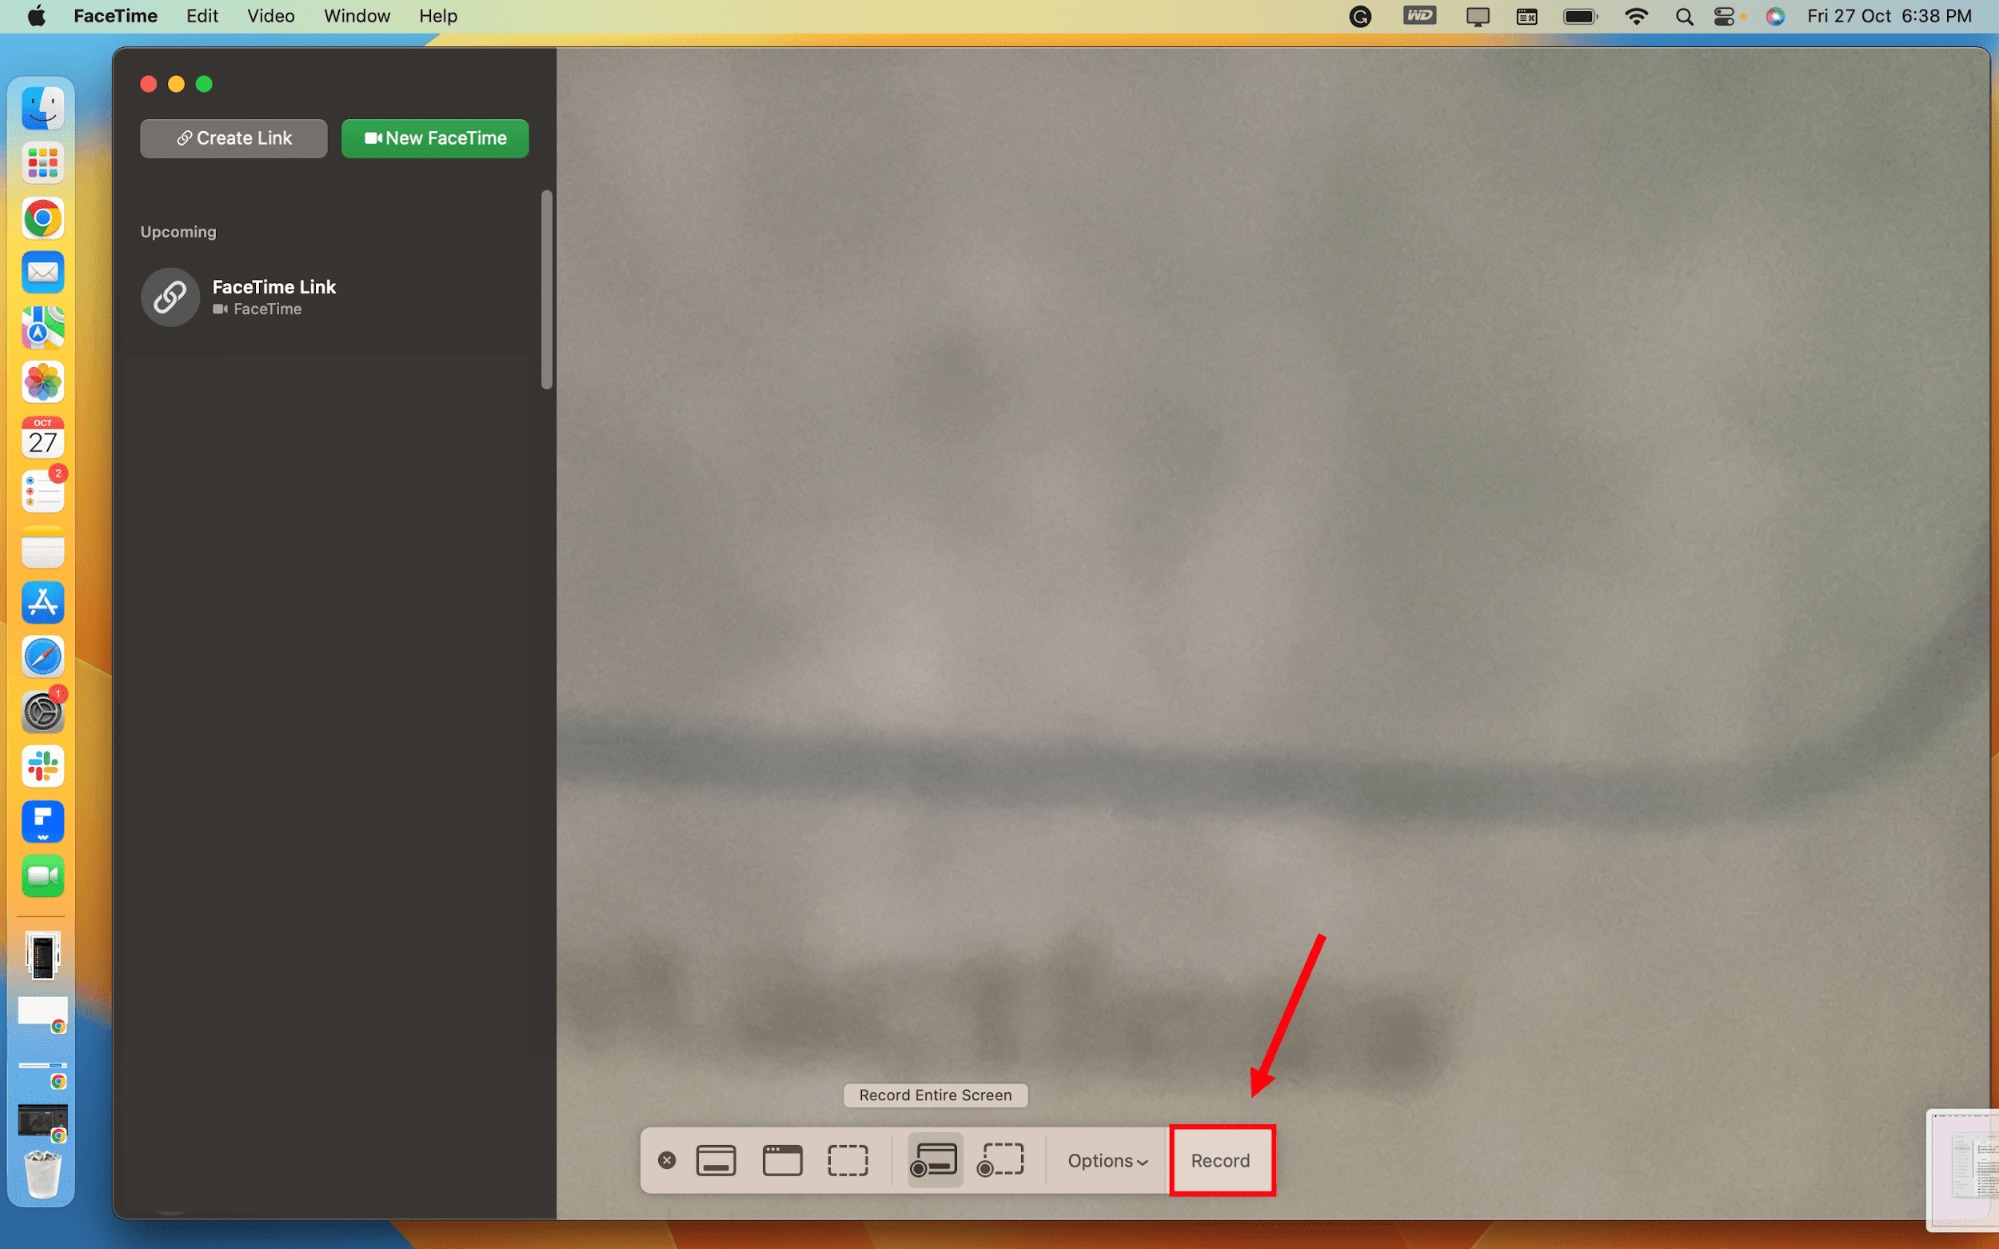
After the call has been completed, you press the keys on your Mac's keyboard—CMD + Control + Esc –which opens the screen recording utility window in its original form, then press the "Stop" button.
Your FaceTime recording will be saved in the Mac Movies folder with the date added to its name for easy identification.
Method 2: Record FaceTime Calls with Audio with QuickTime
Although you can record almost anything on your screen with QuickTime player, it can only capture the screen with your microphone. If you want to screen record FaceTime with the system sound simultaneously, it seems impossible unless you have a microphone. We will walk you through the steps to get the task done:
Step 1. Download the Soundflower Plugin
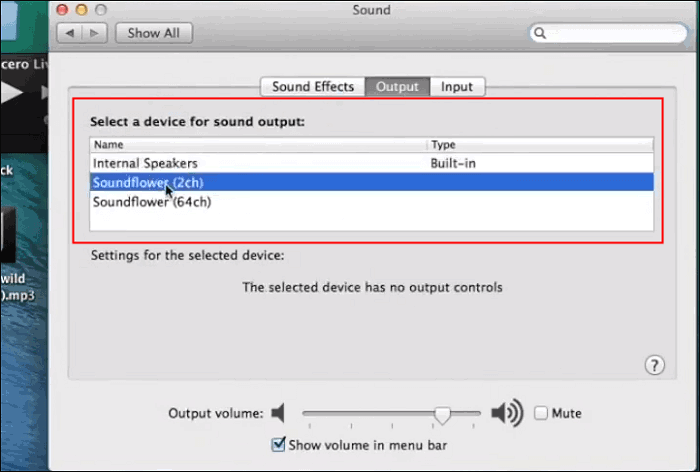
Download the Soundflower Plugin and set it as the default output device on your MAC computer. To do so, go to the Finder, select System Preference> Sound > Output, and click on Soundflower (2ch).
Step 2. Go to QuickTime player
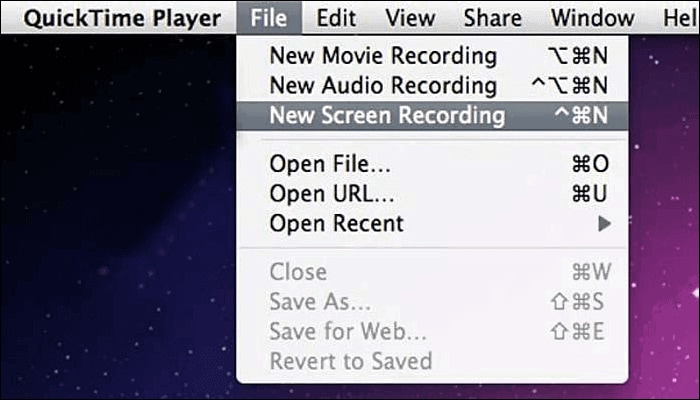
Open the QuickTime Player, and go to the File tab > New Screen Recording. A new window will then appear. Then go to the right side of the window > click on the arrow down > select the Soundflower (2ch) here.
Step 3. Go to FaceTime call
Now click on the FaceTime option on the screen of your Mac. In the menu bar at the top of the screen click on FaceTime > Preferences. In Settings, set Microphone input to the right source, whether built-in or external.
Step 4: Start capturing
Go to the FaceTime Mac and start making a call. Then, in the QuickTime Player, you click on the red button to start capturing. To complete the mission, use the stop button.
Method 3: Record FaceTime Calls on PC/Mac with Audio Completely
While QuickTime Player and built-in screen recorders are convenient, they cannot record audio correctly until you install a plugin. There's an even more powerful tool for recording FaceTime calls with audio completely—Wondershare Filmora. This versatile software works for both Windows and Mac, and it offers advanced features that make it superior to native apps like QuickTime.
- High-Quality Video and Audio Recording: Capture FaceTime calls in full HD, along with clear, crisp audio.
- Internal and External Audio Recording: Unlike some screen recording apps, Filmora can record both the system audio and microphone input simultaneously.
- Powerful screen recording capabilities: It supports recording screens, webcams, and audio at the same time.
- No Time Limit: Filmora doesn't impose recording time limits, making it ideal for longer FaceTime calls, like business meetings or interviews.
- Multi-Device Compatibility: Filmora works seamlessly on both Mac and Windows, unlike QuickTime, which is limited to Mac.
- Editing Capabilities: While QuickTime can only record, Filmora allows you to edit, trim, and fine-tune your recordings for a professional touch.
- Best Video Quality: Record FaceTime calls in top quality at up to 4K video resolution.
How to Use Filmora for Screen Recording FaceTime on Mac or PC?
- Download and install Wondershare Filmora on your computer.
- Open the "FaceTime" app on the Mac.

- Launch Filmora > New Project > Record > Go to Record PC Screen.
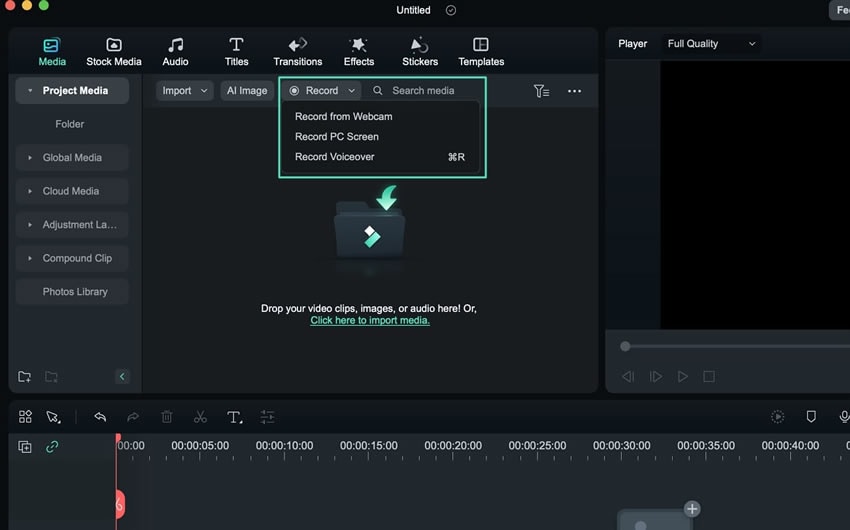
- Now open the FaceTime call and choose the area of the screen you wish to record (in this case, the FaceTime window)
- Begin your FaceTime call and press the red button to Start Recording in Filmora. The software will capture the entire call in HD quality. Make sure to turn on the microphone to record the call with audio.

- After the call, you can press F9 to stop recording and edit the recording in Filmora's timeline, adding captions, trimming, or exporting it in different formats.
How to Record Facetime on An iPhone or iPad?
Recording a FaceTime call on an iPhone or iPad is easier than you might think, thanks to the built-in Screen Recorder feature. Here's how you can do it.
Method 1: Record FaceTime Calls with Inbuilt iOS Screen Recorder
iPhone's built-in feature to capture the screen is one of the simplest ways to record FaceTime calls on iPhone. You can use it on iOS 11 or later versions.
Step 1: Enable Screen Recording in the Control Center
Go to Settings > Control Center. Scroll down to find Screen Recording and tap the green Add icon.
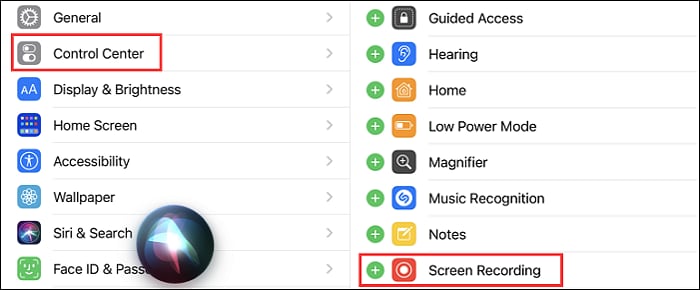
Step 2: Open the Control Center
Go to the top-rightward of the screen, and you find the Control Center.
Step 3: Turn On Microphone for Audio Recording
All that you have to do is to press and hold the button. Click the Microphone icon to allow capturing the external sound.
Step 4: Start Your FaceTime Call
If you are using an iPhone, iPad, or Mac computer, tap on the FaceTime icon and enter your video conference.
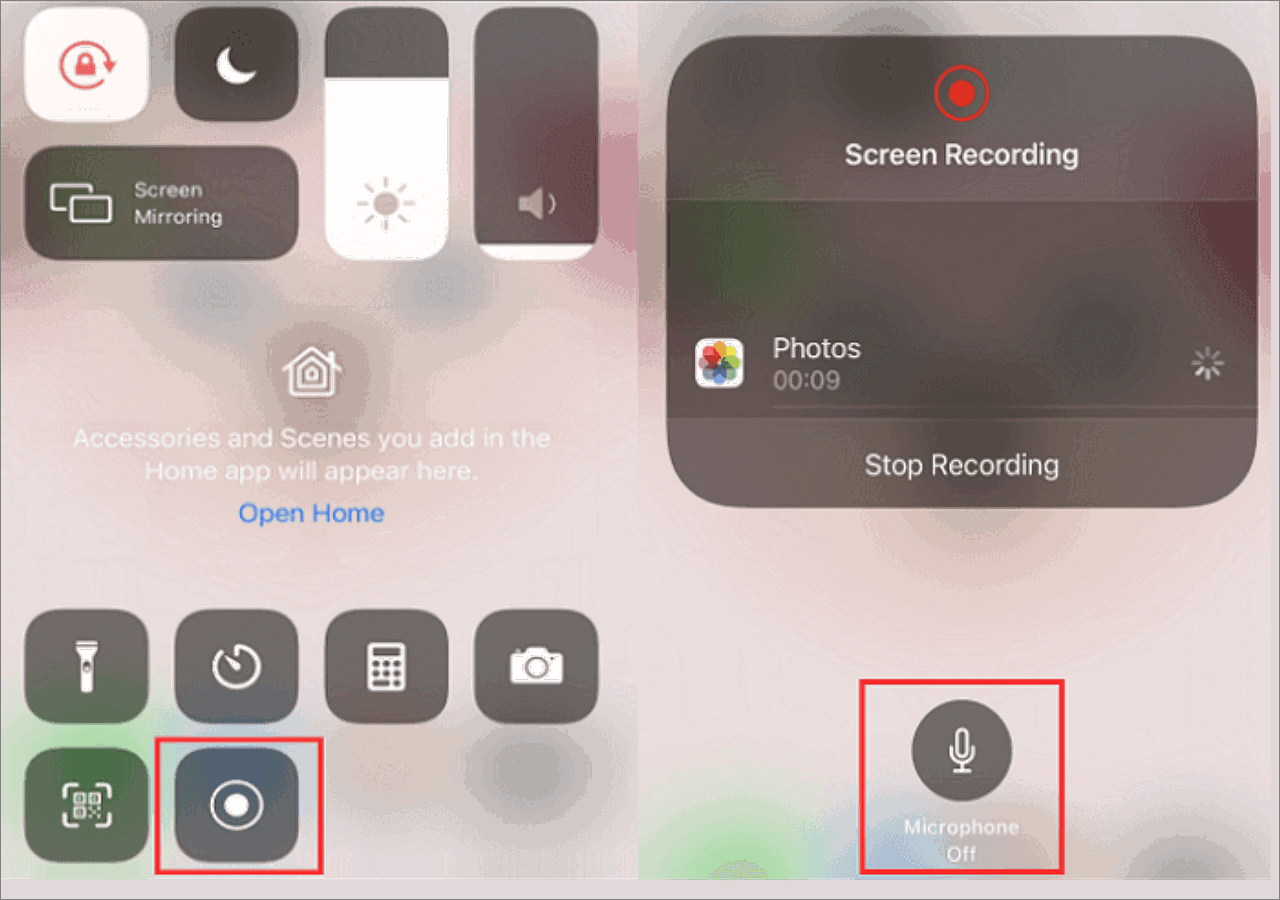
Step 5: Start Screen Recording
Return to the Control Center and select the Screen Recording button to record.
Step 6: Return to FaceTime and Continue the Call
After that, go back to FaceTime and proceed with your video call once the recording is initiated.
Step 7: Stop the Recording
When you're done, hit the red strip across the top left of the screen, to stop the video. After capturing your video through the recording button, it will be saved in the Photos application.
Method 2: Record FaceTime on iPhone Using a Third-Party App
Using the built-in iOS screen recorder does not operate at its best most of the time. Sometimes, it has issues in capturing audio from the call, it restricts its users to overlay over specific apps, and the screen recording cannot be edited. Due to these constraints, most users resort to third-party iOS screen recorder options and Record It! Now let's see how to record a FaceTime using the third-party app called Record It.
Step 1: Download and Install Record It!
Go to the App Store, download, and install Record It! on your iPhone.
Step 2: Start a FaceTime Call
Open the FaceTime app and initiate your video call.
Step 3: Open Record It! App
Swipe to the Home screen and launch the Record It! app.
Step 4: Start Screen Recording
Tap the red Circle button in the Record It! app. Hit Start Broadcast to begin recording the FaceTime call.
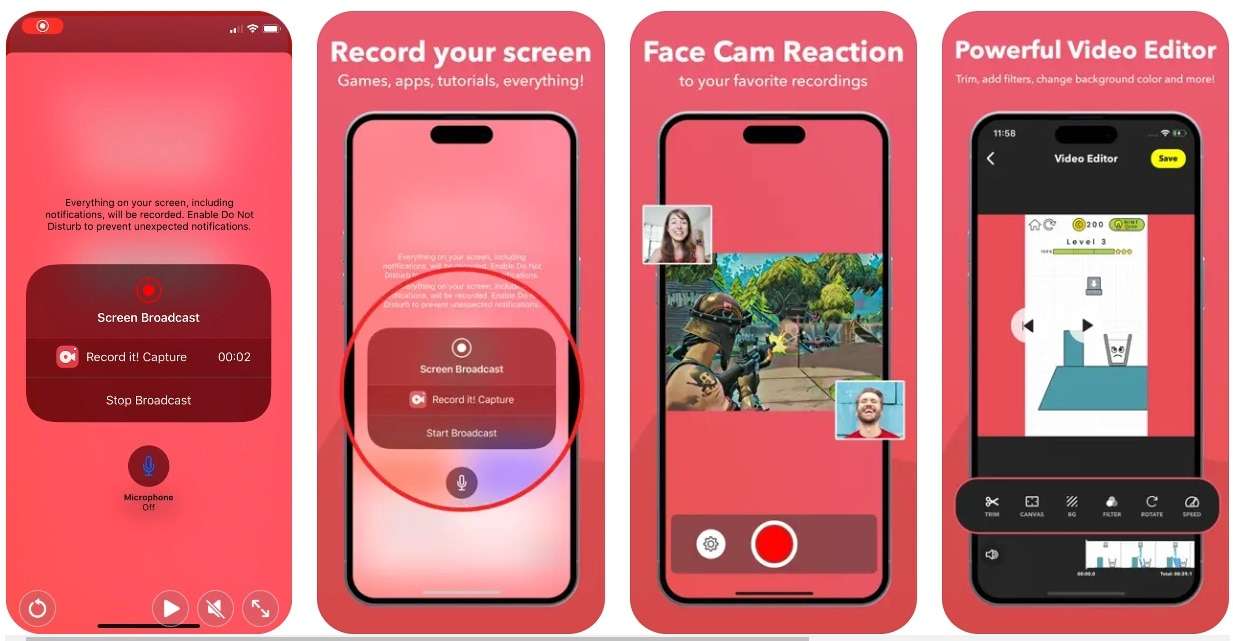
Step 5: Return to FaceTime
Go back to your FaceTime call and continue as usual while the recording is active.
How to Record FaceTime Calls on An Android?
FaceTime can only be accessed by Apple device holders, but recently, Android users have been invited to a FaceTime call through a link shared by a counterpart Apple user. However, Android does not have a FaceTime application, so there are other ways to record these calls.
Method 1: Record FaceTime Calls with an Android Built-in Recorder
When you are on an Android and try to join a FaceTime call, you can capture the call using third-party screen recording applications such as AZ Screen Recorder or the DU Recorder.
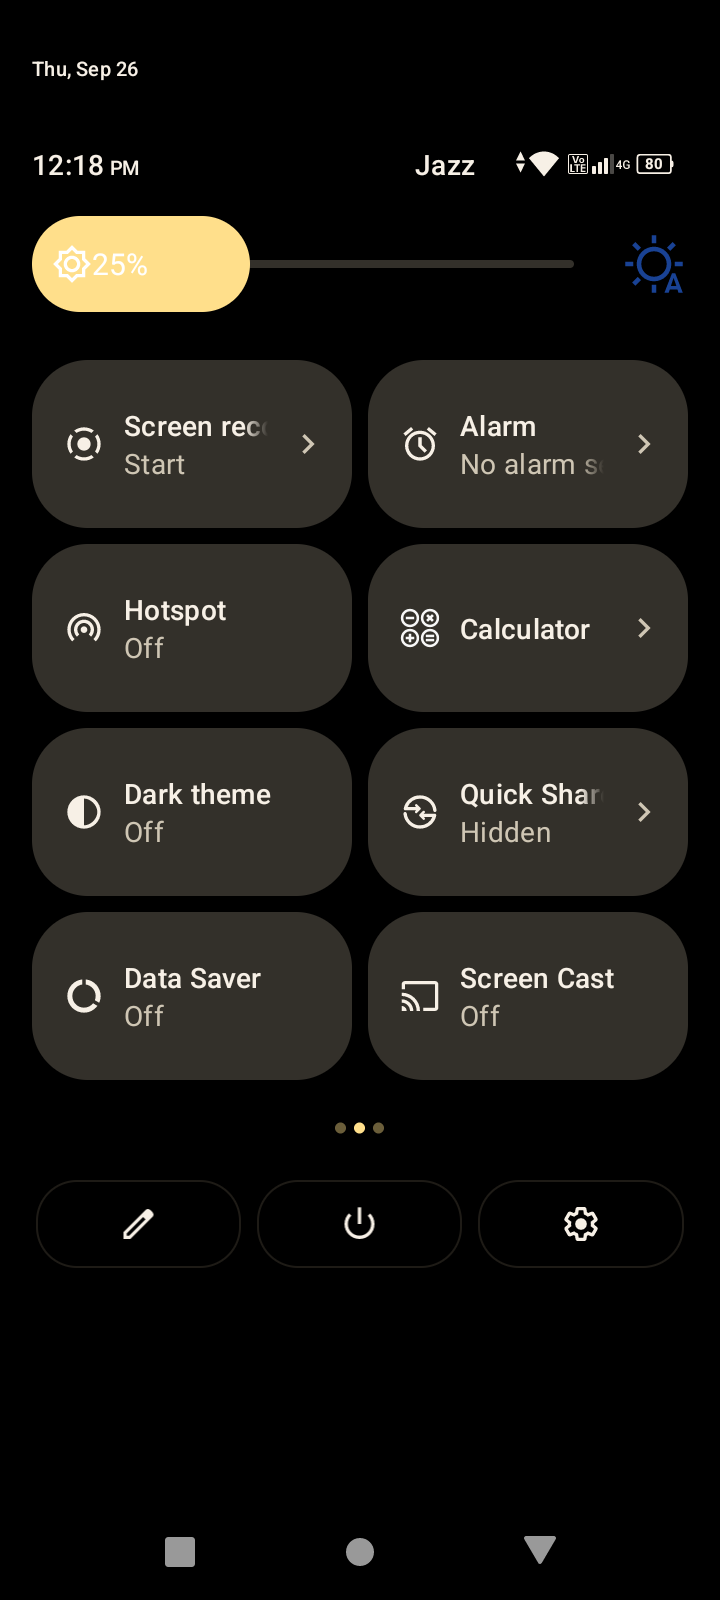
Step 1: Open the Inbuilt Screen Recorder
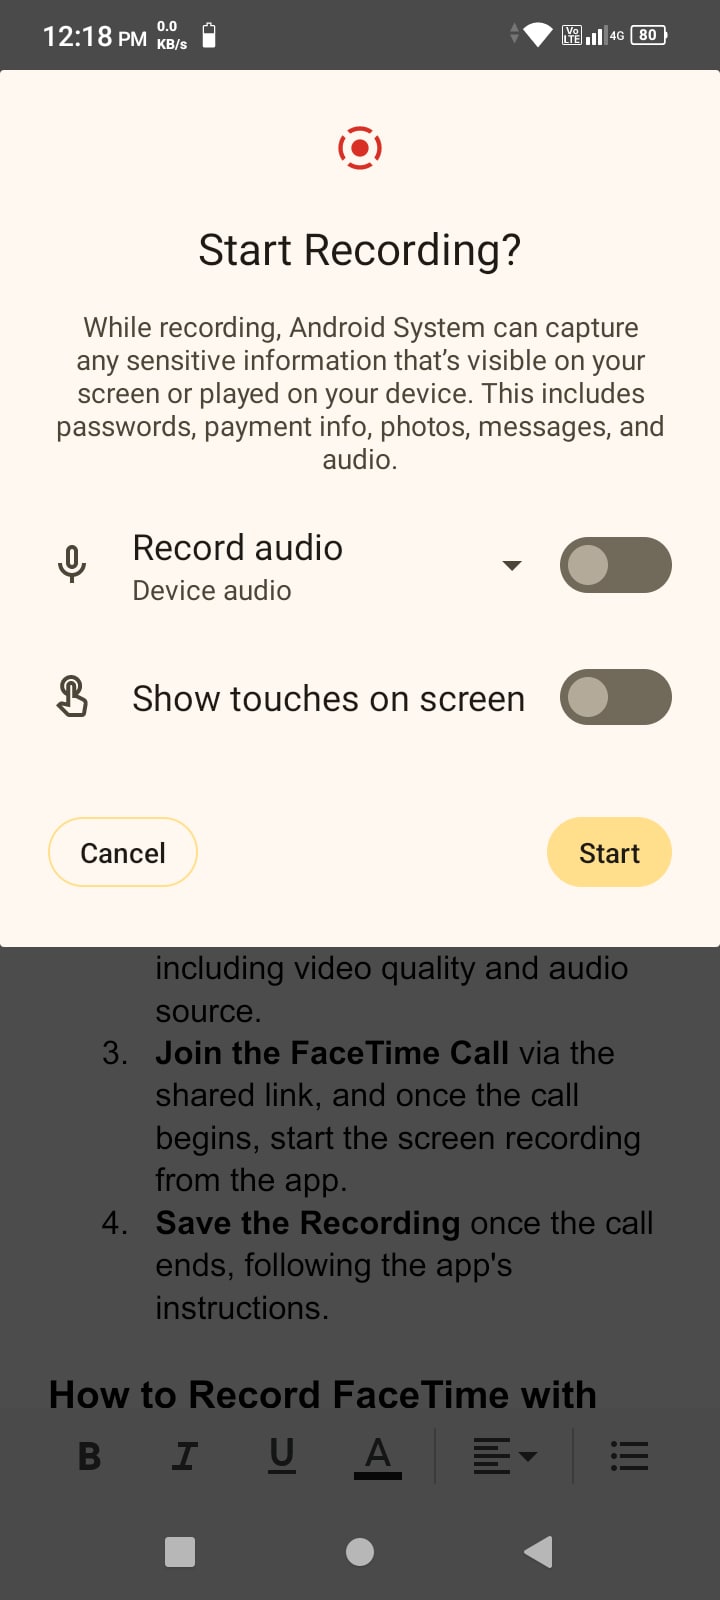
Launch the Built-in Screen Recorder from Quick Settings and adjust the recording parameters, such as the quality of the video or the preferred source of the audio.
Click the FaceTime link shared and enter the call, once the call is active, begin the screen recording from the app.
Step 2: launch FaceTime with the link you get
You need to receive a FaceTime call link from an Apple device user; tapping it opens it in the default browser.
Step 3: Give necessary permissions
FaceTime usually prompts the user to allow the application to access the camera or microphone. Tap Allow and click Join.
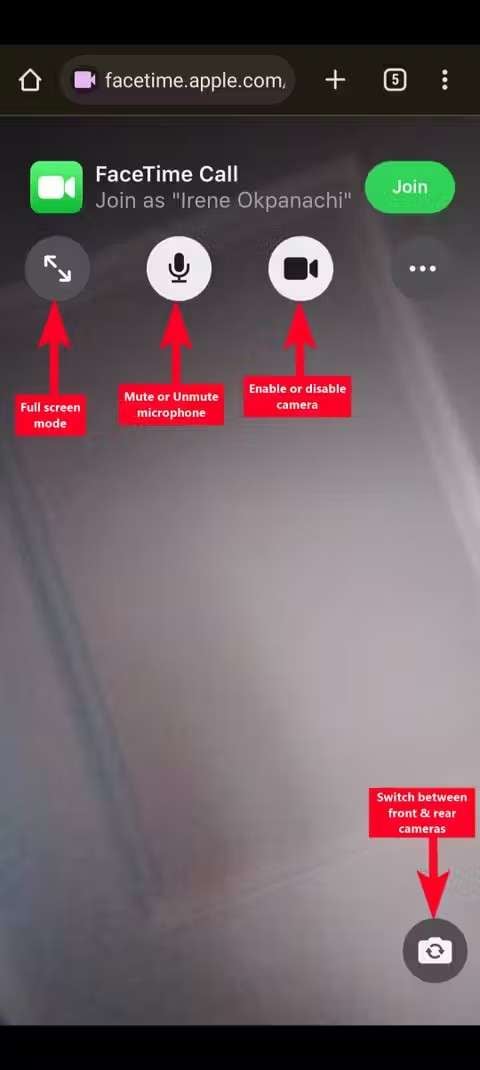
Step 3: Add necessary details
Type your name in the text box, then tap Continue.
Step 4: Save the Recording
Once the call ends, follow the app's instructions.
Method 2: Record FaceTime with Audio on Android Using Third-Party App
Many screen recording apps on Android allow you to record both the screen and external audio. However, recording internal audio might require additional settings, such as using a root app or enabling developer options, depending on the Android device. If you don't want to root your device to record internal audio, you can look for a third-party app to record Facetime with Audio on Android devices.
Step 1: Download and Install AZ Screen Recorder from the Google Play Store.
Step 2: Go to Settings, and tick Record Audio. There are also options to select the audio source or turn on the microphone.
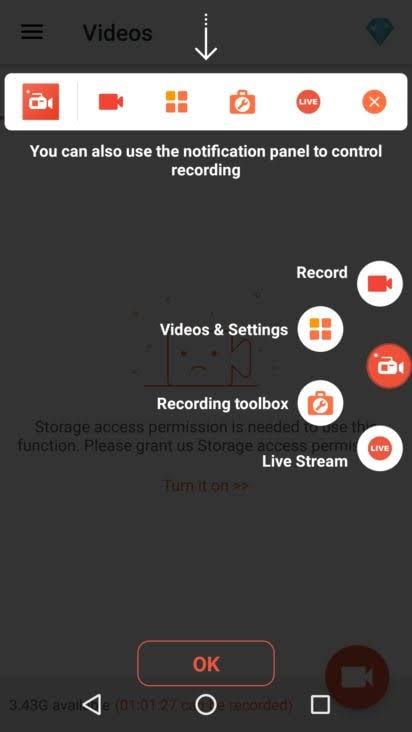
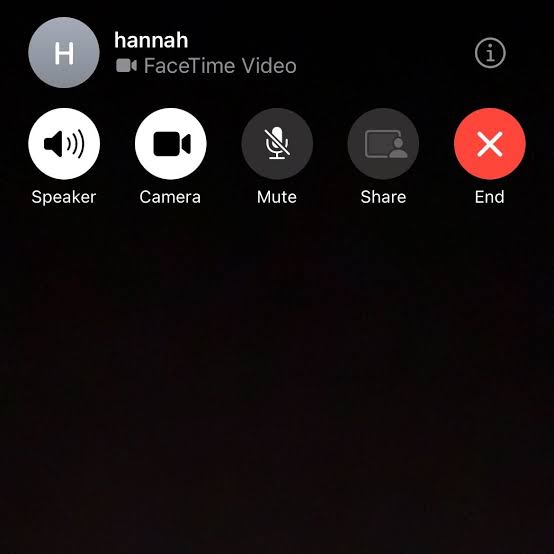
Step 3: To record your FaceTime call, tap the camera icon in the overlay that shows up before you begin your call. In the real scenario, once you start recording, you should connect to your FaceTime call.
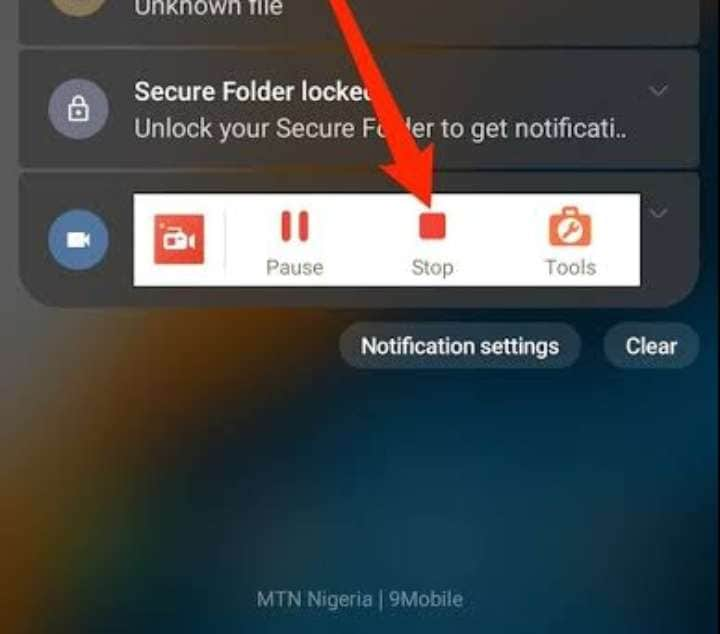
Step 4: swipe down on your screen to pull up the notification panel and touch the Stop icon to save the screen recordings.
How to Record FaceTime Conversations Online?
You can use any online call recorder to record and stream the contents of the FaceTime call with audio online. Here are the steps to use Notta online free screen recorder.
- Navigate to Notta online screen recorder official website.
- Click on the Record Screen tab.

- Choose your recording modes.

- Click on "Start Recording" and then on "FaceTime". When you are through with the call, you notice the red button where you can stop the recording.

- Click on the stop sharing to finish recording.

Conclusion
Through following this guide, you can learn how to record a FaceTime on PC, mobile, and online; If you think it takes too many steps by using the built-in methods, feel free to try Wondershare Filmora as it doesn't limit any screen recording time and it can record audio and screen simultaneously!
FAQs
-
Can I record a FaceTime Call with audio?
Yes, you can. On iPhones, you must enable the microphone option in the Screen Recording settings to capture external audio. For Macs and PCs, we suggest you use Wondershare Filmora to record FaceTime calls with audio with high quality. -
Why is there no sound when I screen-record FaceTime?
The default screen recorder on iPhones only captures video, not internal audio from the app. If you want to capture external audio then always make sure to tap on the screen recording button in the Control Center and turn on the microphone icon. Or you can look for an alternative like Filmora to make sure to record Facetime sound with 100%. -
How to record FaceTime with audio on Android?
On Android, you can use third-party screen recording apps like AZ Screen Recorder, which allow you to record both the screen and audio during a FaceTime call.


