Have you ever wondered how one can make their videos unique? It's no secret that effects and filters can enhance the overall look of your video content. An engaging and well-produced video grabs the viewer's attention. Not only this, but it also keeps them hooked until the end of the video. The essence is that a visually appealing video is paramount in today's digital age.
However, you don't have to worry about adding a professional touch to your videos. The answer to your concern lies in video LUTs. It is a precise way of taking specific RGB image values to modify your video's colors. Moreover, it also helps in maintaining consistent color grading across various scenes and shots. 3D LUTs give your video a unified and professional look, which will be discussed in the article.
In this article
A cross-platform for making videos anywhere for all creators!

Part 1: What is a 3D LUT?
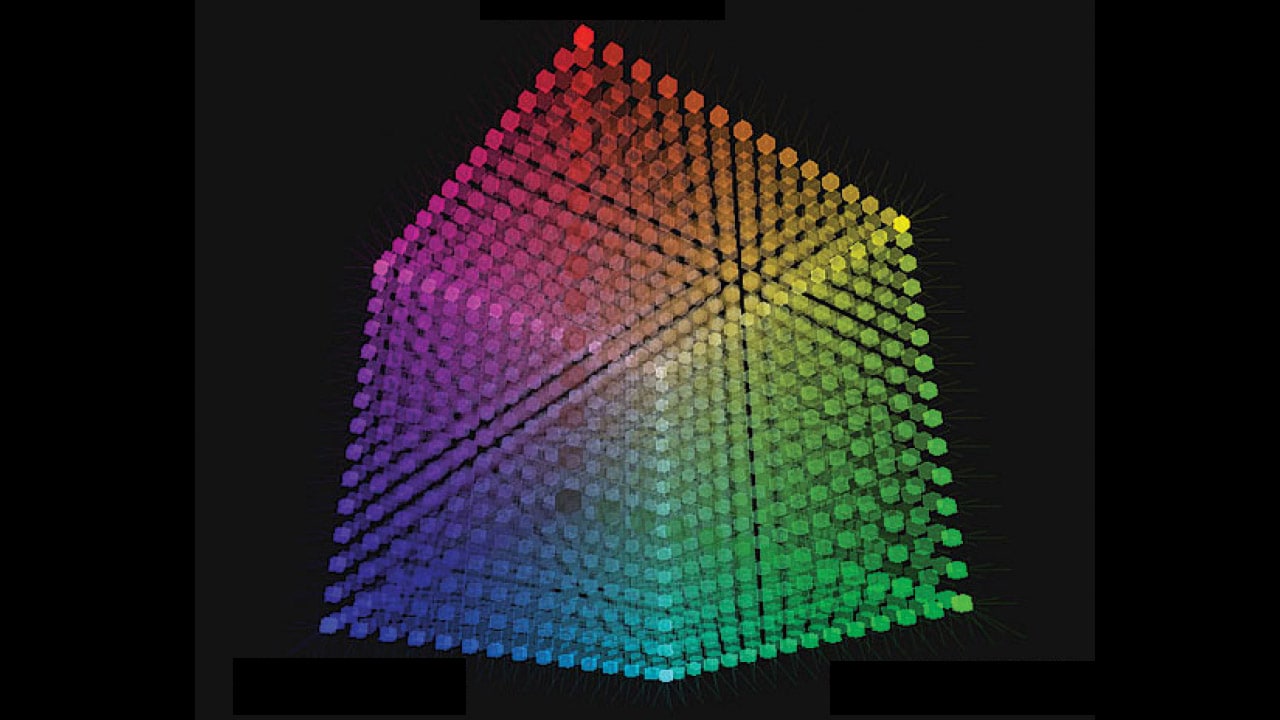
You've surely heard of a 3D LUT, especially in video editing. A 3D LUT (Lookup Table) is a sophisticated utility that enhances your images and videos. Professionals in digital media production use it to modify the color and brightness of an image. It takes an input value, like a color in an image, and generates an output value. This change of values further modifies the appearance of the color in your video.
By mapping each color in an image to a new one, 3D LUTs provide consistent and precise color transformations. Some LUTs are simple, changing one color to another. However, other LUTS can have more complex effects. Moreover, the beauty of a 3D LUT lies in its ability to work on combinations of colors. This ability helps maintain the original image's integrity while transforming it consistently.
Part 2: What Are The Uses of 3D LUTs in Video Editing?
3D LUTs stand for three-dimensional lookup tables. They're used in video editing to let editors color-grade their videos. So, first, understand their uses in detail.
- Making Color Corrections: One use of 3D LUTs is color correction. When you shoot a video, the colors may not be perfect. They might need tweaking to look natural. This is where 3D LUTs come in to adjust the colors to look more balanced.
- Applying Color Grades: 3D LUTs also apply color grades to your videos. They help to change the video's overall color tone. It's not about fixing color mistakes but about giving the video a certain mood. You can also think of it as applying a filter to your video.
- Ensuring Consistency: Video editors use LUTs to keep colors consistent in their videos. This is crucial when you're working on a long video project. You want the colors to look the same throughout the video. For this purpose, video LUTs can help you with ease.
- Speeding Up the Process: Moreover, video LUT editors can speed up your editing process. Color grading can take time if you do it by hand. However, using LUTs, you can apply color grades quickly. This saves you time, which is important when you're on a tight deadline.
- Previewing Your Work: Another use of 3D LUTs is for previewing your work. When you're editing, you want to know how the final product will look. With LUTs, you can preview the color grade, as this lets you make changes if needed.
- Creating a Unique Style: With LUTs, you can create a unique style for your videos. You can use these LUTs to make your videos stand out. They give your videos a unique color palette that suits your style. This further helps your work look distinctive.
- Adapting for Different Screens: Lastly, LUTs are also used to adapt videos for different screens. Screens have different color spaces. Your video might look different on each screen or dimension. 3D LUTs help ensure your video looks good on all screens.
Part 3: Introduction to Wondershare Filmora: A Haven For Effective LUT Editing
Wondershare Filmora is a video editing software that makes the job easy for you. Whether you are a beginner or have more advanced editing skills, Filmora is there for you. This tool is equipped with advanced features that let you create professional-quality videos. A noteworthy feature of Filmora is its powerful color grading options. You can change, modify, or even redo the color tone of your video content.
From color correction to fine-tuning your video's color balance, Filmora makes it all possible. Recently, the video editor has stepped up its game by offering dedicated Filmora LUTs options. This opens a whole new dimension to color grading your videos. You can now apply different LUTs for Filmora to your videos directly. Each preset provides a unique color grade that can significantly elevate the look of your video.
Key Features Of Wondershare Filmora
- Filmora gives complete freedom and more than 900 effects to edit your videos creatively. You can add transitions, titles, video effects, filters, and motion elements to your videos.
- The audio ducking feature lets you professionally fade your music to make your dialogues stand out. This feature allows you to emphasize the dialogues in your video effortlessly.
- With the beauty filters in Filmora, you can alter your nose, face, eyes, skin tone, and other elements. These beauty filters allow you to add enhancements to your face effortlessly.
Part 4: How to Apply 3D LUTs to Your Videos Using Wondershare Filmora?
Are you looking to find a way to apply Filmora LUTs to your video? You're at the right place, as this portion will guide you on how to do it step by step:
Method 1: Application via Effects Tab
Step 1Initiating the Process
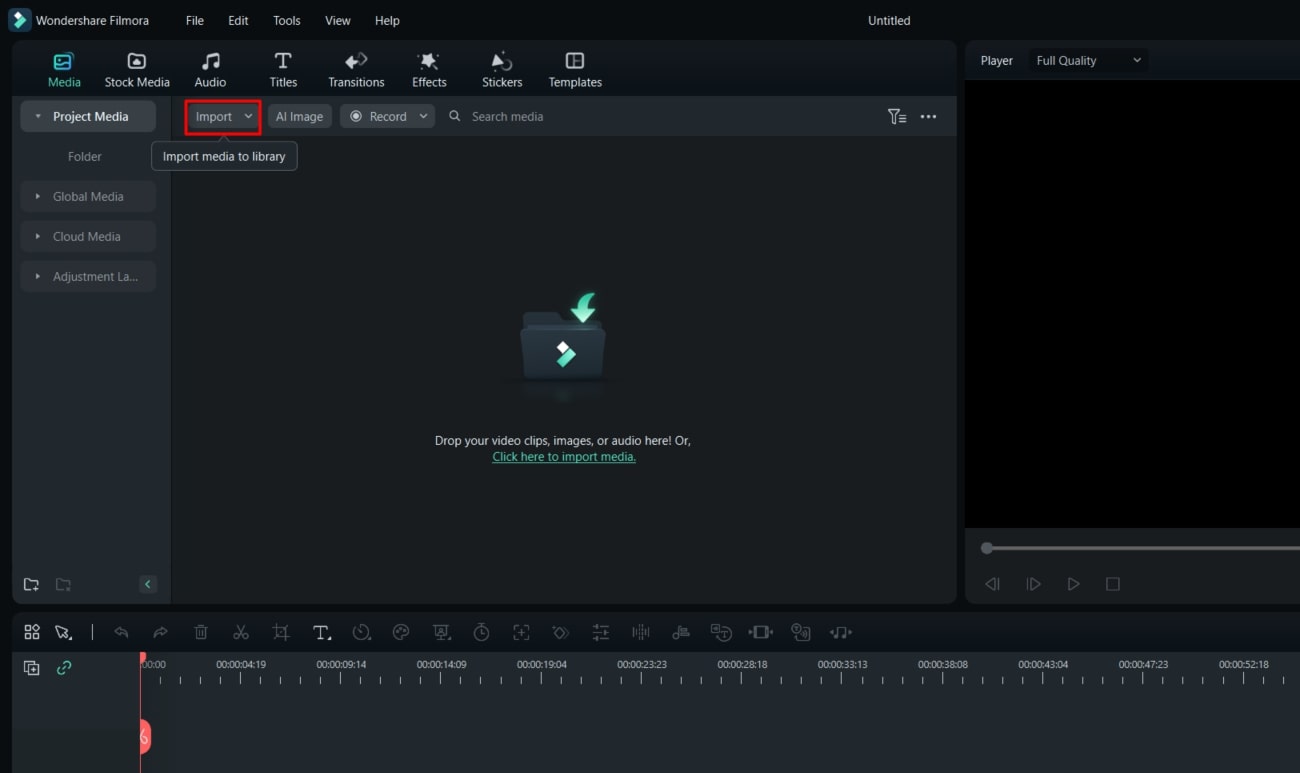
Open Wondershare Filmora to start the process of applying LUTs. Choose "Create Project" from the left panel and proceed to "New Project". In the new window, click the "Import" button to bring your video into the timeline.
Step 2LUT Selection
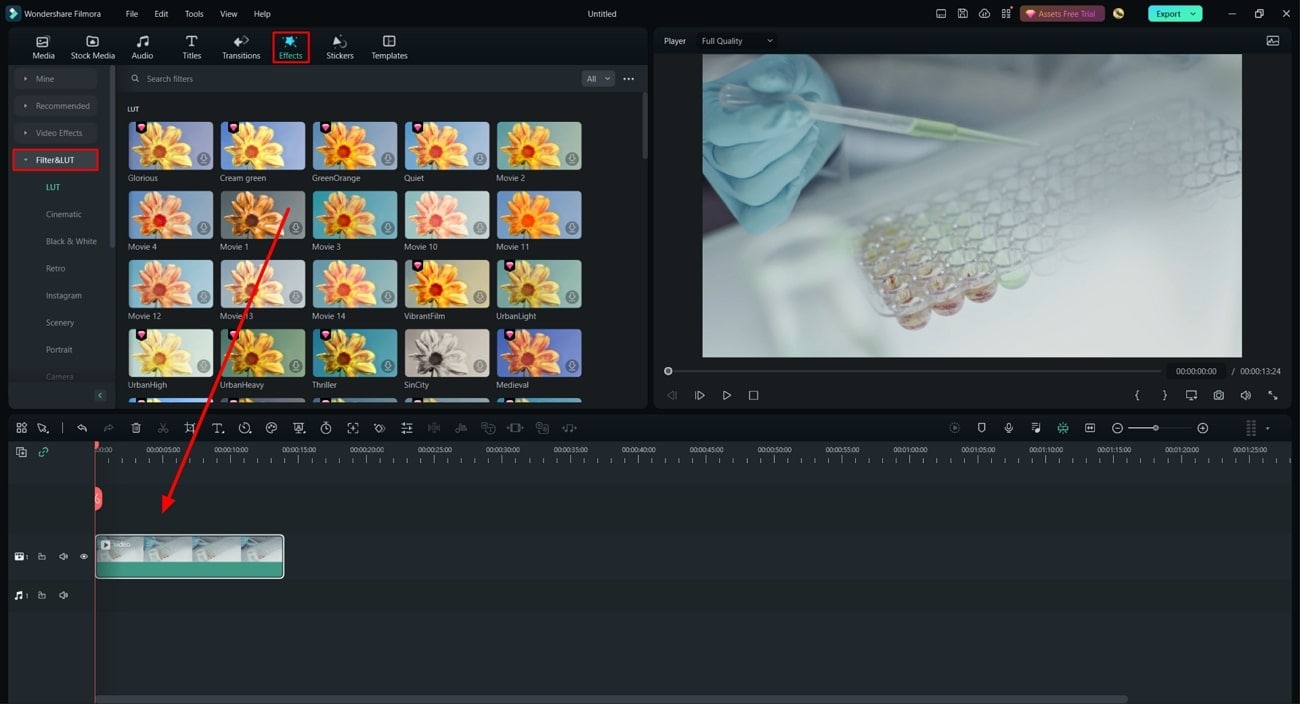
After importing your video, navigate to the "Effects" tab. From there, select "Filters&LUT" on the sidebar, then click on "LUT." Pick the LUT you want to use for your video from the list.
Step 3Applying the LUT
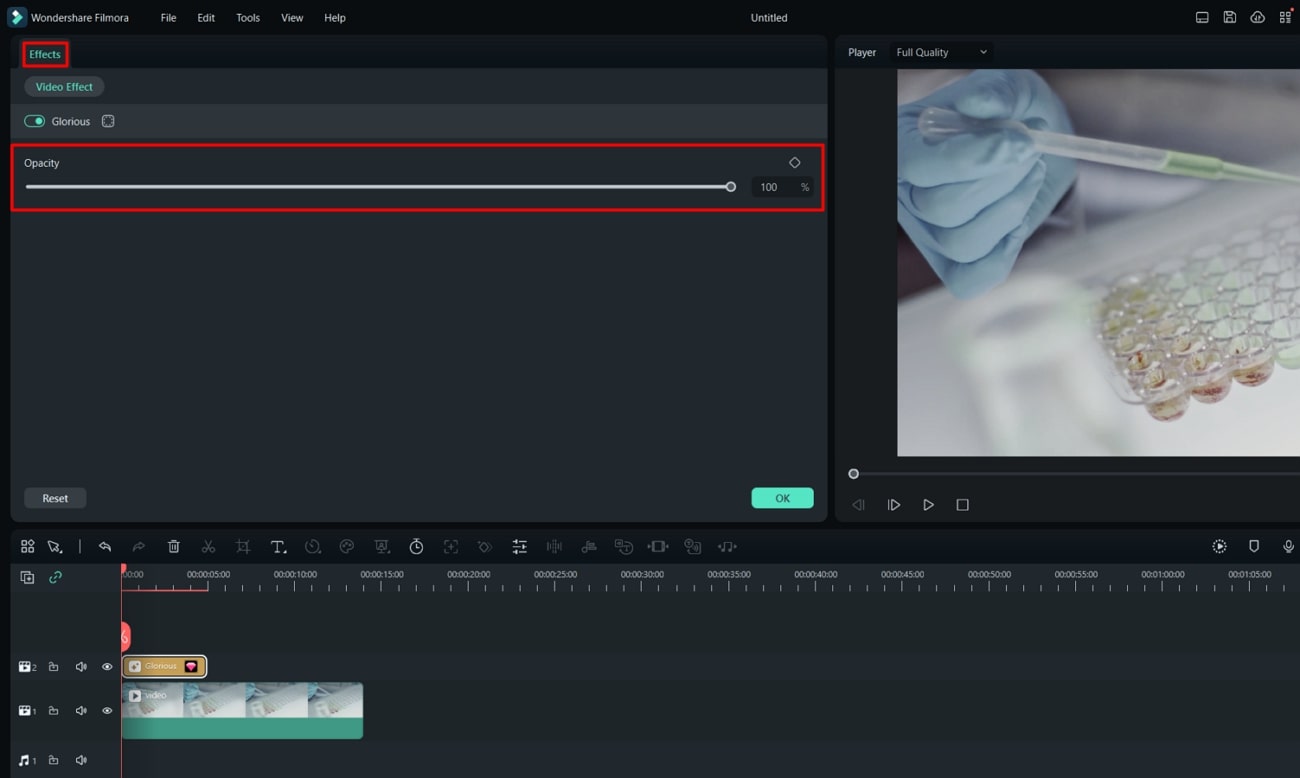
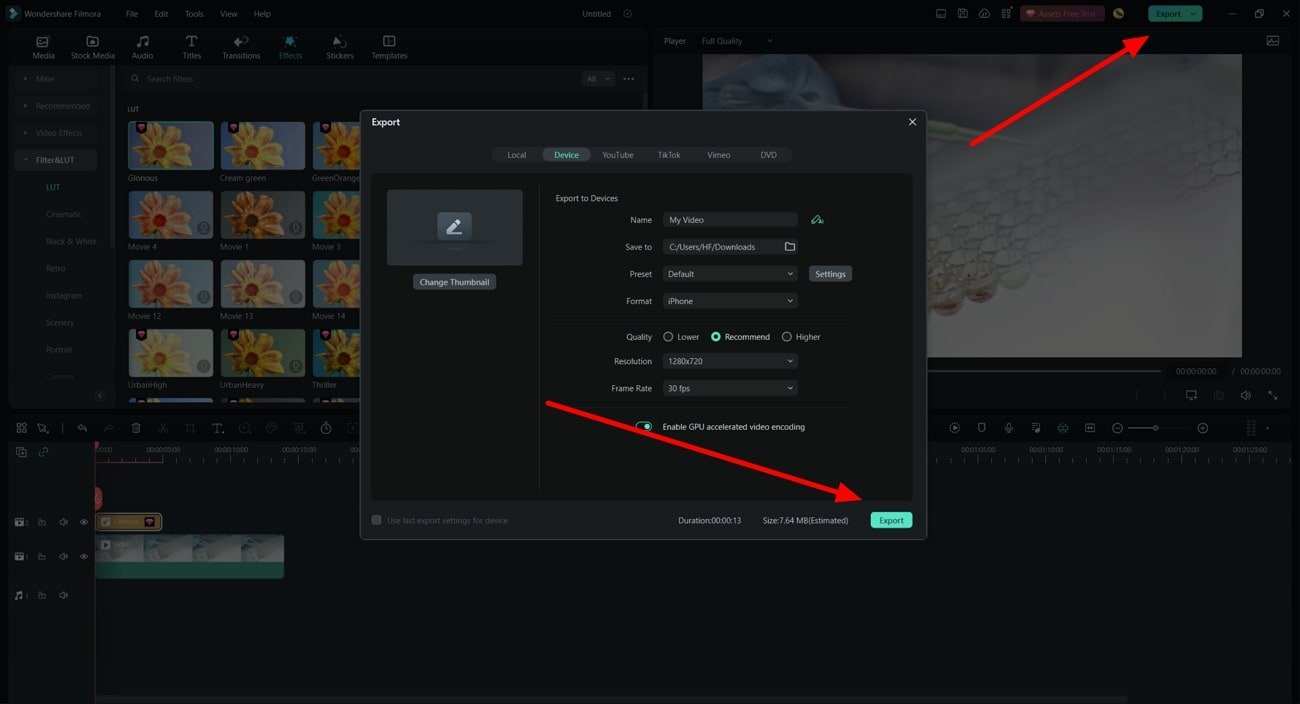
Once you've chosen the LUT, hit the "Download" button. Then, drag the downloaded LUT onto your video. You can adjust the LUT's intensity by clicking on it and shifting the "Opacity" slider.
Step 4Finalizing the Changes
Continue to save your changes and review the final effect on your video. If you're happy, save your project. If not, you can go back and adjust the LUT or choose a new one.
Method 2: Using Video Settings
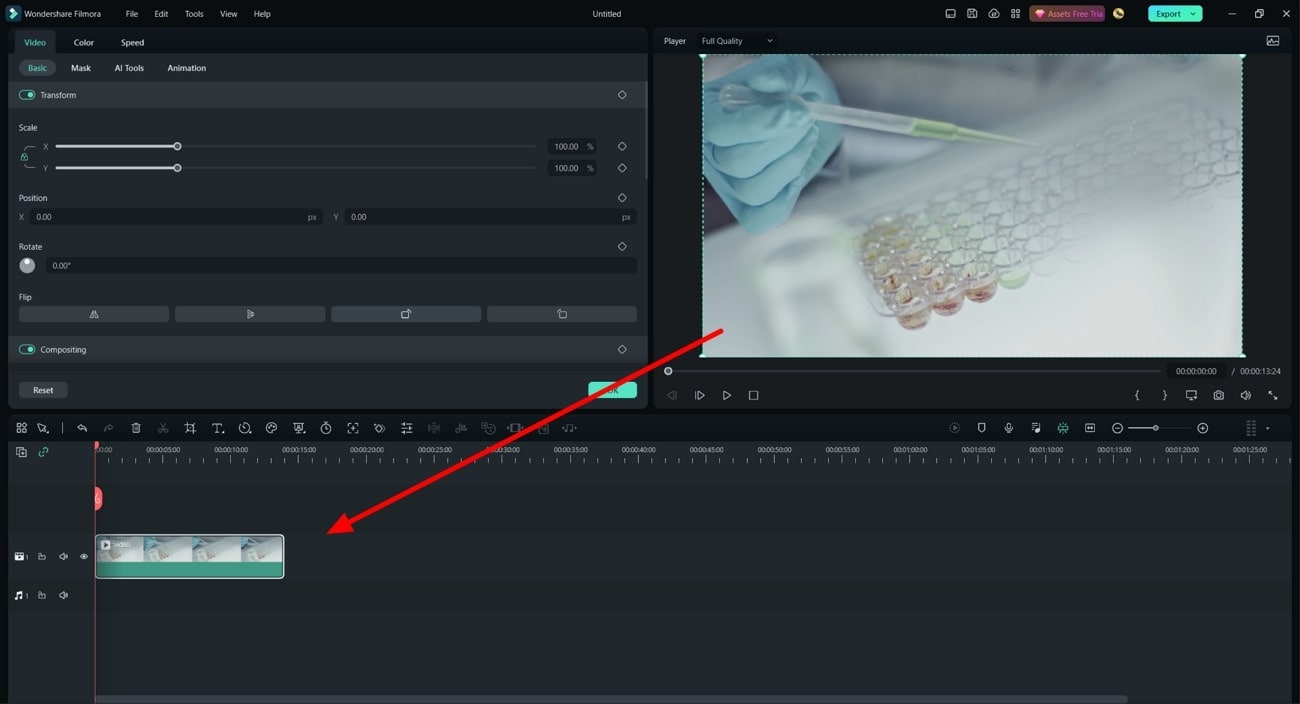
Step 1Enter the Video Settings
After opening Filmora and placing your video on the timeline, double-click the video. This action opens the video settings window.
Step 2Navigating to LUT Options
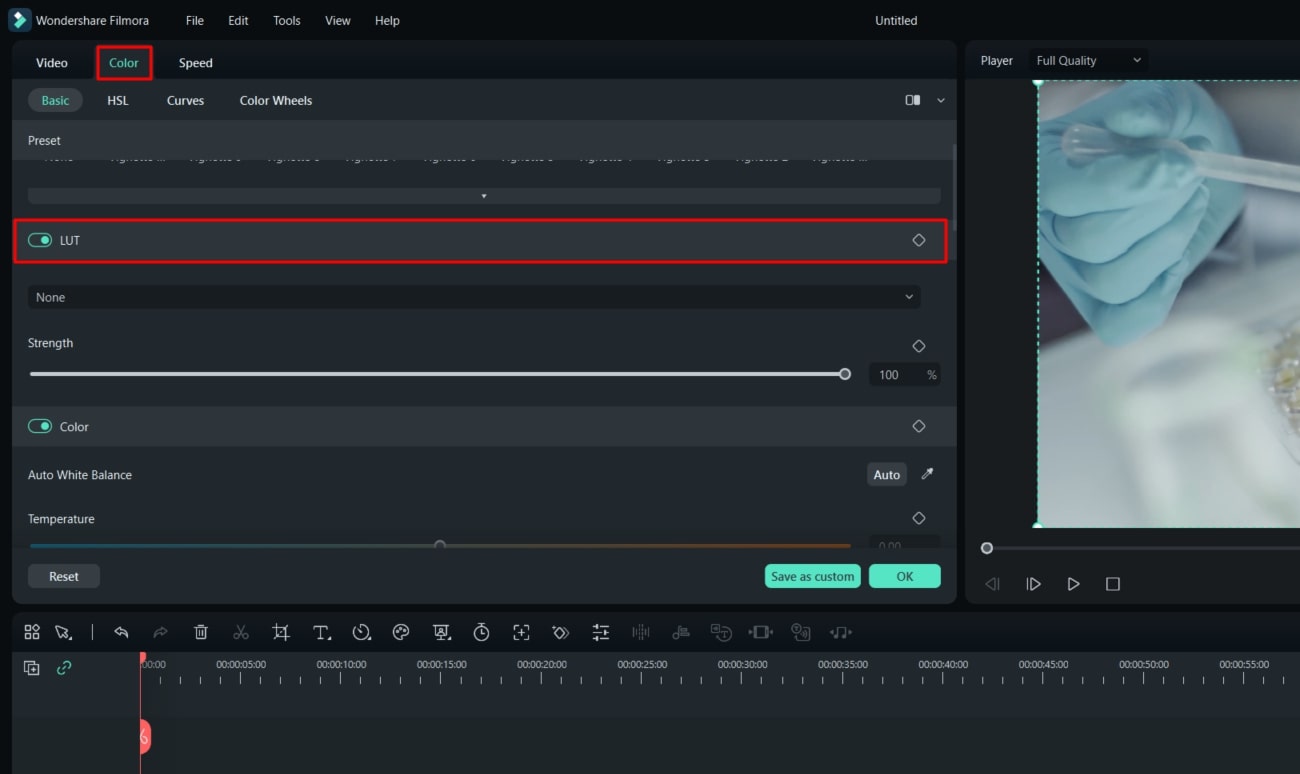
In the settings window, go to the "Color" section. Here, find the "Basic" tab and toggle the "LUT" option to the right.
Step 3Implementing the LUT
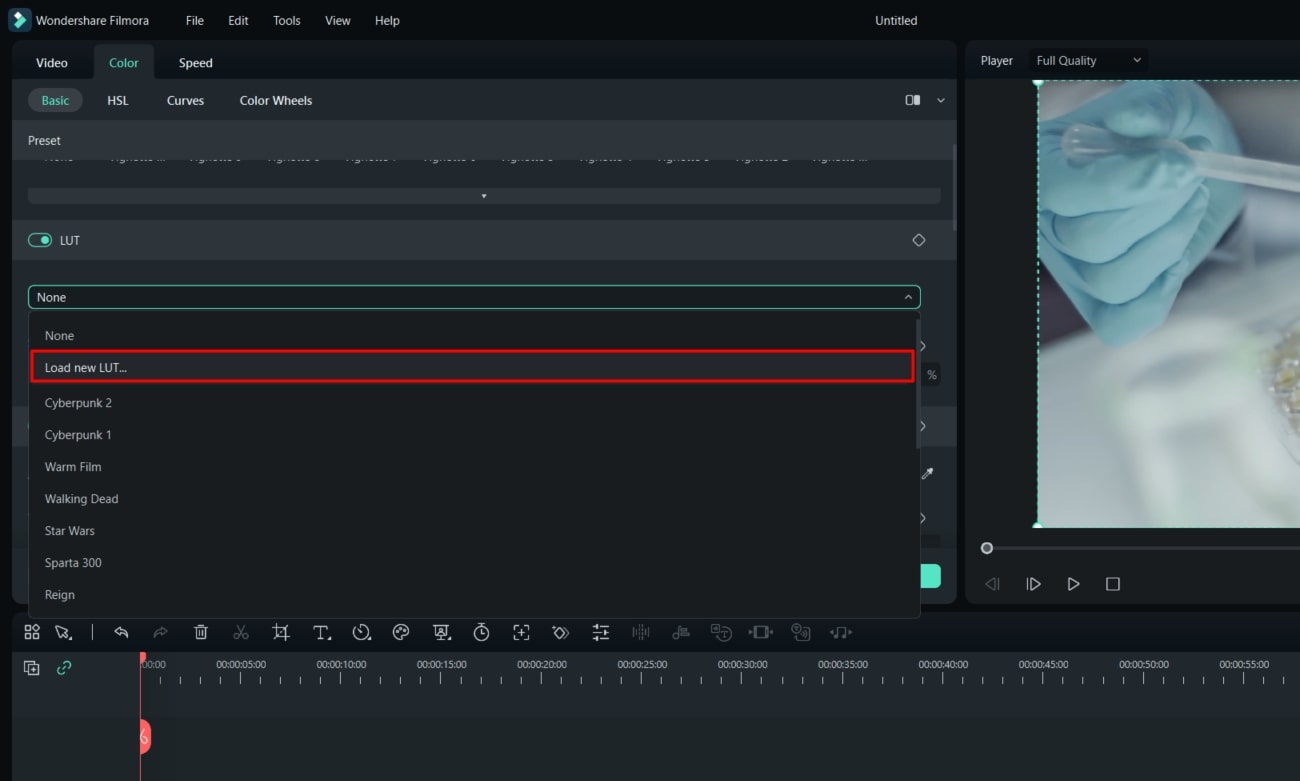
Once the LUT option is active, you'll see a list of available LUTs. Choose one from the list or import your own using the "Load new LUT" option from the drop-down menu. Once selected, the LUT for Filmora is applied to your video.
Bonus Part: Some Top LUTs Offered By Wondershare Filmora
Hold on if you don't know what Wondershare Filmora offers in its LUTs feature. Many Filmora LUTs are available in the tool that you can use and apply to your videos. Some of the most popular video LUTs in Filmora are as follows:
1. Moody 03
Moody 03 adds a lovely pinkish tone to your video and creates a warm and romantic ambiance. You can use this Filmora LUT when you want to capture emotions and create a soft vibe. Additionally, you can use this LUT when you want the pink color to shine in your video.

2. GreenOrange
The GreenOrange LUT for Filmora introduces green and orange hues to your content. It's perfect for autumn scenes or to give a vintage feel. Additionally, it can transform ordinary footage into something nostalgic and poignant.

3. Movie 2
Movie 2 is a unique LUT that Wondershare Filmora is offering. It fades colors and adds a hint of green to your video. This creates a cinematic and slightly vintage aesthetic. It's perfect for giving your videos a classic, film-style feel.

4. VibrantFilm
VibrantFilm is all about bringing colors to your video content. It adds vibrance to your video, making it eye-catching. You can use this LUT when you want to emphasize color and create a lively, energetic mood.

5. Infrared Film
This LUT preset is inspired by the unique look of infrared film. It introduces a striking pink color to your video. This LUT, with its color toning, can create something visually distinctive. You can apply this LUT to your video to give it a romantic vibe.

6. Stuck in the Dirt
Stuck in the Dirt gives your video a warm, brownish tone. It creates a dust and Dirt feel to your video. This LUT is perfect for rustic scenes or to evoke feelings of nostalgia and rugged charm. It is a great LUT for outdoor shoots.

7. Cyberpunk 1
Cyberpunk 1 transforms your video with a neon, cyberpunk-style color grade. It highlights pink and blue shades. This LUT is perfect for creating futuristic, sci-fi, or night-time city scenes. Additionally, you can use this video LUT to create a modern neon-like vibe to your content.

8. Red Brown
Red Brown highlights the brown and red shades in your video. It's ideal for scenes with lots of natural elements or to give your video a warm, earthy feel. This Filmora LUT is perfect for fall or rustic-themed videos and outdoor footage.

9. CinematicTwo
CinematicTwo is a cinematic style color grading LUT. It's designed to give your video a professional, movie-like feel. You can use this LUT for Filmora when you're aiming for a high-quality, cinematic finish. So, add a professional color tone to your video by using this Filmora LUT.

10. Contrasted Film
Contrasted Film is a LUT that increases the contrast in your video. It also highlights the greenish tone in your video footage. This LUT is perfect for outdoor scenes, giving them a vivid, high-contrast look that really pops.

Conclusion
To conclude, 3D LUTs, in particular, have revolutionized modern content creation. They provide a greater degree of control and complexity to the color composition of your video. This has led to more vibrant, dynamic, and better video content. Tools like Wondershare Filmora allow you to apply video LUTs without any hassle. Now, use the power of LUTs and see your content transform.


