Sometimes you just need the audio without the video—or the other way around. Maybe you want to extract a voiceover, swap out background music, or reuse the audio in a different project. If you are using Sony VEGAS, you can split audio and video pretty easily.
Splitting audio from video in Sony VEGAS only takes a few clicks. Once your clip is on the timeline, you can quickly unlink the audio and video tracks so they can be edited separately. We will show you how to use Sony VEGAS to split video and audio, along with a beginner-friendly alternative you might like better.
In this article
Part 1. How to Separate Audio from Video in Sony VEGAS Pro (Step-by-Step)
Sony VEGAS (also known as VEGAS Pro) is a professional-level video editing software known for its flexibility and advanced timeline features. It's a favorite among editors who want precise control over both audio and video.
If you are using Sony VEGAS Pro and wondering how to separate audio from video, follow the simple steps below to unlink the tracks easily.
Detailed Steps to Split (Unlink) Audio and Video in Sony VEGAS
Step 1: Import Your Video
Open Sony VEGAS and drag your video file into the timeline. You'll notice the audio and video appear as a pair, stacked tracks linked together.

Step 2: Select the Clip and Unlink the Audio from the Video
Click on the video clip in the timeline to make sure both the video and its audio track are selected. Press U on your keyboard to ungroup the audio and video, or right-click the clip and select "Group" > "Remove From".
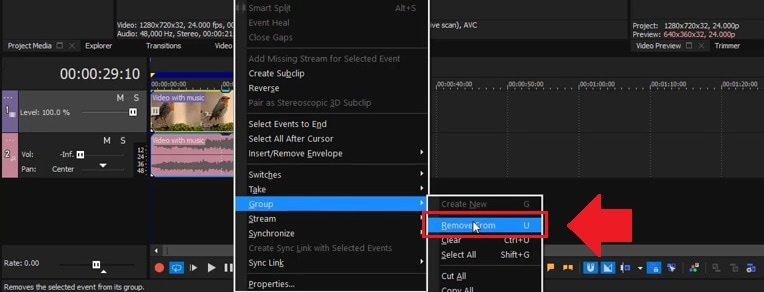
This instantly splits the video and audio in Sony VEGAS into individual tracks.
Step 3: Edit the Audio or Video Separately
Now you can move, delete, or edit the audio and video tracks separately. You're free to mute the original audio, replace it with music or voiceover, or even sync it with other clips.
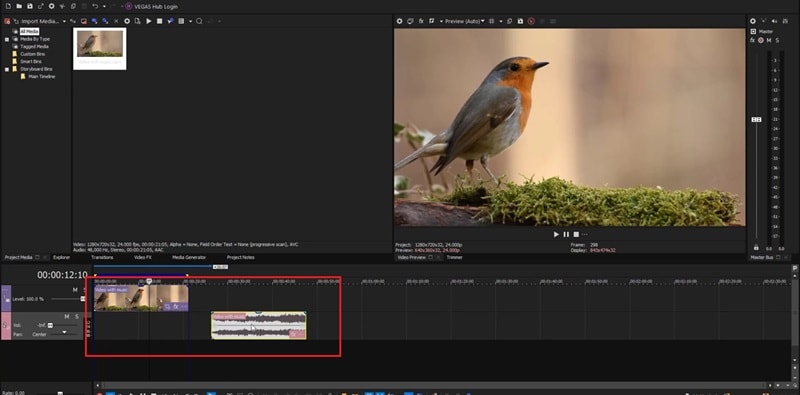
Once your edits are done, you can render the video with or without the original audio, whichever you like. Watch the full tutorial here.
Part 2. The Easier Way to Detach & Separate Audio from Video (Filmora Alternative)
VEGAS Pro lets you split video and audio, but its interface can feel a bit clunky, especially if you're new to editing or just need to do something simple like detaching audio.
The thing is, almost any modern video editor can split audio from video, but the real difference comes in what you can do after that. The right tool can help you clean up audio, add effects, or fine-tune both tracks without digging through complex menus.
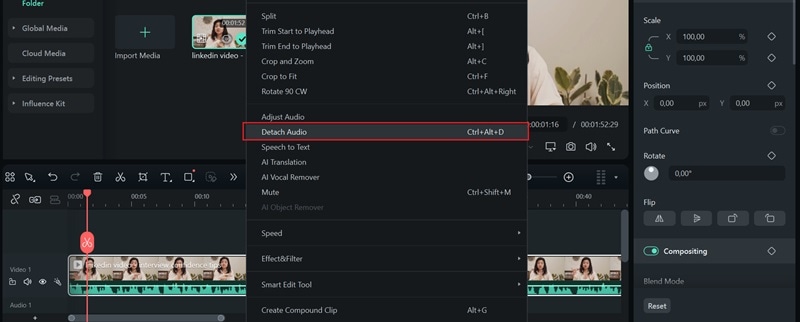
One tool that is easier for beginners and casual editors is Wondershare Filmora. In Filmora, you can simply drag and drop your clip onto the timeline, right-click, and choose "Detach Audio." This single action instantly separates the audio from the video, placing it on its own track, a far simpler process than in Sony VEGAS.
What makes Filmora stand out is what you can do after splitting the audio:
Audio Denoise Tool: Quickly remove background noise to make your dialogue or voiceover sound cleaner.
Auto Synchronization: Wishing to revert changes, but the audio and video files are already out of sync? Filmora can automatically line them back up with just one click.
Built-in Sound Effects & Music: Add royalty-free music and sound effects straight from the media library.
AI Audio Stretch: Adjust the length of background music to fit your video perfectly without changing pitch.
All of these tools are built right into Filmora. Unlike other video editors like Sony VEGAS, which can feel a bit overwhelming and often require external plugins to streamline video editing, Filmora's intuitive interface keeps everything streamlined in one place.
How to Split Audio from Video in Filmora
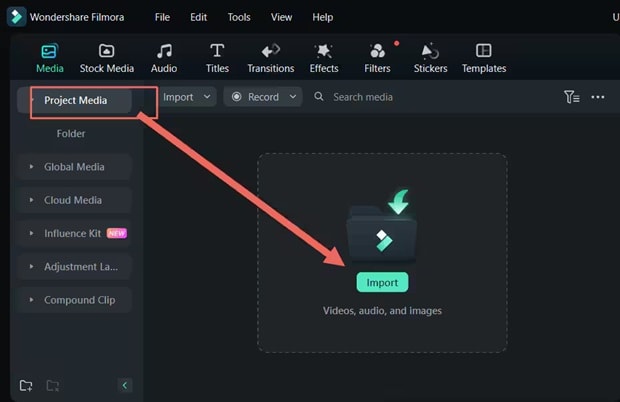
Step 1: Open Filmora and Import Your Video
Open Filmora and click "Import" to bring in your video file. Drag it to the timeline to begin editing.
Step 2: Detach the Audio from the Video
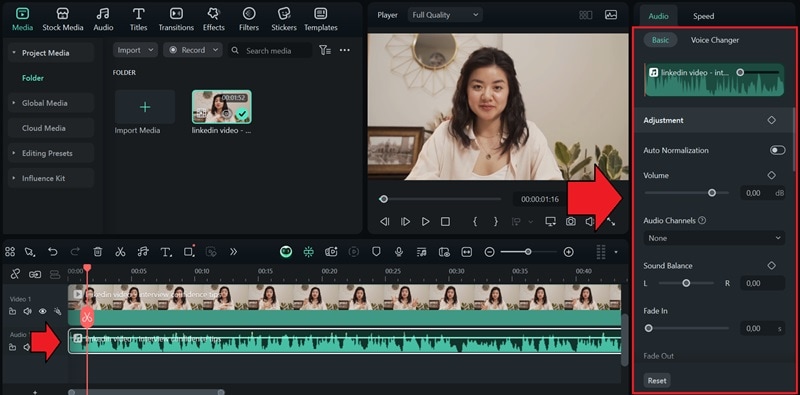
Right-click on the clip in the timeline and select "Detach Audio." Filmora will instantly separate the audio and place it on its own track below the video.
Step 3: Edit as Needed
Now that the audio is detached, you can move it, delete it, replace it with music, or adjust it with Filmora's audio tools like volume control, denoise, voice effects, or music synchronization. You can find these options in the property panel on the right.
Step 4: Export Your Project
Once you're happy with the changes, click "Export," choose your preferred format and settings, and save your new video.
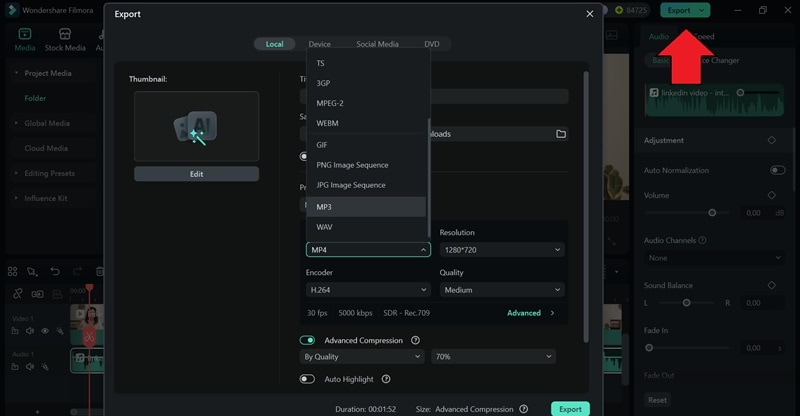
Note: If you only want to keep the audio, make sure to export it as an audio file instead of a video. Filmora supports several popular audio formats like MP3, WAV, and AAC, so you can choose the one that works best for your project.
Part 3. VEGAS vs. Filmora: Which is Better for Splitting & Editing Audio?
You don't always need Sony VEGAS to split audio. Tools like Filmora can handle it too, though the editing experience can feel quite different. If you're deciding which one fits your workflow better, we've prepared a side-by-side look at how they stack up when it comes to audio and video editing features:
| Feature | Sony VEGAS | Filmora |
| Shortcut Key | U | Ctrl+Alt+D |
| Supported Audio Format (Input) | MP3, WAV, AAC, FLAC, AIFF, WMA, and more | AAC, AC-3, M4A, Matroska Audio,MP3, WAV, WMA, and more |
| Supported Audio Format (Output) | WAV, MP3, WMA | MP3, WAV |
| Supported Video Format | MP4, AVI, MOV, WMV, MXF, MPEG, HEVC, and more | MPG, MPEG, MP4, M4V, 3GP, WEBM, MOV, MOD, FLV, F4V, WMV, AVI, MKV, GIF, and more |
| Auto Synchronization | Available (via Timecode, Waveform, or Manual) | Available (AI-Powered) |
| Pricing | High | Low |
| User Level | Intermediate to Advanced | Beginner to Intermediate |
So, what should you choose?
✅ Split audio from video in Sony VEGAS if you need deep audio editing control and are comfortable navigating a more complex interface.
✅ Use Filmora to detach audio if you want to keep things simple with beginner-friendly tools and smart audio features like auto sync, AI denoise, and voice effects, while still supporting the most common file types for quick editing.
In summary: If your goal is simply to separate audio from video for quick edits, Filmora cuts down on complex grouping menus and offers one-click detachment with powerful, simple AI audio tools built right in—making it the ideal choice for efficient, quality editing without the steep learning curve of VEGAS Pro.
Conclusion
Splitting audio from video in Sony VEGAS is one of those editing tricks that comes in handy more often than you think. You can use this method to fix sound issues, add voiceovers, or replace music.
But if you want a faster, beginner-friendly way to detach and edit audio, Filmora also makes the whole process smoother, with bonus tools like AI audio stretch, auto-sync, and voice effects. This makes it perfect for quick edits, creative tweaks, or just getting better sound without getting lost in complicated menus.


 100% Security Verified | No Subscription Required | No Malware


