Earlier this year, football superstar Cristiano Ronaldo made waves by making a YouTube channel trailer, and it really took off! That video was such a hit that he gained millions of subscribers in just the first week.
If you're a content creator or thinking about starting your own channel, his success can inspire you to step up your YouTube game. But making a great channel trailer isn't as easy as it seems.
Don't worry, though! In this article, we'll break down how to create a YouTube channel trailer that really stands out. We'll cover the benefits of having a trailer, share some examples, and provide a step-by-step guide on how to make a trailer for your YouTube channel. Let's dive in!
In this article
Part 1. Why Do You Need to Make a Channel Trailer for Youtube
Many of you are probably wondering why you need to take the time to make a YouTube channel trailer. Well, if you're new to YouTube, just making videos might not be enough to help you stand out – after all, it feels like everyone's a YouTuber these days!
Making a YouTube trailer is like making your channel's personal intro video. It's a quick, 30–60-second clip that gives new visitors a feel for who you are, what kind of content you make, and why they should stick around. It's like saying, "Hey, here's what I'm all about!" without needing a long explanation.

Here's what a good trailer can do for you:
- First Impressions Matter
Your trailer is often the first thing people see, so it's your chance to impress them right away. A strong first impression can be the difference between someone scrolling past or hitting "Subscribe".
- Showcase Your Unique Style
Whether it's your personality, editing style, or the cool twist you bring to your content, your trailer is a quick way to highlight what makes your channel stand out.
- Highlight Key Content
Use your trailer to give a sneak peek of your best videos or the main topics you cover. This way, viewers know exactly what they're signing up for and if your content is their kind of thing.
- Good for SEO & Attracting New Subscribers
A well-made trailer can help boost your channel in search results. Plus, it gives casual visitors a reason to subscribe by showing them what they'll get from following you.
Example of Trailer for YouTube Channel Videos
In a nutshell, making a YouTube channel trailer isn't just a "nice to have" – it's a powerful way to get people interested, show off your style, and grow your audience from the get-go. To help you better understand how YouTube trailer usually looks, we've prepared a few examples of a great YouTube trailer that you can check out below:
Cristiano Ronaldo's YouTube channel trailer showcases Ronaldo's fun personality.
Bob Ross's YouTube channel trailer showcasing painting and storytelling content.
Jelly YouTube channel trailer showcasing gaming and vlog content.
Part 2. Easy Steps to Create a Compelling YouTube Trailer with Top Video Editor: Wondershare Filmora
All the YouTube channel trailers above are great, you can use that as inspiration when trying to make your own. But if you want to make an impressive YouTube channel trailer, you'll need a reliable video editor that is up for the job. Thankfully, you don't need to look for long because Wondershare Filmora is the best YouTube channel trailer maker out there.
Here's why:
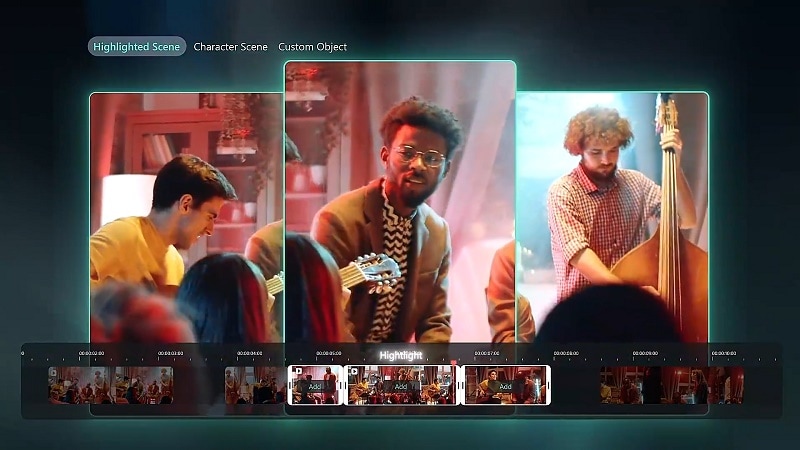
- Feature to Make Highlights: Filmora has an advanced Smart Scene Cut feature that automatically captures the best highlights from your videos. You can showcase your top moments when making a YouTube channel trailer.
- Three Modes Customization: Filmora's Smart Scene Cut has three modes to capture highlights: showcase the best moments, highlight specific people, or focus on certain objects.
- Customizable Text and Effects: You can easily add and customize text, effects, stickers, transitions, and more to match your style and make your trailer stand out.
- AI-Powered Tools: Filmora has cool AI tools like an AI Thumbnail Creator, AI Copywriting for YouTube titles and descriptions, and AI Translation—everything you need to enhance your video and reach a wider audience.
- Easy YouTube Sharing: When you're done editing, you can upload your trailer directly to YouTube from Filmora, saving you time and hassle.
- Effortlessly capture standout scenes with precision.
- Customize object selection for targeted highlights.
- Enhance storytelling with automated scene detection.

Even better, with all these great benefits, you won't need to worry about the price! Filmora offers flexible pricing plans that are budget-friendly. It even offers a free trial for you to try out before fully committing to buy it. So, there's no more excuse!
To help you get started on learning how to make a trailer for your YouTube channel with Filmora, just follow this simple guide:
Step1Launch Filmora and start a new project
Before you start, make sure you've got the latest version of Filmora (V14 and above ) to access all the new features, including Smart Scene Cut. Once it's installed, open Filmora by double-clicking the icon. On the launch screen, click "New Project" to start a fresh editing timeline.

Step2Upload your video and use the Smart Scene Cut feature
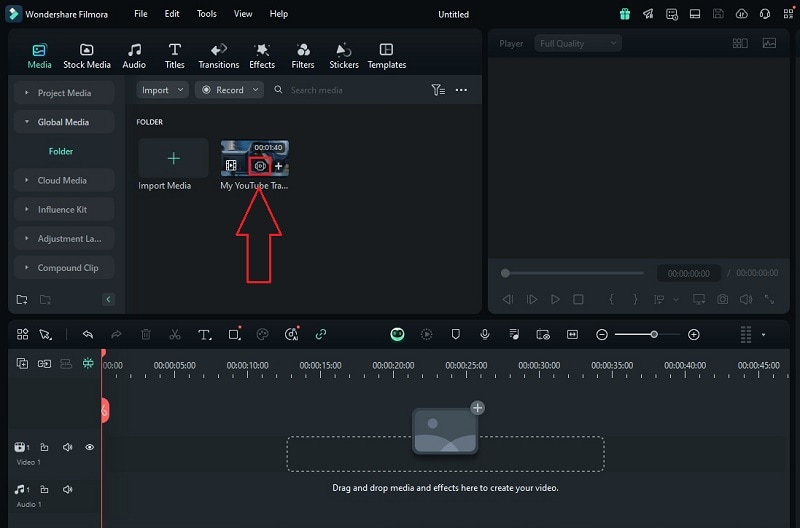
In the editing interface, go to "Media" and click "Import" to add the clips you want to work with. Then, right-click on a clip and select "Smart Scene Cut" from the menu that pops up.

Alternatively, you can also access the Smart Scene Cut feature by clicking its icon on the video thumbnail here.
Step3Choose your video type
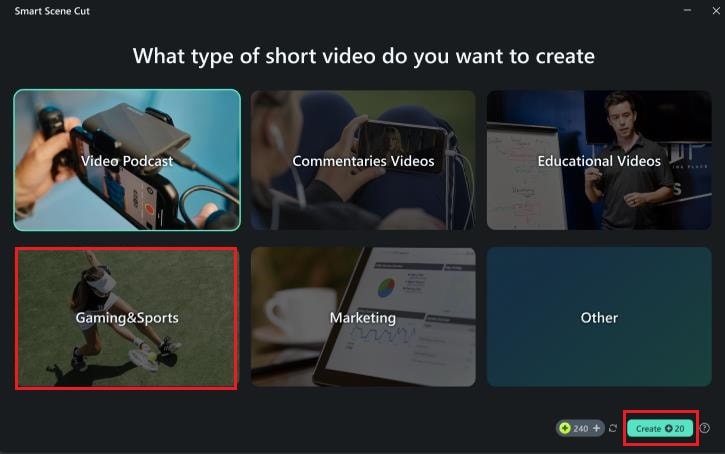
In the next window, pick the type of video you want Smart Scene Cut to focus on. Choose from the options, or select "Other" if none of them fit. For example, if your YouTube content is about video games, select the "Gaming & Sports" category, then click "Create" to get started.
Step4Select the type of highlight
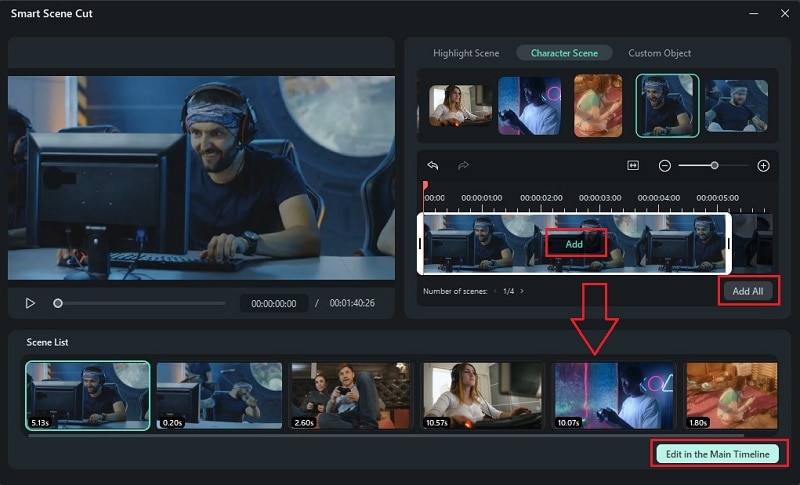
Next, choose how you want to create the highlight by selecting from options like Highlighted Scene, Character Scene, or Custom Object. If you're highlighting a certain character, select "Character Scene". Then, choose the person you want to feature, and the AI will automatically find all clips with that character.
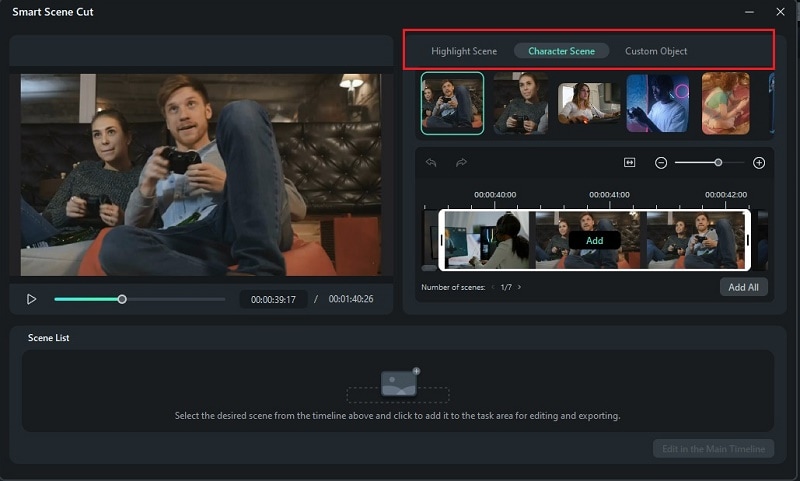
You can click "Add" to pick individual clips or "Add All" to include every clip with that person. When all the clips you want are all added, click "Edit in the Main Timeline" to keep editing.
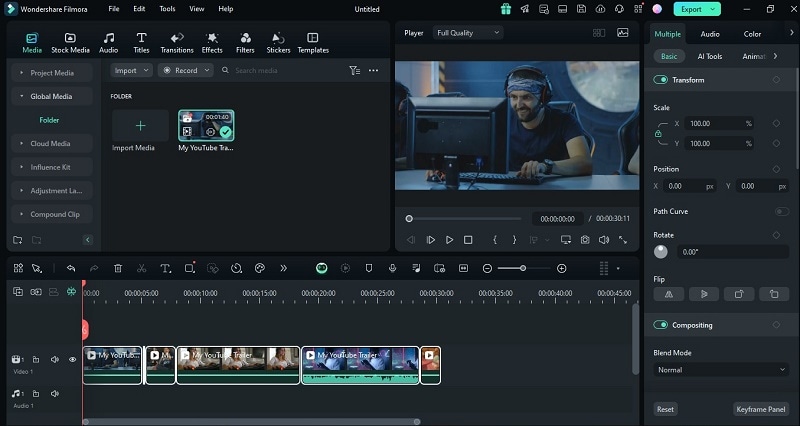
Now, all your clips are in the editing workspace. You can add effects, stickers, sound effects, and more to customize them. If you want to change any of the highlighted clips, no problem—just double-click the clip in the Media folder to reopen the Smart Scene Cut window.
Step5Use Text Animation in the intro video
After Smart Scene Cut has trimmed your YouTube trailer to the best highlights, it's time to make it more exciting! Start by adding some animated text at the beginning of your trailer. Go to the "Titles" tab, choose a style you like, drag it to the timeline, and double-click it to open the editing options. You can customize the text with something like "Welcome to My Gaming Channel".

Next, go to the "Animation" tab in the Text Editing panel to add some movement. Double-click on any animation you want to try, and you can see how it looks in the Preview window. If you like it, just click on the animation to add it to your title.

Step6Add Stickers
To make your video look even better, you can add some stickers that match your content by going to the "Stickers" menu. Browse through Filmora's library, download any stickers you like, and drag them onto the timeline.

If you don't see one that fits your style, you can make a custom sticker using the AI Stickers feature. Just select "AI Stickers" under the Stickers menu, type in a description, and Filmora's AI will create stickers based on what you want.

Once the AI finishes generating it, you can download the result and add it to your video.

Step7Add custom music
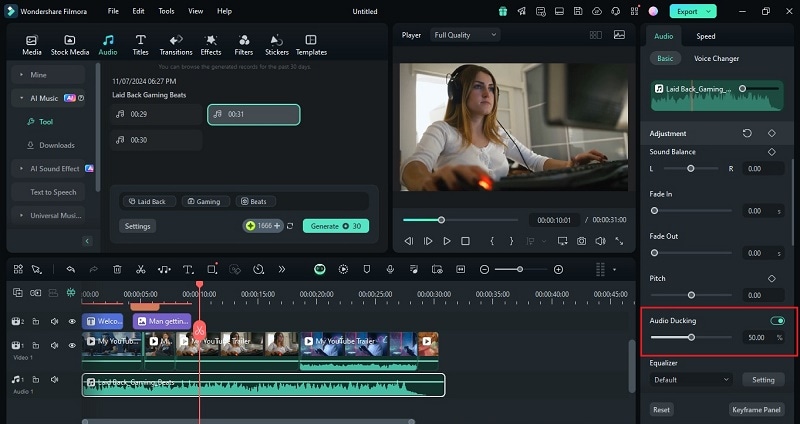
Now that your video is coming together, it's time to add some music to make your channel trailer more energy and excitement. You can use Filmora's AI Music Generator to create music that matches your video perfectly. Just go to the "Audio" tab at the top, then click on "AI Music" on the left. Choose the Mood, Theme, and Genre, then hit "Generate". The AI will give you a few music options to pick from.

Once the music is generated, you'll see the results in the side panel. Click the "Download" arrow to save the music for commercial use, then drag it to the timeline to add it to your video.

Make sure the background music doesn't drown out your voice in the video! Filmora's Audio Ducking feature can help with this by automatically lowering the music volume when you're speaking and raising it back up when you're done. To use it, select your video or audio clip, then go to Audio > Basic. Scroll down to find "Audio Ducking" It's set to 50% by default, but you can adjust it with the slider to get the balance just right.
Step8Save and share your video
When your video is all set, click "Export". In the pop-up window, go to "Social Media" and choose "YouTube" as your upload platform. You can also adjust the title, description, category, resolution, and other details to make everything just right!

Part 3. Optimizing Your Channel Trailer for YouTube
Now that you know how to make a trailer for your YouTube channel, you may think your job here is done. But there's still one more step: making sure it actually gets seen. After all the work you put in, you need as many people as possible to check it out and get hooked on your channel.
So, let's go over a few simple ways to optimize your YouTube channel trailer so it performs well and reaches a bigger audience.
1. Choose the Right Thumbnail
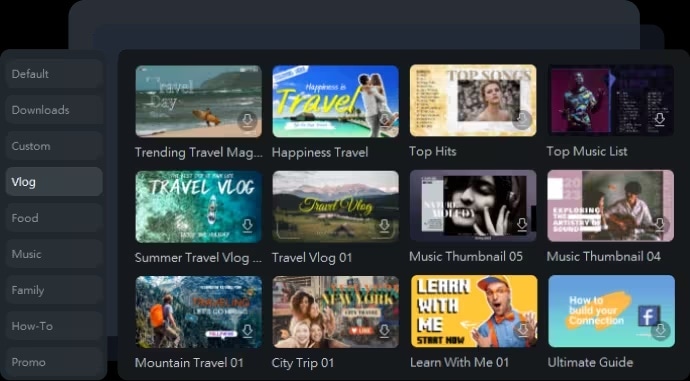
The thumbnail is the first thing people see, so make it stand out! Filmora's AI Thumbnail Creator makes this easy by analyzing your video and suggesting three eye-catching thumbnail options. Plus, you'll get access to over 50 templates and a library of design elements, colors, fonts, animations, and styles to customize it just the way you like.
2. Add Keywords and Tags
Use keywords in your title and description that match what people are searching for. This makes your trailer easier to find. Thankfully, Filmora's AI Copywriting tool can help generate YouTube titles and descriptions with relevant keywords. That way, your videos will get more interaction and engagement than ever before.

3. Add Captions to Your Trailer
Captions make your video accessible to more people, especially since some people watch videos without sound in public places. Captions let you share key info about your channel even if the audio is off. It's also a great way to keep your viewer's attention.
So, after you're done making your YouTube channel trailer, you can use Filmora's Automatic Caption feature to add them easily. Plus, with Filmora's AI Video Translation, you can even translate your captions to reach an international audience!

4. Pin Your Trailer to Your Channel
To make sure everyone who visits your channel sees your trailer, pin it right at the top! This way, it's the first thing new visitors will notice, giving them a quick intro to your content and what your channel's all about. It's an easy way to make a strong first impression and get viewers interested from the get-go.

Conclusion
A lot of people want to know how to make a YouTube channel trailer because it's a great way to introduce your content to new viewers and attract more subscribers. So, this article offers an easy guide on how to create a YouTube channel trailer, with tips, examples, and ways to optimize it for maximum reach.
First, you'll need a solid YouTube channel trailer maker, and Wondershare Filmora is an excellent choice. With its advanced Smart Scene Cut feature, it captures the best highlights from your video, making it perfect for creating an eye-catching trailer.
With the help of other Filmora powerful tools and the tips provided in the article, you can be sure that your YouTube channel trailer will help you reach a bigger audience.


