
 100% Security Verified | No Subscription Required | No Malware


 ChatGPT
 Perplexity
 Gemini
 Claude
 Grok
Grok
FFmpeg is an open-source tool with a wide range of features that allows people to handle video, audio, and other multimedia files. It's quite a remarkable tool for its overall functionality, since basically, all its functions can be done just by using command-line instructions. Its speed and reliability have made it a kind of fan club among developers, video editors, and content creators who have a precise need in their media workflows.
This is a basic tutorial of FFmpeg, which also includes the installation instructions for Windows and Mac and the basic commands for the most frequent tasks.
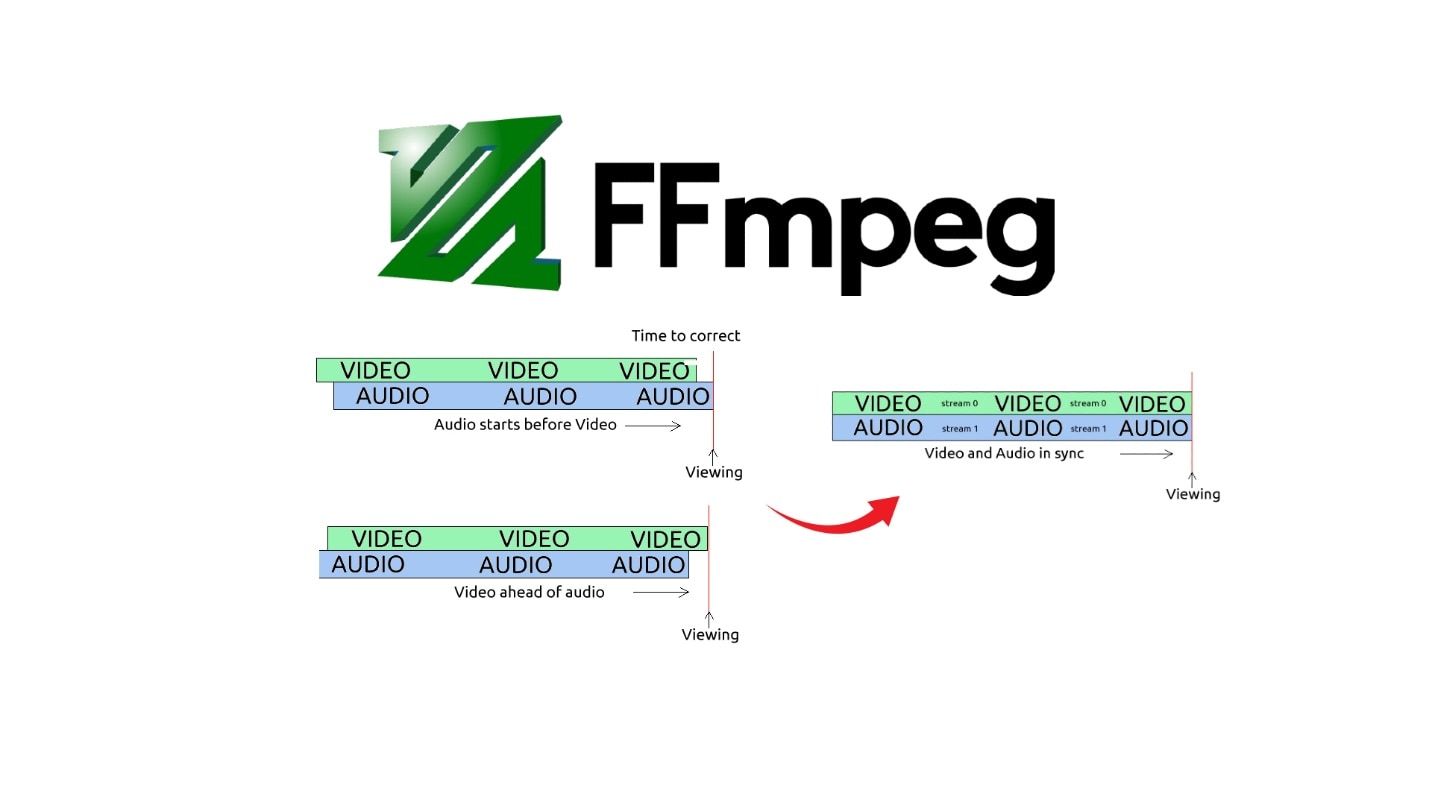
Table of Contents
Part 1: What is FFmpeg and why use it?
FFmpeg is a free, open-source, command-line tool that is mainly designed to process, change, and manage multimedia data such as video, audio, and images. By its libraries and tools, it is really a simple user interface for the same complicated tasks that are done by the user, such as media file conversion, compression, or editing. When taking its minimalist aspect with its powerful features, it turns out to be a great FFmpeg as the world's solution choice for all developers, video editors, and content creators who need precision and speed in their daily work.
Capabilities
FFmpeg is one - practically - a decoding powerhouse that supports almost every audio and video codec for all common and even rare formats, and that is why it can almost always not run into any issues with different platforms. Basically, if you wanted to convert the video to another format, reduce the video resolution, get the audio track from the video, or stream the video, FFmpeg would be able to do all these operations at the same time without any file interruption. Just one simple command in your command-line interface would make this all happen.
An additional feature that is particularly powerful is that, in addition to encoding, FFmpeg can also modify the metadata of files, merge files from multiple videos or audio sources, and create GIFs from videos. Also, if that is what you wanted, a few simple commands would allow you to record your desktop or capture live audio and video without the need of heavy software installation.
Core functions
- A video can be changed to another one (for instance, MP4 to AVI, MKV to MOV) with the same video quality that will be used as a result.
- The sound of the video can be separated from it (for instance, extracting audio from MP3 or AAC files in MP4 videos to use as podcasts or for music editing).
- Large videos can be made small enough to a suitable size for web uploading or storage, allowing for a specific size to be achieved.
- Through either streaming or recording your screen, you can get access to different kinds of content, such as tutorials, games, and presentations.
- By modifying subtitles, tags, or any other file information, your media library will become more organized.
Common use cases
- Transforming video files to the desired formats for playing them on different devices or software.
- Making audio tracks out of music videos, interviews, or webinars by extracting audio only.
- Most of the people wanting to compress their videos are doing this in order to drop the bandwidth and make the online sharing process or cloud uploading faster.
- Screenshot recording is the method used to create step-by-step tutorials or capture gaming sessions.
- Live video streaming is a useful method for events, webinars, or live broadcasts.
Key terminology and concepts in FFmpeg
As a prerequisite for using commands, it is necessary to grasp the terms used in FFmpeg. The concepts will not only facilitate your understanding of how FFmpeg works internally but will also guide you in selecting the right commands.
Containers vs. codecs
A container is basically a file that can hold multiple streams of data without the need to separate them. These streams can be video, audio, subtitles, metadata, etc. Some examples of containers are MP4, MKV, AVI, MOV, and FLV.
A codec is an algorithm that compresses a data stream by reducing its size to be saved in a file and then decompresses the data to its original form.
Transcoding vs. stream copying
Transcoding is a process that only involves the switching of the video or audio stream encoded with one codec to another. The intermediate step of decoding is required here to give the stream in its uncompressed form. Simply the changing of a file format can be the goal of the process (e.g., converting an AVI video encoded with DivX to an MP4 video encoded with H.264). But, re-encoding in the case can be slow, and there is a chance that the quality gets a little compromised due to the redundant encoding.
Stream copying, on the other hand, is a technique that skips re-encoding entirely, and the original streams are simply extracted from one container and injected into the other. As a result, the procedure is greatly expedited, and if the destination container supports the original codes, then the loss is minimal. For example, the video part of the H.264 file in an MKV container can be taken and placed in an MP4 container so that the actual video and audio data remain untouched.
Basic multimedia stream types
FFmpeg is essentially a tool that handles each stream separately within a container. One single file with a video can be a combination of any of the following stream types:
- Video streams are the changing figures of a video, that are compressed by using video codecs just like H.264, HEVC (H.265), VP9, or AV1. In other words, they tell us what to see in the video.
- Audio streams: These are the soundtracks of the video that were encoded with the help of the audio code for example, AAC, MP3, FLAC, or Opus. A video could have different soundtracks for various languages or programs.
- Subtitle streams: These are the texts shown in the video, that is, captions or translations, which are the most common ones to be encoded in formats like SRT, ASS, or DVB.
- Data streams: These are the carriers of the additional data, for example, chapters, metadata, closed captions, or thumbnails that can be used for media playback.
Part 2: How to Install FFmpeg on Windows and Mac
Before you can utilize all the features that FFmpeg provides, the very first step is to have it installed on your computer. It is worth noting that although FFmpeg was made for use through the command line, the installation process is quite simple. We will explain how to download the Windows and Mac versions of FFmpeg and how to begin your media conversion, editing, and streaming.
2.1 How to install FFmpeg on Windows
Putting FFmpeg on Windows a PC is basically getting a correct build, extracting the files and verifying that the program FFmpeg is in the system PATH so that the Command Prompt can access it.
Step 1: Download FFmpeg for Windows
Visit the official FFmpeg download page. Under More downloading options, you'll find FFmpeg packages and executable files for Linux, Windows, and Mac. Hover over the Windows logo and click the Windows builds from gyan.dev link. This will open a new page.
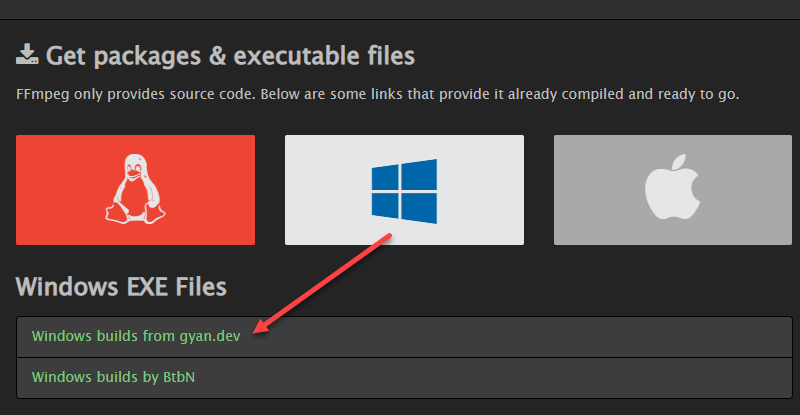
Scroll to the Git master builds section and locate the latest version of the FFmpeg build. Click the ffmpeg-git-full-7z link to download the full build, which includes the most up-to-date libraries.

Step 2: Extract
After the download completes, extract the FFmpeg files and rename the extracted folder to ffmpeg. Move folder to the root of your C drive (e.g., C:\ffmpeg).

Step 3: Add FFmpeg to PATH
Type system variables into the Windows search bar and select Edit the system environment variables. In the System Properties window, click the Environment Variables… button under the Advanced tab. Under the User variables section, select Path and click Edit.
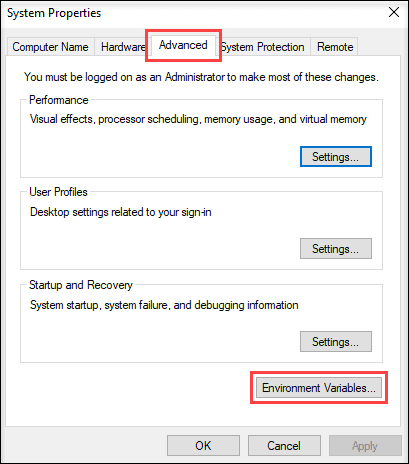
Click New from the right-hand menu. Add the path to your FFmpeg bin folder—usually C:\ffmpeg\bin—and click OK to save the changes.

Step 4: Verify FFmpeg PATH
To confirm that FFmpeg has been successfully installed and added to the PATH: Open Command Prompt or PowerShell. Type: ffmpeg

2.2 How to install FFmpeg on Mac
Installing FFmpeg on a Mac can be really easier and effective if you decide to opt for a package manager like Homebrew that is well known for macOS.
Step 1: Update and upgrade Homebrew formulae
Make sure that your Homebrew as well as its formulae (software definitions) are up to date before you go ahead to install FFmpeg:
Open Terminal on your Mac. Update Homebrew by running: brew update
Upgrade any outdated packages by running: brew upgrade
Updating and upgrading ensure that your system has the latest formulas and avoids compatibility issues during the installation.
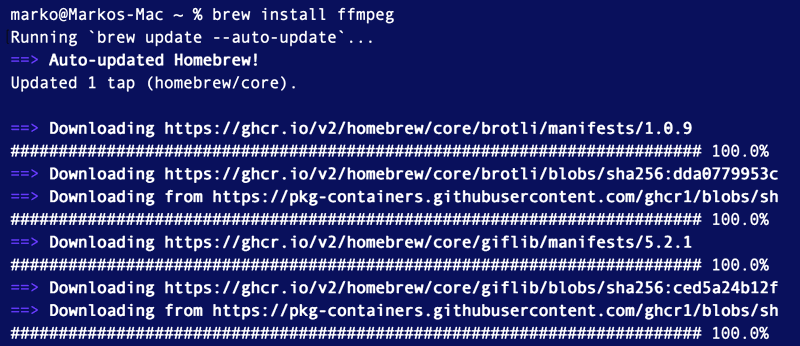
Step 2: Install FFmpeg
In Terminal, run the following command: brew install ffmpeg
Homebrew will download and install FFmpeg along with any necessary dependencies. After the installation is completed, verify FFmpeg by typing: ffmpeg
Press Enter.
Part 3: How to use FFmpeg - basic FFmpeg commands
Most of the time, FFmpeg commands are designed in a logical and consistent manner. A very crucial step in handling the command is to ensure that the sequence of options is followed correctly. The process goes like this: you first specify the input, then change the properties of the file by using filters or codecs, and finally, you set the output file. Just a few of the many FFmpeg commands that are commonly used have been listed below. These are the basic ones that every new user should be familiar with.
3.1 Convert a video file
It is probably the simplest way to convert a video file from one format to another using FFmpeg. This can be your saving when you want your video to be compatible with certain devices, editing software, or online platforms.
Example command:

Explanation:
- -i input.mp4 tells FFmpeg which file to read.
- output.avi is the new file you'll get in AVI format.
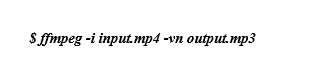
3.2 Extract audio from video
You can also use FFmpeg to separate the audio track from a video. This is perfect for creating podcasts, music tracks, or just saving the audio to edit later.
Example command:
3.3 Compress a video without losing quality
Large video files can be compressed using advanced codecs to reduce size while keeping good visual quality.
Example command:

3.4 Merge multiple videos
If you have several clips that you want to combine into one continuous video, FFmpeg's concat feature is ideal.
Create a plain text file (e.g., file.txt) listing all the clips in order:
- file 'clip1.mp4'
- file 'clip2.mp4'
- file 'clip3.mp4'
- Run the command below.
Example command:
$ ffmpeg -f concat -i join.txt -c copy output.mp4
3.5 Resize or scale a video
Resizing a video is useful for optimizing it for web uploads or specific screen resolutions.
ffmpeg -i input.mp4 -vf scale=1280:720 output.mp4
Part 4: Advanced usage of FFmpeg
After you have learned the basic commands, the full power of FFmpeg goes at your disposal to perform some advanced activities, for instance, screen recording, live streaming, batch processing, or filter application to media files. Hence, the features mean that the software is a multifunctional one, which is equally suitable for users who have just started their way with the tool and those who are highly proficient..
4.1 Recording desktop or screen
FFmpeg can record the entire desktop screen of Windows, and therefore, you can record the playback of the game, the walkthrough of the software, or the presentation if you want, without installing any other software.

4.2 Streaming with FFmpeg
One can use FFmpeg to stream live to various platforms such as YouTube Live, Twitch, or Facebook Live. In this case, a local video is sent to a streaming server.

4.3 Batch processing multiple files
If you are dealing with numerous files that need conversion or compression, it would be very appropriate to utilize the FFmpeg batch processing function that is compatible with shell scripts or batch scripts.

Part 5: Tips for beginners
It would be easier to learn FFmpeg if you follow some simple tips. They help you avoid mistakes and save your time while working with your video or audio files.
5.1 Use -preset options for faster or slower encoding
One can choose the speed of the process by using the -preset option that is available with FFmpeg. For example, if the fast option is chosen, the turnaround will be shortened; however, the file size is likely to be larger. Using the slow or slower settings, the waiting time will be longer, but the result will be of smaller size and of better quality. Find out which one fits your requirements the best.
5.2 Check codec compatibility
Most devices can play MP4 videos encoded with H.264; however, some older devices may not be able to play videos encoded with H.265.
5.3 Explore community scripts for automation
You don't really have to manually enter every FFmpeg command. Many members of the FFmpeg community post scripts and tools online that help with activities such as batch compression, resizing, or watermarking. These pre-written scripts are time savers and make FFmpeg more user-friendly.
5.4 Always keep original files before conversion
Before you begin changing or editing with FFmpeg, always make a duplicate of the original files and store them in a safe location. If a mishap happens or the result is not to your liking, you will still have the original file intact.
Part 6: Wondershare Filmora – a simpler alternative to FFmpeg
If the command-line interface of FFmpeg appears complicated to you, Wondershare Filmora 14 may be a suitable alternative. Filmora, designed for beginners and occasional users, offers an easy-to-understand drag-and-drop interface supported by intelligent editing tools. Thus, creating a video becomes quite a simple thing. The widespread use and highly positive feedback from users worldwide make Filmora one of the most reliable solutions for those who want to create high-quality videos without the need for complicated commands.


6.1 Why choose Filmora over FFmpeg
Editing Filmora is rendered simple, visual, and prompt:
- You do not have to code; in just a few clicks, you can cut, trim, merge, and even change the brightness of videos.
- To give examples, the AI Video Enhancer, AI Portrait Cutout, Smart Short Clips, and AI Auto-Captioning could be used for different parts of a video, thereby automating the process of the video.
- By just a click you are able to export a video that is ready for YouTube, TikTok, Instagram, and more, in which there will be proper resolution and aspect ratio.
- Netflix has over 2.9M+ assets, including the likes of transitions, LUTs, stickers, stock music, and titles for you to use.
- GPU-accelerated rendering and advanced compression technology allow for seamless editing even with a mid-range computer.
If desired, Filmora's AI video enhancer can completely transform the video, making changes to color and sharpness, in addition to upscaling it to 4 4k. The only obstacle that stands between beginners and polished, professional-looking results is the lack of features like FFmpeg.
6.2 When to choose Filmora
Filmora works best for you if:
- You like things to be simple and would rather have a visual editing workflow than memorize commands.
- Your main goal is to make social media videos that are ready to be uploaded on platforms like Instagram Reels, TikTok, or YouTube Shorts.
- Looking for tech like AI audio-to-video, voice enhancer, AI subtitles, and auto-reframe to assist your work and make it quicker.
- You are a newbie or an enthusiast who would like to achieve professional-looking results with the least amount of work.
6.3 When to choose FFmpeg
Although Filmora is very user-friendly, FFmpeg is still a better option in some cases. If you:
- Want highly detailed control over just your codec, bitrate, and filters.
- Must deal with massive batch processing (like 100s of files) and want to automate the workflow of a server.
- Are in a development setting where you heavily rely on scripting and the command-line for the execution of tasks.
Part 7: Troubleshooting common issues
Although FFmpeg usually functions well, its users who are new to it may struggle with installing it or running commands occasionally, and they might be faced with some common problems. Below are some examples of these problems alongside their solutions.
7.1 FFmpeg not recognized in Command Prompt/Terminal
The error message saying "ffmpeg is not recognized as an internal or external command" is a very common one, and it is most of the time telling you that FFmpeg hasn't been added to your system's PATH.
Fix: First, get to your system's environment variables and check if the folder where you keep the bin for FFmpeg is correctly added (for example, C:\ffmpeg\bin on Windows or /usr/local/bin in Mac). After completing the modifications, you should also reboot your Command Prompt or Terminal.
7.2 Unsupported codec errors
Sometimes FFmpeg may indicate errors that certain codecs are not found or are not supported, while it performs file conversion or playback.
Fix: Make sure that you are using the most recent FFmpeg build, as the new versions mostly come with more codecs. Then, if you are still making the same error, please try to set one very common usage codec (e.g., vcodec libx264 for video or -acodec aac for audio) in your command.
7.3 Slow conversion speed
It is not uncommon that when a person is going to convert a big or a high-resolution video with FFmpeg and it takes a very long time, that person should first check if it is because of the settings that he or she has chosen.
Fix: You can make the encoding process much faster by using the -preset option (e.g., -preset fast or -preset ultrafast) at the time of your conversion. Besides that, you are also able to modify the CRF (Constant Rate Factor) value; almost doubling the CRF value (e.g., from 23 to 28) will noticeably cut production and make the process faster with minimal quality loss.
Conclusion
FFmpeg is among the most potent open-source tools that can be used to handle video, audio, and other multimedia files. Its command-line interface might make it look like a beast that you cannot tame, but if you get to know the basic commands, converting formats, extracting audio, compressing, and merging videos, and so on, you will find that there are no limits to what you can do with media processing.
A step-by-step guide to installing FFmpeg on Windows and Mac was given here, along with key concepts, basic and advanced commands, and troubleshooting tips that make your experience more comfortable. For beginners who like looking at pictures and are more comfortable with a user-friendly editor, the Wondershare Filmora is an alternative that offers a simpler editor without losing quality.
If you are a creator, developer, or simply a fan of the craft, knowing how to use FFmpeg will give you control over your media projects that no one else will have. With the right commands and practice, you can not only change your editing flow but also perform almost any multimedia task with ease.
