


 ChatGPT
 Perplexity
 Gemini
 Claude
 Grok
Grok
Do you want to make your videos look more lively and dynamic? What if you could add slow-motion and fast-motion effects to them?
Well, the DaVinci Resolve speed ramp feature is one of the best ways to change the speed of your videos. This article will provide a step-by-step guide for using this feature. We will also explore whether you can add keyframes to DaVinci Resolve's speed ramp.
But hold on! There is more. You will learn tips on how to use this feature. We will also introduce you to the best alternative of DaVinci Resolve.
Let's dive in!
In this article
Part 1. What is Speed Ramping in DaVinci Resolve?
Speed ramp in DaVinci Resolve is a feature that lets you change the speed of your videos at different points. This way, you can make your videos more catchy and exciting.
Let's understand it with an example. Suppose you have a video in which someone is running. You can start the clip at a normal speed, slow it down when they jump, and then make it fast when they land. This will create a dynamic and visually appealing effect.
However, this feature is not just for action scenes. You can use it in any type of video to highlight the important moments or add a creative touch.
Key Features of the DaVinci Resolve Speed Editor
The key features of the DaVinci Resolve speed editor are given below:
- Speed Points: These are markers that you can place on your timeline to set where the speed change starts and ends. You can adjust these points to fine-tune your speed ramp.
- Graph Editor: This tool lets you see and adjust the speed curve of your video. You can create a gradual or sharp change in speed, as per the effect you want.
- Keyframes: Keyframes are basically points on your timeline where you can set different speed values. They allow precise control over how your video speeds up or slows down.
- Retiming Controls: These tools help stretch or compress your video clip to fit the desired speed change. You can easily drag these controls to adjust the speed of your video.
- Smooth Transitions: The Speed Editor allows you to create smooth transitions between different speeds. It makes sure that the changes you have made are smoothly playing.
Now that we know the basics of the DaVinci speed ramp feature let's move forward and explore how to use it.
Part 2. How To Speed Ramp in DaVinci Resolve?
Speed ramping in DaVinci Resolve is not rocket science. With precise control, you can create smooth transitions between different speeds. It makes your footage more engaging.
While the process involves many steps, you can make detailed adjustments to get the exact effect you want. One of the key features for this is the "Retime Curve," which helps create seamless speed transitions.
Though you need to learn to use the DaVinci speed ramp, the results are worth it. Now, let's explore the concrete steps to creating speed ramps in DaVinci Resolve.
Steps to Speed Ramp in DaVinci
You can follow the instructions given below to speed ramp in DaVinci:
Step 1: First, import the video you want to edit in DaVinci Resolve and drag it onto the timeline.

Step 2: Next, right-click on your video clip in the timeline. Select ""Retime Controls"" from the menu. The speed adjustment options will appear above your clip.

Step 3: Now, we are supposed to select the point where we want to change the speed and put the play head there. Then, click the dropdown arrow next to the speed percentage and select ""Add Speed Point." " You can add multiple speed points.

Step 4: Click again on the speed percentage between the speed points. Click ""Change Speed"" and select the desired speed. For example, choose 50% to slow down the video or increase it for a fast-motion effect.

Step 5: Right-click on the video clip. Select ""Retime Curve"" from the menu. This will open a graph below your clip that shows the speed changes over time.

Step 6: In the Retime Curve, you will see points representing your speed changes. Click the arrow on the top left of the curve panel and enable the " "Retime Speed" " option.

Step 7: You will see two buttons right in the middle of the graph panel. Select the curve one and adjust your keyframes to make your transition smoother. You can experiment with different locations and save that best sync with your video.

By following these steps, you can create smooth and professional-looking speed ramps in DaVinci Resolve.
Is It Possible To Create Speed Ramps in DaVinci Resolve Using Keyframes?
Yes, you can create speed ramps in DaVinci Resolve using keyframes. This method provides precise control over speed changes.
By adding keyframes and adjusting the speed between them, you can create smooth transitions. You can have a look at the steps we discussed earlier to add and adjust keyframes, ensuring smooth and professional-looking speed ramps in your video.
Additional Tips for DaVinci Resolve Smooth Speed Change
Here are some additional tips for DaVinci Resolve smooth speed change:
- This technique works well for slow motion, fast motion, or a combination of both.
- Try different speed and transition lengths to see what works best for your video.
- Adding sound effects can make speed changes more impactful and engaging.
- Be cautious with extreme speed changes, as they can affect video quality.
DaVinci Resolve speed ramping tools are reliable and efficient. They let you have precise control over your video timing. However, if you are a new user, a learning curve is required to use this tool and master this effect.
Part 3. How Do I Use the DaVinci Neural Engine for Speed Ramping
The DaVinci Neural Engine uses advanced AI to set itself apart from the standard speed ramp DaVinci Resolve 18. This helps create smoother transitions and maintain video quality. Unlike the manual adjustments required with the Retime Curve, the Neural Engine automatically analyzes and optimizes your video for the best results.
After following the step-by-step guide for adding keyframes and adjusting speed points, you can enhance your speed ramps further. Simply enable the DaVinci Neural Engine by selecting the "Speed Warp" option in the Inspector panel.

This will apply AI-driven enhancements, ensuring your speed changes are fluid and professional. However, if you want to explore a more easy way to get this job done, read the next part. It is for you!
Part 4. How Does DaVinci Resolve Compare to Filmora for Speed Ramping
As already discussed, speed raming can make your videos more dynamic and engaging. However, doing it on DaVinci Resolve can be a bit complex for newcomers. But don't worry! Let us introduce you to Wondershare Filmora, an alternative to DaVinci Resolve. Both these tools offer speed ramp features, but they cater to different skill levels of users.
If you are a beginner and want to add speed effects without making the process complex, Filmora is the best option for you. It offers a user-friendly interface with a lot of useful features. You can use them to edit and enhance your video with just a few clicks.
Advantages of Using Wondershare Filmora's Speed Ramping
- Customizable Speed Presets: Filmora provides a variety of speed ramp presets, such as "Montage," "Hero Moment," and "Bullet Time." These presets allow users to quickly apply different speed effects tailored to specific moments in their videos, enhancing the overall impact.
- Maintain Audio Pitch: Unlike some editing software, Filmora ensures that the audio pitch remains consistent even when the video speed is altered. This feature is crucial for maintaining audio clarity and ensuring that dialogue or music sounds natural, regardless of speed changes .
- Advanced Customization Options:You can add multiple keyframes to create complex speed changes, allowing for more intricate and dynamic edits. This flexibility enables editors to craft unique narratives and visual styles that suit their content.
- Streamlined Editing with AI Tools: Filmora incorporates AI-driven features like Automatic Scene Detection and AI Copilot Editing, which can enhance the editing process and help users create more polished videos with less effort.
You must have decided to use this tool by now. Therefore, let’s learn how to use Filmora to create speed ramps.
Video Tutorial for a Smooth Speed Ramp Creation
Steps to Speed Ramp in Filmora
First, download and install the Wodershare Filmora software on your PC/laptop. Then, follow the instructions given below:
Step 1: Launch the Filmora software, import the video you want to edit, and drag it into the timeline.

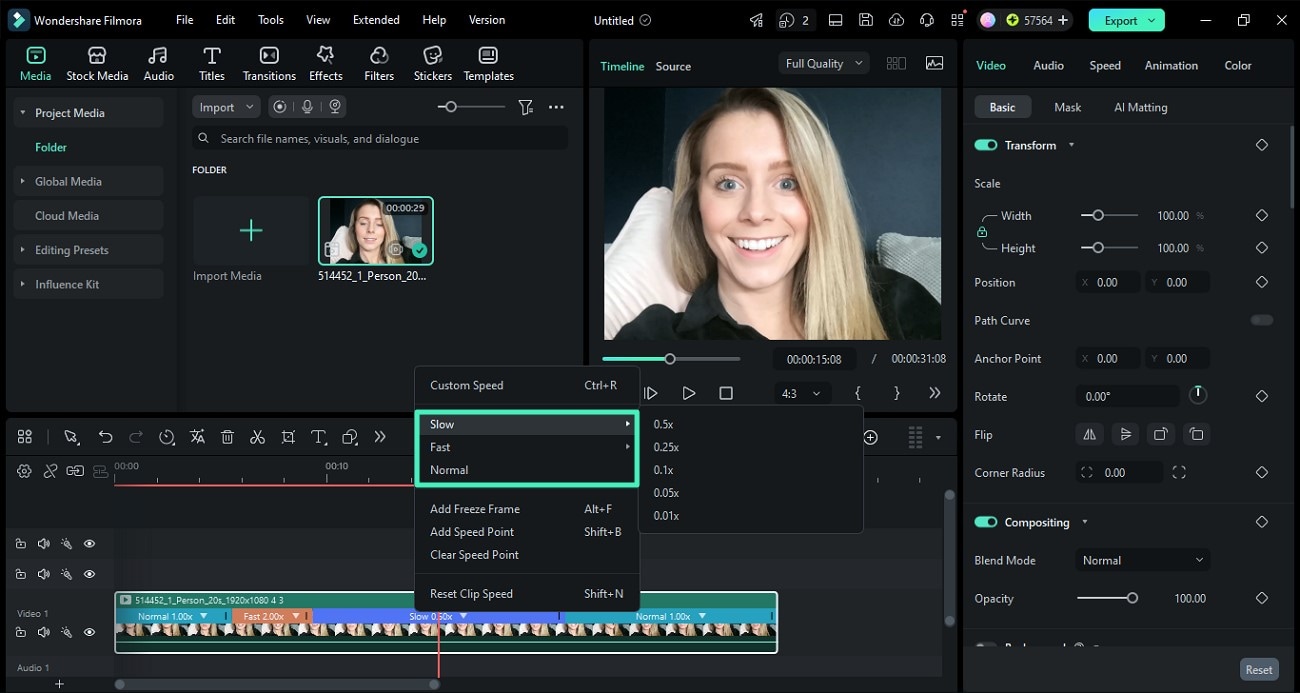
Step 2: Once your video is on the timeline, right-click on it and select ""Speed"" > " "Speed Ramping."" It will open a menu with effects on the left pane.

Step 3: You will see various options in the speed ramping menu. You can either choose the custom one to create your own effect or select from any ready-made one.

Step 4: Let's choose the custom one. You will see a graph with the keyframes on the same panel. You can move the keyframes or adjust the speed settings until you achieve the desired effect.

Step 5: Once you are satisfied with the speed ramping, click ""OK"" to apply the changes. Then, export your video by clicking on the " "Export"" button and choosing your preferred settings.

Tip: Update to Filmora v15.5.10+ to enable multi-segment speed adjustments for timeline clips (segment speed ramping). Read the full instructions here: Apply Segmented Speed Control in Filmora
Did you see how easy it is to create a speed ramp in Filmora? Like DaVinci speed ramp, there is no need to go through daunting steps—just a few clicks, and you are done. To better understand, let's compare both products and find out which is best for speed ramping.
Part 5. Comparison Table of DaVinci Resolve and Filmora Speed Ramp
In this section, we will compare a few aspects of the speed ramp feature of both editors. You can review them and decide which one is best for the users.
| Features | DaVinci Resolve | Filmora |
| Ease of Use | DaVinci Resolve's process involves more steps and clicks, which some users find less intuitive. | Filmora’s simple layout and clear instructions make it easy for beginners to use speed ramping without hassle. |
| Process | In DaVinci Resolve, you need to right-click the clip, select "Retime Controls," then "Retime Curve," and adjust the speed curve. | In Filmora, you can adjust speed directly in a few clicks. Or you can choose from the ready-made effects. |
| Precision | DaVinci Resolve offers precise control through its "Retime Curve" feature, allowing for detailed speed adjustments. | Provides simple speed adjustments with keyframes, making it easier to create smooth transitions. |
| Presets | DaVinci Resolve has limited presets, which some users find less useful. | Comes with various built-in presets that simplify the speed ramping process, especially for beginners. |
| Workflow | DaVinci Resolve's process is more time-consuming, with multiple steps for each speed change. | You can streamline the workflow, allowing for quick adjustments and efficient editing. |
| Advanced Features | Both software offers advanced features like keyframe manipulation and curve adjustments. DaVinci Resolve's "Retime Speed" option in the curve editor is praised for its flexibility. | Provides advanced features in a more accessible way, making it easier for users of all levels. |
| Integration with Other Tools | DaVinci Resolve's speed ramping integrates well with its color grading and effects tools. | Also integrates smoothly with its various effects and transitions. |
This was a brief comparison of both tools. DaVinci Resolve speed ramp is best for professional editors. It offers precise control which suits those editors who need to do detailed editing and are willing to invest time to learn the software.
Filmora, on the other hand, is perfect for beginners and casual editors. With its user-intuitive interface, they can quickly make the changes without learning it. You don't have to go through daunting steps to change the speed of the video. Meanwhile, it offers advanced features with easy-to-use options to enhance your video.
Well, the choice between DaVinci Resolve and Filmora may vary. It depends on your need, skill level, and the complexity of your projects.
Conclusion
Wrapping it up! Speed ramping is a great way to add speed effects to videos. This article has explored the DaVinci Resolve speed ramp feature. We walked you through the steps to use it and the key features of this tool. However, as discussed, the DaVinci speed ramp is designed for professional editors. It can be difficult for beginners to use.
This is where Filmora comes in. It offers the same features but with an easy-to-use interface and simple steps. This is best for those who have just started their video editing journey and don't want to go through complex steps. If you are among those users, try Filmora video editor and make your videos look stunning!
