"I've recently tried to use HitFilm Express to track a specific point in my video but couldn't find my way around its motion tracking features. Can anyone help me figure out how motion tracking works in HitFilm Express?" Yes, we can!
HitFilm Express is a free video editing software powerhouse packed with all the basic editing tools and top-grade features and tools, including color keying, motion tracking, and color grading. With its built-in assets, you can polish your video content to perfection. Stay with us as we delve deeper into the intuitive world of motion tracking with HitFilm Express.
In this article
Motion Tracking Features of HitFilm Express
The HitFilm Express's Motion Tracker enables you to track the movement of any object in your video by locking, isolating, and linking its movement to the contents of another video layer. The Motion Tracker tool requires two video layers in the timeline to work:
- The original video layer that provides the motion you wish to track;
- The target video layer where you want to add the isolated (tracked) motion.
Here's how it works. Let's say you have a video of a car in motion and wish to add animated text that follows the car's movement. The car is the original video layer, and the text is the target layer. So, all you need to do is apply the Motion Track effect to the target layer to get the desired outcome.
Tutorial for Motion Tracking in HitFilm Express
Below is a detailed step-by-step guide to using Motion Tracking in HitFilm Express to track the movement of any object in your footage. Install HitFilm Express and follow the steps below.
- Launch HitFilm Express on your computer and navigate to the Edit tab;

- Import your files (image, video, or both) by dragging and dropping them into the Media panel;

- Drag and drop the video file into the Editor timeline;

- Right-clip on the video in the timeline and select Make Composite Shot;

- In the Make Composite Shot window, name your video and click OK;
- Click the tab with your video and expand the menu next to the video layer you wish to track;
- Select the target object and enable Motion Tracker to open the Tracking panel;

- Add a tracker to the selected video layer to track the object's movement;

- Drag the tracker to the object you wish to track in your video;

- Go to the Track panel and select the motion tracking mode (Single or Double);

- Go to the Track Controls tab and select how you want to track the object;

- Go back to the video layer menu and expand the Tracker menu to access the tracking points and keyframes for different moving positions of the object.

Now, you have multiple tracking points for each keyframe in your video footage. You can use those tracking points to attach text or any other asset to the tracked object to make your video stand out.
The Other Motion Tracking Tool to Consider
If you find HitFilm Express a bit too much for your video editing skills, perhaps you should look into other motion-tracking solutions that can streamline the process and make things simpler. One such motion-tracking tool is Wondershare Filmora.
Filmora is an AI-powered video editing powerhouse packed with top-grade AI-enabled editing features you can tap into to polish your video footage to perfection. In addition to powerful editing tools, Filmora's Motion Tracking tool is a wonder on its own.
- Intelligent motion tracking – analyze and track the movement of one or several objects automatically, giving you access to the object's motion path;
- Enhance your footage with texts and titles – add texts and titles to follow the movement of the target to make your footage stand out;
- One-click face blurring– instead of adding effects frame by frame, Filmora allows you to apply the effect to every frame throughout the video using the intelligent Motion Tracking feature with the mosaic effect. You can censor, pixelate, or blur objects or faces with a single click.
- Create custom-made visual effects to boost storytelling – allow you to transform common symbols, video clips, images, and emojis into customized visuals and effects that you can apply to your footage.
Tell your story the way you wish your viewers to see it and allow the target audience to immerse themselves in the magical world you create with Filmora motion graphics.
How to Use Motion Tracking in Filmora?
Download and install Filmora on your computer, then follow the steps below to use Motion Tracking.
- Launch Filmora and navigate to the main menu; Select Create Project > New Project;
- Navigate to Files > Import > Import Media Files, select the video clip for tracking, and click Open to import it to the Media Library;
- Drag and drop the clip to the timeline;
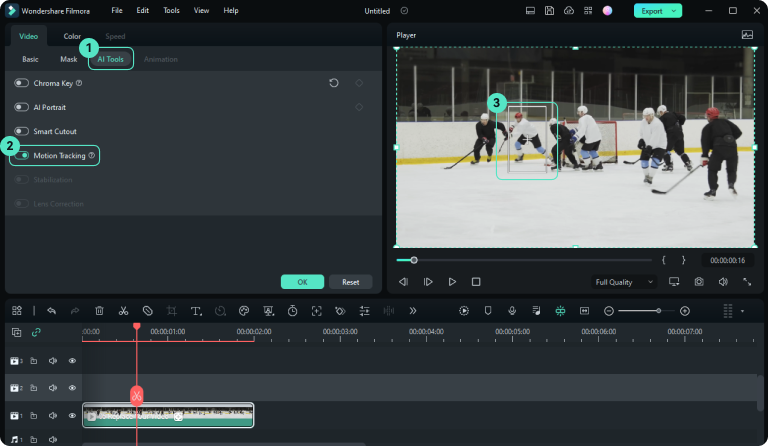
- Click the Video tab > AI tools > select Motion Tracking, move the tracker over the target object, and click Start Motion Track;
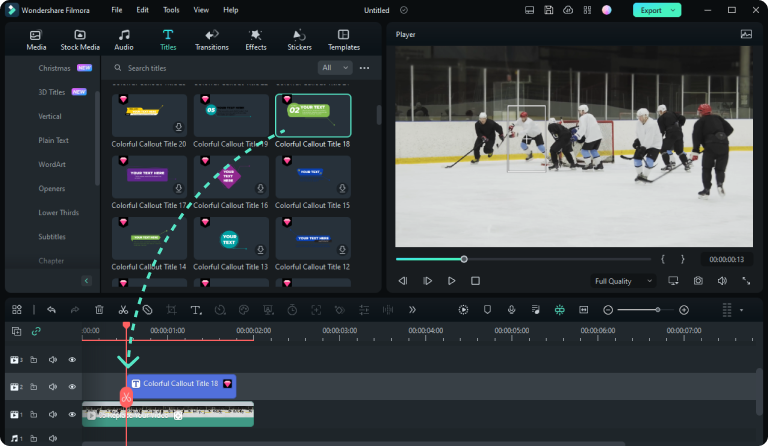
- Add an element, graphic, or text that you wish to follow the moving object;
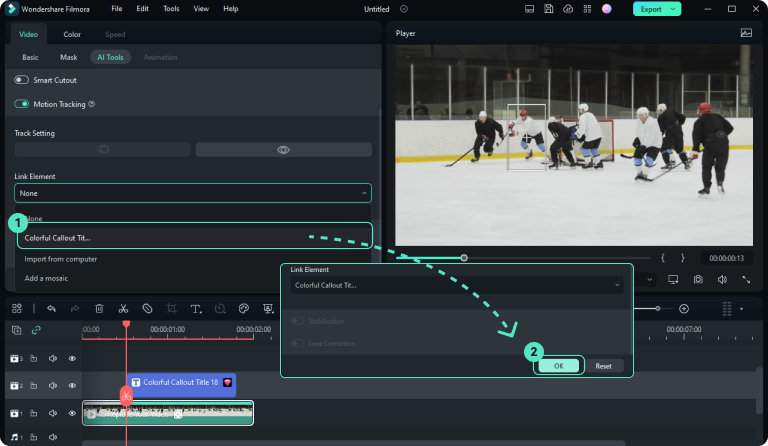
- Click the Motion Tracking dropdown menu and link the element to the target object;
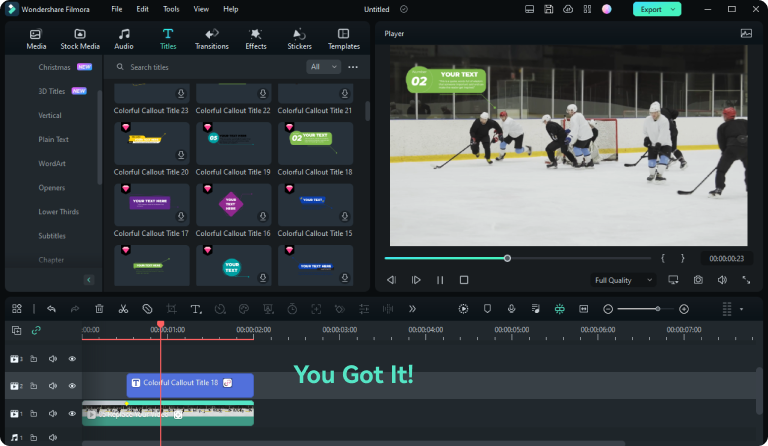
- Preview the changes you've made in the Player window;
- Click Export to save the edited video on your computer.
How To Use Motion Tracking With Filmora Mobile
As we all know, motion tracking is a complicated video editing skill requiring a desktop. However, these days, mobile apps are equipped with features to do it. This means that you can create advanced-level video editing procedures on the go. This is an excellent development because most videos are taken from a mobile phone. You might as well edit them using the device, right?
Filmora is one of those tools that offer this fantastic feature. To access it, follow the steps below:
Step 1: Download Filmora on your mobile phone (Android and iOS).
Step 2: Make a New Project, then import your video.
Tip: Using videos with a green screen is a more effective way to use motion tracking.
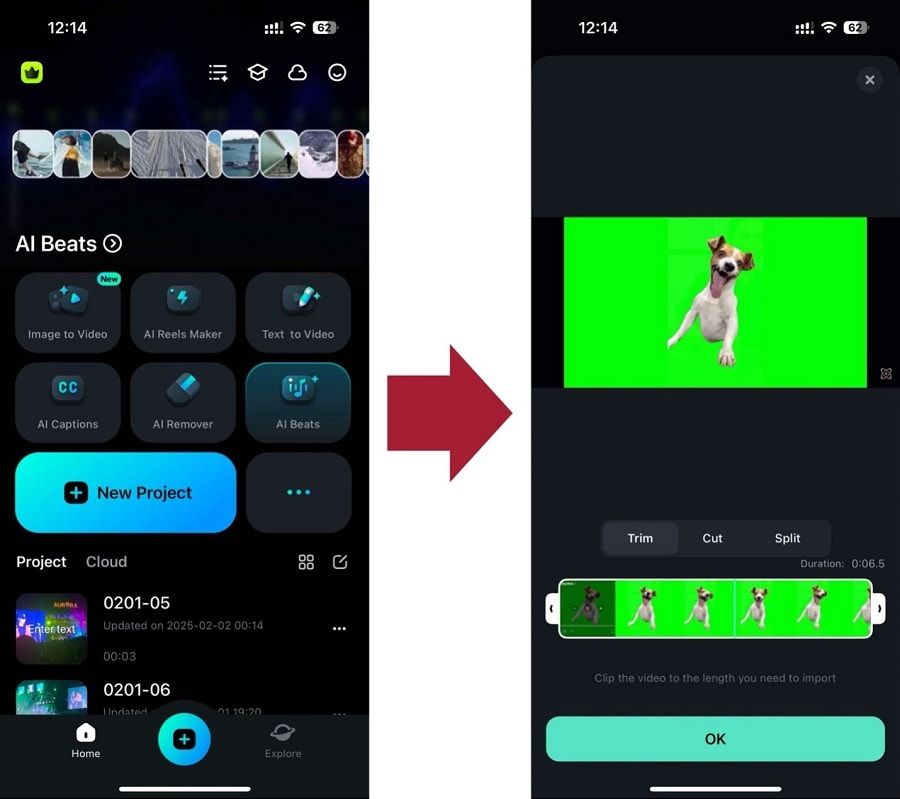
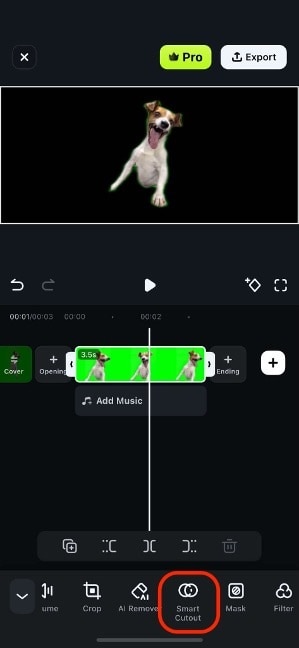
Step 3 (Optional): If you’re using a green screen video, use the Smart Cutout feature first to remove the background.
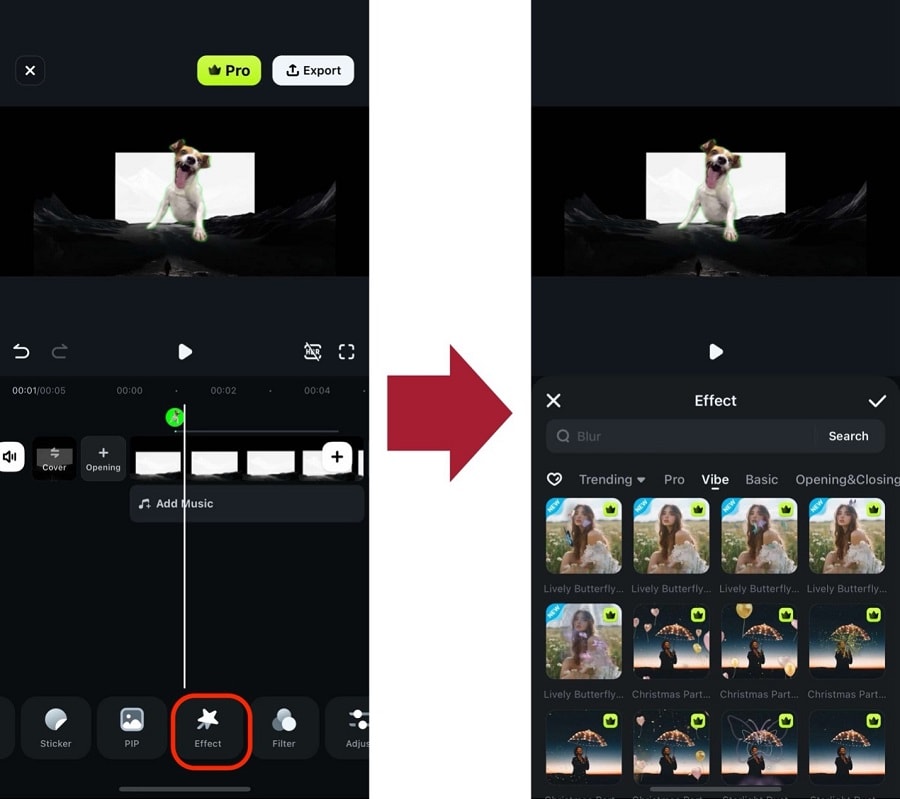
Step 4: Now, add an Effect to the video.
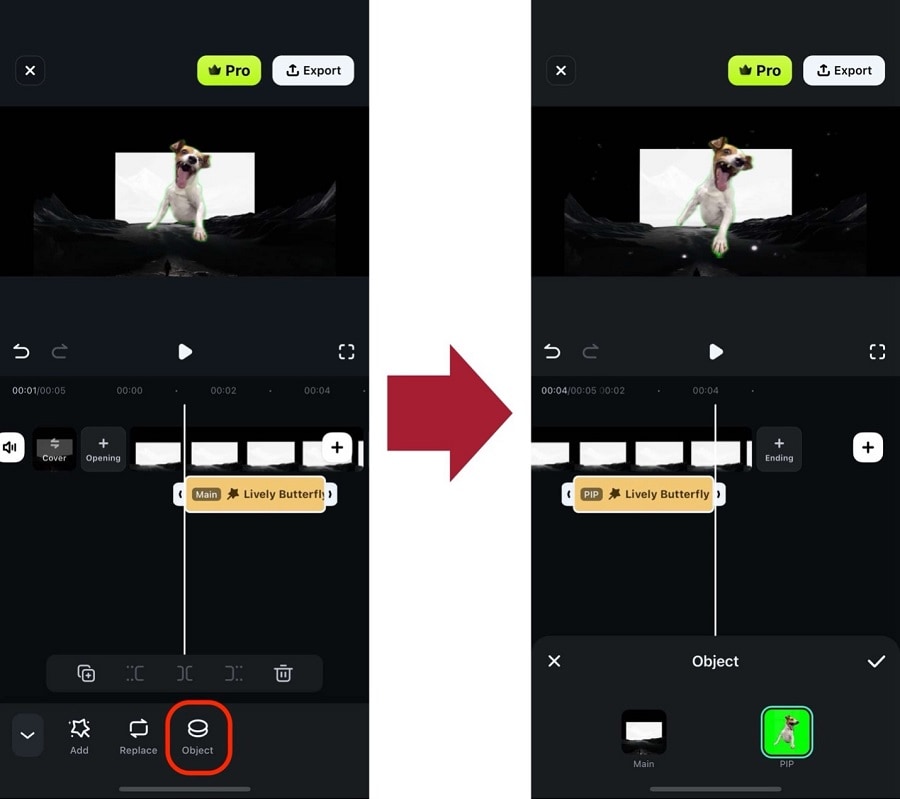
Step 5: Once the effect is applied, select the clip again. Then, go to Object and select the object you want to motion track. This will use the effect as the object moves.
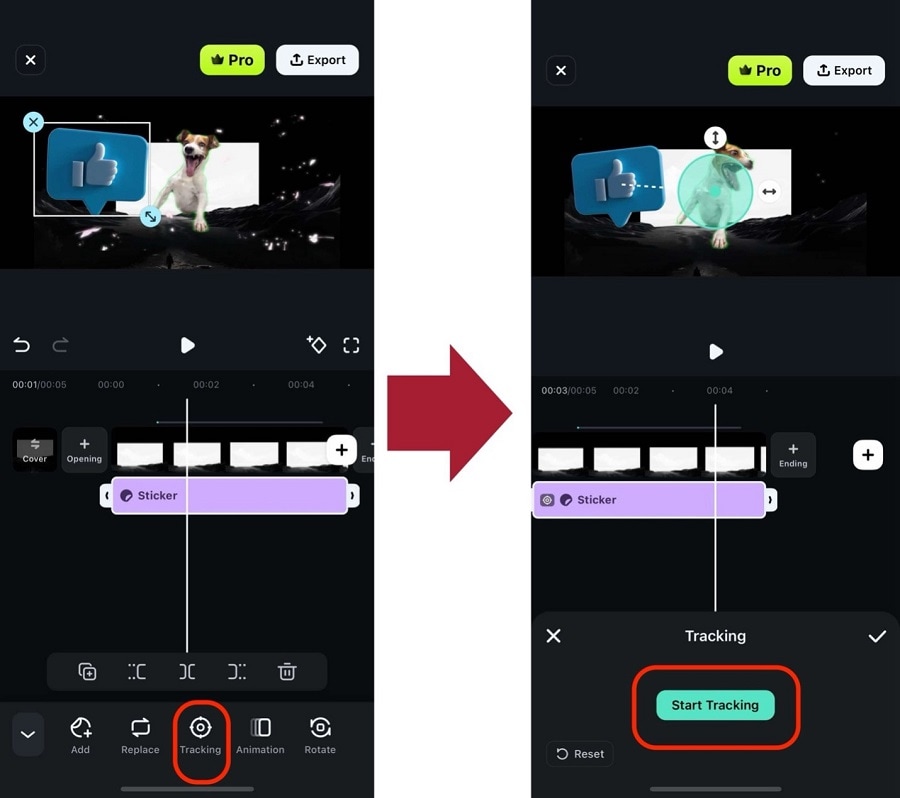
Step 6: You can also do the same on stickers or text. Select the object (Sticker or text) you’ve added, then go to Tracking > Start Tracking.
With the methods provided above, you’ve now unlocked the skill of motion tracking without using Blender on your phone. These advanced functions are made possible by Filmora, so try it out today!
- Learn how to track moving objects with precision.
- Add text, images, or effects that follow the action seamlessly.
- Enhance storytelling by keeping elements in focus.

Conclusion
In this article, we've learned how to use motion tracking in HitFilm Express, which requires a steep learning curve, including investing time and effort to get ahead of it. If that's not an option for you, you can streamline the motion tracking process with Wondershare Filmora. It makes professional video editing easier with the power of AI.
With Filmora, you can track the motion of several different objects, isolate keyframes by track points, and enhance the tracked objects with a wide range of high-end visual effects.


