DaVinci Resolve is a video editing software packed with a wide range of features, including video motion tracking. Tracking in DaVinci Resolve allows you to track objects, motion, or elements within a video frame. You might have seen videos where text or effects follow a person or object as it moves across the screen—that's likely the result of tracking.
While tracking can be challenging for beginners, this guide will walk you through the basics and inspire creative uses of video tracking. Before we get into the technical process, let's be familiar with how DaVinci Resolve tracks your video. Then, we will also give you tips on how to enhance your tracking skills and other accessible alternative software to DaVinci Resolve.
In this article
Part 1 Understanding Tracking in DaVinci Resolve
One thing that makes DaVinci Resolve great compared to other advanced video editing software is its Fusion workflow. This workflow provides a powerful node-based environment for working on advanced visual effects and motion graphics.
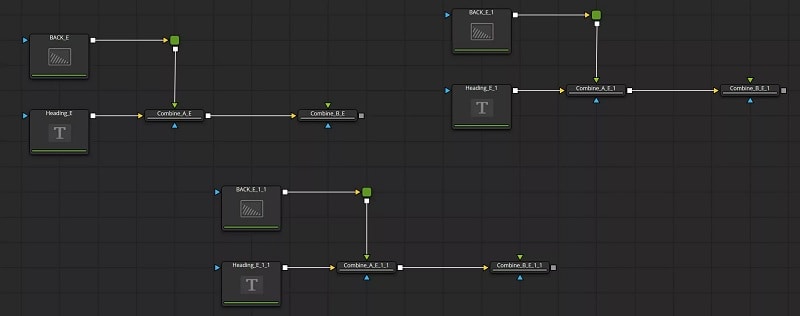
When compositing or working with visual effects in Fusion, tracking is one of the most commonly used techniques. It's especially useful for applying effects or graphics that stay synchronized with the moving elements.
There are a few tracking tools available in the DaVinci Resolve Fusion workflow. Understanding each tool can help you determine which tracking tool to use. You can also watch Jippman's YouTube video which gives a useful overview of these Fusion Tracker tools.
1. Planar Tracker
DaVinci Resolve Planar Tracker is designed to track flat surfaces, such as signs, TV screens, the side of buildings, or any other planar surfaces within a video. Unlike point tracking, which tracks individual points, the Planar Tracker analyzes the motion of an entire plane. It's ideal for tasks where you need to attach an element to a flat surface or stabilize footage that contains planar movement.
- Pricing: Available on the free version.
- Limitations: One limitation of the Planar Tracker in DaVinci Resolve is that it analyzes the entire selected area, which can lead to issues and tracking disruption if there are bright highlights, moving objects, or reflections within the tracking region. In such cases, switching to the "Point" tracker might yield better results.
2. Tracker (Point Tracker)
The Point Tracker, also known simply as the "Tracker," focuses on tracking specific points or small, distinct features within your video. This tool can track changes in position, and if you set multiple points, it can also handle scaling and rotation. It's best suited for tasks that require tracking a small region of the frame, such as adding motion blur to a moving object or attaching text or graphics to a specific point in the scene.
- Pricing: Available on the free version.
- Limitations: The Tracker tool can struggle with tracking accuracy if these points become obscured or if there are significant distractions such as bright highlights or reflections. The tool may also require manual corrections, particularly in complex scenes or with significant camera motion, as it may not handle rapid changes or large-scale movements effectively.
3. Surface Tracker
The Surface Tracker is designed to track more complex surfaces that may warp or bend over time, such as clothing, skin, or any other non-rigid surfaces. This tool is excellent at following the movement and deformation of these surfaces. It's ideal for tasks like applying tattoos, graphics, or textures that need to move and deform naturally with the surface.
https://www.youtube.com/watch?v=N0LAdGm9d9U
- Pricing: Available on the free version.
- Limitations: The Surface Tracker may face limitations when dealing with extreme surface deformations or poorly defined areas with insufficient texture. Its accuracy can be compromised if the surface lacks contrast or if the scene is highly detailed and demanding.
4. Camera Tracker
Fusion's Camera Tracker node calculates the path of a live-action camera and generates a virtual camera in 3D space with matching motion. This virtual camera replicates the movement of the actual camera that recorded the scene, so you can add 3D elements to the footage.
- Pricing: Available on the Studio version.
- Limitations: When using the Camera Tracker tool for 3D tracking in DaVinci Resolve, complex scenes with significant depth changes or numerous moving elements can pose challenges, and the tracking process can demand substantial processing power.
Part 2 How to Use Tracking Features in DaVinci Resolve?
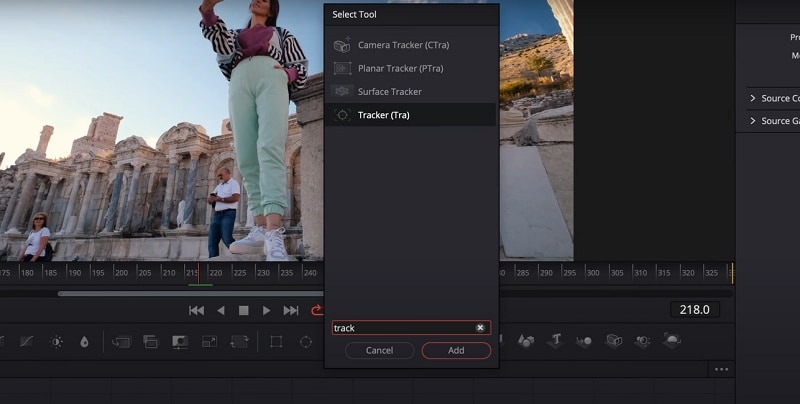
To open DaVinci's tracker tools, you need to click the media on your Fusion workflow and press Shift+Spacebar. Then, it will bring up a selection of tools on DaVinci Resolve. Search for "Tracker" and you will see the tracker tool options as mentioned before. After selecting the tracker tool you need, you can click "Add."
Alternatively, you can also right-click the media node on the workflow and select Insert Tool to open the tools options.
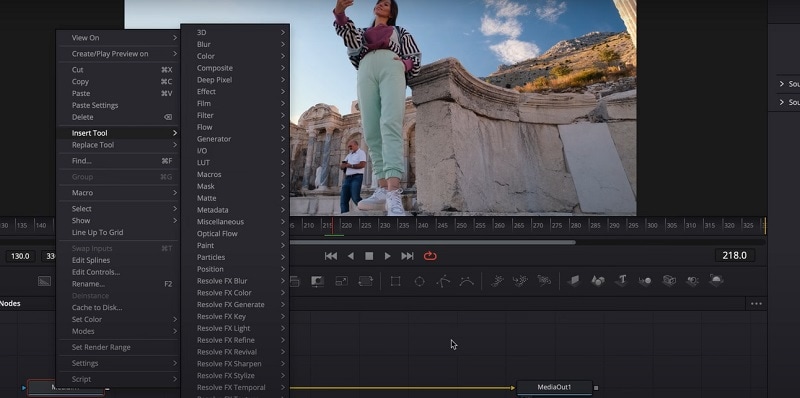
Once you have added the tracker tool, the next step is to determine how you want to use it. Below, we have provided a few use cases to help you understand how to effectively apply object tracking in DaVinci Resolve.
Feature 1: Planar tracking
We will demonstrate this tutorial from Jippman's YouTube video. To perform Planar Tracking, start by adding the Planar Tracker node and selecting the area you want to track using a Polygon. This area should be on the same flat surface where you'll apply the effect, but it doesn't have to be the exact spot where the effect will appear. Often, the best tracking points are just outside the area you want to edit, where there's good contrast.

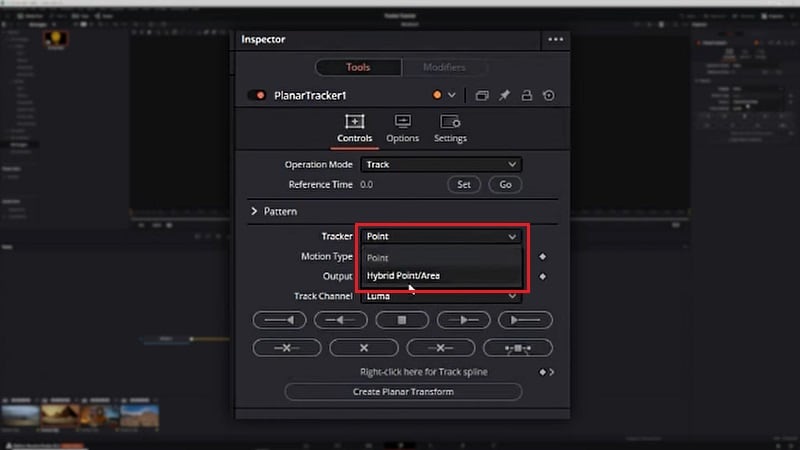
The Planar Tracker offers two types: ""Point"" and ""Hybrid Point/Area."" Point Tracker tracks individual points within the selected area. It's simpler and can be effective if you have only a few high-contrast points to track. Meanwhile, Hybrid Point/Area Tracker combines point tracking with area tracking. This tracker offers higher accuracy by analyzing both points and the surrounding area.
Why does the Planar Tracker not Track to the end?
There's a question in the Blackmagic forum about why the Planar Tracker might not track through to the end of a sequence. This issue often arises when the tracked area becomes occluded or obscured. To address this, you have a few options:
- Attach an Occlusion Mask: You can create and apply an occlusion mask to cover areas where the tracked surface is hidden or blocked.
- Adjust the Tracked Area: Modify the tracked area to include different parts of the sequence where the surface remains visible.
- Manual Adjustment: Intervene manually to fix any areas where automatic tracking fails. If you're using the Corner Pin tool, this can be done by animating the corner points for the problematic frames to maintain accurate tracking.
You May Also Like: How to Mask in DaVinci Resolve
Feature 2: Motion tracking
A simple motion tracking on DaVinci Resolve can be done using the regular Tracker tool. After adding the Tracker node, place the tracking points on distinct, high-contrast areas to ensure accurate tracking.
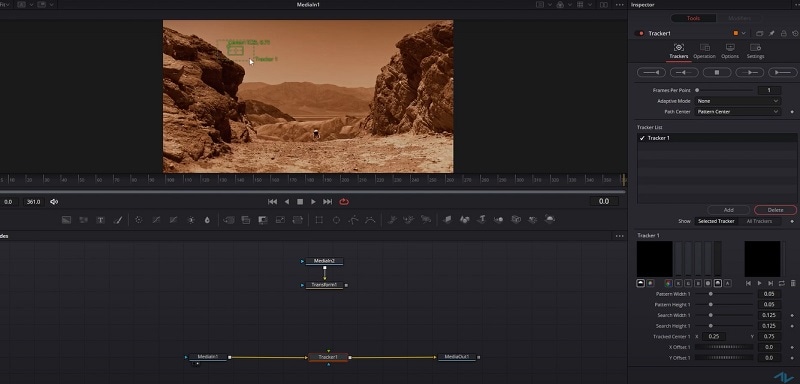
Play through the sequence and let the Tracker tool analyze the movement of the selected points. The tool will create a tracking path based on the motion of these points.
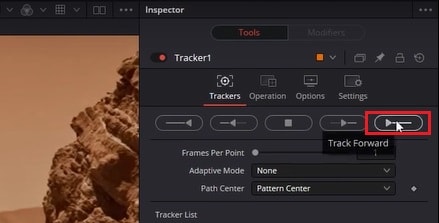
Once tracking is complete, you can use the tracking data to apply effects or elements that follow the motion of the tracked points. For example, you can add graphics that move in sync with the tracked object. For a more detailed tutorial for motion tracking on DaVinci Resolve, you can watch ActionVFX's video on YouTube.
Feature 3: Text tracking
For text tracking in DaVinci Resolve, the technique you use will depend on the surface you are tracking. If you're placing text on flat surfaces like walls, it's ideal to use the Planar Tracker. Follow the steps mentioned earlier to achieve this effect.
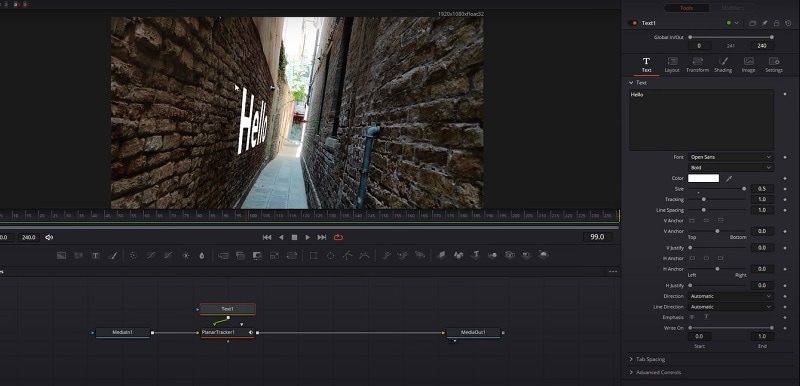
Then, to track the text, drag and drop the Text node in the Fusion workspace and connect it to the "Tracker" node. In the viewer, position the text where you want it to appear in relation to the tracked area.
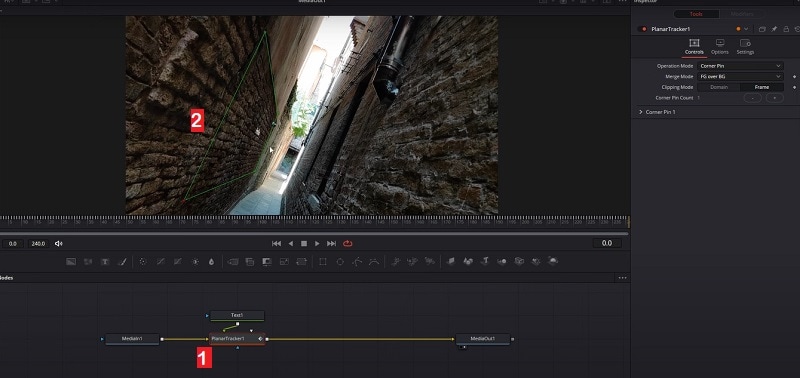
Customize the text's font, size, and color in the Inspector. You can watch the full tutorial on DaEx's YouTube for more details.
For complex surfaces like a textured shirt, use the Surface Track er tool. Define the surface with the Bound option, customize the Mesh points, and start tracking by clicking Track Forward under the Track option. After tracking, connect the Text node or other object element to the Tracker node.
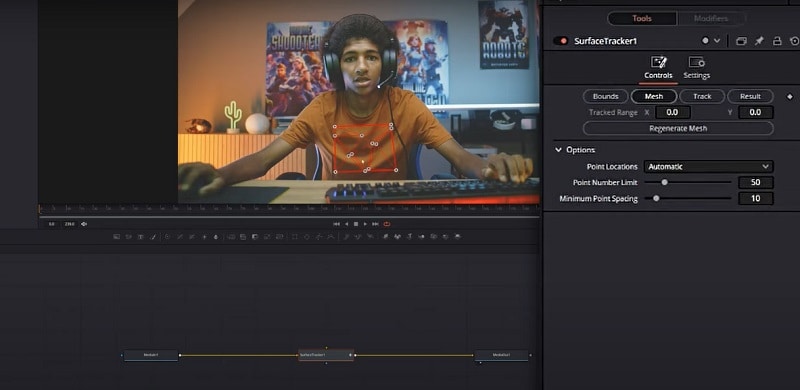
Can I do 3D Text Tracking in DaVinci Resolve 18 Free Version?
There's a question on Reddit asking if we can do 3D text tracking in the DaVinci Resolve free version. While you can do text tracking using the Planar tracker, you need the Studio version for the 3D camera tracker.
Feature 4: 3D tracking
For 3D tracking on DaVinci Resolve, you'll need to use the Camera Tracker tool, which is available on the Studio version. It will allow add other elements to the 3D scenes in your footage.
After adding the Camera Track er node, there will be a bunch of settings in the Inspector panel. Clicking the Auto Track under the Track tab will auto-track your footage and generate blue dots that help track your footage.
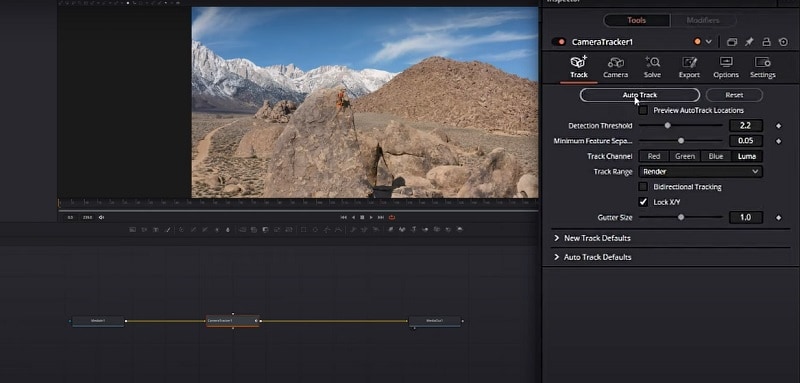
The Camera tab will show you information regarding the camera you are using. Meanwhile, the Solve tab helps in adjusting any tracking errors in your footage. Go to the Export tab if there's no problem with your tracking to adjust and generate the 3D nodes. Then, see and follow the full tutorial here to make use of Camera Tracker for 3D tracking.
Part 3 How to Enhance Your Tracking Skills
After learning all the methods of tracking in DaVinci Resolve, it doesn't stop there. If you want to become more professional in video editing, here are some tips to enhance your tracking skills and be familiar with the software quickly:
- Understand the Basics Thoroughly
People often want to jump straight into advanced techniques, but having a solid understanding of the basics—such as keyframing, motion estimation, and the different types of tracking (point, planar, and 3D)—is important. Mastering the basics will make it easier to tackle more complex tracking tasks.
- Experiment with Different Tracking Tools
Different tracking software and tools may offer unique features and capabilities. Experiment with various tools to understand their strengths and weaknesses, and find the ones that best suit your needs.
- Keep Practicing and Learning from the Experts
Consistent practice is key! Study tutorials, attend courses, and review case studies to gain insights from experts in tracking. This continuous learning will help you adjust to the software quickly. Remember that consistent effort will lead to improved skills over time.
Part 4 Wondershare Filmora: A Simpler Alternative for Easy Tracking Without DaVinci Resolve
If you are feeling overwhelmed by the tracking features in DaVinci Resolve, Wondershare Filmora is an accessible alternative that is much easier to use while offering motion-tracking features. Those who want effective tracking capabilities without the complexity of more advanced software will find Filmora useful.
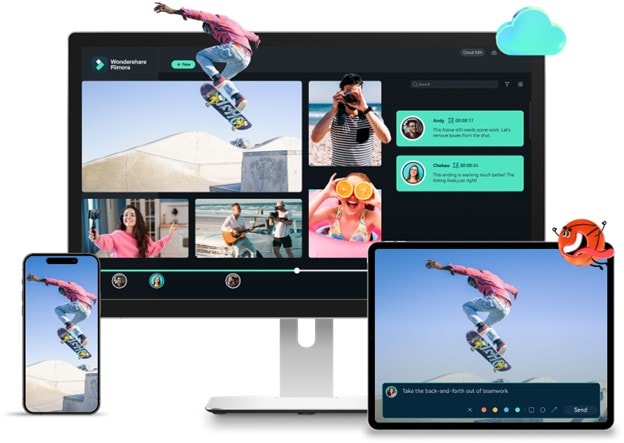
Filmora is a powerful video editing software designed for ease use. The motion tracking feature in Filmora is intuitive and straightforward, which helps users track objects or text almost automatically.
The main features of filmora's motion tracking are summarized as follows:
- Object Tracking: Allows tracking of any moving object, such as a person or hand, throughout the video.
- Overlay Options: Users can add various elements like text, images, or videos that follow the tracked object's movement.
- Customizable Text and Images: Users can customize the size, orientation, and duration of text or images that follow the tracked object.
- Playback and Fine-tuning: After applying motion tracking, users can playback the video to check the results and make adjustments as necessary.
- Playback and Fine-tuning: After applying motion tracking, users can playback the video to check the results and make adjustments as necessary.
- Multiple Object Tracking: Users can track multiple objects by selecting different layers from a dropdown menu after the initial tracking is done.
Is Filmora Motion Tracking Free?
Wondershare Filmora is free to download on Mac and Windows. The motion tracking feature is available on the free version. However, there will be a watermark when exporting. If you want to remove the watermark and access its full features, you can upgrade your plan starting from $9.99/month or $49.99/year only, depending on the country and the device you are using.
How to Use Filmora Motion Tracking
Step 1: Create a new project and import your videos.
After installing the latest version of Filmora, launch and create a new project. Then, import your videos for tracking from your local folder or Filmora's Stock Media. Add them to the editing timeline.
Step 2: Apply motion tracking to your video.
To apply motion tracking to your video, click the clip in your timeline and go to AI tools to enable the motion track on the right panel. Adjust the selection of the object you want to track and click "Click to start motion track" to proceed.
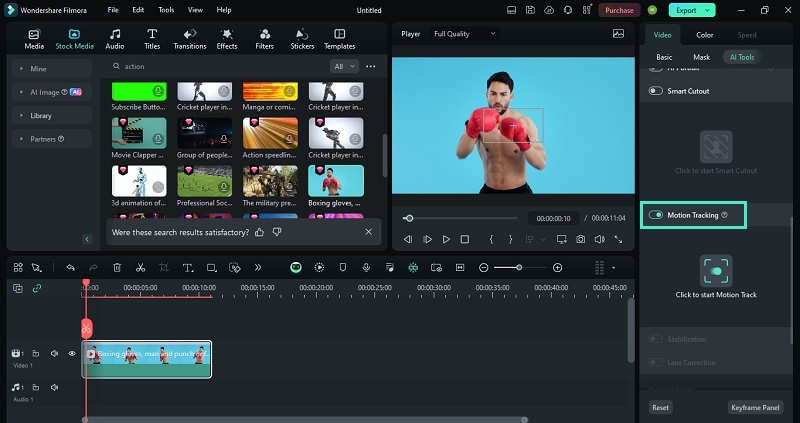
Adjust the tracking area on the preview window. Make sure that the subject you wish to track remains within the frame throughout the entire clip. To proceed, click the Start Tracking button and it will automatically track the area you've selected.
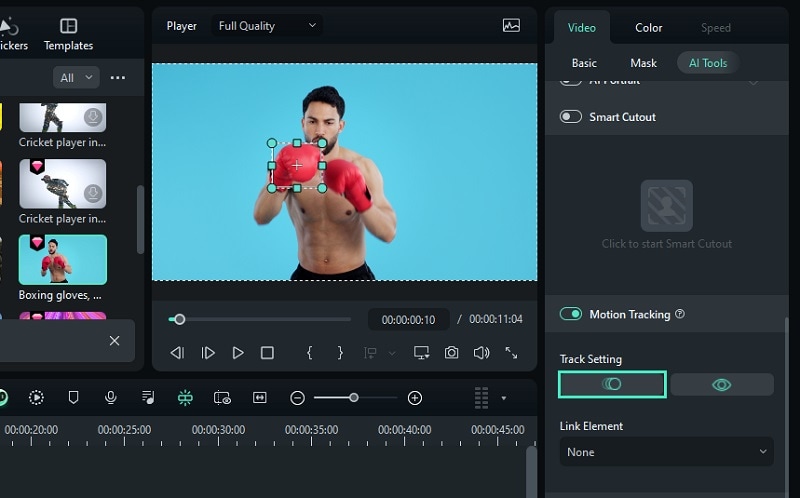
Step 3: Add and adjust the object for tracking
Import the object you want to track (such as text, a sticker, or an image) and place it above the main video track. Adjust its position, size, and orientation as needed.
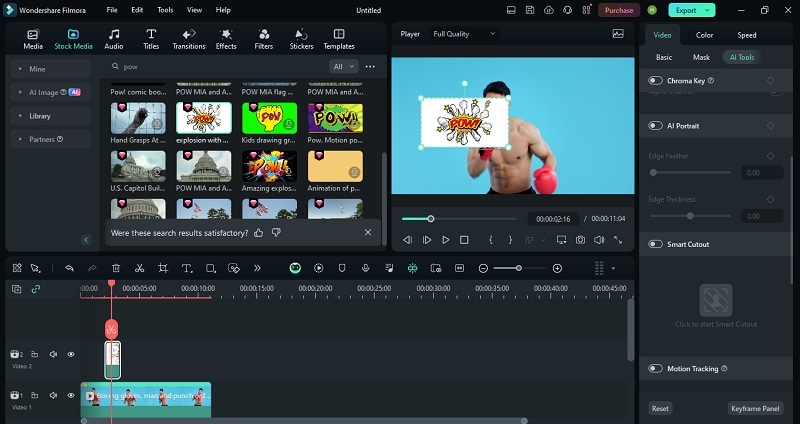
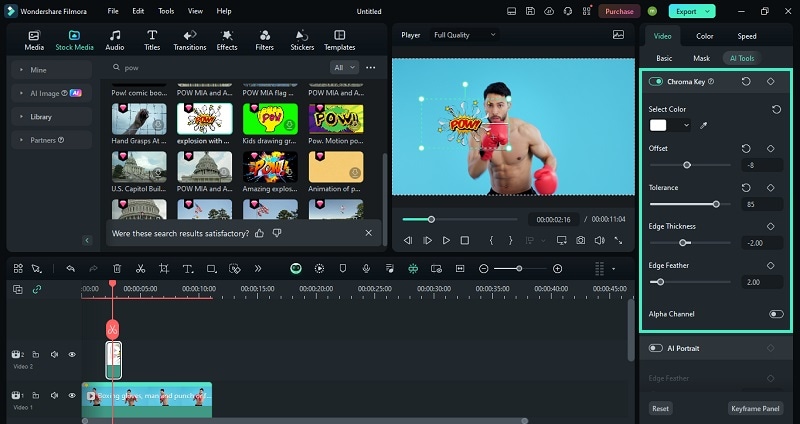
If the object has a solid color background that you need to remove, use the Chroma Key tool. Select the element clip on the timeline, go to Image/Video > AI Tools in the property panel, and enable Chroma Key. Use the eyedropper tool to select and automatically remove the background color.
For more complex backgrounds, use the AI Smart Cutout feature. Go to Image/Video > AI Tools and enable Smart Cutout. Then, click the "Click to start Smart Cutout" button.
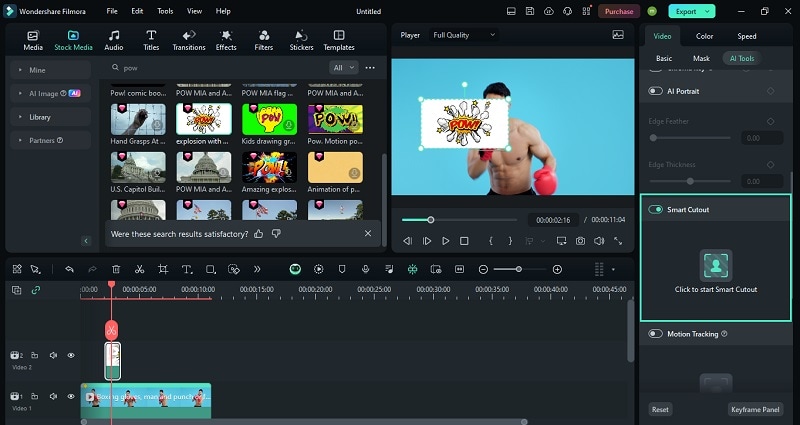
Once a new window appears, select the area you want to keep using the brush and the tool will remove the area you don't select. Click Save to proceed.
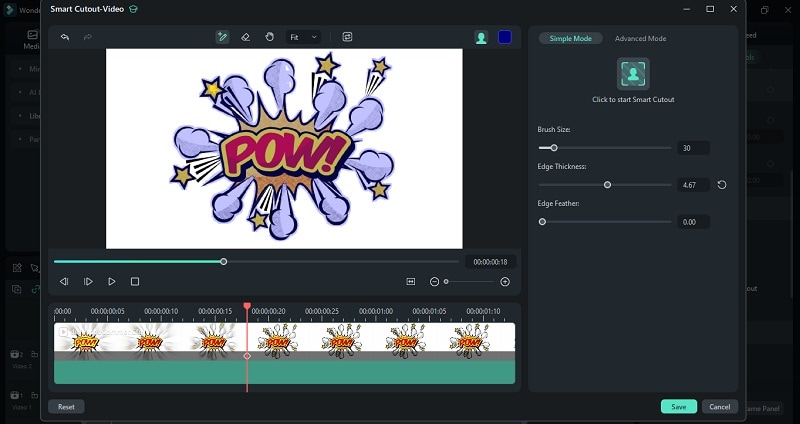
Step 4: Apply the motion tracking to the following object
Back to selecting the video clip with motion tracking on the timeline. Open the dropdown menu for Link Element under Motion Tracking and choose the object you want to follow the tracked movement.
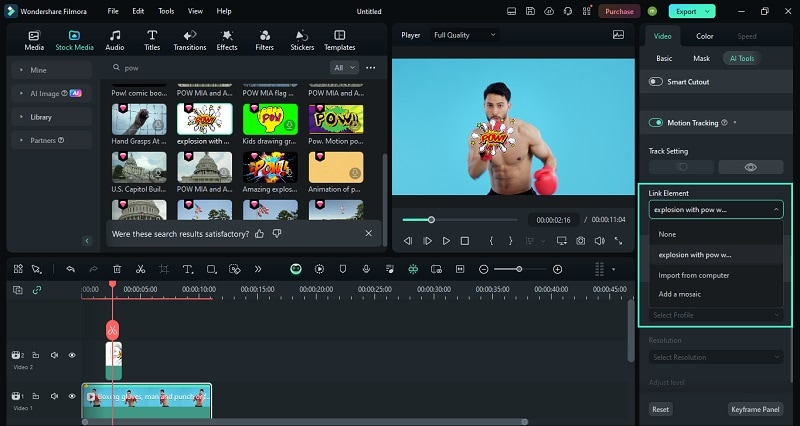
Step 5: Review the motion tracking result
Play the video to preview the tracking. If done correctly, the object will follow the movement of the subject in your video.
Tracking Feature in Filmora vs. DaVinci Resolve: Quick Comparison
After learning about the tracking feature in DaVinci Resolve and Wondershare Filmora, the differences between them become clear. DaVinci Resolve offers more advanced tracking tools, making it perfect for detailed visual effects work. Meanwhile, Wondershare Filmora is more beginner-friendly. It provides an easier and quicker way to achieve basic tracking while still providing other powerful features.
See the table comparison below for a side-by-side look at how these two tools stack up in terms of ease of use, cost, features, and overall performance.
| Filmora | DaVinci Resolve | |
| Ease of use | User-friendly interface; suitable for beginners. | More complex interface; requires some learning. |
| Pricing | Free version available. Paid plans are more affordable, starting from $9.99/month, with the perpetual plan costs $79.99, depending on the country and the device you are using. | Free version available. The Studio version is relatively more expensive at $295. |
| Features | Motion tracking | Planar tracking Point tracking Surface tracking Camera tracking |
| Performance | Adequate for basic motion tracking | High performance but requires more system resources for complex tasks. |
| Render speed | Generally faster | Need more processing power for complex tracking |
| Limitations | Limited to basic tracking and effects | It can be overwhelming for beginners; requires more powerful hardware for advanced features. |
Conclusion
Many editors use the DaVinci Resolve tracking feature to create complex visual effects and seamlessly integrate elements into their projects. Thanks to its Fusion workflow, you can perform detailed motion tracking with high precision. Some of its tracking tools include the Planar Tracker, Point Tracker, Surface Tracker, and Camera Tracker, each with its own specific applications for different types of tracking needs.
But while DaVinci Resolve generates a high-quality tracking result, it can also be complex and require a steeper learning curve. In such cases, we have also provided a motion tracking alternative, which is using Wondershare Filmora. This software offers a more creative approach to motion tracking, making it easier to achieve good results with less effort.


