
 100% Security Verified | No Subscription Required | No Malware

What is audio normalization? Simply put, audio normalization is an automated gain adjustment that ensures consistent volume across your clips. Whether you need an AI audio normalizer to fix volume spikes or an audio leveler online for a quick podcast edit, this guide covers it all.
Audio normalization is a powerful tool that ensures consistent sound levels across your music, podcasts, videos, or audio content. It enhances the experience and makes your content sound professional. If you're a content creator or an audio fan, know this. It's crucial to understand audio normalization. You must know how it works and when to use it.
In this article
Part 1. What is Audio Normalization and What Does it Do?
Audio normalization is the process of adjusting an audio file's gain so its loudness or peak level matches a target value. It evens out volume jumps across clips without changing the content itself.
Audio normalization adjusts the overall volume of an audio file to ensure consistent levels. This feature analyzes the peaks or loudness of the audio and aligns them within a specific range. So, if you are a podcast fan or YouTube viewer, you can enjoy a seamless experience. Here is the audio normalization benefits you need to know:
- A smoother and more enjoyable listening experience
- Professional-grade audio for podcasts, videos, music, and other media

Types of Audio Normalization
- Loudness normalization adjusts audio levels to match how humans perceive loudness. It measures loudness over time, not just a moment's volume. It uses standards like LUFS (Loudness Units Full Scale) to ensure a consistent, natural listening experience.
- Peak normalization adjusts audio levels by targeting the track's highest peak. It ensures the loudest moment reaches a specified level. This process doesn't change the overall loudness or perceived volume of the entire audio file, focusing only on the peak amplitude.
When to use Audio Normalization
Audio normalization has countless uses. It applies to podcast production, video editing, and live streaming. However, it's not always the right tool, especially in scenarios where dynamic range is critical. Stay tuned as we explore how to use audio normalization effectively, and the best software you might want to try.
Part 2. Volume Normalization vs Loudness Normalization
What Is Volume Normalization?
Volume (peak) normalization sets the loudest sample to a defined ceiling (e.g., -1 dBFS), without guaranteeing consistent perceived loudness across the full clip.
Audio Normalization & Dynamics Processing Methods
| Method | What it adjusts | When to use | Pros | Cons |
| Peak/Volume Normalization | Highest sample to target (e.g., -1 dBFS) | Quick leveling between clips | Fast, simple | Perceived loudness may still vary |
| Loudness Normalization (LUFS) | Integrated loudness to target (e.g., program loudness) | Podcasts, videos, streaming | Consistent listening experience | Requires analysis |
| Compression | Dynamic range | Dialog balance, music | Controls peaks | Can sound squashed if overused |
| Limiting | Hard ceiling | Prevent clipping | Prevents overs | Artifacts if pushed |
Why Normalizing Audio Matters for Social Media
Platforms like YouTube and Spotify have strict loudness normalization standards. If your audio is too loud, they will turn it down (limiting your quality); if too quiet, your audience won't hear you. Using Filmora’s auto normalization ensures your content hits the -23 LUFS (or -14 LUFS for web) sweet spot every time.
Part 3. How to Normalize Audio in Filmora (Step-by-Step)
 secure download

When it comes to audio normalization, having the right software can make all the difference. Among the many tools available, Wondershare Filmora stands out as an all-in-one solution for both video and audio editing. Its user-friendly interface and powerful features make it great for creators of all levels. Its seamless workflow is a plus!
Filmora simplifies complex editing tasks, including audio normalization. Whether you are balancing sound for a podcast, fine-tuning music for a video, or ensuring consistent volume for a live stream, Filmora offers powerful tools to get your tasks done easily.
Key Features:
- Automatic Audio Normalization: Filmora's audio normalization feature balances the volume of your audio tracks. It ensures a professional sound output.
- Multi-Track Audio Editing: Filmora normalizes audio across multiple tracks. It's ideal for videos with dialogue, music, and sound effects.
- Customizable Options: Unlike some tools that offer only basic adjustments, Filmora provides customizable settings to match your specific needs, whether for peak or loudness normalization.
- Integrated Video and Audio Editing: Filmora offers more than just audio normalization. It has a full set of video editing tools. You can create enhanced content without switching between software.
Filmora sets itself apart from other software with its ease of use, all-in-one functionality, and affordability. Many audio tools require advanced technical knowledge. Filmora's design lets you do audio normalization without losing quality seamlessly.
Unlike software that focuses only on audio, Filmora integrates video and audio editing. It provides a complete solution for creators. Additionally, it offers pro features at an affordable price. So, both hobbyists and pros can use it for high-quality work.
How to Use Audio Normalization in Filmora
Step1Import your clips into Filmora.

secure download
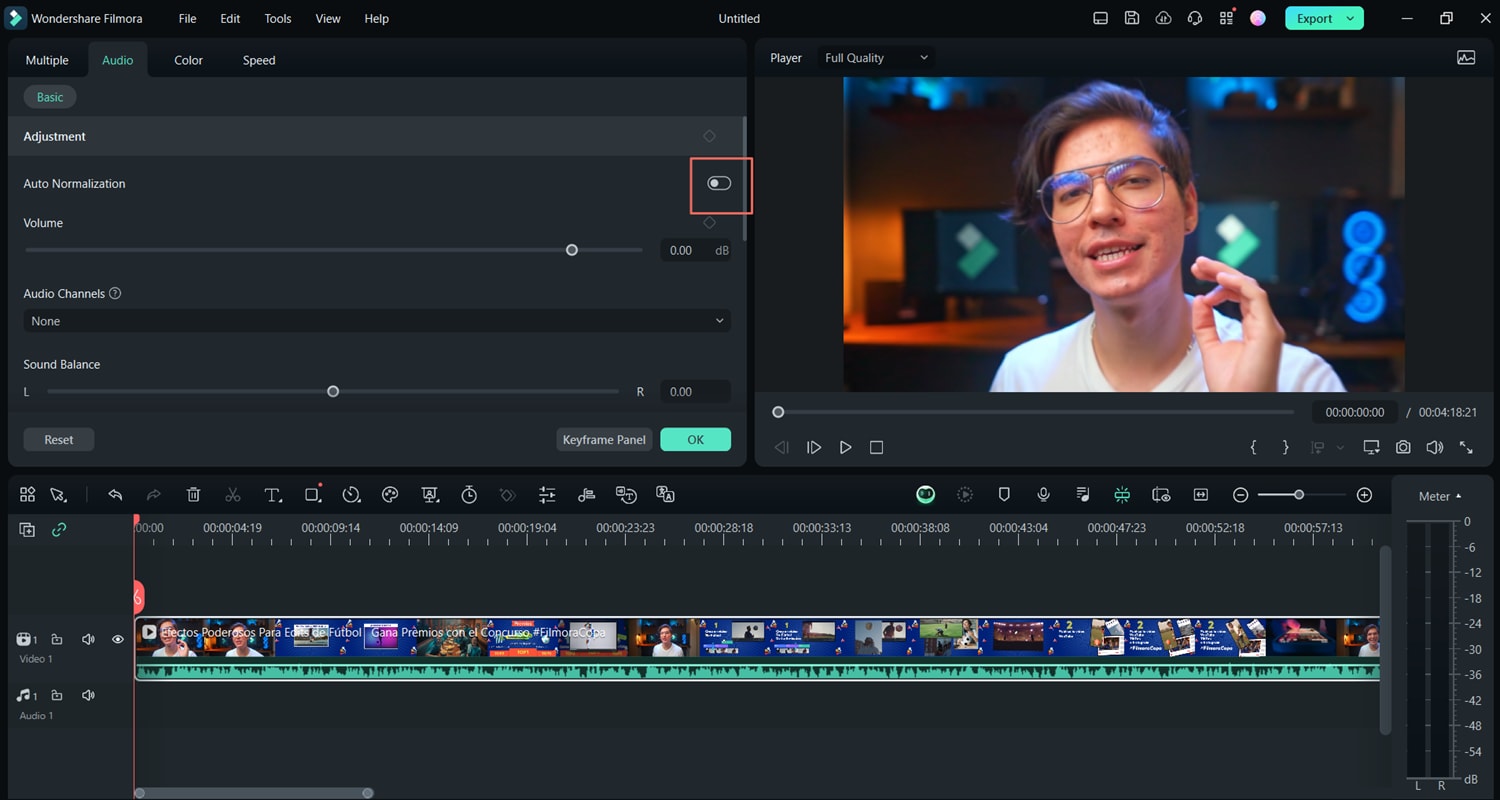
Step2Select the clip → Audio > Adjust Audio → toggle Auto Normalization.
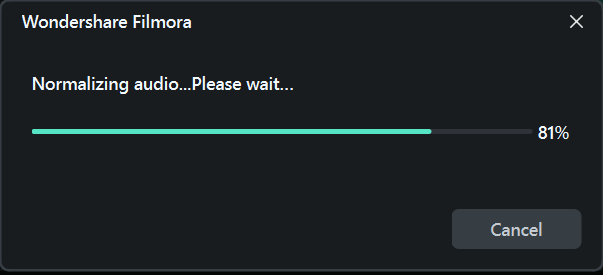
Step3Analyzes selected clips automatically.
Filmora analyzes all selected clips and aligns them to the European program loudness standard (~‑23 LUFS) automatically.
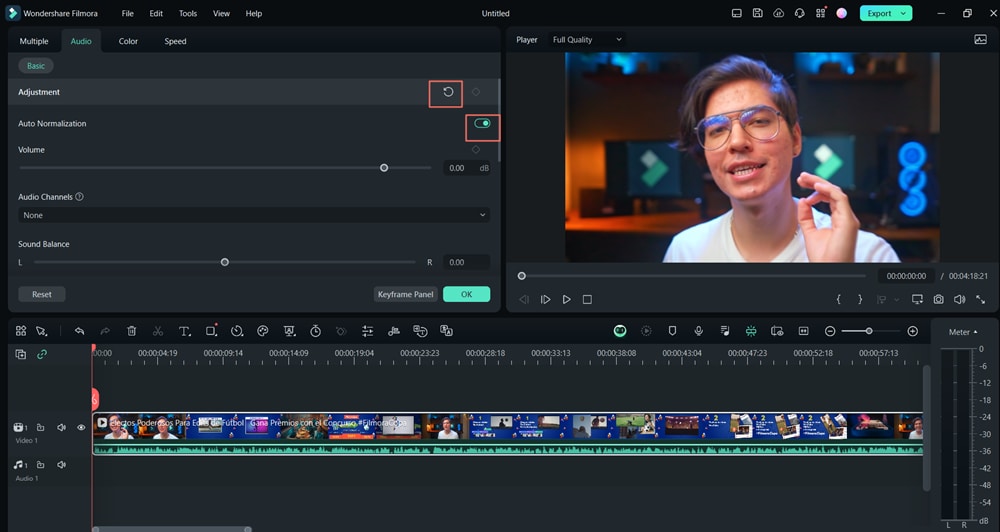
Step4Fine‑tune with the volume slider or re‑check icon if needed.
Part 4. Normalize Audio Online (Free Options + When It's Enough)
Don't want to download or install software? You can normalize audio directly in your browser. Online audio normalizers are quick, free, and ideal for simple projects like podcasts, interviews, or voice memos. Below are some reliable free options:
1. AudioMass (Web-based Editor)
AudioMass is a free, open-source browser-based DAW. It lets you upload audio, apply effects, and use peak normalization instantly. It's lightweight and requires no sign-up.
- Best for: Quick fixes, small files
- Pros: No registration, very fast
- Cons: Limited advanced options (no LUFS targeting)
2. MP3Gain Online
MP3Gain has an online version that adjusts MP3 volume without re-encoding. It normalizes to a target decibel level and preserves file quality.
- Best for: MP3 music tracks
- Pros: Lossless adjustment, simple interface
- Cons: Only works with MP3 files
3. Kapwing Online Audio Editor
Kapwing offers an online audio editor with a normalization toggle. It's more flexible—supporting video + audio tracks together—and exports in multiple formats.
- Best for: Creators editing both audio and video
- Pros: Cloud-based, supports multiple file types
- Cons: Free plan has watermark and file size limits
4. Veed.io Audio Normalizer
Veed.io provides a one-click “Normalize Audio” button in its online editor. It's designed for podcasters, vloggers, and business users.
- Best for: Podcasters, YouTubers
- Pros: Easy UI, works with video too
- Cons: Limited free tier, requires account for exports
When to Use Online Audio Normalizers
Online audio normalizers are perfect if:
- You only need to fix a few short clips
- You want a quick result without installing software
- You don't need precise loudness control (e.g., LUFS for broadcast)
However, for multi-track editing, loudness normalization to standards (like −23 LUFS), or projects with dialog + music + effects, an all-in-one tool like Wondershare Filmora is more reliable. Filmora integrates Auto Normalization directly with video editing, giving you professional-grade results without switching tools.
Online Audio Normalizers vs. Filmora: Which Should You Choose?
| Feature | Online Normalizers | Filmora (Desktop) |
| Ease of Use | One-click, browser-based, no installation required | Simple drag-and-drop UI, integrates with full video editor |
| File Support | Mostly audio files (MP3, WAV); some support MP4 | Supports multiple video + audio formats (MP3, WAV, MP4, MOV, etc.) |
| Normalization Type | Mainly peak or basic gain adjustment | Auto Normalization with program loudness standard (~−23 LUFS ±1 LU) |
| Multi-Track Editing | No (processes one file at a time) | Yes (normalize across multiple tracks: dialog, music, effects) |
| Advanced Audio Tools | Very limited (no compression, EQ, or ducking) | Includes Audio Ducking, EQ, compressor, and AI Audio Enhancer |
| Performance | Depends on internet speed; free tiers limit file size | Runs locally on desktop, faster processing, no size limits |
| Best For | Quick fixes, short audio clips, beginners | Podcasters, YouTubers, video editors, professionals |
Online normalizers are great for quick and free fixes, but if you need professional-level loudness control, multi-track workflows, and integration with video editing, Filmora is the smarter choice.
Part 5. Common Issues & Fixes
Even though audio normalization is a powerful tool, it doesn't mean it's without issues. Understanding these common issues and how to fix them can help you maintain the best audio quality for your projects. If you hear pumping after normalization, use Audio Ducking to balance background music against dialog, or try AI Audio Enhancer to improve clarity before normalizing.
Audio Normalization Isn't Working
Sometimes, audio normalization may not work. The volume levels may be unchanged or inconsistent.
Solution:
- Check Audio Format: Ensure that your audio file is in a format that supports normalization, like WAV or MP3. Some compressed formats may not work as effectively.
- Verify Settings: Double-check that the Auto Normalization option is enabled in the Audio Editing panel.
- Manual Adjustments:If automatic normalization fails, you can adjust the audio levels manually. Use the volume sliders in the Audio Editing panel.
Loss of Dynamic Range
Normalizing audio can sometimes reduce its dynamic range. This can make the audio sound flat and less expressive. This can happen if the normalization process is too harsh or applied incorrectly.
Solution:
- Use Subtle Normalization: For music, avoid maximizing the audio to a target level. It can ruin the dynamic range. Use a more conservative approach instead.
- Manual Volume Adjustments: If the auto normalization limits the dynamic range too much, you can manually adjust specific sections' volumes to preserve natural variations.
- Try Peak Normalization: Instead of loudness normalization, use peak normalization. It makes less intrusive volume adjustments.
Over-Normalization Leading to Distortion
Over-normalization may occur if the volume is turned up too high. This may cause distortion or clipping, especially at the loudest moments of the track.
Solution:
- Avoid Over-Normalizing: Don't push the audio too close to 0 dB. It may cause clipping.
- Use Compression: To balance the sound without over-normalizing, consider using compression in addition to normalization. Compression lowers the loudest parts and increases the quietest parts. This keeps the sound balanced without distortion.
- Limit the Target Level: Set a target level that leaves some headroom to ensure that the audio does not peak and cause distortion.
Conclusion
Audio normalization becomes essential if you want to create enhanced and prol-sounding content. Adjusting the volume for consistent sound improves the listening experience. This applies to podcasts, videos, music, and live streams. Filmora provides an easy way to normalize audio. It helps adjust audio levels without losing quality. Audio normalization tools also have potential issues such as over-normalization or loss of dynamic range. You need to take steps to overcome them to get the best results. With the right approach, audio normalization can improve your projects.
Regardless of your skill level, understanding how to use audio normalization effectively will ensure your content sounds balanced, clear, and enjoyable for your audience.
secure download
