


 ChatGPT
 Perplexity
 Gemini
 Claude
 Grok
Grok
Are you tired of spending hours aligning clips and perfecting transitions in your video projects? Discover the power of Auto Ripple Filmora! This innovative feature automatically adjusts the duration of your clips.
This ensures smooth transitions and no gaps. The tool is ideal for creators who value efficiency and quality.
Auto Ripple lets you focus on creativity without getting bogged down by tedious edits. Whether you're a professional editor or just starting, Filmora simplifies your workflow, making professional-looking videos easier to achieve.
Get ready to transform your editing process with Filmora’s Auto Ripple!
In this article
Part 1. What is Auto Ripple in Filmora?
When digital creators need to merge multiple videos, they must focus on minor details. The ripple effect is the best feature for getting a single video for a particular purpose. Many online tools offer their ripple edit feature.
Wondershare Filmora is the best ripple edit tool for analyzing video gaps. This tool can adjust the videos' duration to remove the gaps between them.
Now that you know what Auto Ripple Filmora is. Next, look at the benefits of this effect.
Part 2. Why Do You Need to Perform Filmora Auto Ripple?
In the editing process, the Auto Ripple Filmora systemizes the editing requirements. It provides a smooth transition between the video clips. With this effect, it's possible to streamline the changes during the editing process. Filmora ensures that it provides more efficient and better results. Let's discuss a few benefits of the Filmora auto ripple effect:
-
Auto Ripple Adjustment: The auto ripple effect adjusts video clips on the timeline after you change their duration. It keeps clips right next to each other, ensuring your video plays smoothly without gaps.
-
Saves Time: This feature saves editors a lot of time. It automatically handles adjustments. Hence, it lets you focus on more important tasks instead of repetitive edits.
-
Keeps Videos in Sync: The auto ripple effect fills any gaps that might disrupt video flow. It adjusts the duration and placement of clips. So it maintains smooth transitions and keeps audio and video in sync.
-
Accurate Edits: Auto Ripple makes precise edits without excessive trimming, protecting your data from loss. This benefits you when working with multiple video layers.
-
Smooth Transitions: Auto ripple creates seamless transitions between clips. This maintains consistent pacing. It also enhances the professionalism of your edits.
Till now, you know the advantages of using Filmora Ripple edit. You might be wondering how to use this effect in Filmora. Let's solve this mystery in the next part!
Part 3. How To Perform Auto Ripple in Filmora?
Are you looking for a reliable tool that provides updated editing features? Wondershare Filmora is the answer. It offers efficient and quick auto transformations. One of the most advanced and best features is the auto ripple edit. It transforms the edited video by eliminating the gaps and applying smooth transitions. Thus, it merges two different video clips amazingly.
You can learn how to perform the Auto Ripple effect in Filmora with a video guide.
Meanwhile, we will discuss it in steps to simplify the whole procedure.
Steps to Perform Auto Ripple Filmora
Follow the steps below to perform auto ripple in Filmora.
Step 1: Start the Editing Process
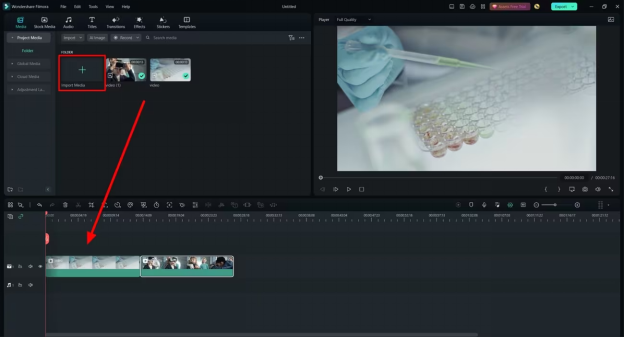
To edit multiple media files in Filmora, start by opening a new project. Once you're in the editing interface, click the "Import" button located in the media panel. Then, select all the media files you want to use and drag them to the timeline, placing them on the same track.
Step 2: Speed Enhancement of Timeline
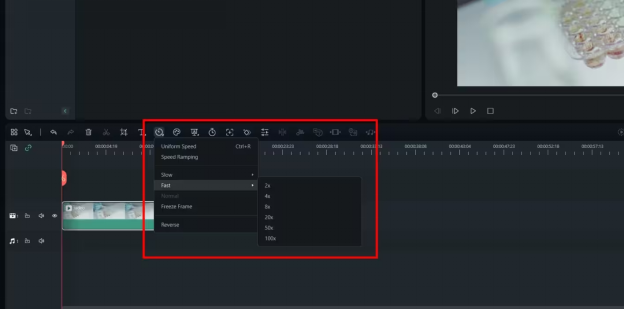
Once your media is lined up on the timeline, you can adjust its speed. Look for the "Speed" icon on the timeline toolbar. Click on this icon, then choose your desired speed rate from the dropdown menu for your media files.
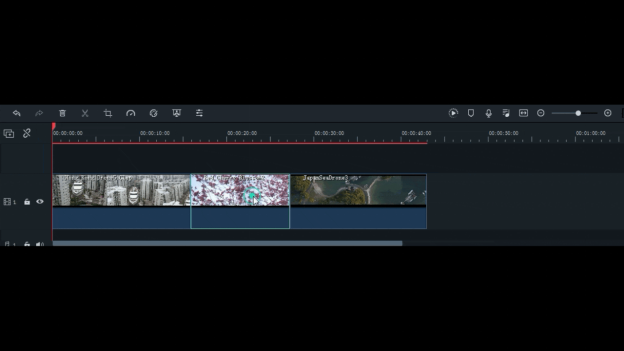
Step 3: Enable the Auto Ripple for Timeline
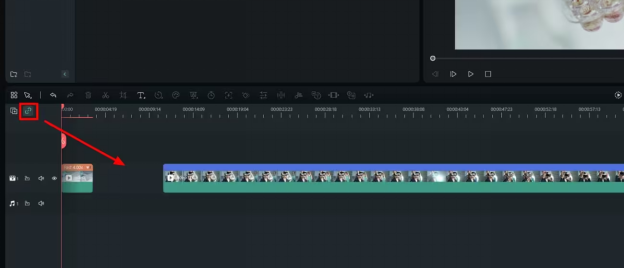
After speeding up the clip, you'll need to adjust the duration of the other clips on the timeline. To simplify this process, go to the left menu of the timeline and find the "Auto Ripple" button. Turn it on. This will automatically adjust the positions of all clips on the timeline, ensuring there are no gaps.
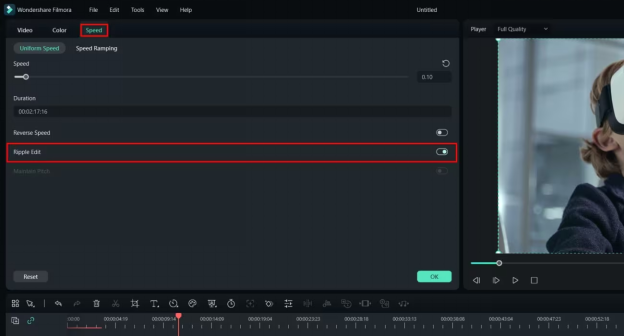
Step 4: Auto Ripple From Speed Settings
To apply the ripple effect to a single video’s speed, double-click the video to open a new window. Then, navigate to the "Speed" menu. Select "Uniform Speed" from the options presented. Input your desired speed value in the space provided and enable the "Ripple Edit" option. This will increase the video's speed and smooth out any abrupt transitions.
So far, you know how to perform Auto Ripple Filmora. Next, let's discuss removing gaps between clips on the timeline.
How To Remove Gaps Between Clips on the Timeline With Auto Ripple ON
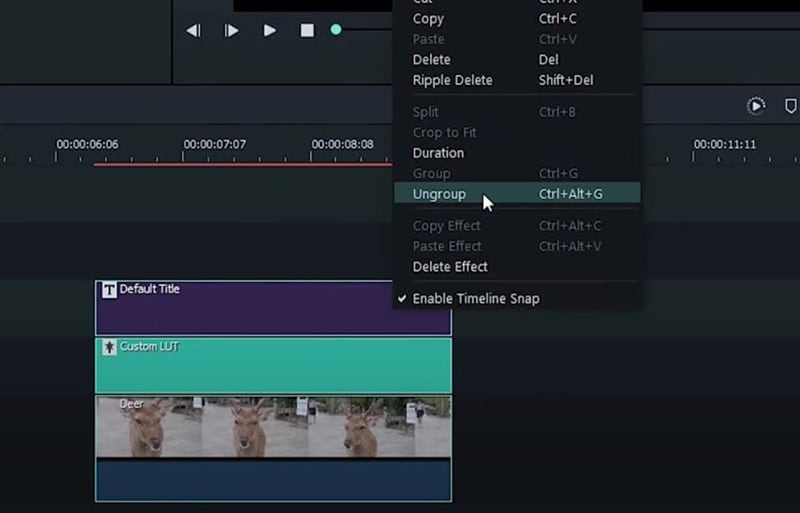
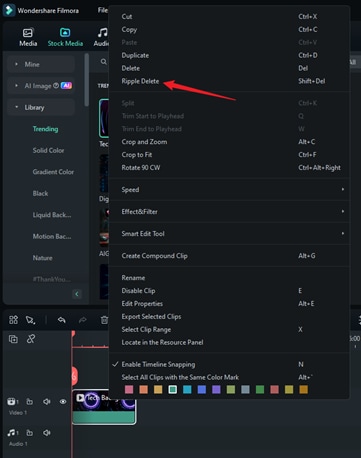
All versions of Filmora. has the Ripple Delete feature. This feature automatically connects two nearby video clips. To use it, right-click on the clip you want to remove and select Ripple Delete from the menu.
The Auto Ripple feature automatically closes gaps left when you remove footage. It's usually on by default. You can turn it off or on by clicking its icon, which is next to the Manage Tracks icon at the top left of the timeline.
When you cut and remove part of a video clip in Filmora, the Auto Ripple option can automatically close the gap between the remaining clips if it's on. Using Ripple Delete by hand can take longer, especially with many files.
Auto Ripple saves you time by pulling clips together, avoiding black screens in your final movie. It also lets you swap two clips on the same track. Just drag one clip over the other, and Filmora will switch them as soon as you let go of the mouse.
If Auto Ripple is off and you remove a clip, you must manually shift the other clips to fill any gaps.
How To Change the Order of the Video Clips With Auto Ripple
You can drag and drop a video clip onto part of another clip automatically cuts. The first clip will split, and all parts after the cut will move behind the second clip.
If you do this with Auto Ripple turned off, it will overwrite the covered part of the second clip and remove that segment from the timeline.
How To Insert Clips in Auto Ripple Mode
Auto Ripple speeds up the process of inserting a new clip between two existing clips on the timeline. Just drag a clip from the Media tab to where you want it on the timeline. A green box will appear, showing how much space the clip will take. Drop the clip there to add it between the other two.
When Auto Ripple is on, dragging the edge of a clip will shorten its duration but keep the length of other affected clips the same. Remember, Auto Ripple can impact all tracks on Filmora’s timeline.
To avoid accidentally moving a media asset, lock its track. This way, only unlocked tracks will be affected by Auto Ripple, allowing you to keep assets on one track in place while adjusting others.
Part 4. Why Is the Filmora Auto Ripple Not Working?
If the Auto Ripple feature in Filmora is not working, there are several potential reasons to consider:
Troubleshoot 1: Auto Ripple Isn’t Effective
Make sure only the layer you want to apply Auto Ripple to is unlocked. Lock all other layers to avoid any interference from different tracks.
Troubleshoot 2: Can't Ripple Delete in Filmora
Sometimes, the Ripple Delete function might not work as expected. For detailed discussions and solutions from other users, you can check out discussions on Reddit or watch troubleshooting videos on YouTube. Here are some useful links:
Troubleshoot 3: Timeline Snapping Interference
Check whether "Timeline Snapping" is enabled. This setting, when active, might clash with the Auto Ripple function. Try toggling it off to see if it helps with the Auto Ripple issue
Troubleshoot 4: Check for Updates in Filmora
Ensure your Filmora software is up to date. Developers frequently release updates to fix issues and enhance features, including the Auto Ripple function. Keeping your software updated can resolve existing issues and improve performance.
We have discussed the potential causes of the Filmora auto ripple not working until now. Next, look at solutions!
The following solutions will help you to troubleshoot the issue.
- Manual Ripple Delete: If Auto Ripple isn't working, you can manually close gaps. Select all clips on the timeline, right-click, and choose "Close Gap." This ensures that all spaces are removed without relying on Auto Ripple.
- Auto Ripple Toggle: Make sure Auto Ripple is turned on. Click the Auto Ripple icon next to the Track Manager on the left side of the timeline. Sometimes, just toggling this feature can make it work again.
If Auto Ripple still fails, try these methods:
- X Icon: To delete a gap, click the gap and then the "X" icon. This method quickly removes unwanted gaps.
- Right-Click: Hover over the gap, right-click, and select "Ripple Delete." This removes the gap and adjusts the alignment of nearby clips.
- Keyboard Shortcuts: Click the gap and press "Shift + Delete" on your keyboard. This shortcut is a fast way to clean up your timeline.
These strategies can help you manage and fix issues with the Auto Ripple feature. Thus, ensuring smoother editing in Filmora.
Part 5. Wondershare Filmora's AI Editing Features Perfect Your Video Editing Experience
Filmora offers many smart tools besides the ripple edit. These tools simplify complex editing tasks with just one click. Here are some features that make editing easier for content creators:
1. AI Text-based Editing
Filmora now includes AI Text-Based Editing to simplify video editing. This advanced feature allows users to remove silent clips and trim videos using text commands automatically. See the complete guide for more details on this function and how to use it.
How to Use AI Text-Based Editing?
Here are the steps to use AI text-based editing for Windows:
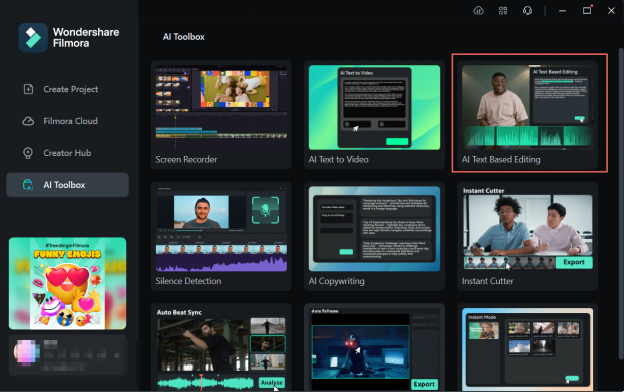
Step 1: Launch Filmora and Choose AI Text Clipper
First, download and install Filmora on your computer. After installing, open it and either log in or sign up. Move your mouse to the settings panel and click "Create Project". Then, choose "AI Text-Based Editing" from the main screen options.
Step 2: Import Files and Enable Text-Based Editing
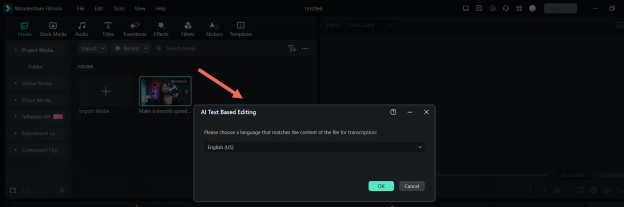
After choosing AI Text-Based Editing, your device's "File Explorer" will open. Double-click the clip you wish to edit, bringing up a mini-window. Select "Text-based editing," choose your preferred language, and click "OK." The video will begin transcribing for text-based editing, and you can watch the conversion progress.
Step 3: Start Text-Based Editing
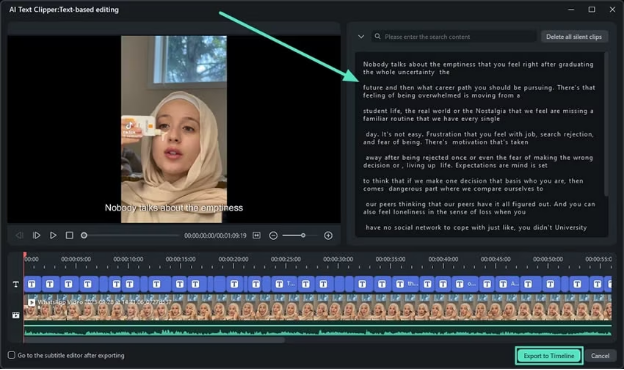
Once the conversion finishes, the editing window will open. To remove a video segment, delete its corresponding text in the right-side text box. Also, you can search for specific phrases or words and use the "Delete all silent clips" feature for better results. After making your edits, click "Export to Timeline" at the bottom right to finalize.
Step 4: Additional Adjustments and Export
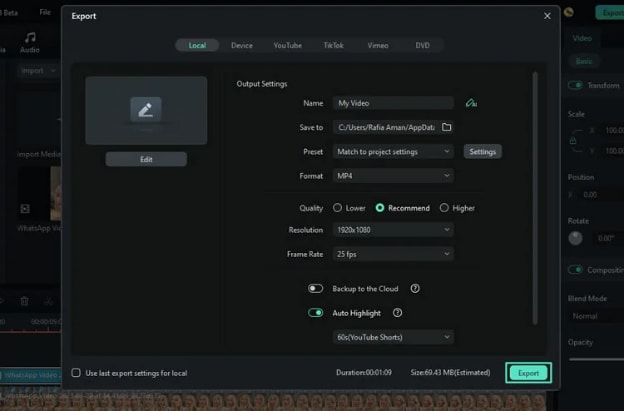
Now that your video is on the Filmora's timeline, you can tweak both visual and audio elements. Enhance the audio, adjust the colors, and add effects or transitions. When you're satisfied with the settings, go to the top right corner and click "Export." Adjust the settings in the export window as needed and click "Export" again to complete the process.
That's all about this feature. Next, let's discuss another exceptional feature.
2. Copilot Editing
AI assistants are crucial in editing, and Filmora's new AI Copilot Editing feature offers valuable insights about your videos. It doesn't edit the video itself—that's for other AI and manual features—but it does highlight what's missing to elevate your video. Here's how to access and enable this guiding feature in Filmora.
Let's see how you can effectively use this feature.
Steps to Use AI Copilot Editing for Windows
Below are the steps to use AI copilot editing for Windows.
Step 1: Create a New Project in Wondershare Filmora
Download and open Filmora on your desktop. Then, move your cursor to the "New Project" button and click it.

Step 2: Access the AI Copilot Feature
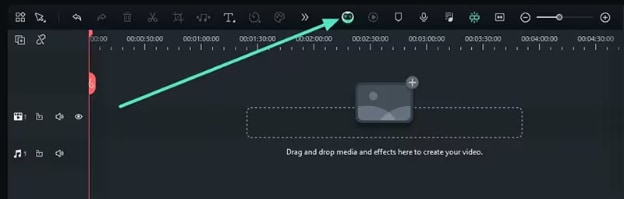
In Filmora’s editing interface, find the timeline toolbar and head there. Select the "AI Copilot" feature from the available options.
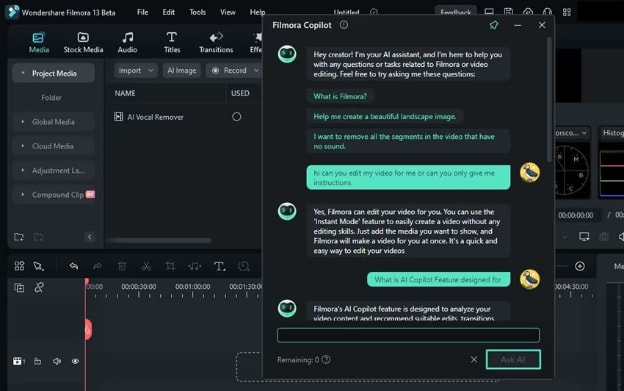
Step 3: Ask the AI Copilot
Enabling AI copilot editing opens a new window called Filmora Copilot, which functions like a chatbot. Users can ask it for editing suggestions. It will analyze your video and recommend improvements. After entering your query, click the "Ask AI" button.
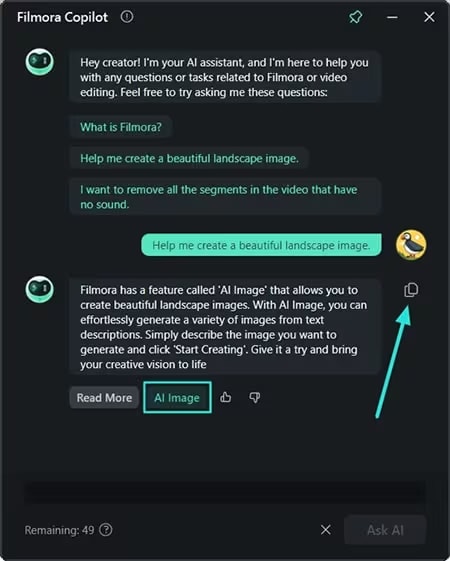
Step 4: Access Specific Functions From the AI Copilot Feature
When you ask the AI Copilot about a feature in Filmora, it not only answers but also directs you to that feature. Click the button shown to access it directly. You can copy the answer using the "Copy" icon on the same screen.
That’s it! Let’s discuss some of the frequently asked questions on Auto Ripple Filmora.
Final Words
Enhance your video editing with Auto Ripple Filmora. This tool adjusts video durations automatically, removing gaps to create smooth transitions. It's perfect for blending scenes or refining cuts.
Auto Ripple saves time and ensures your edits look professional. By using Filmora, you simplify your workflow and improve video quality. This makes it easier to produce engaging content.
Discover how Filmora can transform your video projects. Try it today and experience seamless editing that lets your creativity shine.
