In today’s digital world, a logo reveal is often the first thing people see when they encounter your brand or content. It sets the tone for your message and can help you establish a memorable identity. A Blender logo reveal, with its sleek 3D animations, is a fantastic way to grab attention and make your logo pop. However, not everyone has the time or expertise to master Blender’s steep learning curve.
That’s where Wondershare Filmora comes into play. Filmora offers a simplified alternative, allowing creators of all skill levels to produce professional-looking Blender-inspired logo reveals. In this article, we will guide you through the process of creating stunning logo reveals using Filmora, explain why Blender logo reveals are so effective, and share tips to make your animation even more captivating.
In this article
Part 1: Understanding Blender Logo Reveals
What is a Blender Logo Reveal?

A Blender logo reveal is a type of animation that involves introducing a company’s logo through 3D effects. With Blenders, designers can create life-like logos by adding realism through incorporating fine details and realistic scenes, genuine lighting, depth, and motion. Here are the most standard features of a logo reveal done in Blender:
- 3D Motion and Animation: The logo often moves, rotates, or transitions in three-dimensional space, creating a sense of depth and realism.
- Dynamic Lighting: Proper lighting helps create mood and drama, making the logo appear polished and professional.
- Texturing and Effects: Adding textures, such as metallic surfaces or glowing edges, enhances the visual appeal of the logo.
These reveals are popular across various industries, from tech startups to content creators and educational platforms, due to their ability to add a touch of elegance and modernity to any brand.
Why Create Blender Logo Reveals?
Blender logo reveals aren’t just visually engaging—they also serve strategic purposes in branding:
- Professional Branding: A stunning logo reveal helps reinforce your brand’s identity. It conveys a sense of professionalism and sophistication, helping your audience immediately recognize your brand.
- Enhanced Visual Appeal: Unlike static logos, 3D logo reveals are dynamic and can capture attention instantly. The smooth movements and transitions create a sense of excitement, making your brand more memorable.
- Flexibility Across Industries: Whether you're in tech, marketing, education, or even entertainment, a Blender logo reveal can add the right touch of creativity to your content. It's ideal for digital videos, product launch trailers, social media branding, and more.
A Blender logo reveal can be well made to do more than capture attention; it can invite customers to stronger engagement with the brand.
Part 2: How to Create a Blender Logo Reveal with Filmora
Filmora simplifies the process of creating logo reveals while still offering impressive results. Here’s how you can craft a stunning logo reveal using Filmora in just a few steps:
Step-by-Step Guide
1. Install and Launch Filmora
- Download and Install: Visit Wondershare Filmora’s official website and download the software. The process is simple and user-friendly. Once installed, open the application.
- Create a New Project: Click on the “New Project” button to begin your logo reveal.
2. Explore Filmora's Animation Effects
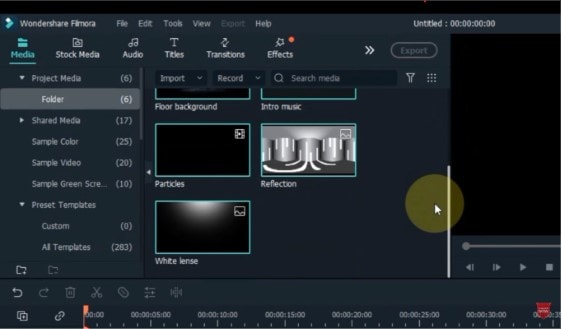
Filmora’s robust library of animation effects is one of its key strengths. You don’t need to start from scratch; instead, you can leverage built-in templates and effects to create a professional logo reveal quickly.
- Access Animation Effects: Navigate to the “Effects” tab in Filmora, where you’ll find an array of motion graphics and transitions.
- Search for Logo Reveal Effects: Use keywords like "3D," "logo," or "intro" to locate effects that simulate Blender’s aesthetic. For example, look for effects that involve rotations, floating elements, or light bursts to create dynamic transitions.
- Preview and Select: Take advantage of Filmora's preview feature to view effects in action. Try several options before selecting the one that fits your vision.
3. Upload Your Logo
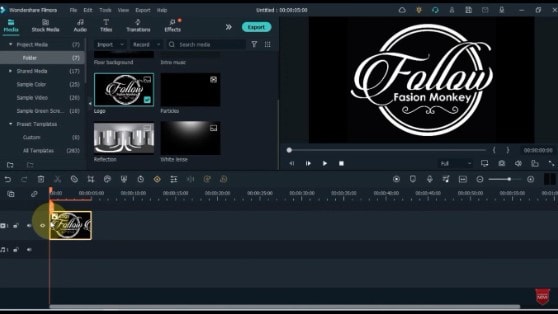
Once you’ve chosen an effect, the next step is to upload your logo:
- Import Your Logo: Click the “Import Media Files” button to add your logo file to Filmora. Ensure that your logo is high resolution to maintain its quality throughout the animation process.
- Drag to Timeline: After importing, drag the logo into the timeline at the appropriate position. Make sure it’s sized correctly for the animation effect you've chosen.
4. Customize the Animation
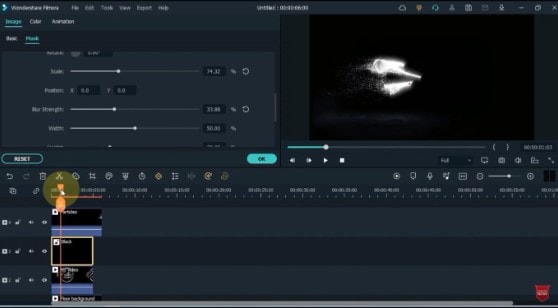
This is where you can really personalize the look of your logo reveal:
- Apply the Effect: Drag and drop the animation effect onto your logo in the timeline. Filmora will automatically animate your logo based on the effect you’ve chosen.
- Adjust the Parameters: You can fine-tune the animation by adjusting the motion speed, perspective, or angle of rotation. Play around with these settings to make the animation feel smooth and natural.
- Layer Additional Effects: Filmora allows you to apply multiple effects to create depth and complexity. For example, adding a glowing effect while the logo rotates can create a striking contrast.
5. Preview and Export
Before finalizing the project, make sure to preview the animation:
- Preview: Use the preview window to watch your logo reveal in action. Look for any adjustments that need to be made, such as refining the timing or tweaking the transitions.
- Export: Once you're satisfied with your animation, click the "Export" button. Choose your preferred resolution (e.g., 1080p or 4K) and file format. You can save your logo reveal and use it for your branding materials, social media, or promotional videos.
Part 3: Enhancing Your Blender Logo Reveal
Now that you know how to create a logo reveal, let’s explore ways to enhance it further.
Lighting and Shadows

Lighting is a crucial component in 3D animation. Even with Filmora's simplified tools, you can simulate realistic lighting effects to enhance your logo reveal:
- Directional Lighting: The intensity of the shadows produced by directional lights is so sharp that they can be used to accentuate specific details in your logo. Seek out the angles that give the most visual impact, and play around with how the light is positioned to achieve it.
- Ambient Lighting: Add a touch of ambient lighting to reduce harsh shadows and create a more balanced look.
- Gradients and Highlights: Do not forget that by changing the gradients and highlights, you can create the illusion of a depth and reflection. Use them in the parts of your logo that need prominence.
Adding Sound Effects and Music
To take your logo reveal to the next level, don't overlook the audio:
- Soundtracks: A great soundtrack can elevate the entire animation. Filmora offers a variety of royalty-free music tracks that can enhance the futuristic or corporate vibe of your logo reveal.
- Sound Effects: Adding sound effects like whooshes, metallic clangs, or glowing tones can make the animation feel more interactive. Sync these sounds with key animation moments to give your logo reveal an extra layer of impact.
- Audio Syncing: Ensure the audio complements the timing of the animation. If your logo rotates or fades, make sure that the sound effects align perfectly with the visual transitions.
Text Overlays and Taglines
To make your logo reveal even more impactful, consider adding text overlays:
- Taglines or Slogans: Add your brand’s slogan or tagline beneath the logo. This can help reinforce your message and further solidify your brand identity.
- Text Animations: Experiment with text animations to make the tagline appear or fade out as the logo transitions. You can use Filmora’s built-in text effects or customize them to match the overall style of the logo reveal.
Part 4: Exploring Creative Tools Beyond Filmora
While Filmora provides a fantastic balance between ease of use and professional results, some users may prefer tools like Blender for more advanced animation needs.
Blender for Advanced Users
For those with experience in 3D animation, Blender remains one of the most powerful tools available:
- Highly Customizable: Blender allows users to create logo reveals from scratch, offering complete control over every aspect of the animation, from textures to lighting.
- Advanced Rendering: With Blender, you can achieve high-quality renders with advanced settings, such as ray tracing, depth of field, and motion blur.
- Free and Open-Source: As an open-source platform, Blender is free to use and offers an extensive library of tutorials and community resources to help you create even more advanced logo reveals.
While Blender’s learning curve is steep, its power and flexibility make it the go-to option for professional 3D animators.
Canva for Simpler Animations
On the other hand, if you need a quicker and more basic logo reveal, Canva can help:
- Easy-to-Use Templates: Canva’s vast library of templates makes it easy to create simple, stylish logo reveals.
- Minimal Animation: While Canva doesn’t offer advanced 3D animations, its animations can still add a professional touch, such as fade-ins, zooms, and slide effects.
- No Design Experience Needed: The Canvas drag-and-drop interface makes it easy for beginners to create polished results without needing advanced skills.
Conclusion
Creating a Blender logo reveal is an excellent way to showcase your brand with creativity and style. However, you don’t need to be an expert in 3D design to make a polished logo reveal. Wondershare Filmora offers a simple and accessible alternative that enables both beginners and experienced creators to produce stunning results.
Whether you’re opting for Filmora’s easy-to-use animation effects or Blender’s full 3D capabilities, the key to a successful logo reveal is creativity and attention to detail. By following the steps outlined in this guide and experimenting with various effects, you can create a logo reveal that not only captures attention but also communicates your brand’s identity effectively.


 100% Security Verified | No Subscription Required | No Malware

