Lines and shapes are some of the basics of visual design on which creativity in design is built. In the same light, simple typography accentuates how a design is perceived, passes a message, and draws attention to important information amidst other visual components of a design.
This article will provide a comprehensive guide on how to use Photoshop text along path feature. It will cover the basics of how to use the tool, the various shortcuts you can use, and other tools you can use to write text on a path on videos.
In this article
Using Photoshop Text on a Path Tool

Photoshop text on a path merges these two elements most uniquely. Unlike regular text tools that use rectangular text boxes, this tool writes text that follows a path.
This tool allows designers and editors to create effects that would be difficult with the standard text tool and adds creativity to text placement. It gives you more control over how your text with other parts of your design or photo.
There are three types of paths to consider when using the type on a path tool in Photoshop:
- Hand-drawn paths: that you can shape into any form. You can create these using a pen or drawing tool.
- Shape: which includes circles, squares, or other geometric contours that can be used as paths.
- Images: You can use the edges of an image or parts of a photo as a path in Photoshop.
Writing text on a path in Photoshop begins with creating a path. You can create a path using any of these two tools; the pen tool, and the shape tool. The tool you choose depends on your design needs.
The Pen Tool
This tool allows you to create hand-drawn paths for your text. It allows you to create straight or curved paths using anchor points on your design.

Step 1: To create a path using the Pen tool, select the Pen icon on the dashboard to activate the tool.
Step 2: Click on any part of your design to place anchor points, then adjust the lines between them to give your desired shape or curve.
Step 3: Change the tool mode on the navigation bar to Path.

The Shape Tool
This tool is used to create paths using predefined geometric shapes like circles and squares.

To create a path using the shape tool, select the Rectangle icon on the dashboard. Then, select your desired shape from your list of options. Just like with the Pen Tool, change the tool mode on the navigation bar to Path after drawing your shape.
Compared to the Shape Tool which offers precise symmetrical shapes, the Pen Tool is flexible and can be used to draw complex and unique paths.
Fitting Text to Path in Photoshop
Once you've created a path, the next step is to fit texts into it.
Step 4: Select the Type Tool. Set your font type, font size, text alignment, and color.

Step 5: Hover the cursor over the path. When it changes to an I-beam cursor with a dotted wavy line across it, click on the path and start typing. Your text will automatically follow the path.

Flipping Text on the Path
To flip the text, simply drag it across the path. The text will flip in the opposite direction. If you mistakenly flipped your text while editing, simply drag it back across the path with the Path Selection Tool. This will return your text to its original direction.
Additional Tips
- Editing the Path: You can modify the path after adding text by using the Direct Selection Tool to adjust anchor points.
- Creating Curved Text: You can create more complex text shapes by using the Pen Tool to draw custom paths.
- Upside Down Text: If you want to type on a path upside down, you can adjust the text's baseline using the Path Selection Tool.
- Moving the Text: You can reposition the text along the path by using the Path Selection Tool. The black arrow of the Path Selection will change to an I-beam cursor with a black arrow once you place it over the text you want to move.
Photoshop flip text on path was made available from earlier versions of Photoshop—Photoshop CS. However, newer versions of Photoshop generally offer more functionality and better performance. Hence, it is recommended to use type on path on Photoshop 2022 and above.
You can use Photoshop type on a path tool on Mac; the process is just the same as using the tool on a Windows computer.
Are There Any Shortcuts for Adding Text on a Path in Photoshop?
Yes, there are a few keyboard shortcuts that can help when adding text on a path in Photoshop:
Step 1. Select the Type Tool by pressing T on your keyboard.

Step 2. With the Type Tool selected, hover your cursor over the path until you see a small "+" symbol appear next to the cursor. This indicates you can click to add text.
Step 3. Click once on the path to add a text box. The text will automatically align to the path.

Step 4. To edit the text, simply start typing. You can also use the following shortcuts:
- Ctrl/Cmd + A to select all the text
- Ctrl/Cmd + B to make the text bold
- Ctrl/Cmd + I to italicize the text
Step 5. To move the text along the path, select the Path Selection Tool (A) and click and drag the text to reposition it.
Step 6. To flip the text to the inside of a circular path, use the Path Selection Tool to click and drag the text across the path.
Step 7. To adjust the path itself, you can use the Direct Selection Tool (A) to select and move anchor points.
So in summary, the main shortcuts are using the Type Tool (T) to add text, the Path Selection Tool (A) to move the text, and common text shortcuts like Ctrl/Cmd + A, B, and I to edit the text once added to the path. This allows for a quick workflow when working with text on paths in Photoshop.
Limitations of Adding Text on a Path in Photoshop

While the text-to-path tool offers a versatile way of adding text to designs, it does have limitations you should be aware of. Some of them include:
- Limited Text Length: only a few characters can be typed along the path, especially in certain versions of Photoshop. This can be frustrating when trying to fit longer text into a curved or complex path
- Path Type Restrictions: Text can only be added to vector paths created with the Pen Tool or Shape Tools. If a path is not properly defined or if it is a rasterized shape, text cannot be added.
- No Direct Manipulation of Text Position: While you can move the text along the path using the Path Selection Tool, precise adjustments to the text's position relative to the path can be challenging and may not allow for fine-tuning without affecting the overall layout.
- Limited Customization Options: While basic font and size adjustments are available, there are fewer options for advanced text effects compared to standard text layers. This can limit creative flexibility when designing complex layouts.
These limitations can affect the ease and effectiveness of using text on a path in Photoshop, making it important for users to be aware of these factors when planning their designs.
Alternative Ways to Create a Text on Path in Videos Using Filmora
While Photoshop offers a fun way to create text on a path in photos and designs, it does not do much on videos. To type in a path on videos, tools like Wondershare Filmora may come in handy. Filmora is an AI-powered video editing software that allows you manipulate videos and photos with ease. It allows you to get creative and produces professional results regardless of your skill level.
You can write cursive text on a path in Filmora using the Text Path feature that allows you to add write texts on a path.With its efficiency and compatibility with both video and photo media, Filmora Text Path Animation is an easy tool for editors and creators who want to experiment with cursive text in visual content.
- Create text that flows along a path you design.
- Customization options to design interactive text effects.
- Draw any shape with ease using the Bézier tool.
- A variety of Text Styling Options aligns with your creative vision.
- Combine the text along a path with Filmora's Creative Assets.

Step-by-step guide to Create a Text on Path in Videos Using Filmora
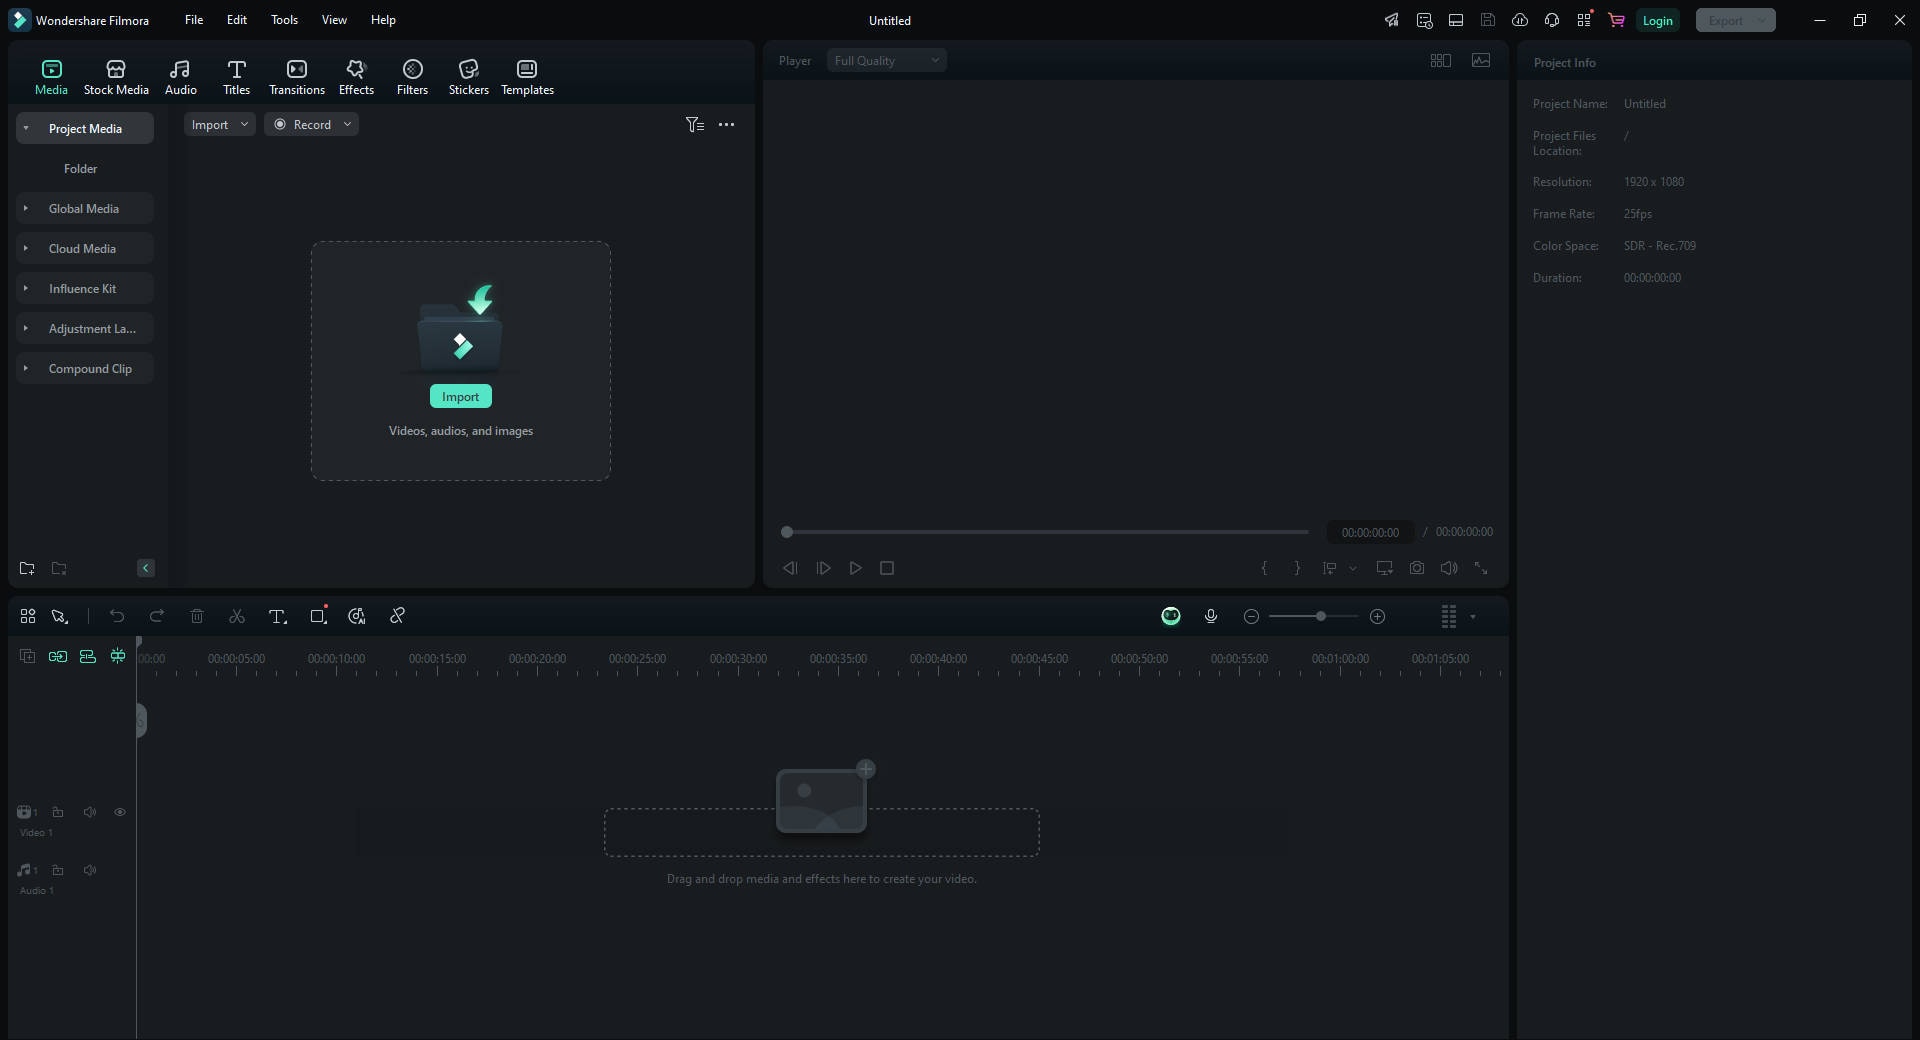
Step 1: Import Your Media Files
Start by launching Filmora and importing your video or image into the timeline. Drag and drop the file from your computer to the Media Library in Filmora.
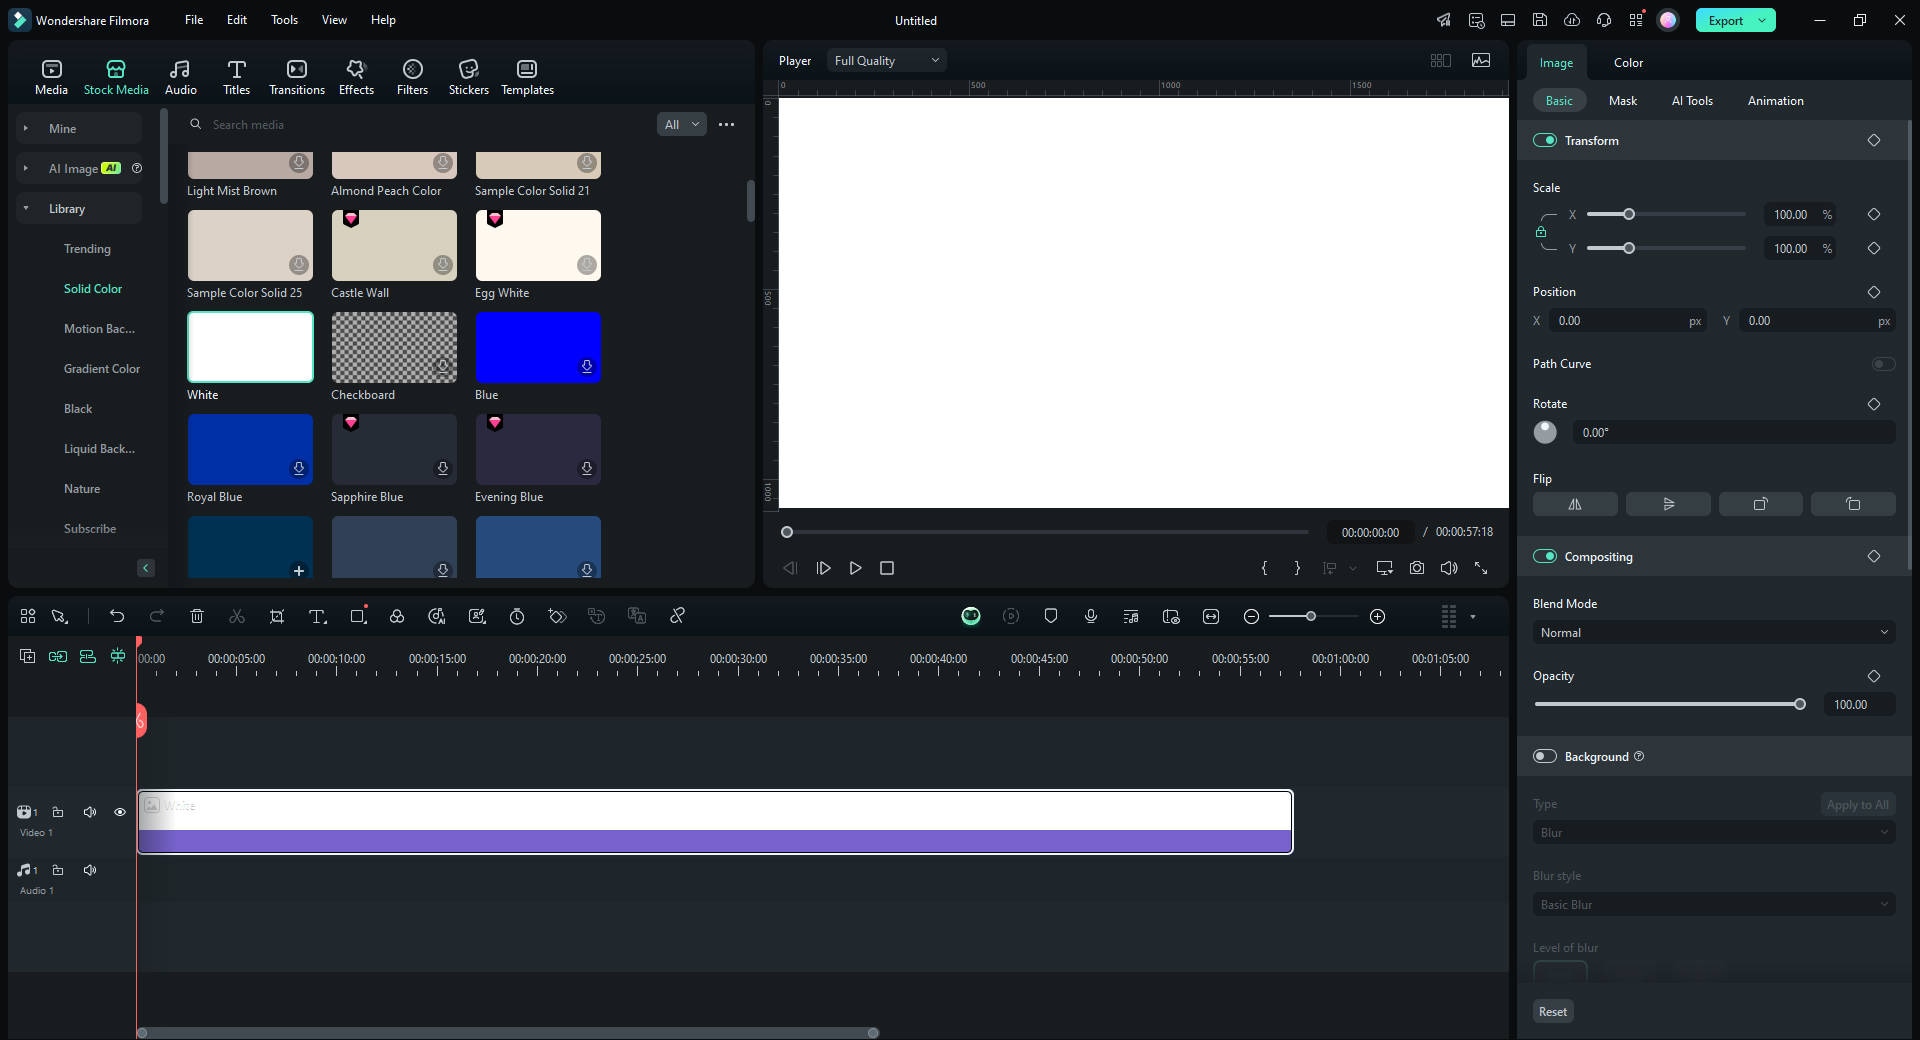
Step 2: Add Your file to the Timeline
In this guide, we will use a solid background from Filmora as the background image. Drag the background file onto the timeline.
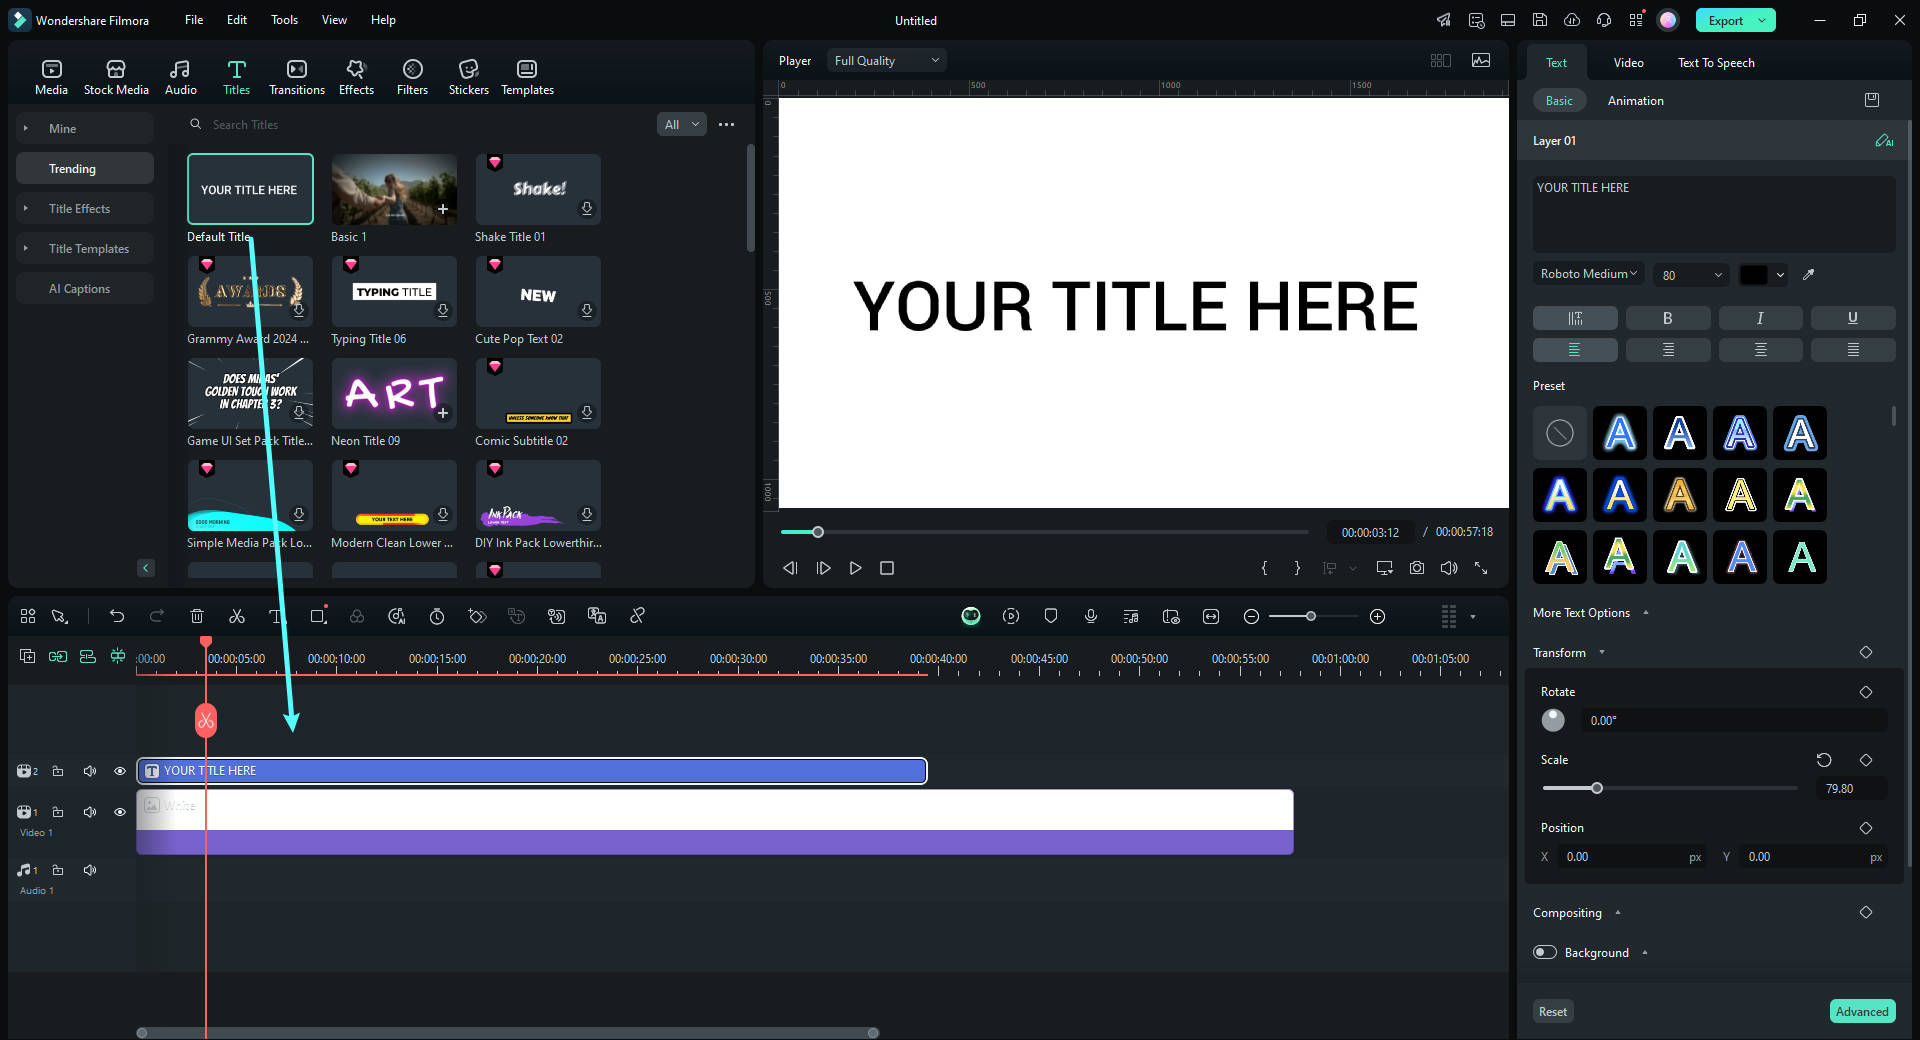
Step 3: Add Text Layer in Filmora
Click on the "Titles" tab and choose a text style that complements your design. Drag the text style onto a new track.
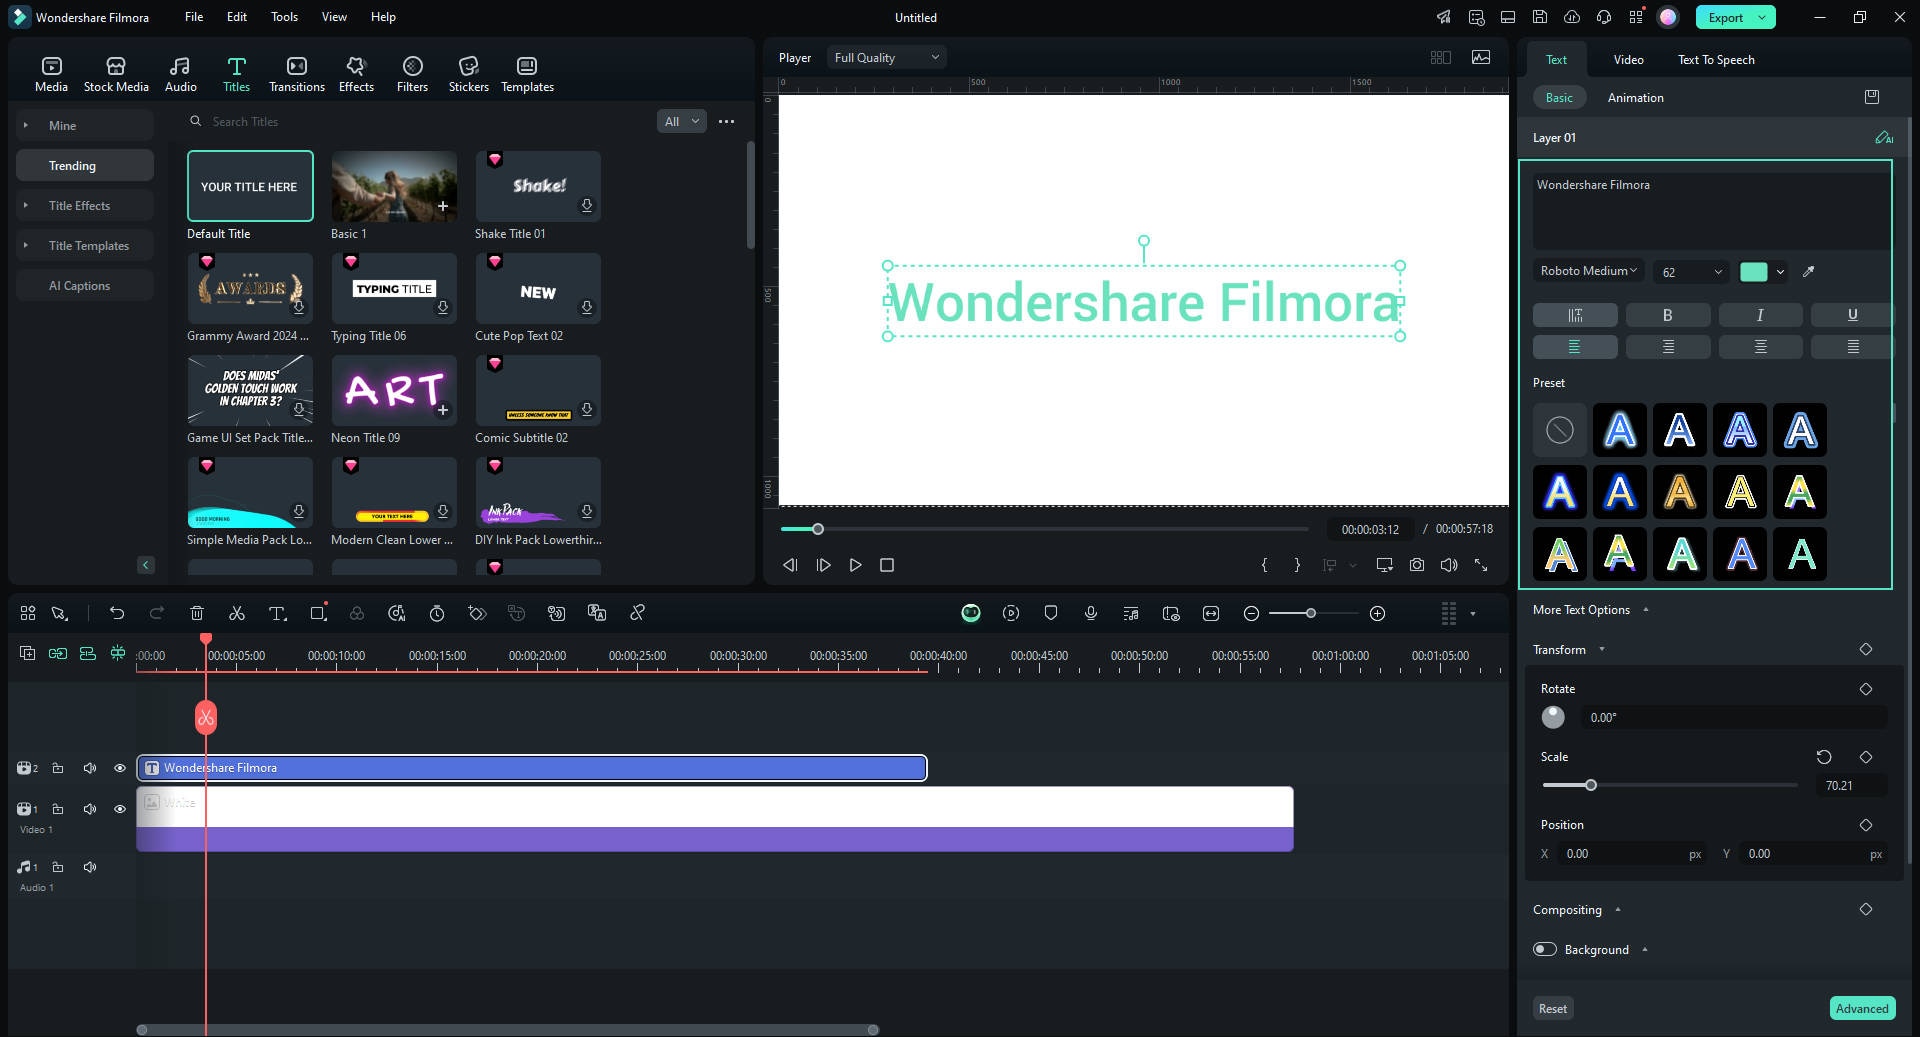
Step 4: Edit Text and Apply Effects
Double-click on the text in the timeline to edit it. Customize the font, size, and color to match your design. You can also apply effects from the Effects tab.
Step 5: Position the Text Along the Path
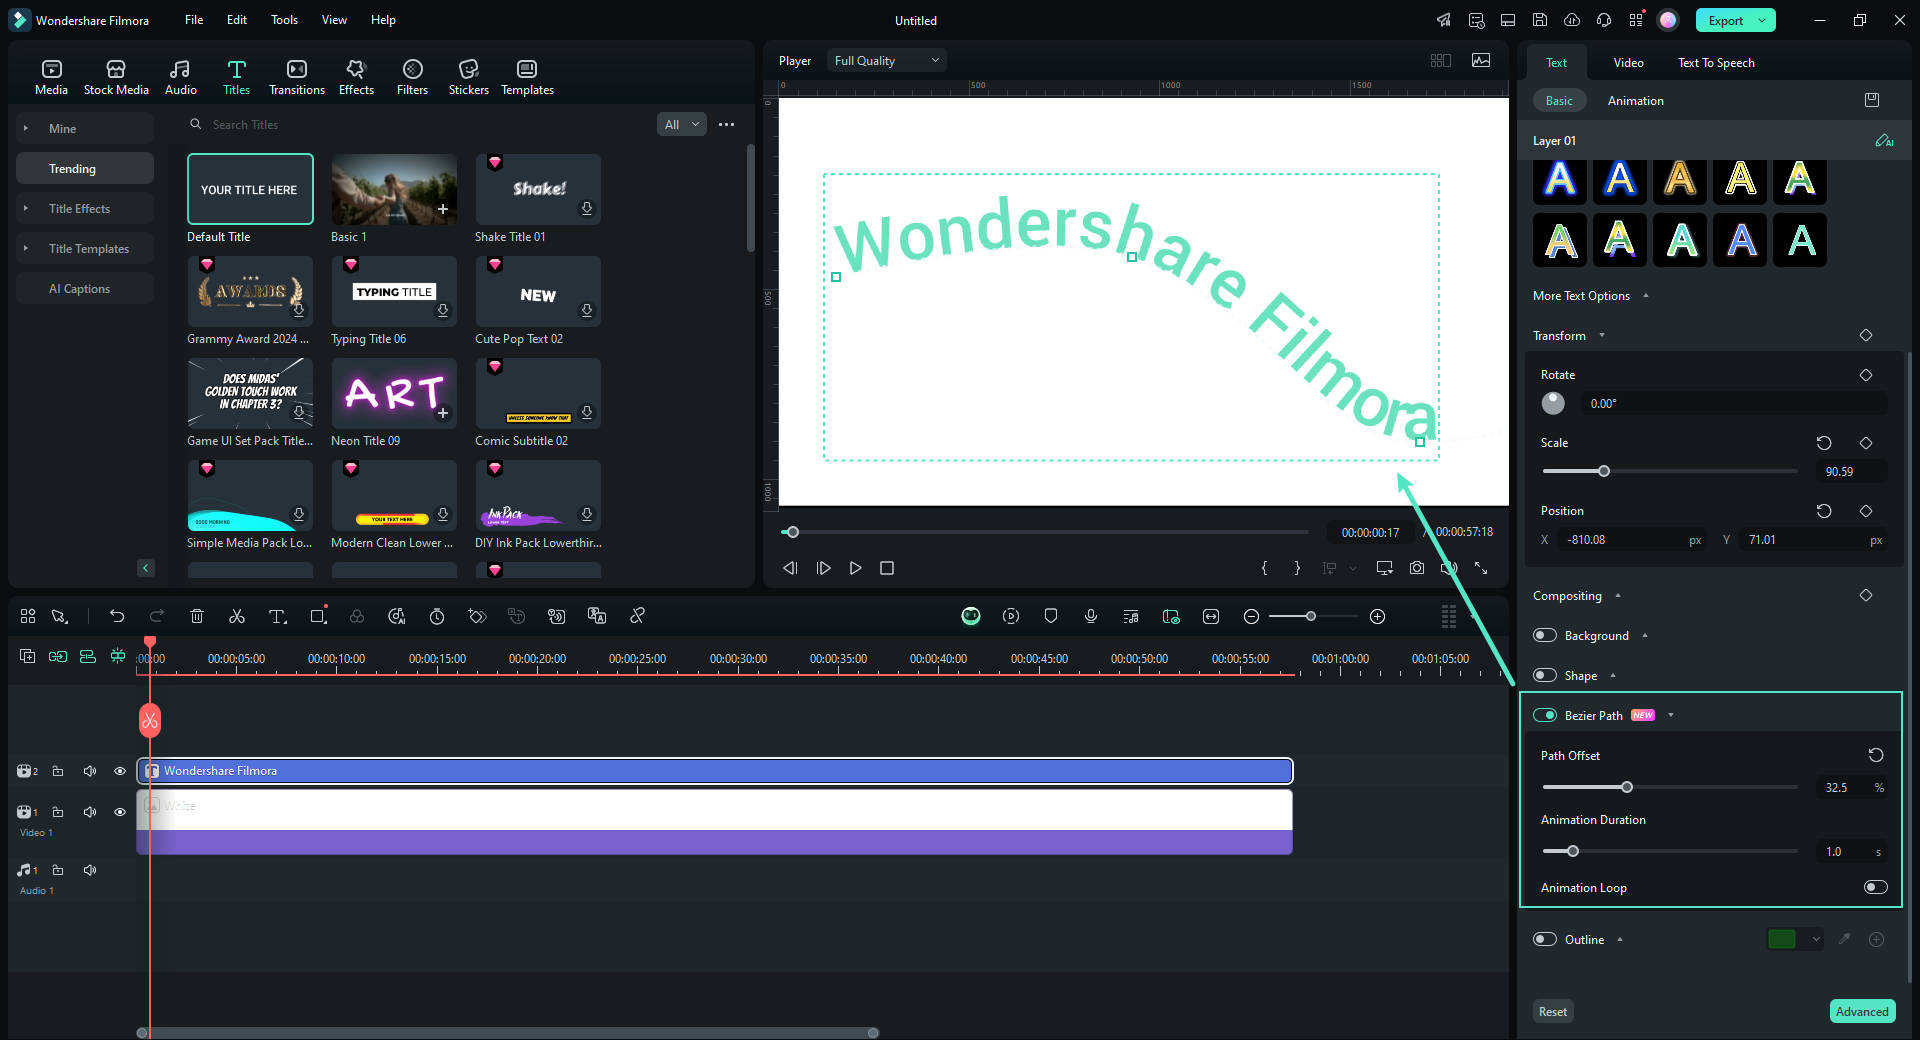
Turn on the "Bezier Path" toggle in the "Basic" section. Drag selections around points and Bezier handles to position the text along the path of your design. Adjust the rotation, spacing, and alignment as needed.
Use the "Animation Duration" slider to adjust the animation speed.
Step 6: Fine-tune and Preview Your Project
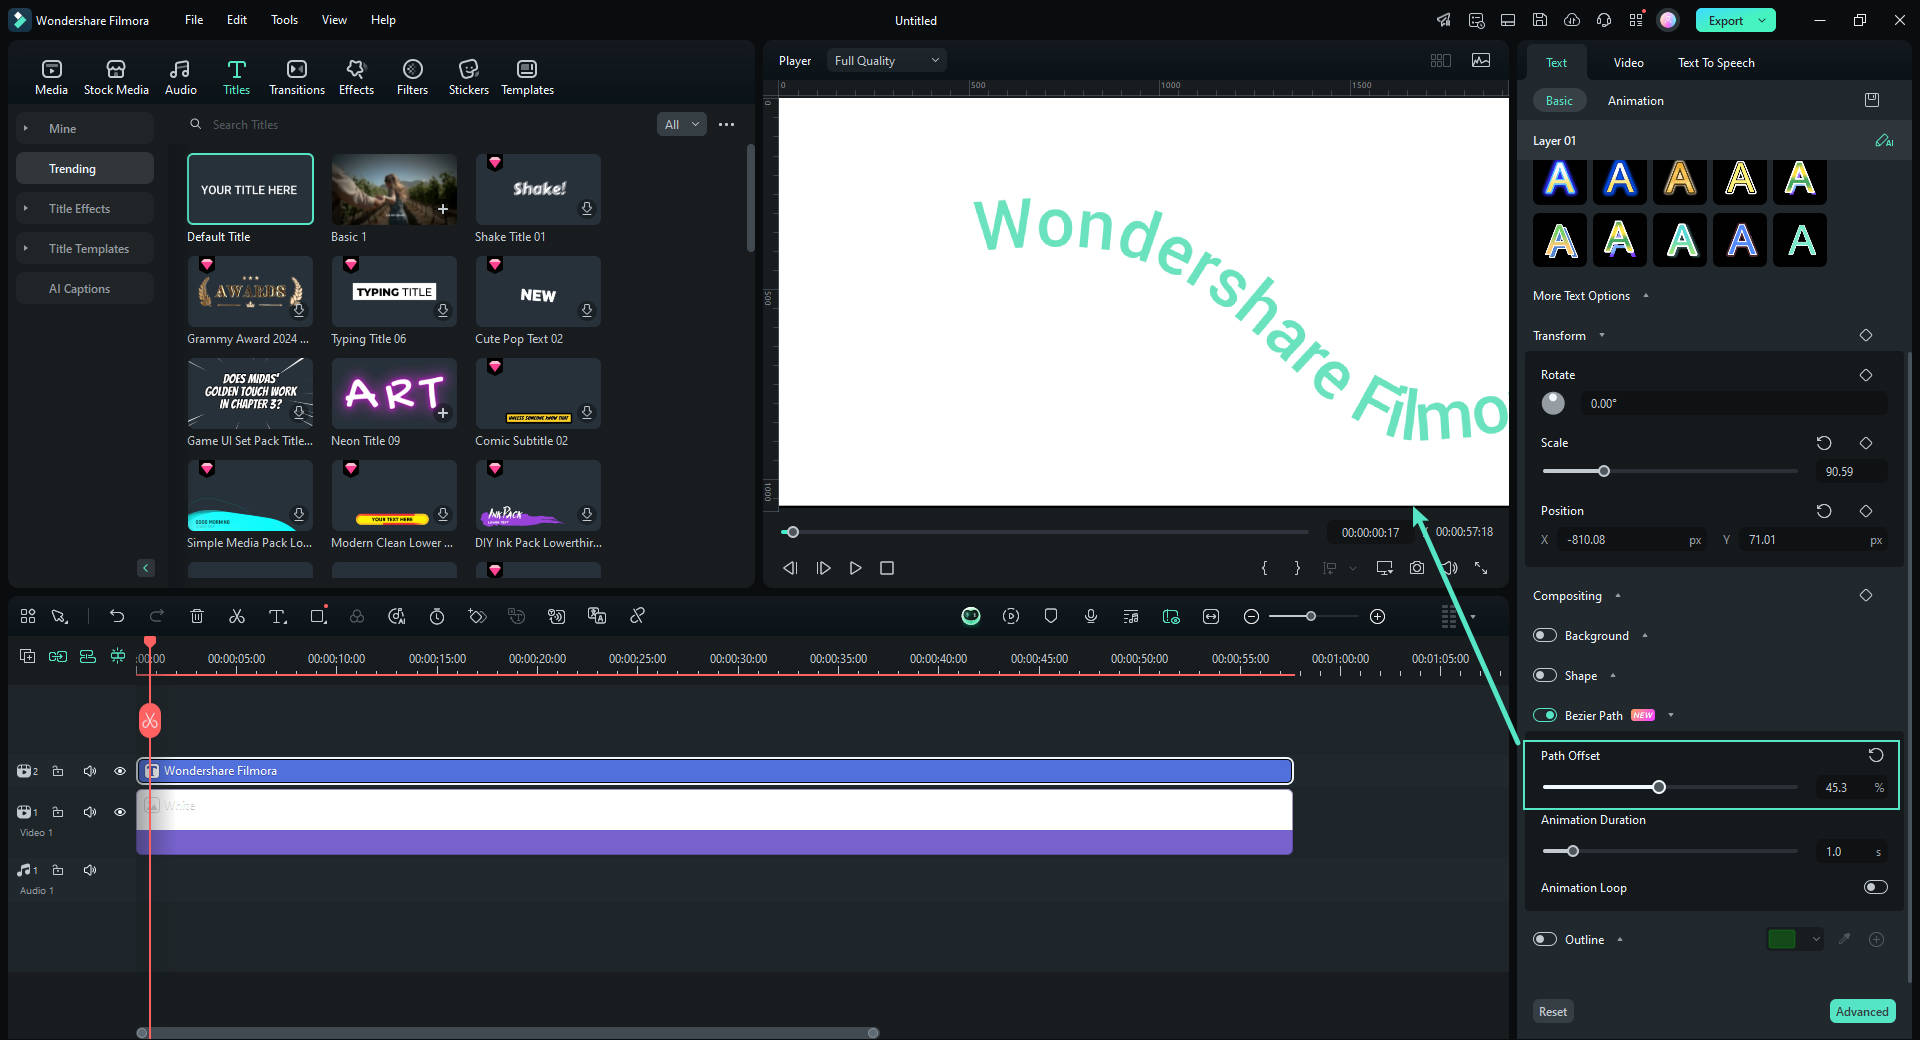
Play the timeline to preview how your text fits with the path. Make final adjustments to the text's position or effects by using the "Path Offset" slider to ensure it fits seamlessly.
Step 7: Export Your Project
Once you are satisfied with the text fit, click on the "Export" button. Choose your preferred format and resolution, then export the video or image with your fitted text.

Practical Applications of Photoshop Text on a Path Tool
The Photoshop text along path tool can be used in different ways to create unique and visually compelling text effects. These are the different areas this tool can be applied in design.
Brand design: The Type on a Path Tool is useful in creating brand logos and other branding elements where text needs to be manipulated into specific shapes and lines. It is important in maintaining brand consistency, especially in branding where text integrates with other design components.
The Starbucks logo is a prime example of effective curved text design, featuring the brand name "Starbucks Coffee" elegantly wrapped around the circular emblem. This design utilizes a circular path to create a visually appealing layout, where the text follows the curve of the logo, enhancing its iconic look. The top arc of the logo displays "Starbucks" while the bottom arc reads "Coffee, Tea, and Spices," creating a balanced and harmonious composition that is instantly recognizable. This technique of curving text not only adds aesthetic value but also reinforces brand identity, making it a powerful element in logo design.

Designing badges: Some badges are designed in such a way that text follows a specific path, for example, circular text around a central emblem, or text that follows the contours of a custom shield, shape, or symbol. This is commonly seen in sports logos and organizational emblems.
Creating unique typography for graphics and posters: Typography is a unique way of getting creative with graphics and posters. You can use the Type on a Path Tool to shape texts around a path and make texts interact with visual elements of a design in a way that stands out.
Incorporating texts along custom shapes: When creating complex designs where text needs to be in sync with other design elements, adding texts to custom shapes, abstract shapes or line art adds a layer of creativity to your work and gives it a more polished look.
Layering texts for a 3D effect: Consider layering texts using the Type on a Path Tool, to create a 3D effect that adds depth and dimension to your design. You can also simulate 3D effects by adding text along multiple paths and layering them creatively on top of each other.

Creating digital art: The Type on a Path Tool can be used to create word art or add captions that go with the flow of your digital art. This is an unusual way of integrating text with art and can be eye-catching if done properly.
Customizing invitations: This tool can be used to curve texts around decorative borders, place texts along a ribbon outline, or align text along an ornate frame. This is particularly useful when designing custom invitations for weddings or events that require a personal touch. With this tool, you can customize your text to match the theme of your event.
Conclusion
Photoshop text on a path tool is a creative way to incorporate text as a design element in your flyers and photos. Get acquainted with Photoshop, master the steps involved in using the Type on a Path tool, and go on to create simple and eye-catching designs.
For writing text on a path in videos, opt for tools like Filmora to get the job done.


