


Tired of manually filling the gaps created by clip trimming? Try the DaVinci Resolve Ripple edit tool! Save your time, work smarter, and give your clips a more professional look. DaVinci Ripple edit tool adjusts your clips automatically whenever you make a change in between your clips. You can do anything from trimming videos to faster clip adjustments.
Say bye to manual adjustment and get professional Ripple editing tools.
Let’s get started with a brief look into it.
In this article
What is DaVinci Resolve Ripple Edit Tool
What is a Ripple edit in Davinci? To keep it short, adding, deleting, or re-adjusting items in your timeline affects all its contents. The contents from the right side move towards the lift side to fill any created gap.
It allows you to add and delete items from your timeline without having to adjust other clips in the timeline.
By mastering Ripple Edit DaVinci Resolve, editors can significantly speed up their workflow and maintain better timeline organization.
Now, we will discuss using the DaVinci Resolve Ripple edit feature.
Main features of Ripple edit tool in DaVinci Resolve
- It automatically adjusts the clips in your timeline whenever You add, delete, or extend a clip.
- It saves you from the trouble of manually adjusting the clips and saves you time.
- It maintains precise sequences of items/clips in the timeline.
- You can perform Ripple editing on various file formats and complex projects.
- You can perform Ripple edits on multiple tracks.
- Davinci offers keyboard shortcuts to speed up your editing process.
Now, explore a step-by-step guide on how to use the Ripple Edit Tool of DaVinci Resolve.
How Do You Use the DaVinci Resolve Ripple Edit Tool?
In the DaVinci Resolve Ripple edit tool, you can Ripple Delete, Ripple Trim, and many other things. Here’s how you do it:
How to Use Ripple Delete in DaVinci Resolve?
Ripple Delete is handy when you want to automatically adjust all other clips in the timeline after deleting a specific clip.
- To perform Ripple Delete on both audio and video tracks, press Shift + Delete. This will delete the selected tracks.

- When you want to delete a gap in the timeline, select the gap and press Delete.

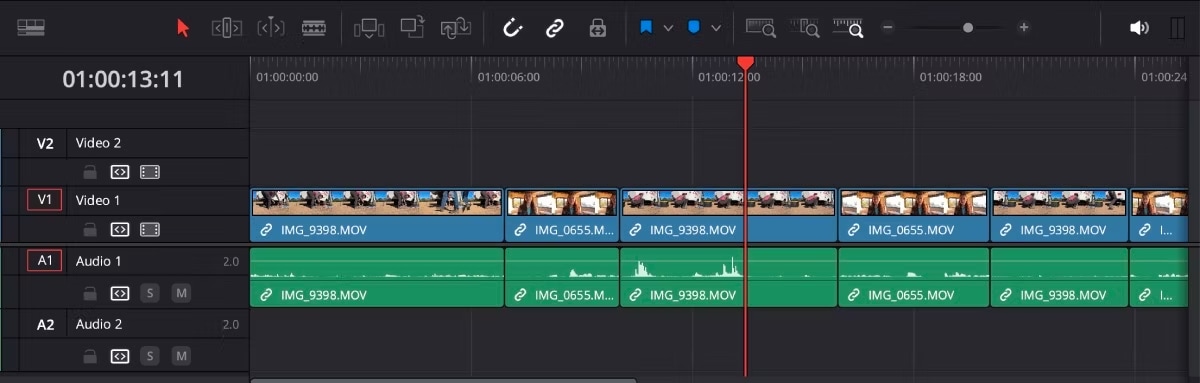
How to Ripple Delete on Multiple Tracks?
Ripple editing works across multiple tracks, moving clips on all tracks to accommodate changes. If you want to Ripple Delete on multiple tracks, it can be a bit tricky, but here’s how to do it:
- Unlock all your tracks so that you can Ripple edit tracks evenly.

- If there are two clips and two audios, as in the above image, clicking Shift + Delete while deleting clips will cause clips on the right side to shift without overlapping.

- If you select the gap and click Delete, then your gap will be deleted, causing clips to overlap.

How To Use Ripple Trim in DaVinci Resolve?
If there is a specific section of your clip that you want to delete and want to keep the rest of it. You can use Ripple Trim to do so. Here is how to use Ripple Trim:
- Keep playhead where you want to trim and press Command/Control + Shift + [. The beginning of the clip will disappear, and other items will shift over.

- If you want the clip's end to disappear, press Command/Control + Shift + ].

How To Ripple Overwrite in DaVinci Resolve?
Ripple Overwrite is useful when replacing a clip in your timeline. The new clip will start from that exact spot by placing the playhead at the beginning of the clip. The length of the newly added clip will determine the extent to which items in the timeline shift over.
- Drag and drop the clip in the preview window.
- Drop the video on Ripple Overwrite from the options on the right side.

- The new clip will replace the old clip, and other items will scoot over.
How To Ripple Insert in DaVinci Resolve
It is similar to Ripple Overwrite, but instead of replacing the clip, you will add a new one while shifting other items. Here is how to do it:
- Place the playhead where you want to add a clip.
- Drop the video on Ripple Insert from the options on the right side.

How to Ripple Speed in DaVinci Resolve
If you want to change the speed of a video, the items on the right side will shift over to create space. Here’s how you do Ripple Speed:
- Highlight the clip you want to edit and select the Change Speed option.

- Adjust the speed and tick the Ripple Timeline checkbox.
- After this, click Done.

Customize Keyboard Shortcuts to Make Ripple Editing Easier in DaVinci Resolve
Davinci offers keyboard shortcuts to speed up your editing process. You can add shortcuts using the following steps.
- Click on DaVinci Resolve > Keyboard customization. The keyboard shortcut panel will pop up.

- Type Ripple in the search bar to check for any options without shortcuts.
- You can also make shortcuts easier by clicking Save.

Let’s look into some issues while performing Ripple edits in DaVinci Resolve.
What Are Some Common Issues With Ripple Editing in DaVinci Resolve?
While DaVinci Resolve offers a powerful and versatile editing environment, you may encounter several common issues when working with the ripple editing feature. These challenges often stem from performance drops, unexpected audio-video shifts, and difficulties with the software's handling of complex timelines.
Understanding these issues is crucial for editors looking to optimize their experience and ensure smooth editing processes.
Here, we explore some of the most frequently reported problems associated with ripple editing in DaVinci Resolve, along with potential workarounds and solutions to enhance your editing efficiency.
Common issues faced while Ripple Editing in DaVinci Resolve:
- In nested sequences and complex timelines, the Ripple edit feature doesn’t work well sometimes.
- The ripple edit process can slow down in large projects and high-quality clips.
- If not used carefully, unexpected gaps might occur in your timeline.
- It doesn’t allow integration of various platforms and plugins.
So, how can we avoid these issues? Here are a few tips and tricks to do so:
- Ensure that your editable clip is unlocked.
- Break down complex projects into smaller sections.
- Free up your system space by closing unnecessary apps.
- Find other video editing software.
For editors who prefer a more seamless and intuitive ripple editing experience, Wondershare Filmora offers a compelling alternative. Filmora's ripple editing functionality is designed to provide a more predictable and reliable workflow, with features that aim to address many of the common issues encountered in DaVinci Resolve.
Filmora Ripple Edit Tool: The Best Alternative to DaVinci Resolve Ripple Edit Tool
Wondershare Filmora offers a Ripple edit tool. It allows you to trim, cut, and delete clips while maintaining the gaps in your timeline. After deleting a clip, a huge gap can be left in your timeline. Enabling the Ripple edit feature in Filmora will remove this gap automatically when you delete a section. It shifts the items from the right side to the left side to fill the gap. This feature of Filmora saves users time and hard work.
Eliminate the need to manually adjust the position of every clip after making an edit, allowing for a smoother editing process.

Key Features of Ripple Edit Tool in Filmora
- Sync Preservation: Ripple Edit maintains the sync of all clips in the timeline, including video, audio, and effects, preventing misalignment when you trim or cut sections of your project.
- Automatic Gap Removal: When you cut or delete a clip, the Ripple Edit Tool automatically closes the gap, ensuring that the remaining clips are seamlessly aligned without disrupting the timeline.
- Flexible Trimming: Easily trim the start or end of a clip with Ripple Edit, and the tool will adjust the surrounding clips automatically, ensuring that the timeline remains intact.
- Undo Functionality: Make adjustments confidently, knowing that you can easily undo any changes if the result isn't what you expected, without affecting the entire timeline.
How Do You Use the Auto Ripple in Filmora?
- Download Wondershare Filmora on your device by clicking the buttons below. So that you can access its Ripple edit feature.
- Upload your editable clip in the Filmora timeline by dragging and dropping it.

- Right-click on the clip, a pop-up will appear. Adjust the speed and duration, then click Ok.

Now, your Ripple edit feature is enabled. No matter what you add, delete, or trim clips, Ripple Edit can maintain the gap and sequence of your timeline.
While there's no global setting to force ripple editing for all actions, understanding and using the appropriate tools and shortcuts can achieve similar results. We have discussed Filmora and DaVinci Resolve, and now we will discuss their main differences.
What Are the Differences Between the Filmora and Davinci Ripple Edit Tools?
Both have a Ripple edit feature. However, some differences exist between how these tools work and what they offer. The main differences between DaVinci Resolve and Filmora are mentioned below:
- Filmora has a beginner-friendly interface with less customization, while DaVinci Resolve offers more advanced options for editing videos.
- Filmora focuses on basic Ripple edit features, while DaVinci Resolve offers complex project management features.
- While Filmora is easy to use for beginners, DaVinci Resolve is great for professionals and complex projects.
Combine Other Editing Techniques for Precise Timeline Management
To get exact results, consider combining your Ripple edit tool with other online AI tools and techniques. Here are some methods for better results:
- Rate Strech: Adjust your clip speed while maintaining the audio pitch.
- Slip Tool: Using this, modify your clips without changing their durations.
- Keyboard shortcuts: For a faster editing process, utilize keyboard shortcuts.
- Slide Tool: By using this, you can move clips without affecting their adjacent clips.
Final words
You can master video editing my excelling in tools like Ripple editing. By understanding its limitations and functionalities, you can create smooth and professional videos. Stop wasting your time manually adjusting your clips over and over, and get the Ripple edit tool. In this article, you have read about the DaVinci Resolve Ripple Edit tool as well as the Filmora Ripple edit tool. You can experiment with these tools and combine them with other integrations and tools to find the best one for you.
