
 100% Security Verified | No Subscription Required | No Malware


 ChatGPT
 Perplexity
 Gemini
 Claude
 Grok
Grok
Spatial video is an innovative method of recording that captures the detail and reality of a scene in addition to the depth and perspective. Whereas a standard 2D video captures flat images, spatial videos keep the distance, depth, and perspective of a scene - thus, one can get the feeling of being there. This unique feature is what makes spatial video the new king of photography, filmmaking, and even the sharing of personal memories.
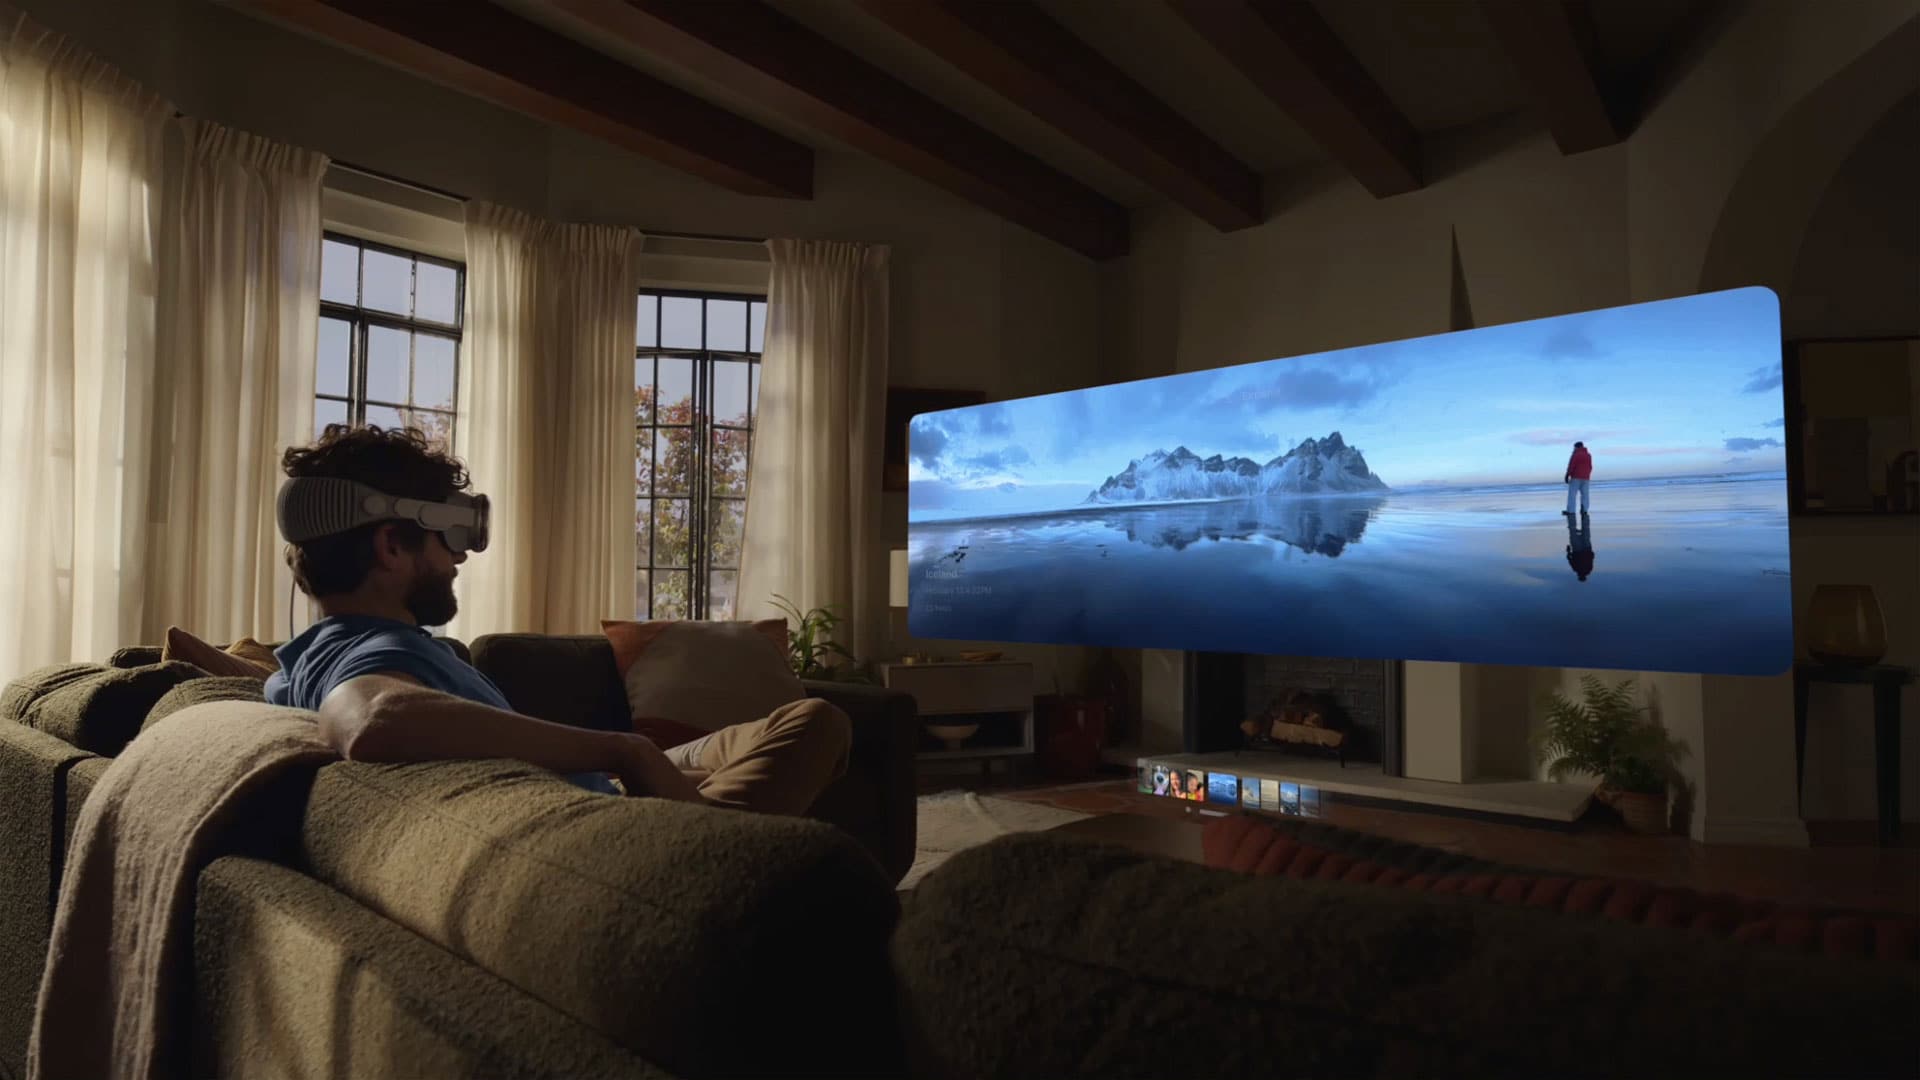
Through the implementation of a feature for capturing spatial videos on the iPhone 15 Pro and iPhone 15 Pro Max, and later the iPhone 16 series, Apple has made this disruptive technology accessible to the masses. When these spatial videos are viewed through a device like the Apple Vision Pro, the result is a vivid and realistic experience that far surpasses what can be seen on regular screens.
This is the comprehensive tutorial on spatial video, covering everything about the spatial video concept, its technical aspects, the step-by-step method of the recording process (with a special focus on supported iPhone models), and a diverse list of its evolving, practical applications, including immersive entertainment and 3D memory preservation.
In this article
Part 1: What is Spatial Video?
Spatial video is a video of the future that can record the whole visual representation, along with the depth and space data of a scene. The additional channel of data makes the viewing experience more vibrant and nearly 3D, so you can feel as if you are in the same place as the scene instead of just watching it on a screen.
How It Differs from Traditional Formats
- Versus traditional 2D video: 2D videos of standard quality show only height and width, i.e., everything is displayed on a flat plane. However, the spatial video adds to the depth perception so that the objects come closer or farther from the viewer — just the same way we perceive the world around us.
- Versus the 360-degree or VR video: The main feature of 360-degree and VR videos is that the complete environment surrounding the camera is captured; hence, these videos are the closest to the virtual world, and the user can get the feeling that they are there. Whereas the aim of the spatial video is to have realistic figures right in front of the camera with accurate 3D depth for personal videos, events, and storytelling, so that a full virtual environment is not required.
An everyday analogy
If you want to understand it better, then imagine the difference between a photograph and a stereoscopic 3D postcard. The photo is attractive but flat, whereas with the 3D postcard, you can experience the distance, like some objects are popping out while others stay at the back. Spatial video does the same thing for your videos.
Part 2: How Does Spatial Video Work?
Spatial video is a technology that captures images so that our human eyes can understand the distance between objects. Regular videos capture one flat image, while in this case, two different perspectives of the same scene are recorded separately by a small distance. This breakthrough closes the gap between the video and reality. Consequently, spectators can comprehend videos as if they were close-ups of life.
The dual-lens capture
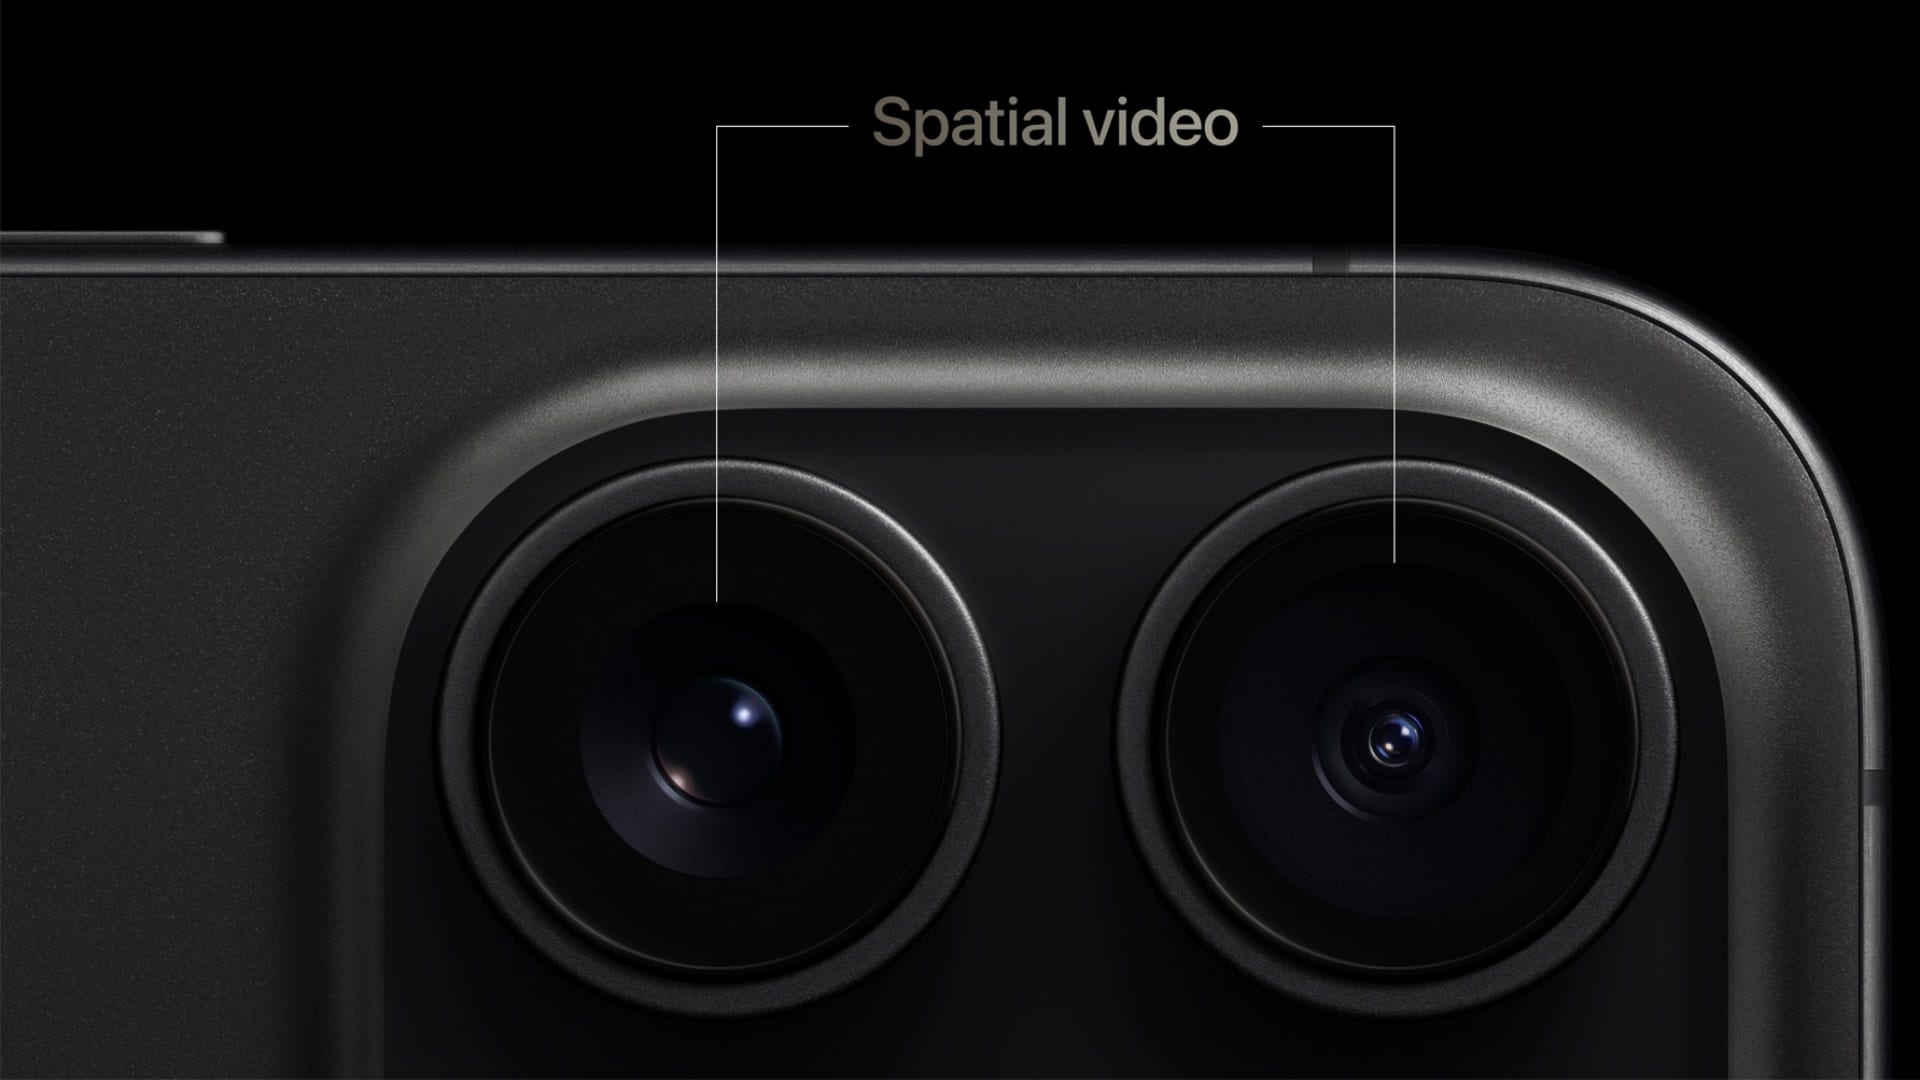
The core element of the spatial video is a dual-lens capture system, which functions similarly to our two eyes. Each lens captures the scene from a slightly different position, and the small difference between these two images is necessary for the creation of depth perception.
For instance, Apple's usage on the iPhone 15 Pro and iPhone 15 Pro Max is the combination of Main and Ultra-Wide cameras both in landscape mode so that two perspectives can be shot simultaneously. Some advanced computational photography algorithms are then used to make two videos perfectly matched so as to take care of the differences in the lenses' fields of view or any distortions. The final product is a stereoscopic video presenting realistic distance and scale.
Recording depth and parallax
The feeling of depth in spatial video is mostly contributed to by parallax, which is the phenomenon of objects changing their position when viewed from two different angles. The change, or disparity as it's called here, is very carefully gauged and recorded by the camera system. Spatial videos achieve the viewer's perception of distance by capturing parallax, thus giving a feeling of three-dimensional space. The playback of such a video on a device like the Apple Vision Pro, wherein each eye is provided with its respective view, is the method of reproduction that is most faithful to the original scene.
Playback for immersive viewing
When a stereoscopic display is used, spatial video is displayed simultaneously to both eyes, with one view being handed to the left eye and the other to the right. This dual playback confuses the brain into combining the two views, which is why it provides a lifelike 3D experience that feels immersive and natural. Only the primary view is set out for those who are on a regular 2D display, therefore the video is still played as a standard flat video without the depth effect.
Storage formats and file sizes
Simply put, spatial video is double the storage of a traditional video because it carries two video streams and some spatial metadata. Apple turned to Multi-View HEVC (MV-HEVC) to carry its spatial videos, a format that keeps the two views as separate layers within one video file.
This design ensures that older devices, which do not recognize spatial playback, will, by default, display the base layer only as a standard 2D video. Though MV-HEVC is a kind of master in compression, the spatial videos still eat a lot of hard disk space. For example, consider the iPhone 15 Pro model, which captures spatial videos at 1080p resolution and 30 frames per second in SDR, resulting in an estimated size of about 130 MB per minute. In contrast, a regular 1080p 30fps flat video will consume a little over 60–70 MB per minute of storage. The extra space is reserved for the second view and the spatial metadata, which enable the stereoscopic effect to occur.
Hardware & software requirements
Specialized hardware and software are necessary for the capture and playback of spatial video. To capture spatial video, a device with two cameras and software that can synchronize them is needed. Among the first mainstream smartphones with built-in spatial video capture are Apple's iPhone 15 Pro, iPhone 15 Pro Max, and the iPhone 16 series, which run iOS 17.2 or later. During playback to achieve the immersive effect, a stereoscopic-capable display is required, e.g., the Apple Vision Pro headset, which sends each view directly to your eyes.
From the software point of view, iPhone's Camera app has a separate spatial video mode, and the recorded videos go into the Photos app in a Spatial album. The use of Final Cut Pro on Mac for editing means that the spatial videos can be imported and exported to be further perfected, while AVFoundation, Apple's framework, is the one that supports developers in changing side-by-side stereo video into MV-HEVC format with spatial metadata.
Part 3: iPhone and Spatial Video (Apple's implementation)
With the introduction of native recordings on the iPhone 15 Pro and iPhone 15 Pro Max with iOS 17.2, Apple has completely changed spatial video for everyday users. For the first time, a mainstream smartphone gave anyone the opportunity to film 3D videos of any kind without the need for special equipment. The technology further advanced with the iPhone 16 series on iOS 18, allowing for more accurate depth capture. In the case of the iPhone 16 Pro models, this advancement included the addition of on-ear spatial audio recording, enabling effortless integration of both visuals and sound.
How Apple uses multiple lenses and depth sensors
Apple's method involves merging the Main and Ultra-Wide cameras to obtain two different views of the same object, just like our eyes. These two views are matched with the help of depth sensors and aligned through computational photography to result in the stereoscopic effect. Due to this mixture, the video can still show the viewer the realistic distance and size as if it were an immersive playback, but at the same time, it can be displayed as normal (flat) on the screens of devices that are unable to show 3D.
Recording devices
Spatial video recording is supported by the following devices:
- iPhone 15 Pro and iPhone 15 Pro Max with iOS 17.2 or later
- iPhone 16 and iPhone 16 Plus with enhanced depth capture
- iPhone 16 Pro and iPhone 16 Pro Max, which not only record 3D video but also capture spatial audio
These phones provide spatial recording of a professional level but in the form of a smartphone, thus allowing the user to record without using any extra cameras or other accessories which can be quite inconvenient.
Playback devices
One of the best ways to enjoy spatial videos in their full beauty is to use devices specifically designed for stereoscopic playback:
- The Apple Vision Pro offers perfect 3D depth by giving each eye the corresponding view.
- Meta Quest 3, along with other VR headsets, could also play these videos, but only after they are converted into compatible side-by-side formats.
- Moreover, these videos can be played in 2D on regular devices like iPhones, iPads, or Macs, which means that even without special hardware, users can still access these videos.
Benefits of Apple's spatial video
Apple's solutions provide a bunch of new benefits for the average user:
- 3D-capture of your life: Such moments as birthdays, weddings, and your travels become to keep forever with you increasingly vivid and lifelike.
- iCloud integration at its best: Spatial videos, just like in the old days, are still automatically backed up and accessible on different devices.
- Deep engagement with the audio and video: With the help of spatial audio that comes with the iPhone 16 Pro, perfect sound is achieved for playback on Vision Pro, making it feel like you were standing there in the captured moment.
- Quick sharing: Friends who don't have 3D-capable headsets can still view these videos in 2D format.
Through the brilliant combination of hardware innovation, spatial audio, and seamless integration across the entire ecosystem, Apple has stepped up its game and set the bar for the stunning video experience that you can carry around in your pocket.
Part 4: How to Record Spatial Video
When you want to record spatial videos on your iPhone, things are straightforward, but let us face it, you will need to have a device that supports this feature, as well as the right version of software and settings. For your 3D video recording, a simple step guide is shown below.
Requirements
- An iPhone 15 Pro or iPhone 15 Pro Max with iOS 17.2 or later, or any iPhone 16 series model (iPhone 16 Pro/Pro Max is spatially also the audio).
- First, enough space on your device to save the recordings, because spatial videos take up more space, are larger than standard 2D videos, and the size is around 130 MB per minute at 1080p, 30 fps.
- Light is suitable for spatial video, as well-lit environments are recommended for accurate depth.
- If you are going to feel the 3D effect, then you must have a stereoscopic playback device just like the Apple Vision Pro.
Steps to record spatial video on iPhone
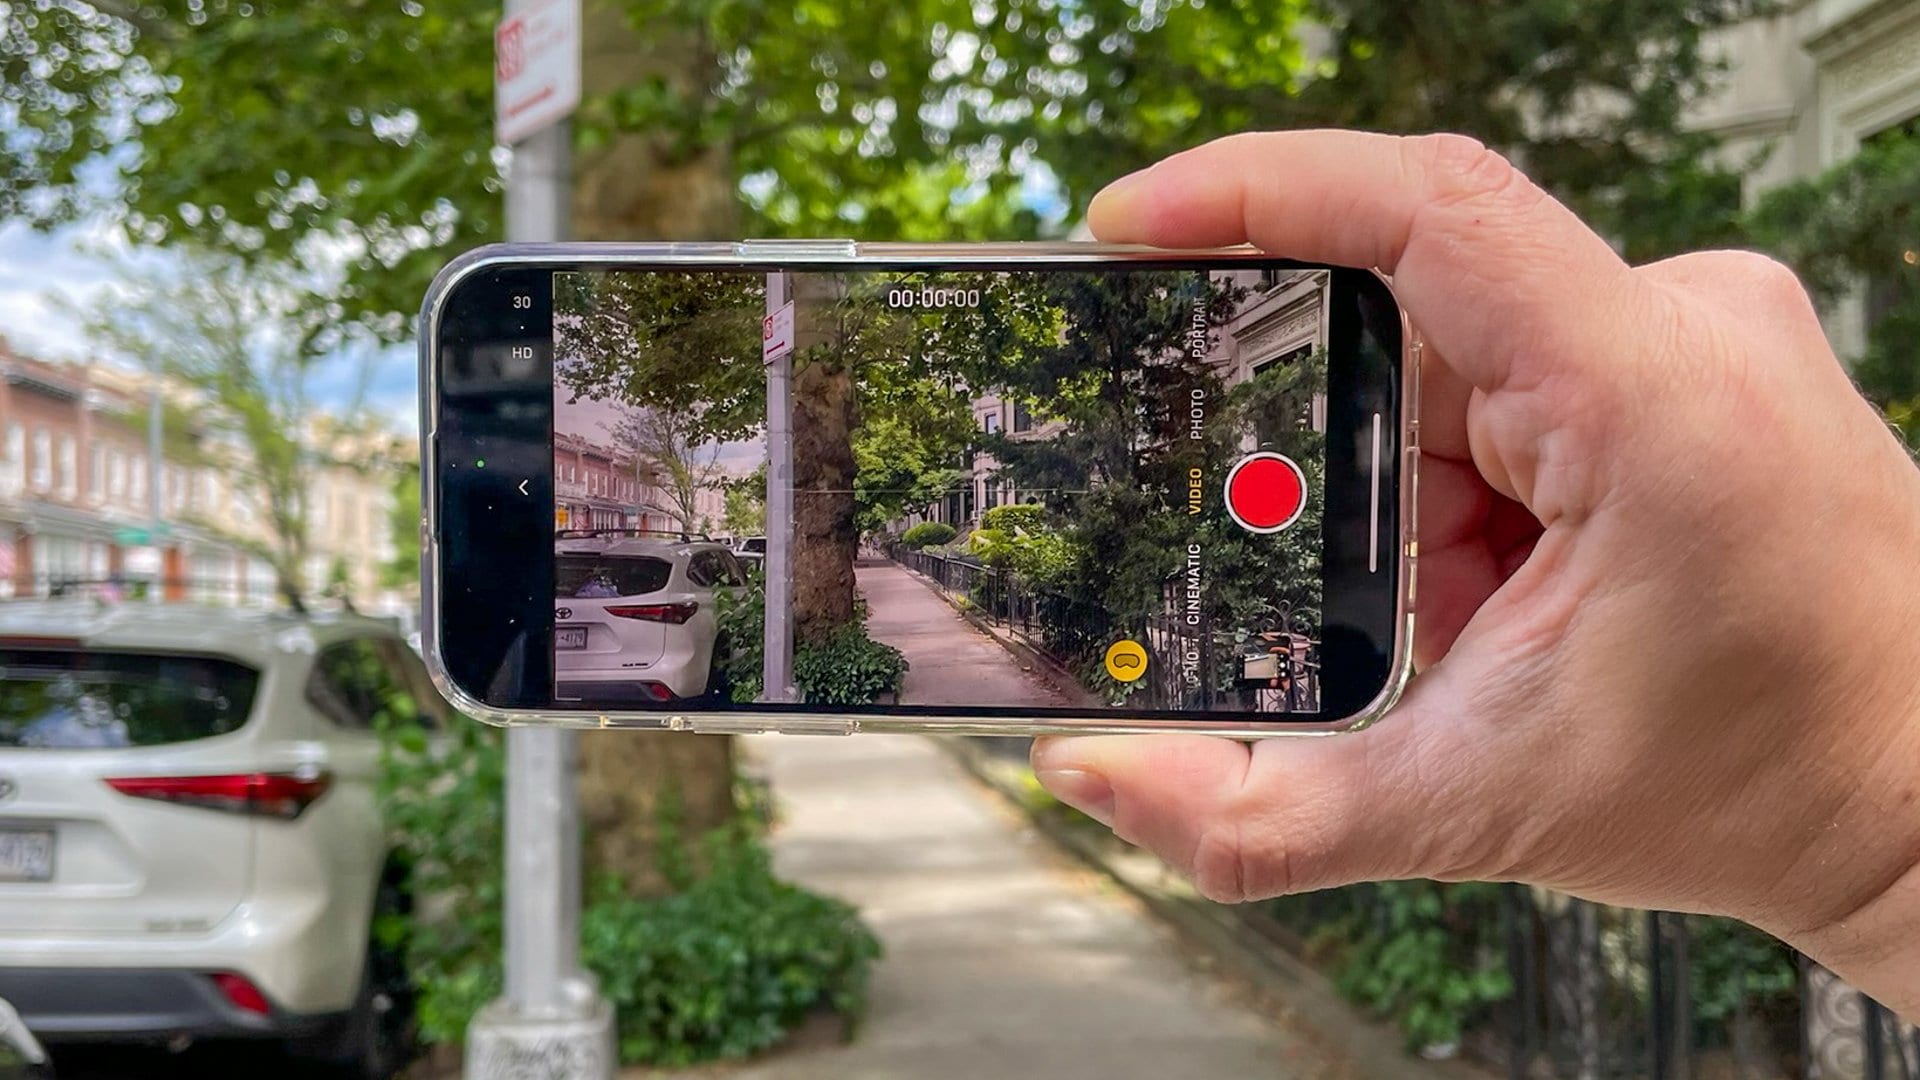
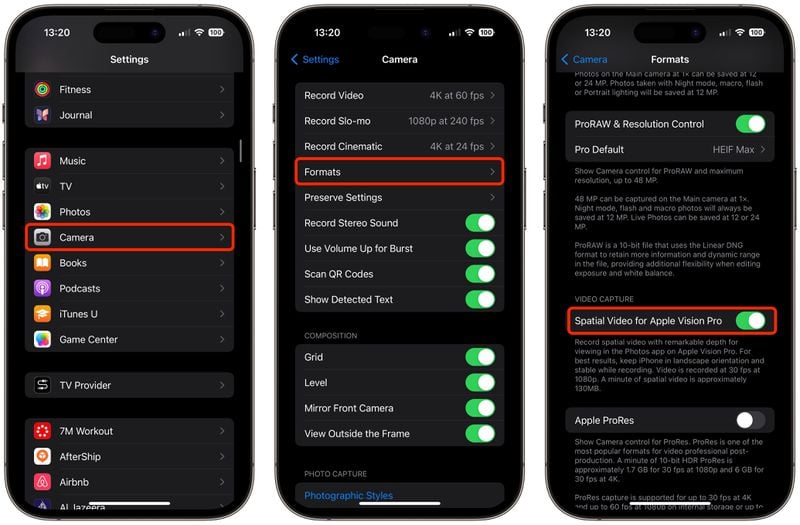
Step1Enable spatial video recording
First, open Settings on your Apple iPhone and then go to Camera > Formats, and turn on "Spatial Video for Apple Vision Pro." By this, the option camera will record videos in a spatial (3D) format rather than standard 2D.
Step2Open the Camera app
iPhone's built-in Camera app is what you use to take photos. In this app, you should switch to Video mode.
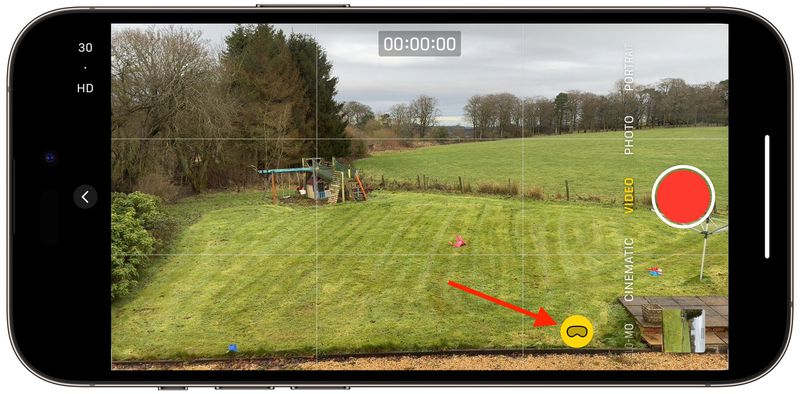
Step3Hold your phone in landscape orientation
Recording a spatial video in the landscape mode only is as the Main and Ultra-Wide lenses need to be parallel for the two distinct perspectives to be captured.
Step4Hold the camera steady
Frame your subject and press record. Ensure that your phone is stationary and do not move it abruptly. The steady shot will allow the cameras and depth sensors to accurately record the parallax and maintain the 3D effect.
Step5Check out your clip
After you have finished, press the stop icon. The "Stop Recording" feature will automatically save your spatial video to the Photos app in the "Spatial" album.
Other devices that support spatial video
Spatial video isn't limited to iPhones. You can capture or experience 3D video with various devices designed for immersive viewing.
VR/AR headsets:
- Apple Vision Pro – the primary playback device for iPhone-captured spatial videos.
- Meta Quest 3/Pro – supports playback of side-by-side 3D video formats.
- Other mixed-reality headsets that can display stereoscopic video content.
Specialized 3D cameras:
- Canon RF-S 3D Lens with compatible EOS R cameras.
- Insta360 EVO and similar foldable 3D/VR180 cameras.
- Professional rigs for cinematic VR experiences.
Best practices for quality spatial video
To maximize depth and realism in your spatial videos, follow these guidelines:
- To maintain a steady hold on your phone or camera, it is advisable to use a tripod or gimbal.
- To capture details of depth clearly, the recording should be done in bright and well-lit areas.
- For the optimal 3D effect, the main subject should be placed 3-8 feet away from the camera.
- Slowly move the camera and refrain from making quick pans or shakes.
- Depth becomes richer when you have layers that are clear (foreground, middle, background)
Part 5: How to Edit Spatial Video with Final Cut Pro
One can say without a doubt that the official software for editing spatial videos is Apple Final Cut Pro. The said app supports stereoscopic depth data in a very convenient manner; hence, users can cut, render and export their spatial videos while keeping the 3D effects intact.
Key features for spatial video editing in Final Cut Pro
- Native spatial video import: Bring in the spatial videos that you have recorded using iPhone or any other device that is compatible with the software without any hassle.
- Depth-aware editing: You can do the adjustment of the stereoscopic depth to prepare the 3D experience for the user.
- Color correction and grading: Let users adjust the brightness, contrast, and colors of the video to fully immerse themselves in the dazzling visuals.
- Spatial audio support: Ensure that the spatial audio recorded with the iPhone 16 Pro models' microphone is perfectly in sync with the video for an overall realistic experience.
Steps to edit spatial video in Final Cut Pro
Step1Import your spatial video
You can either connect your iPhone to your Mac or simply use AirDrop or iCloud for transferring spatial videos. After that, launch Final Cut Pro and proceed to File > Import > Media to load the videos into your project.
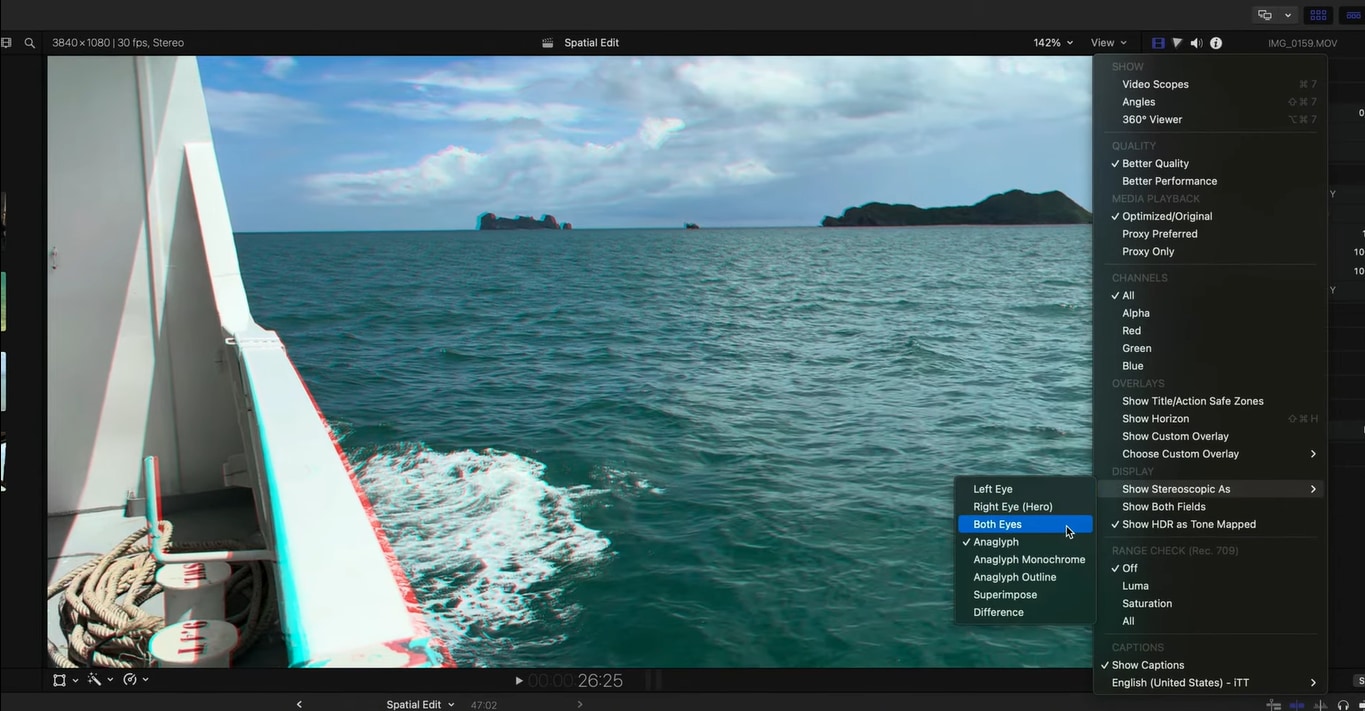
Step2Enable "Both Eyes" view
To access the stereoscopic (3D) playback of your spatial video in the viewer, select the "Both Eyes" option. This allows you to have a preview of the depth feature that will be displayed on a device like Apple Vision Pro.
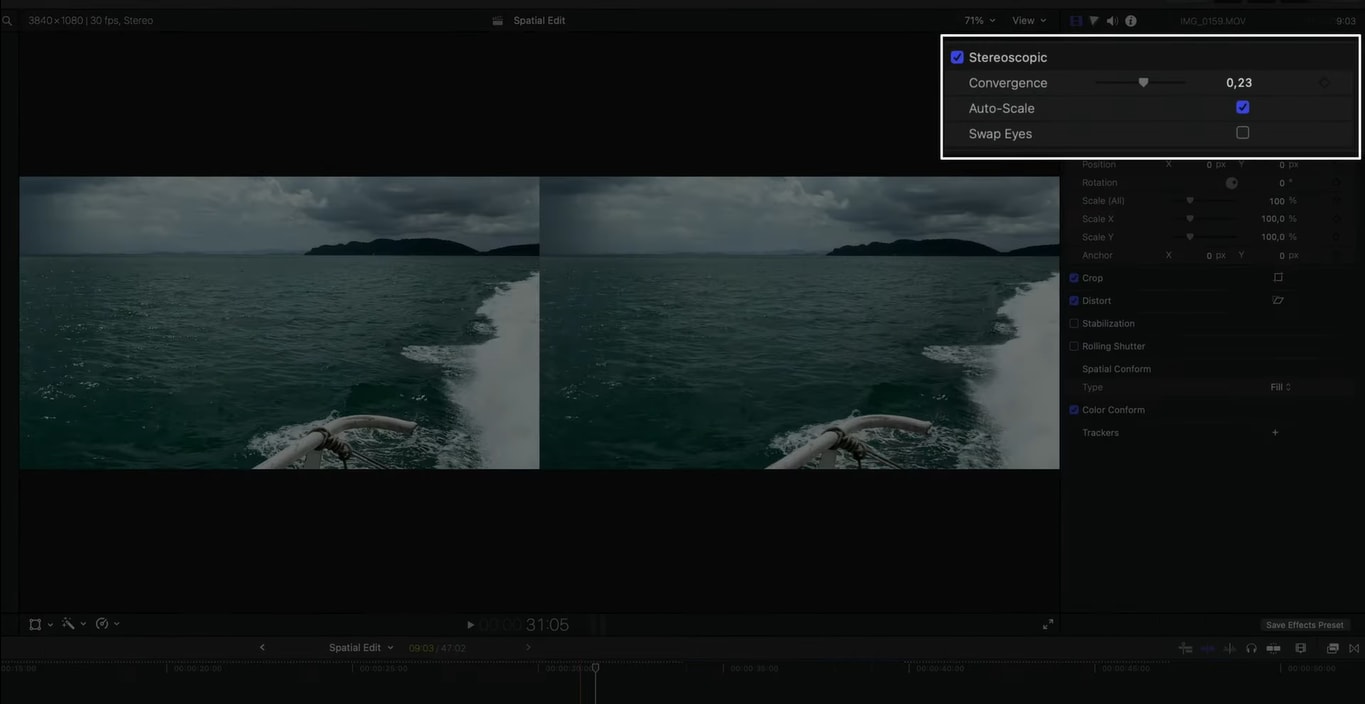
Step3Auto Scale and enhance visuals
If your spatial video is somewhat cropped or does not fit the frame, select your clip from the timeline, open the Inspector panel, and click Auto Scale.
After that, perform color correction, grading, filters, and transitions for the first. If the purpose of your video is to create an immersive experience with spatial audio (available on iPhone 16 Pro models), ensure that the audio and video are perfectly synchronized.
Step4Export your edited spatial video
Navigate to File > Share > Export File, select HEVC Spatial Video, and then save your file in a format optimized for playback on compatible devices, such as Apple Vision Pro.
Part 6: Bonus Tool: Wondershare Filmora – An Impeccable Editor
Despite Wondershare Filmora not being able to handle spatial video editing, its wide range of tools and high-quality output make it an excellent option for simple video editing and exporting. So, plan to create social media, vlog, or presentation videos from your spatial footage. Filmora-introduced AI tools can be incredibly speedy and user-friendly for editing these 2D videos.


Key strengths of Filmora
- User-friendly interface: A good choice for beginners who want professional output without hours of practice getting used to the program.
- Editing in high resolution: Allows not only 4K but also 8K cutting for brilliantly clear pictures.
- Cinematic effects built in: Grants the use of filters, LUTs, transitions, and templates for eye-catching results.
- AI-powered tools: Comprising AI Video Enhancer, Auto Reframe, Smart Short Clips, and Portrait Cutout, these tools bring the desired effect more quickly and effortlessly.
- Advanced audio features: Offers AI Vocal Remover, AI Audio Denoise, and spatial sound enhancements that make an audience fully engrossed in the experience.
- Fast export and sharing: Enables users to quickly and conveniently export and share their work on YouTube, TikTok, Instagram, and many other platforms.
Why consider Filmora?
By virtue of its simplicity as well as its power, Filmora finds itself in a favorable position. If you plan to multitask, you can use Filmora to edit your standard video alongside your spatial content, or create quick, polished clips without having to navigate complicated professional suites such as Final Cut Pro or Premiere Pro.
Just to name a few of the AI features in Filmora 14 that use the latest technology in the industry: The AI-driven features of Filmora 14—such as Smart Short Clips, AI Video Translation, and AI Portrait Cutout—are indeed a game-changer for content creators who need to work fast and not sacrifice their creativity in the process. First of all, as we know, creativity could be very limited if the workflow wasn't smooth and efficient, but that is not your case if you are with Filmora.
Part 7: How to Watch Spatial Video
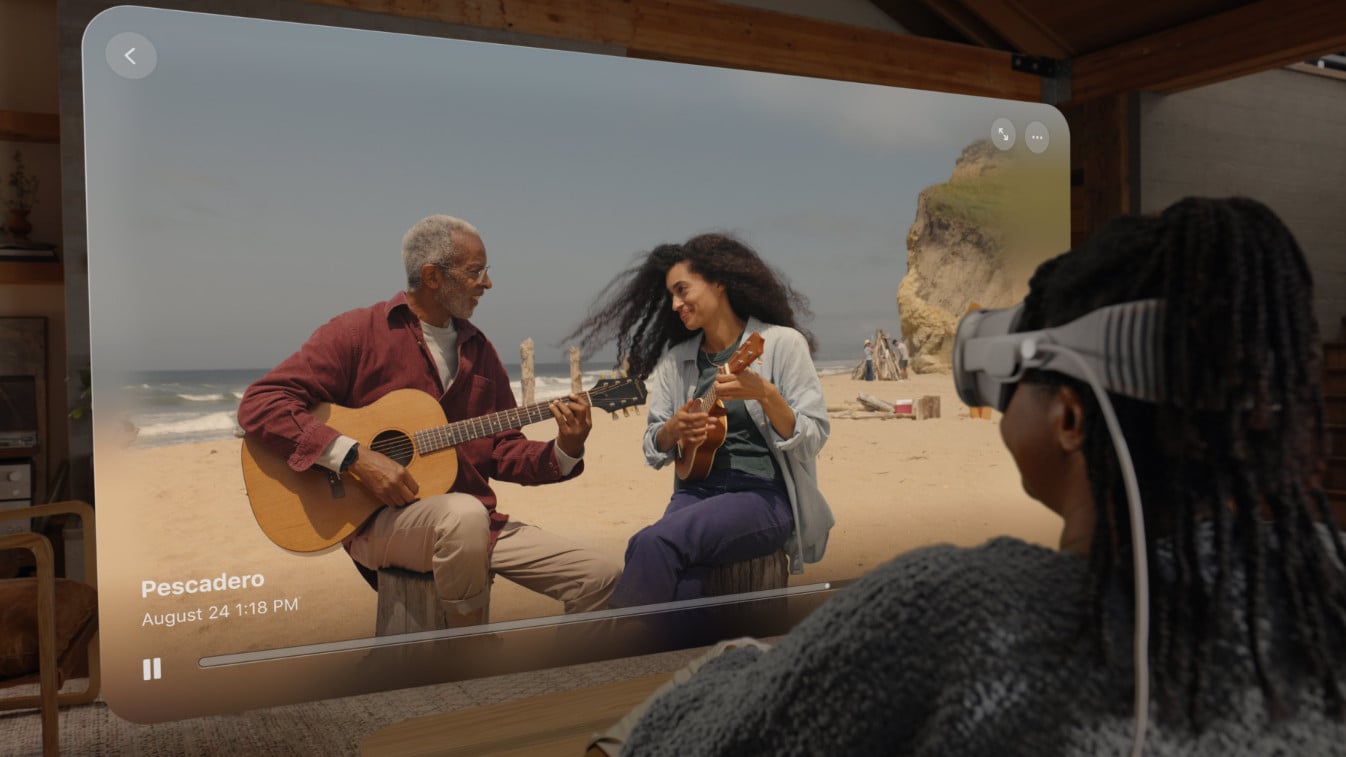
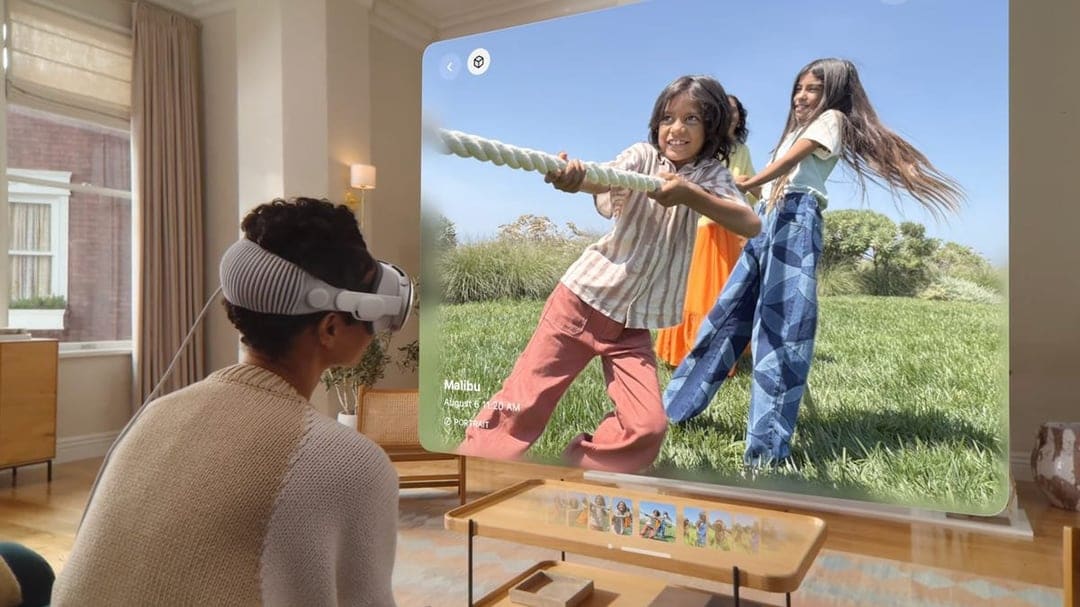
- Playback on Apple Vision Pro: Apple Vision Pro is the best place to show off your spatial videos. The Photos app picks them up and replays them as complete 3D, allowing you to watch them either in a window or in an immersive mode where you get to see the whole scene around you.
- Viewing with VR/AR headsets: Spatial videos may also be seen via VR headsets such as Meta Quest and Oculus. Most of the current directly supported spatial video format headsets can open the file without any trouble. If not, you may need to use a third-party app to convert the file to a side-by-side stereo format and then load it into the headset.
- Standard 2D viewing: On gadgets without 3D playback capabilities, such as most mobile phones, tablets, and PCs, spatial videos will automatically switch to their standard, flat (2D) versions. This is a way to ensure compatibility, albeit at the cost of losing the added sense of depth.
- Immersive vs. flat playback: Immersive playback allows you to see all the depth, parallax, and the whole feeling of being there in the stage. Flat playback only utilizes the underlying video layer; thus, it appears as any non-3D video without the 3D effect.
Part 8: How to Share Spatial Videos
- Sharing with Vision Pro users: Either through the Photos app or cloud platforms like iCloud, Vision Pro users are free to distribute spatial videos. They are simply able to check them out in 3D on their headset without any hassle.
- Sharing with non-Vision Pro users: They will be able to view the shared video in 2D if the friends with whom you share the file do not have a 3D device. To make VR headset users get access to the video, you may need to supply them with the version that has been converted into stereo and is compatible with their device. By the way, spatial videos take up a lot of space; hence, you should think of storage and bandwidth before sharing.
Part 9: Limitations and considerations
Technical limitations
Even though a spatial video provides an amazing 3D experience, the technology is still limited. The viewpoint is fixed, so it is not possible to move around the scene as in the case of true 6-DoF VR content. The resolution may also be lower than that of a standard 4K or higher-quality 2D video, especially after compression. Besides that, spatial videos tend to have quite strict requirements regarding the frame rate and the playback device to maintain depth and smoothness.
Practical considerations
It is quite a challenge to shoot a spatial video, and the requirements include good lighting; otherwise, the depth accuracy and the quality in general will be lower. The camera movement and composition can also be more challenging; gentle movements and properly executed framing are beneficial for the viewer's comfort. Moreover, the files take up a lot of space compared to regular videos, so they not only store more but also progress in uploading or sharing can be slower.
Furthermore, another disadvantage is that spatial video is still limited to the use of specific hardware for both recording and playback, e.g., iPhone 15 Pro and later models for capturing, and devices like Apple Vision Pro or certain VR headsets for 3D viewing. Now, there are only a handful of professional apps, such as Final Cut Pro, which provide complete support for spatial formats. Thus, editing tools are still quite constrained.
Conclusion
Spatial videos are revolutionizing the capturing and re-experiencing of memories in a way that adds a layer of depth and reality that even standard videos cannot match. With the introduction of spatial video recordings on iPhone 15 Pro and subsequent models, as well as immersive playback on devices like Apple Vision Pro and Meta Quest, this technology is becoming increasingly accessible.
Still, the process of editing a spatial or standard video should not be difficult if you are a beginner and want a powerful tool to develop your videos—whether standard 2D or immersive clips—Filmora will be your best ally. It features user-friendly drag-and-drop editing, diverse effects, and advanced AI tools that make it easy for both new and experienced creators to demonstrate their creativity.
