Matroska Video Files, in short, MKV files, are special container formats that store various media types, including video, audio, images, and subtitles, on a single file. Beyond its flexibility, the major factor that makes this format special is its ability to store more media than others and still retain a high video quality.
Now, while this format is a game-changer in video editing, it can be a hassle to add subtitles to MKV files, especially because not all video editors support it. However, many audiences prefer subtitled content over plain videos, and MKV files can help you achieve that. You just need the right guidance.
Fortunately, in this article, you will learn how to add subtitles to MKV files easily on Windows, Mac, and Linux devices. You will also discover how to do this online from any device connected to the internet. Keep reading to find out more.

In this article
Part 1: How to Add Subtitles to MKV files on Mac and Windows
For people using Windows and Mac devices, you can add subtitles to MKV files using Wondershare Filmora. This is a video editor that supports different container formats, including MP3, MP4, AVI, and MKV files.

Beyond basic video editing, Filmora allows you to add captions to your videos with ease, using a plethora of advanced features. Not to mention, it offers accessibility on almost all devices and a quick way to edit videos like a professional. Here are some of its features:
- Superb video stabilization with low distortion.
- Vast video/audio effects and creative assets.
- Powerful AI for effortless content creation.
- Intuitive, professional yet beginner-friendly.
- Works on Mac, Windows, iOS, and Android.

- Filmora offers a free plan so you can experience its features for adding subtitles to videos before making a payment.
- It offers subtitle editing features that let you change the color, size, and font of your subtitles even after adding them.
- Filmora offers an advanced subtitle auto-generator that lets you add SRT to MKV files and other video formats automatically.
- It also lets you add your subtitles in different languages, including Spanish, Chinese, and French, depending on your preference.
Method 1: How to Add Subtitles Using Titles Feature
Below is how to add SUB to MKV on Filmora using Filmora’s Tittles feature. Before you begin, be sure to download the app to your device and create an account:
Step 1: Launch Filmora and import your MKV file.
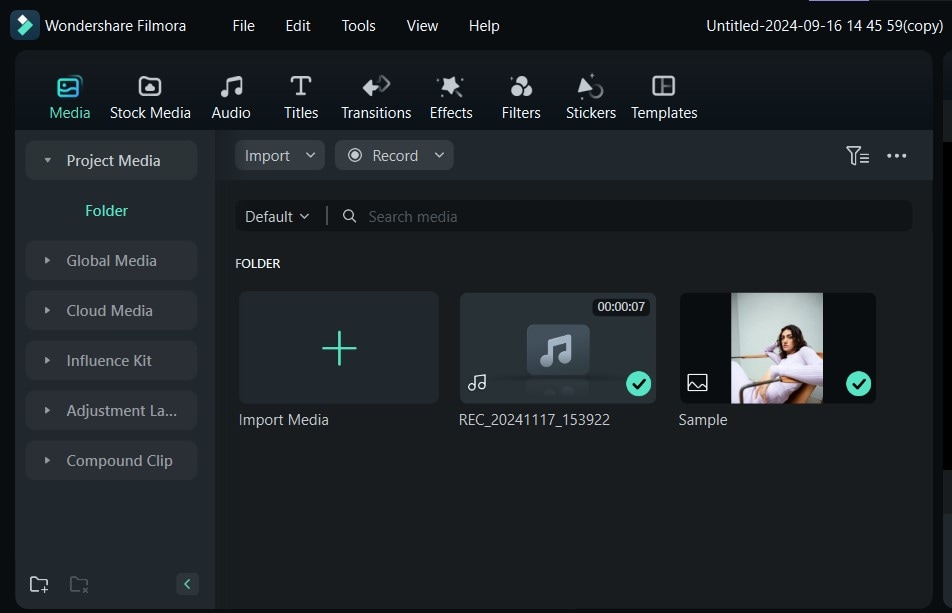
Step 2: From the top panel, click Titles.
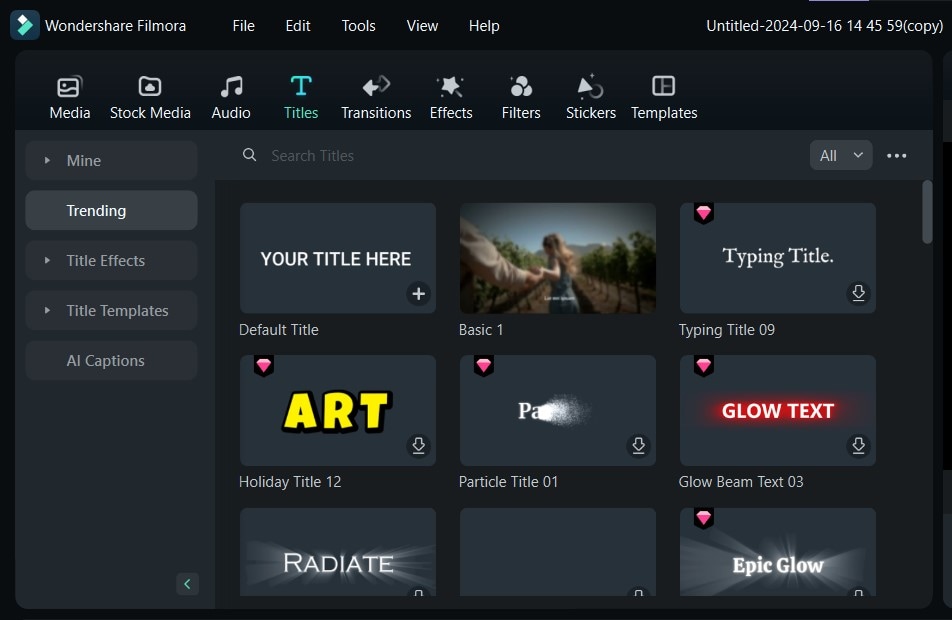
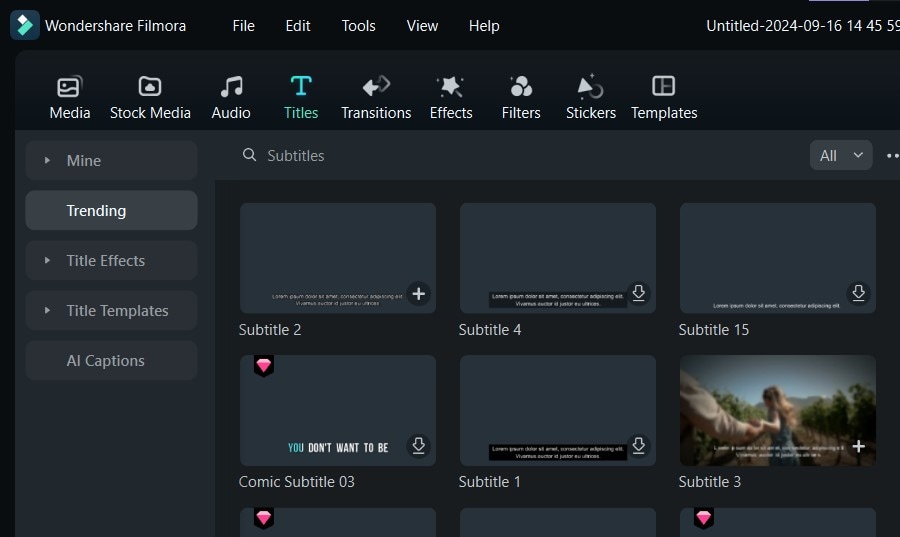
Step 3: Type Subtitles into the search bar at the top of the Titles menu and select from the various options available
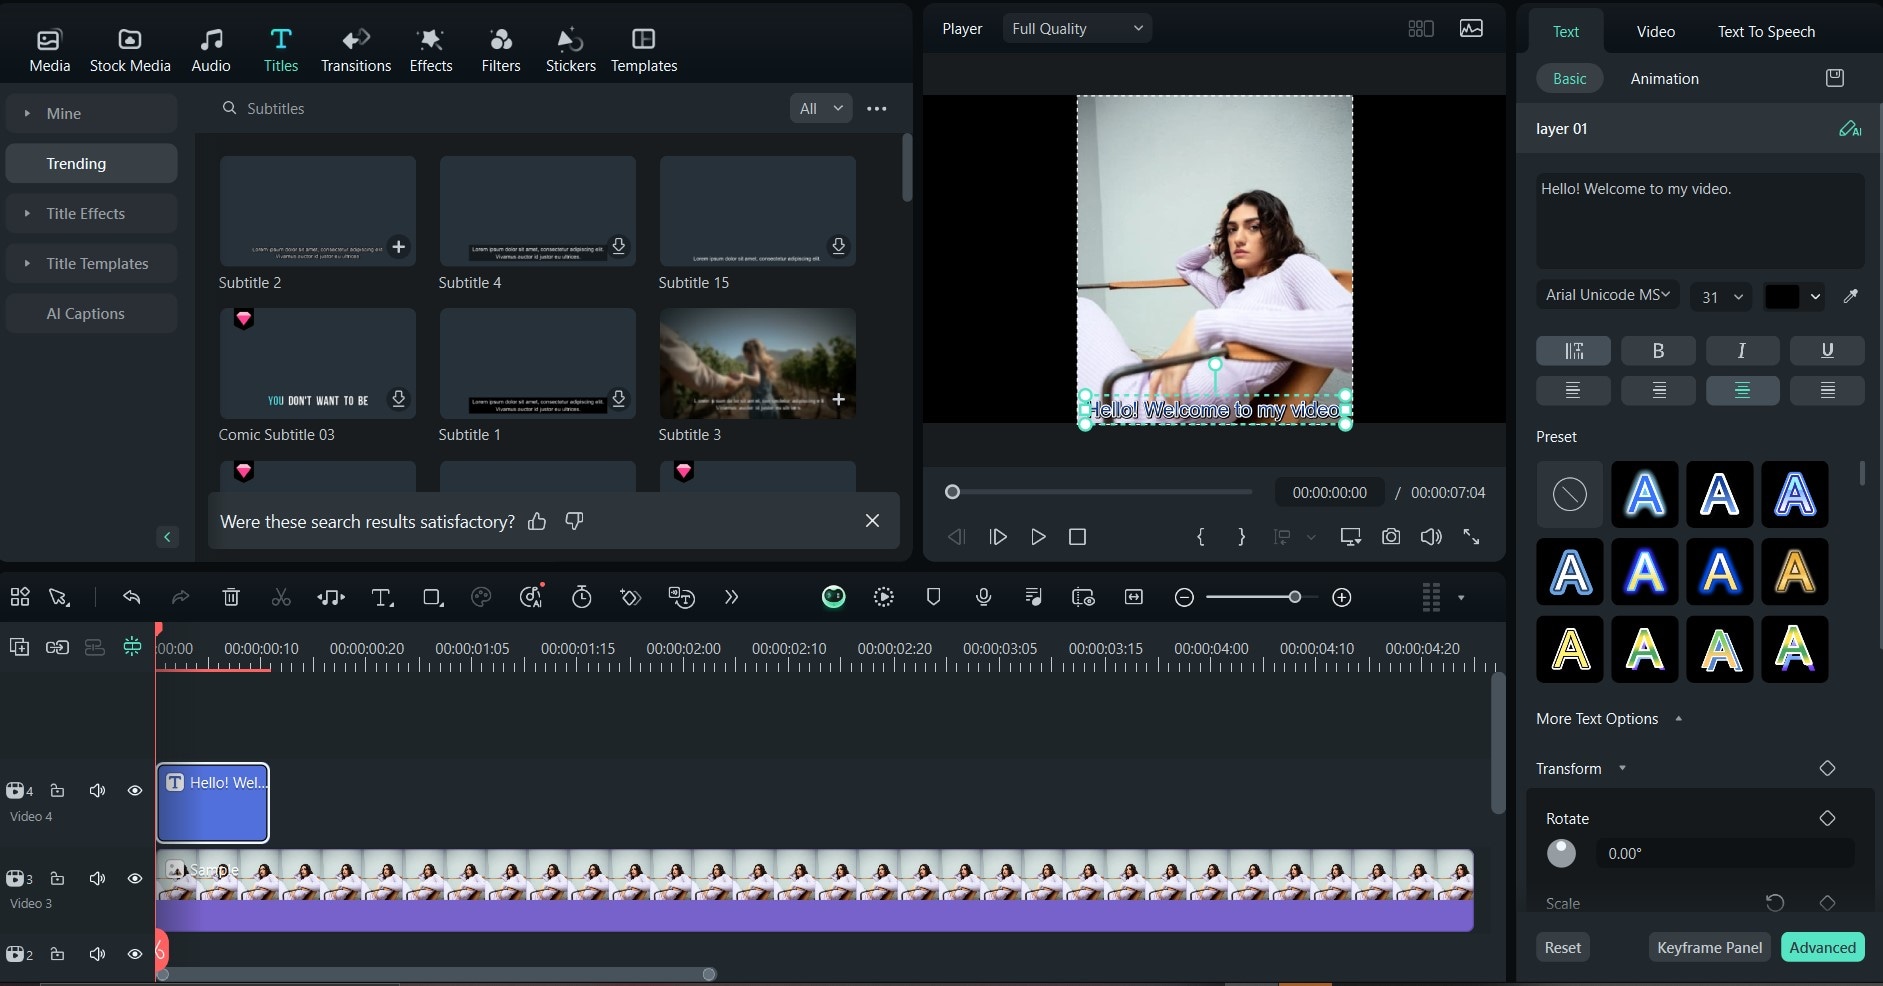
Step 4: Edit the subtitles to your taste. You can also change individual properties like color and font to meet your preferences.
Method 2: How to Add Subtitles Using Speech-to-Text
Filmora’s Speech-to-Text feature automatically transcribes your video in your preferred language and adds subtitles directly for you. Here’s how to use this feature:
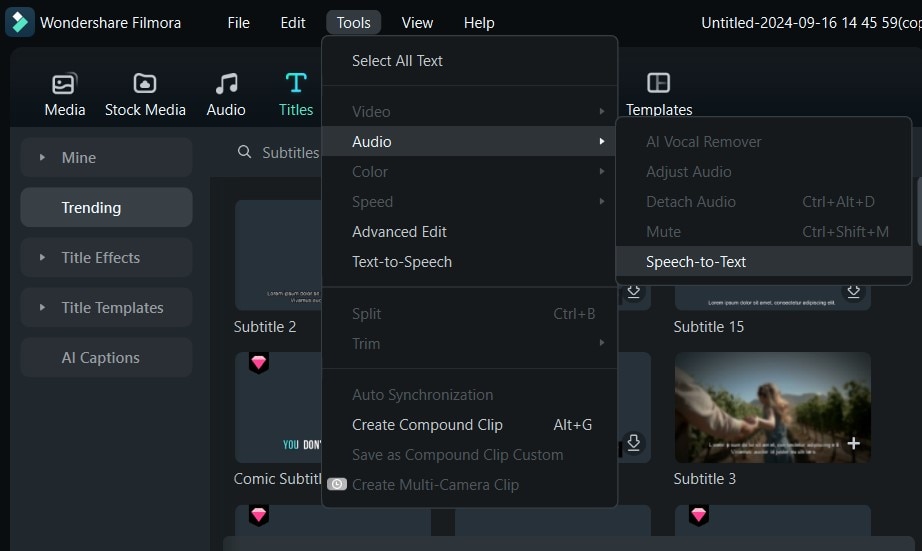
Step 1: After launching the platform and importing your MKV file, tap the Tools option at the top of the editing suite. Then click on Audio from the menu and select Speech-to-Text. Ensure that your video is selected while doing this so Filmora can transcribe it accordingly.
Step 2: Select the language of the speech in the video from the Language of the Audio to be Transcribed field. Then, choose your preferred language in the Language to be Translated to field. At this stage, check that the file to be converted is set to Clip Selected before you proceed.
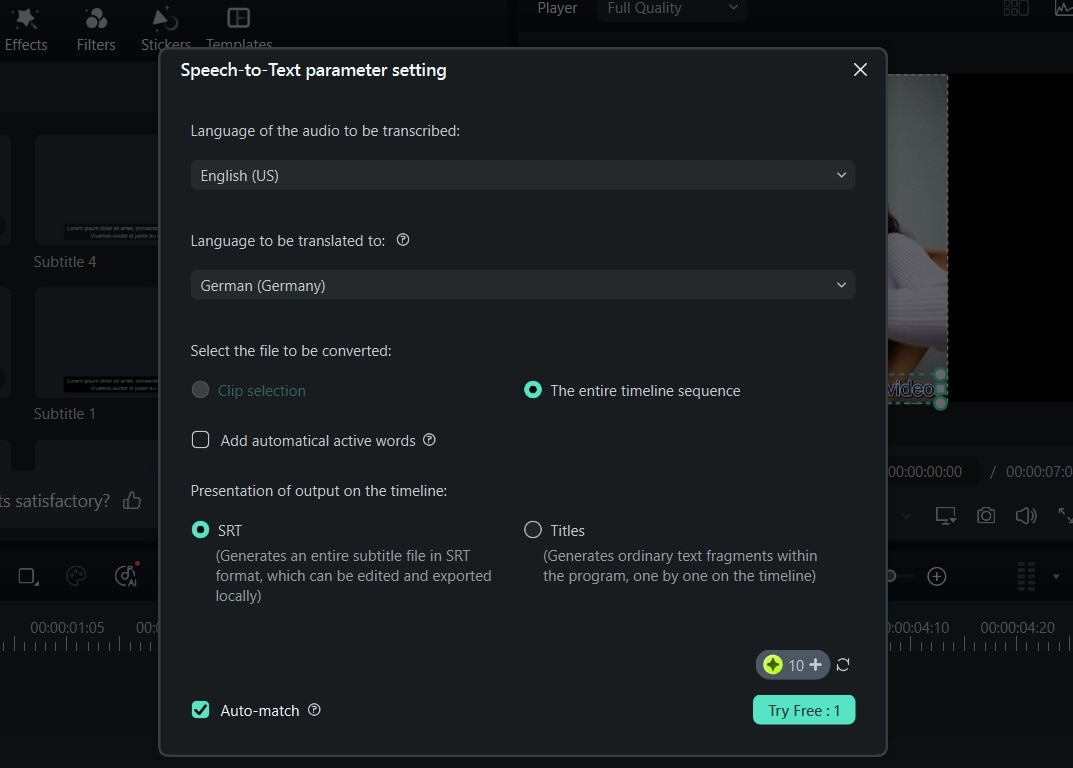
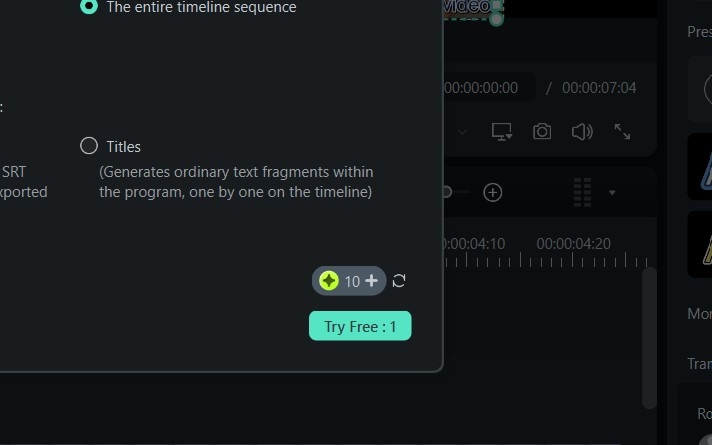
Step 3: Set the output presentation to SRT and generate the subtitles. If you’re using the free plan, click Try Free.
Step 4: Now, Filmora will transcribe your video and add subtitles in the language you’ve chosen. From here on, you can preview your video, edit it further, and export it in your preferred format.

Part 2: How to Add Subtitles to MKV Files on Linux
Adding MKV subtitles on Linux devices can be a bit tricky, specifically because not all video editors are supported on these devices. However, we found a solution that’s effective and reliable for adding subtitles to your videos.

MKVToolNix is a set of tools and services specially designed to help you alter and enhance MKV videos. Best of all, it’s supported on Linux devices as well as Windows. The tools in this suite include MKVMerge, MKVExtract, MKVInfo, MKVPropEdit, and more.
Below are some of MKVToolNix’s features for adding and editing subtitles on MKV files:
- MKVToolNix allows you to add and remove the subtitles from MKV files with ease from Linux devices
- It offers batch processing, which lets you process different MKv files simultaneously. This means that you can edit their subtitles in batches.
- It is free and open source, enabling you to access its subtitle editing feature without purchasing a plan.
Here is how to add MKV subtitles using MKVToolNix:
Step 1: Download MKVToolNix from the official website and install it on your device.

Step 2: Launch the tool and click on Add Source Files at the bottom of your screen to add the video you want to edit. Be sure to check the Track, Chapters, and Tags section for any files you don’t want in the output.

Step 3: Now, go to Add Source Files again to add the SRT file. Then, go to Tracks, Chapters, and Tags to edit the properties of your subtitles. Set the Forced Track Flag option to Yes to ensure the subtitles automatically play on different video players.

Step 4: Click on Start Multiplexing to create a new video with the subtitle file you provided.

Limitations of Using this Method
While you can use MKVTooNix to add subtitles to MKV files, it can be a limited solution. Below, we’ll highlight some of the limitations of using MKVToolNIx to add subtitles to MKV files, which you might encounter using this method:
- MKVToolNix doesn’t support hardsubbing. This means that you can’t permanently add subtitles to your video with this tool.
- It doesn’t offer flexible video editing functions like subtitle extraction alone. You have to use its sister app, MKVExtract.
- It doesn’t support advanced video editing features like noise reduction or video effects.
- It offers limited support, making it a bit complex for beginners or users who want to perform simple editing.
- It can reduce the quality of your video after adding the MKV subtitle.
Part 3: How to Add Subtitles to MKV Files Online
If you don’t want to download a software application to add subtitles to MKV files, or you’re working on a single project and don’t need that many features, an online tool would be perfect for you. Kapwing video editor, for example, is a great place to start.

Kapwing is a video editor that offers an online studio where you can add subtitles to files within minutes. Here are some of its top features:
- With Kapwing, you can automatically generate subtitles for your video and embed them directly.
- Kapwing lets you manually customize your subtitles according to your preferences and standards.
- You can also add SRT to MKV files on Kapwing by uploading the file to the platform and embedding it into the video
Below are the steps to use the Kapwing MKV subtitle editor:
Step 1: Go to the Kapwing online Studio Editor and import your MKV file to the editing suite.

Step 2: To import your own SRT file, go to Subtitles from the left menu and tap Upload SRT.

Step 3: To automatically generate subtitles, select Auto Subtitles from the Subtitles menu. You can also select the Dub Video option to translate your subtitles into another language.

Step 4: Select Start From Scratch to edit your subtitles from scratch. Then, preview the video and save it to your device.

Limitations of Using Kapwing to Add Subtitles to MKV Files
The following are some limitations that you might experience using Kapwing to add subtitles to MKV files:
- After adding subtitles to the video and adding other editing features, there is a chance of reduced media quality.
- While Kapwing offers a variety of features for adding subtitles to videos, it can be challenging for beginners to navigate the platform.
- The platform sometimes experiences occasional glitches and slow media exporting rates.
Comparing the Methods of Adding Subtitles to MKV
In this section, we will compare the method of adding MKV subtitles explained in this article based on device support, video quality, subtitle editing features, and added effects for subtitles. Let’s begin:
| Platform | Wondershare Filmora | MKVToolNix | Kapwing |
| Device Support | Supports Windows, Mac, Android, and iPhone devices. | Supports Linux, Windows, and Mac devices. | It supports online editing and editing on mobile devices such as Windows and MacOS devices. |
| Video Quality | Excellent video quality, even after adding MKV subtitles. | Average video quality after editing. | Good video quality after editing subtitles. |
| Subtitle Editing Features | Comprehensive subtitle editing features, including media upload, basic subtitle editing, and automatic subtitle generation. | Limited subtitle editing features. | Various features, including basic editing, SRT upload, and automatic subtitle generation. |
| Added Effects for Subtitles | Numerous text effects, transitions, and text property edits to choose from. | Limited added effects for subtitles. | It offers added effects for subtitles, such as effects and transitions. |
| Overall Rating: | 4.9/5 | 3.9/5 | 4.5/5 |
Part 4: Other Ways to Improve Your MKV Subtitle Video
Adding MKV subtitles is only the first step. You can take your subtitle editing to the next level; however, you can only do it on the right platform. Filmora is the perfect tool for this, as it offers numerous text effects to improve your subtitle editing. Here is how to access and use this feature:
Step 1: After adding your subtitles, click on the text on the timeline to highlight it. Then, click on Titles and go to Title Effects.

Step 2: Choose the type of effect you want from the numerous effects available. You can make the text slide in, shake, or even glow.

Step 3: You can also add text animation by clicking Animation from the right panel and choosing from the various options.

Conclusion
Knowing how to add MKV subtitles is a process that requires in-depth guidance and a great editing platform. Whether you’re using a Linkus, Windows, or MacOS device, doing this is easy with the direction in this article. However, you should also consider your experience level and purpose is you want to merge subtitles with MKV files.
Wondershare Filmora caters to beginners and professional video editors alike. While it has various advanced features, it can also be used to make simple edits or content for social media. Not to mention, it is easy to navigate and use, with resources that direct you on how to use the platform. To begin, all you have to do is download Filmora.


