If you are wondering how to do scrolling credits in iMovie on iPhone? Here’s a quick guide!
End credits are widely used in filmmaking, television productions, documentaries, and other kinds of video content. They add a finishing touch to your video projects and acknowledge the production crew while leaving a lasting impression on viewers. While various end credit styles exist, scrolling credits are a popular choice in movies and short films.

Several tools can create rolling credits, but iOS users, especially iPhone users, have a limited list of options, as most professional software are not available to use on mobile devices. IMovie, a versatile video editing tool available across various Apple devices, is a good option. However, the iPhone version is more simplified, and designed primarily for basic edits including text integration and manipulation.
This article will guide you on how to make scrolling credits on iMovie on iPhone and add that professional touch to your video projects. It’s a simple process that’s easily applicable!
In this article
Part 1: How to Make Scrolling Credits in iMovie
Adding scrolling credits in iMovie is not the only way to include end credits in your video projects; there are two kinds of end credits you can add to your videos with iMovie; centered credits and scrolling credits.
Follow these steps to create and add any of these two kinds of end credits to your videos with your iPhone.
Step 1:Import your video to iMovie on your iPhone.
Step 2:Add a background clip at the end of your video on the timeline if you want your credits to display on a black background. Here’s how to add a background to your videos.
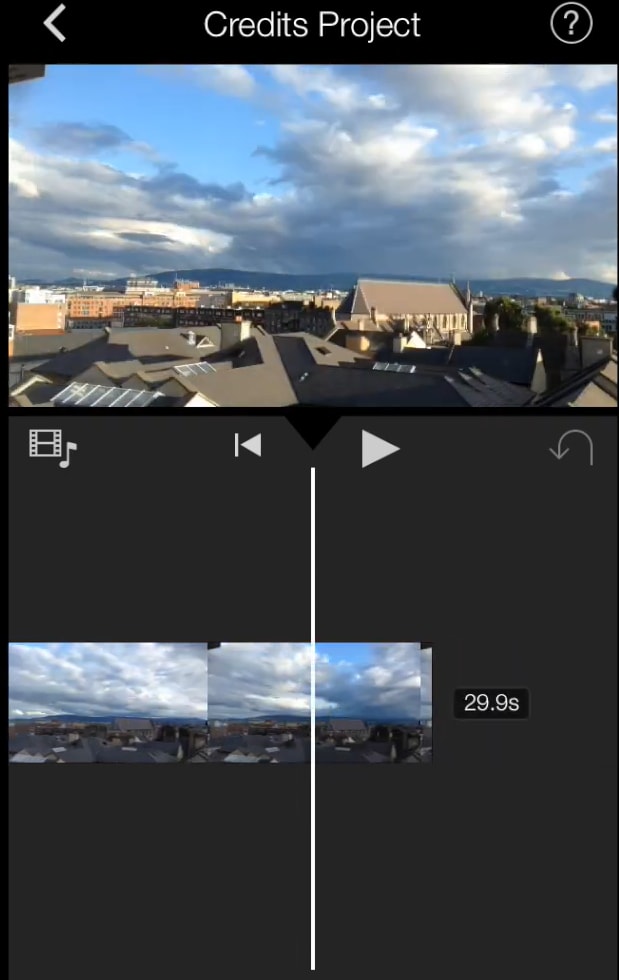
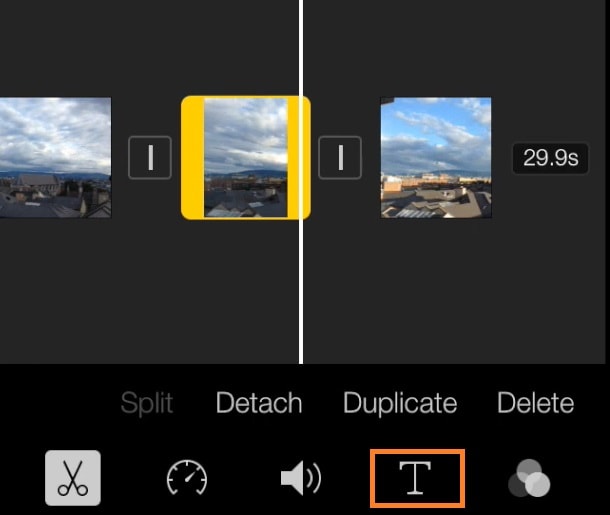
Step 3: Move your cursor to the part you want your credits. Click on the Titles button in the inspector tab at the button of the screen, represented as T.
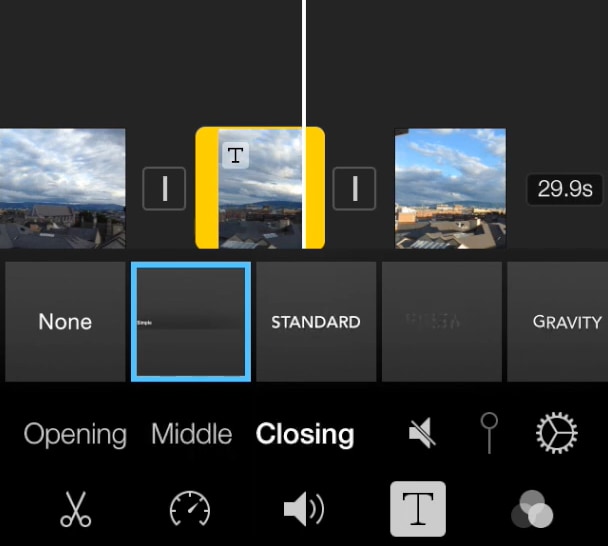
Step 4: Select the text style highlighted below among the options and click on Closing to add your end credits. A text box will appear on your screen.
The process of adding credits to iPhone is similar to iPad but quite different on Mac which have both centered and scrolling text options. With iMovie on Mac, you have more text templates to choose and more editing options that enhance customization of end credits.
Part 2: Customizing Scrolling Credits in iMovie
Customizing your scrolling credits to fit the tone and theme of your video adds a bit of artistry to your creative project. You can change your text color, type, and even where it appears onscreen.
To edit your text credit, click on the text box on the screen above the timeline. Enter your text and hit Done on the keyboard.
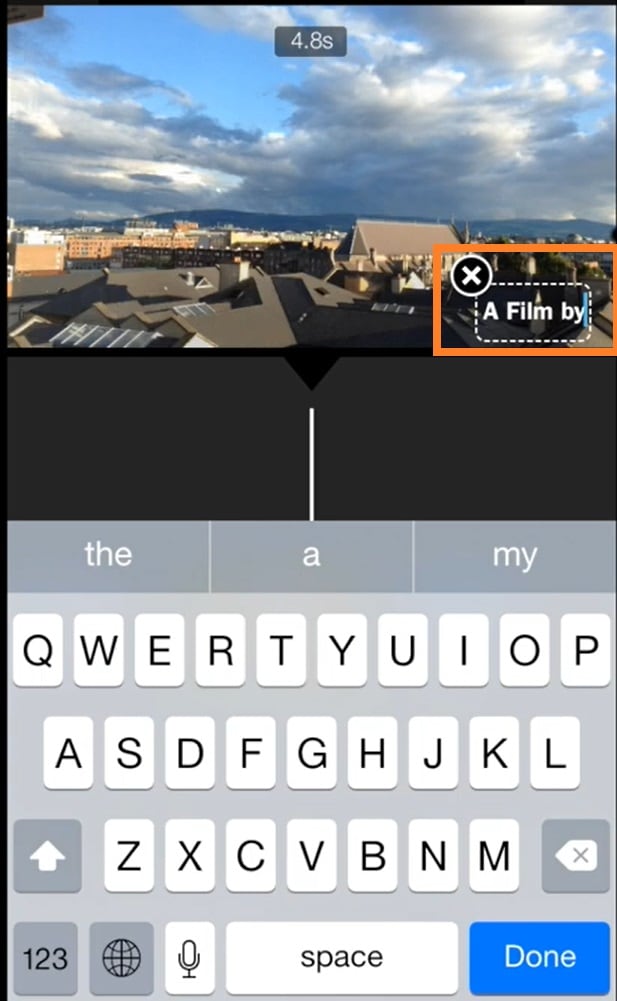
To resize the text, pinch the text on your screen to increase or decrease the size.
To move the position of the text, simply drag it to a new position.
To change your font type, Click on the Font icon or the Color button on the inspector tab.
Part 3: Combining Centered & Scrolling Credits in iMovie
A combination of centered and scrolling credits is popular for certain video projects. Depending on your video, using both end credits together, if done properly, can create a more appealing conclusion.
For example, using centered credits to spotlight key contributors to your project or essential members of the production crew, then transitioning to scrolling credits for main cast members and other members of the production team.
However, combining centered and scrolling credits on iMovie iPhone is not possible as the scrolling feature is not supported on iPhone. Fortunately, you can achieve this with iMovie on your Mac.
To combine centered and scrolling credits in iMovie on Mac, simply add centered and scrolling text templates side by side on the timeline. Adjust the duration and arrange the individual text clips in the order you want them.

Part 4: Adding Custom Graphics with Scrolling Credits iMovie
Adding custom graphics or visual effects to scrolling credits on iMove is ideal for themed videos, presentations, or personal projects. Integrating visual elements like images, videos, graphics, etc., into your rolling credits can enhance the aesthetic of your video and make it resonate better with your viewers.
Custom graphics can come in different forms depending on the theme and purpose of your video. These include:
- Logos for brand promotions and corporate presentations.
- Images and illustrations for personal projects or projects that aim at connecting or resonating with people.
- Icons for role-based, departmental, or organizational projects.
- Subtle textures or patterns in the background.
- Animated graphics for a little extra show.
Follow these steps to add custom graphics—for this illustration, a background—to scrolling texts.
Step 1: Open your video project with iMovie on your iPhone or iPad and scroll to the end of the video on the timeline.
Step 2: Click on the Add Media represented by a “+” button, then select Backgrounds.
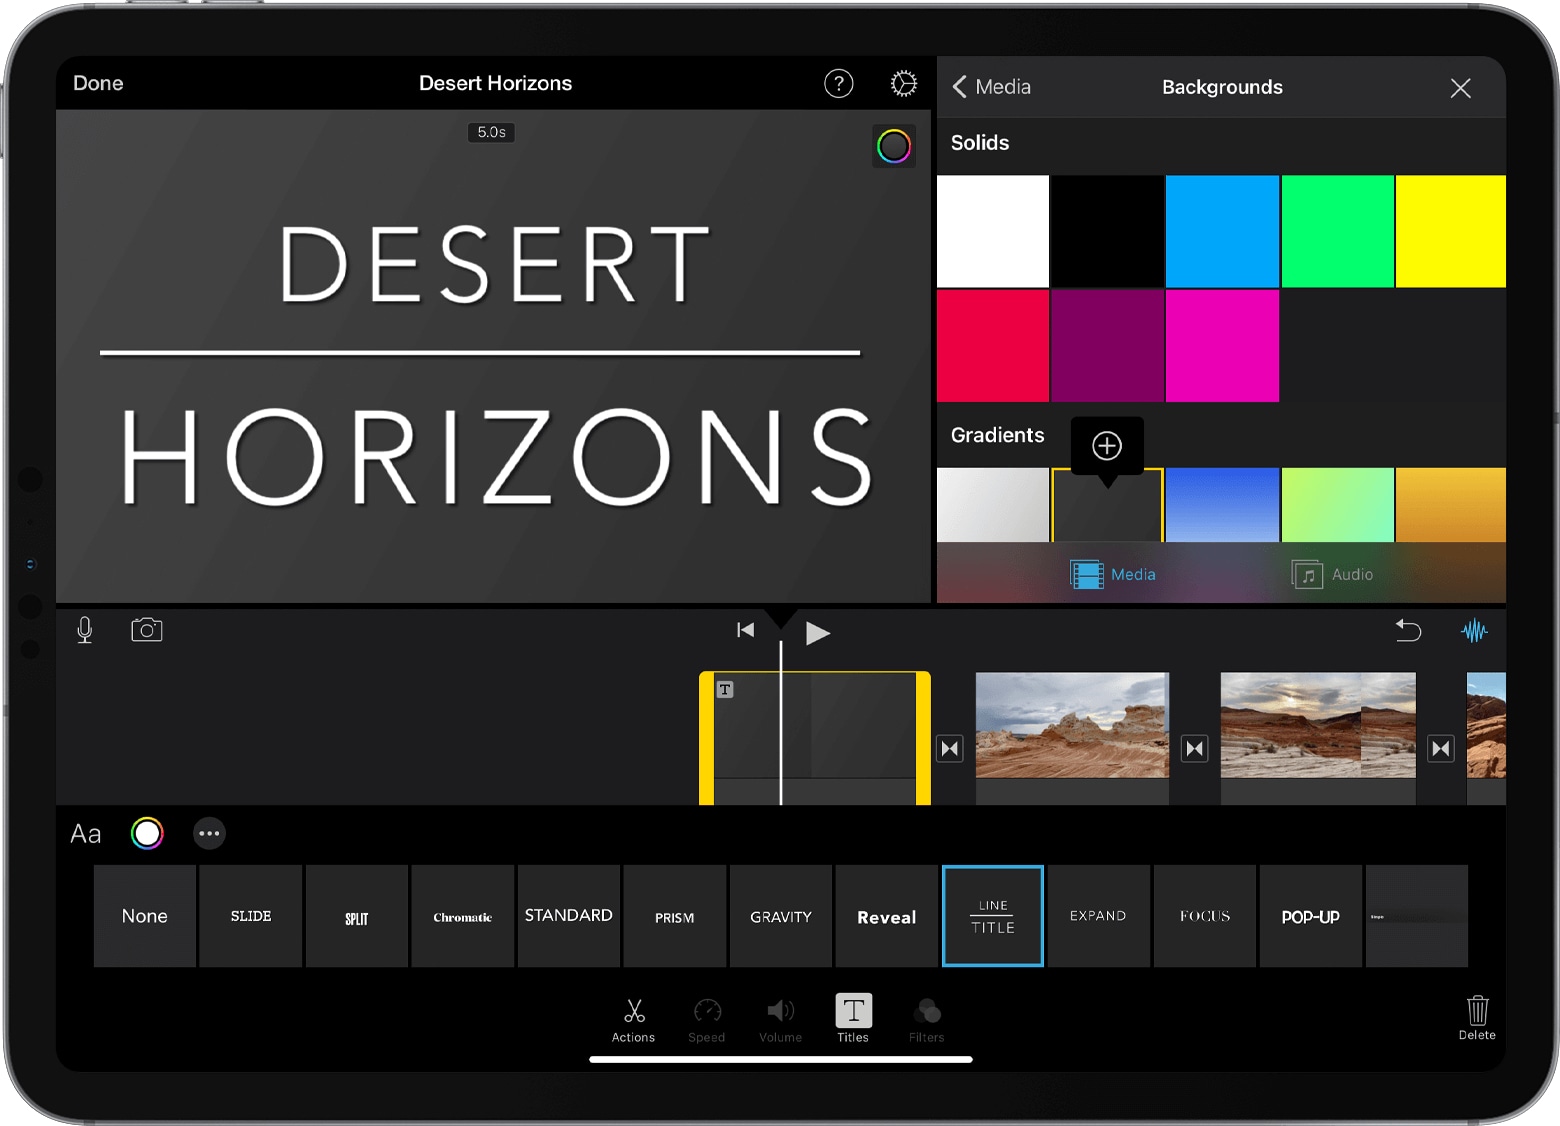
Step 3: Select a preferred background and add it to your video project. A background clip will immediately appear on the timeline. You can adjust the clip to your desired length.
If you want your scrolling credits to appear over different kinds of graphics or multiple images, simply add your desired graphics to the timeline as shown above. If you want to add multiple images in the form of a slideshow, prepare your slideshow and upload it as media onto iMovie. Then place it on the timeline as shown above.
Bonus: An Easy Alternative to iMovie: Adding Scrolling Credits with Filmora
Scrolling credits iMovie is a recommended tool for creating and adding scrolling texts to videos. However, iPads and iPhones do not support this feature. Hence, iPhone users should opt for an alternative tool, like Wondershare Filmora, that can be used to add end credits.
Filmora is a video editing software with professional video, image and audio manipulation tools available for both Windows and iOS users. From editing simple videos to short films, this tool has a wide range of features that can be used in various industries for various kinds of effects.

An example is the End Credits feature that adds scrolling texts to videos. This tool is available web and mobile versions of Filmora, including iPhones and iPads. So if you’re looking for how to make scrolling credits for iMovie iPhone, this could be a perfect alternative!
Here’s How to Create Scrolling Texts on Your iPhone Using Filmora
Step 1: Upload your video on Filmora.
Step 2: Click on Text icon on the tool bar. Go to Subtitle, scroll down and pick the credit template of your choice. Click on the “+” sign.
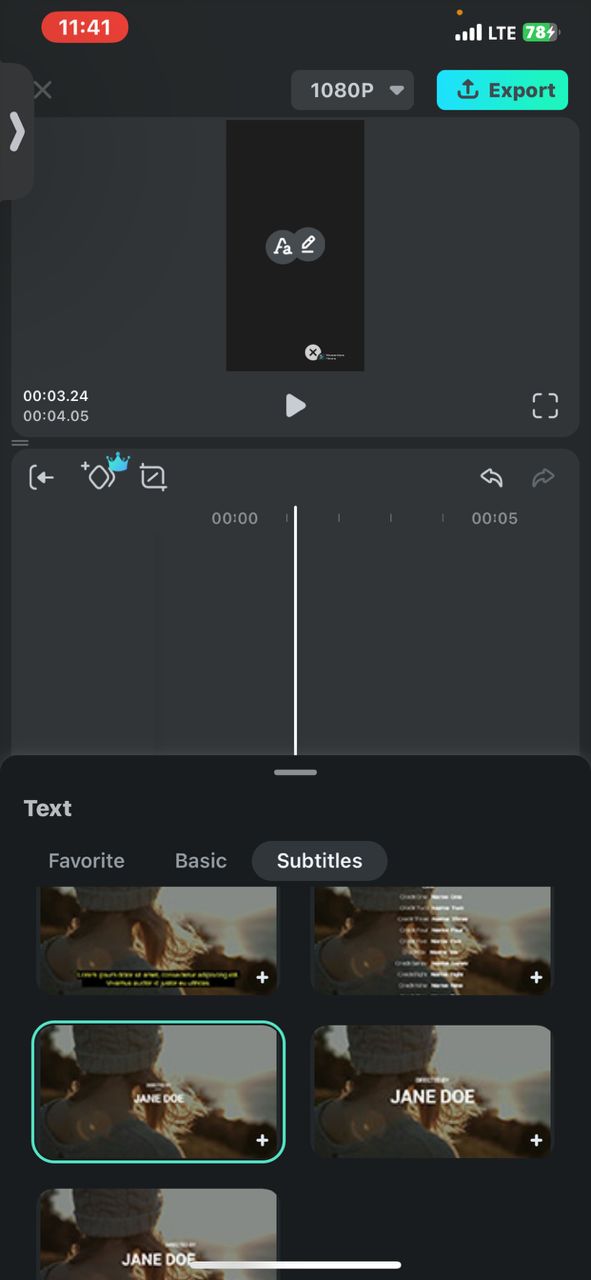
Step 3: The text editing box will open automatically. Type in your text and click on this icon as shown, to save your edit and show them on the preview screen.

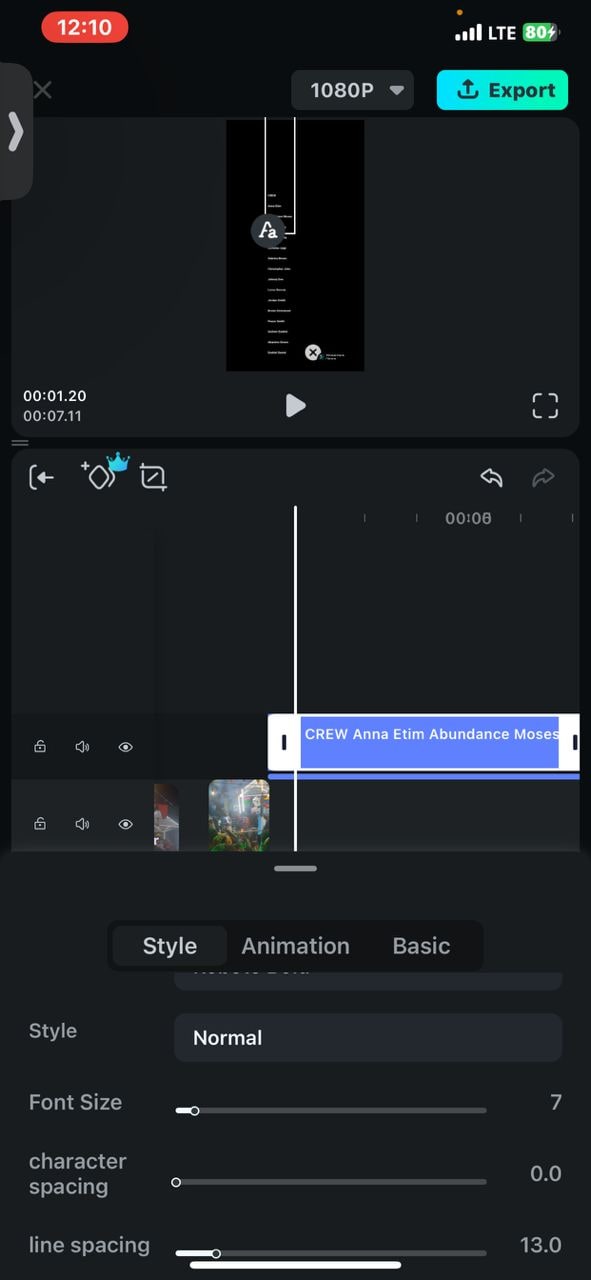
Step 4: When you’re done writing your text, click on the text clip on the timeline. The toolbar will change to a text editor tab. Click on Adjust > Styles and select your preferred credit template. Here, you can change your font color, type, size and even text alignment.
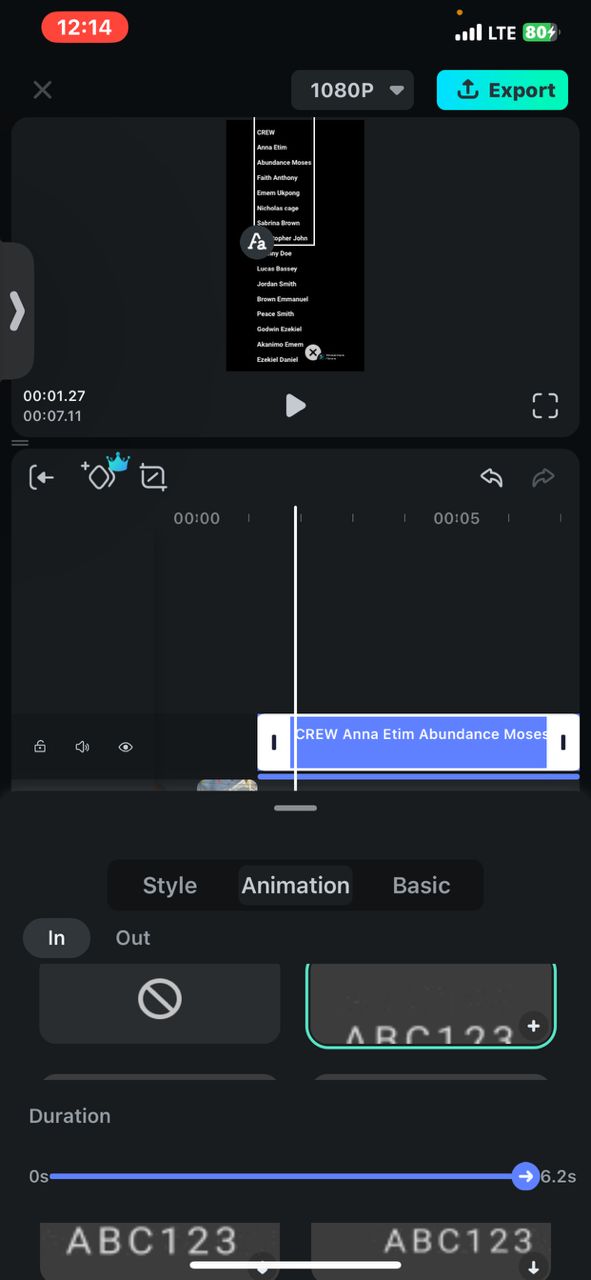
Step 5: Go to Animation on the same pop-up. Select the first animation effect on your list. This will add a moving effect on your text, causing it to scroll across the screen.
Filmora vs iMovie, Who’s Best for End Credit Creation?
Filmora provides a more comprehensive set of features and customization options for adding end credits, making it suitable for users who want more control and flexibility. iMovie is a good choice for Mac users who want a simple, free solution for basic end credits.
| Feature/Aspect | Filmora | iMovie |
| Ease of Adding Credits | Straightforward process using preset titles | Simple to add credits, but less customization options |
| Preset Titlesskys | Wide range of preset end credits to choose from | Limited selection of end credit presets |
| Customization | Allows customizing font, size, color, alignment | Basic customization options for credits |
| Text Editing | Easy to edit text in the credits | Can edit text, but less advanced options |
| Scrolling Animation | Supports smooth scrolling animation for credits | Scrolling animation is basic |
| Workflow | Drag-and-drop credits onto timeline | Add credits through the Titles menu |
| Rendering | Real-time preview with minimal rendering needed | Real-time preview, but may require rendering |
| Pricing | Subscription plans | Free with Apple devices |
| Platforms | Windows, Mac, Android, iPadOS, iOS | Mac only |
Summary of Differences
- Filmora provides a wider selection of preset end credits with more customization options for font, size, color, and alignment. iMovie has a more limited selection and basic customization.
- Adding credits in Filmora is a straightforward drag-and-drop process onto the timeline. iMovie requires adding credits through the Titles menu.
- Filmora offers smooth scrolling animation for credits, while iMovie's scrolling animation is more basic.
- Filmora allows easy editing of the credits text, while iMovie has more limited text editing options.
- Filmora provides real-time previewing with minimal rendering needed. iMovie also offers real-time preview but may require rendering for complex credits.
- Filmora is available for both Windows, Mac, and Mobile devices, while iMovie is Mac-only and free with Apple devices.
Conclusion
A proper credit is the difference between a tacky film ending and a professional result that leaves a good impression on your viewers. With its versatility, tools like iMovie are a good option for creating scrolling credits on iPhone. Unfortunately, iPhones and iPads do not support this feature.
For those looking for how to make scrolling credits on imovie iphone, Filmora is a great alternative you should try out!
Filmora for Mobile Filmora for Mobile Filmora for Mobile Filmora for Mobile Filmora for Mobile
Edit Videos on Your Mobile Phone with 1-Click!
- • Brand New AI Features for Efficiency Improvement.
- • Access a massive library of video effects to make it uniquely impressive.
- • Automate repetitive tasks with AI, bring good video ideas more efficiently.


