To blur faces in iMovie is an essential technique for protecting personal privacy and preventing identity theft. For instance, revealing the faces of victims, such as in cases of sexual assault, can unintentionally expose their identities, which should remain confidential. This is where video editing tools come in handy. On television, various tools are used to blur faces and safeguard sensitive information. Besides protecting individuals' identities, the blurring feature is also useful for concealing other private details like car license plates, financial data, and more.
In this article, we will explore how to blur faces in iMovie, as well as introduce Filmora, a powerful alternative with even more advanced face-blurring capabilities.
In this article
Part 1: How To Blur Face using iMovie Alternative - Wondershare Filmora
So far, no version of iMovie is available for Windows. However, Wondershare Filmora can help you blur faces in videos on Windows, Mac, iOS, and Android platforms. In addition, Filmora offers many AI features and advanced editing techniques to make your video editing more efficient.
- Blur faces in videos with extensive tools and dynamic interface.
- Motion tracking ensures moving faces stay blurred in every frame.
- AI face mosaic blurs crowds with a single click.
- Apply face-off effect to selectively obscure faces in your video edits.

3 Methods To Blur Faces Using Filmora
There are three major and easy ways to blur faces in videos using a desktop app. These methods include using the AI face mosaic, the face-off effect, and motion tracking. In this section, you will discover how to blur people's faces in videos using both methods.
How To blur faces using the AI Mosaic feature
AI Face Mosaic is a new feature available in Filmora version 14 and above. It helps users quickly apply mosaic coverings to sensitive individuals who should not appear on screen, especially in scenes with multiple people. Let's take a look at the steps to use this feature.
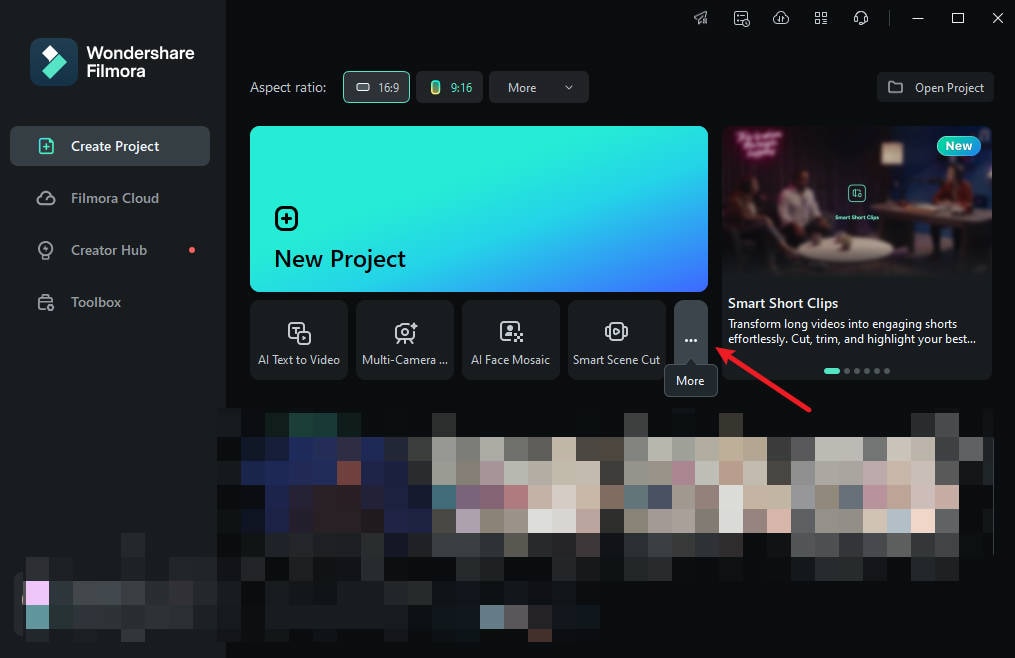
Step 1: Launch Filmora on your PC and go to "More" or select the three dots at the end of the editing options.
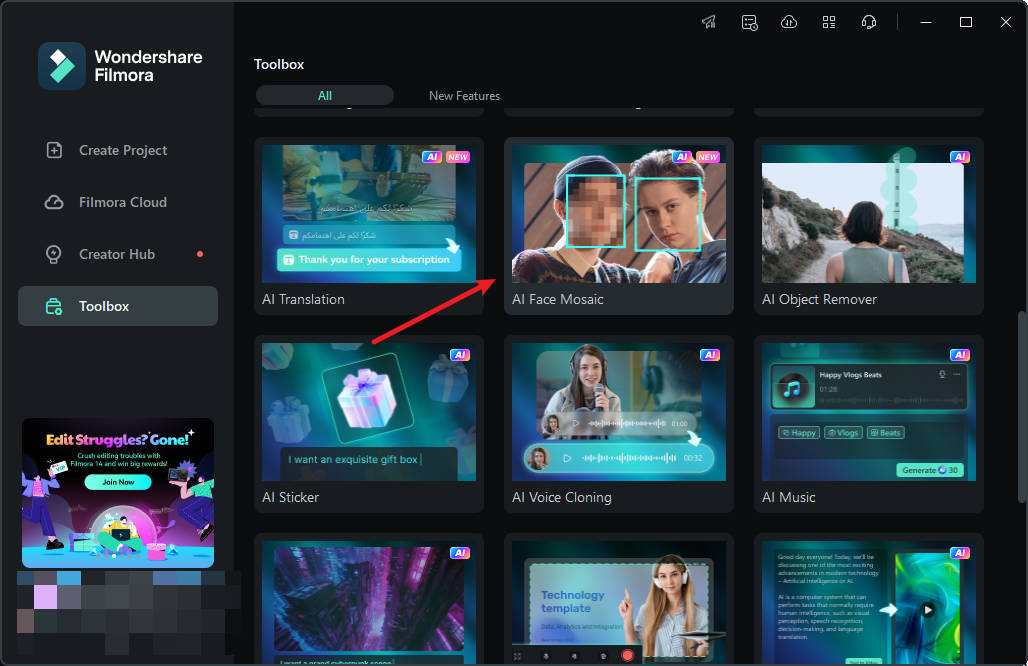
Step 2: Click on "AI Face Mosaic". Then, import your media for editing.
Step 3: Filmora will automatically analyze the video to apply the blurring effect to faces throughout the footage. Once the analysis is done, each face will have the mosaic effect.
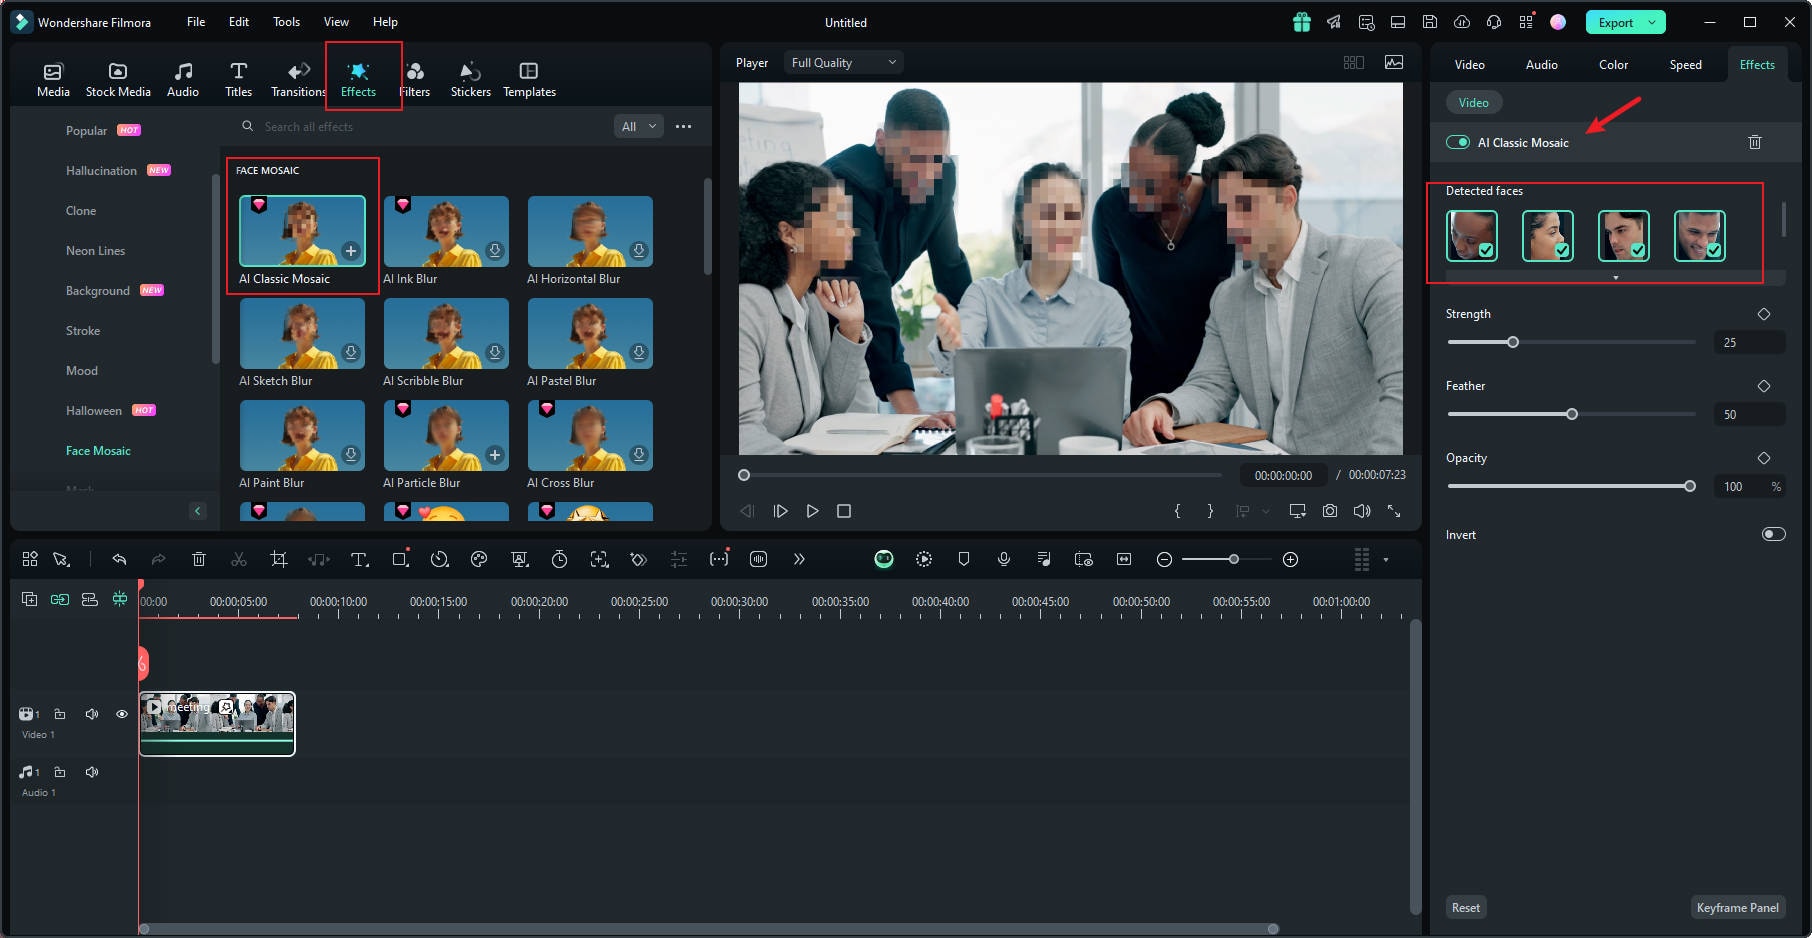
Step 4: To choose a face to remove the mosaic effect, deselect it from the right-hand panel.
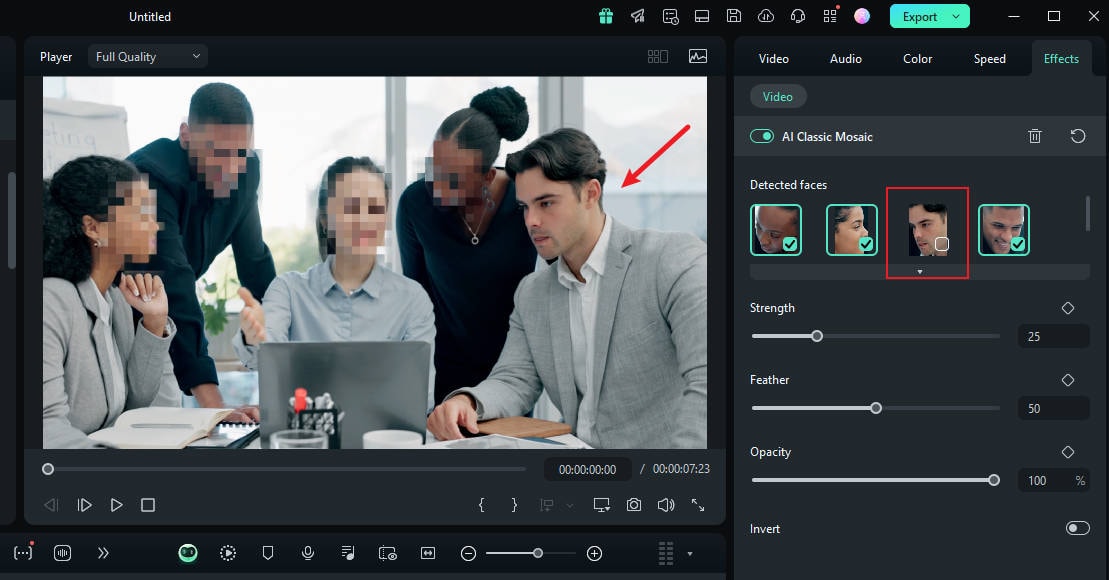
Step 5: You can also use the grader to adjust the strength, feather, and opacity of the blur.
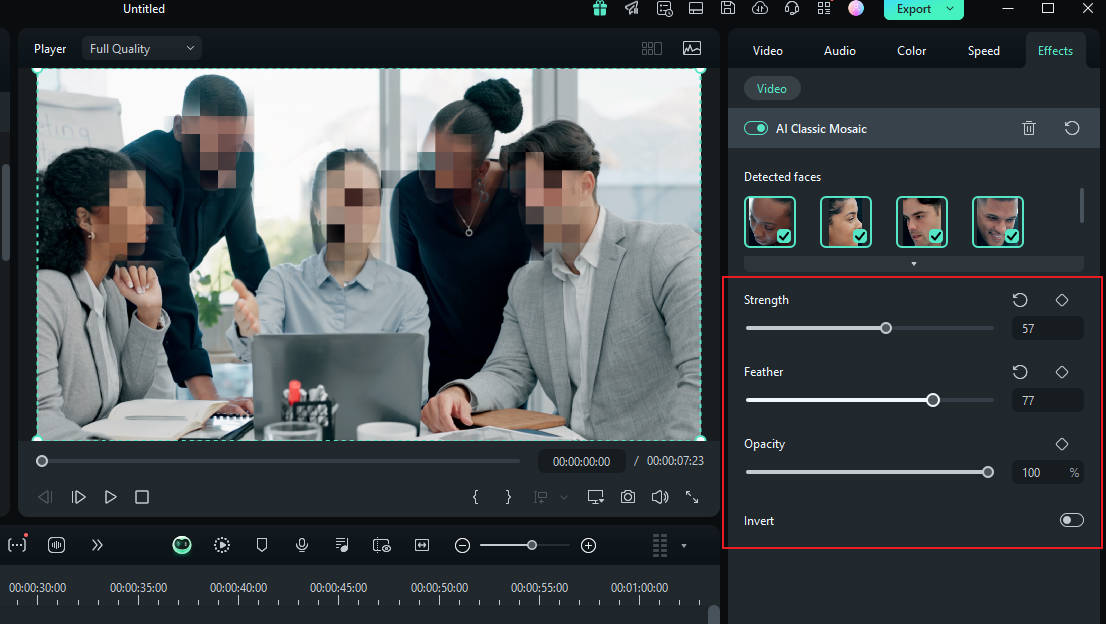
Step 6: You can also invert the mosaic by clicking "Invert". This makes everything else, except the faces, have the mosaic effect.
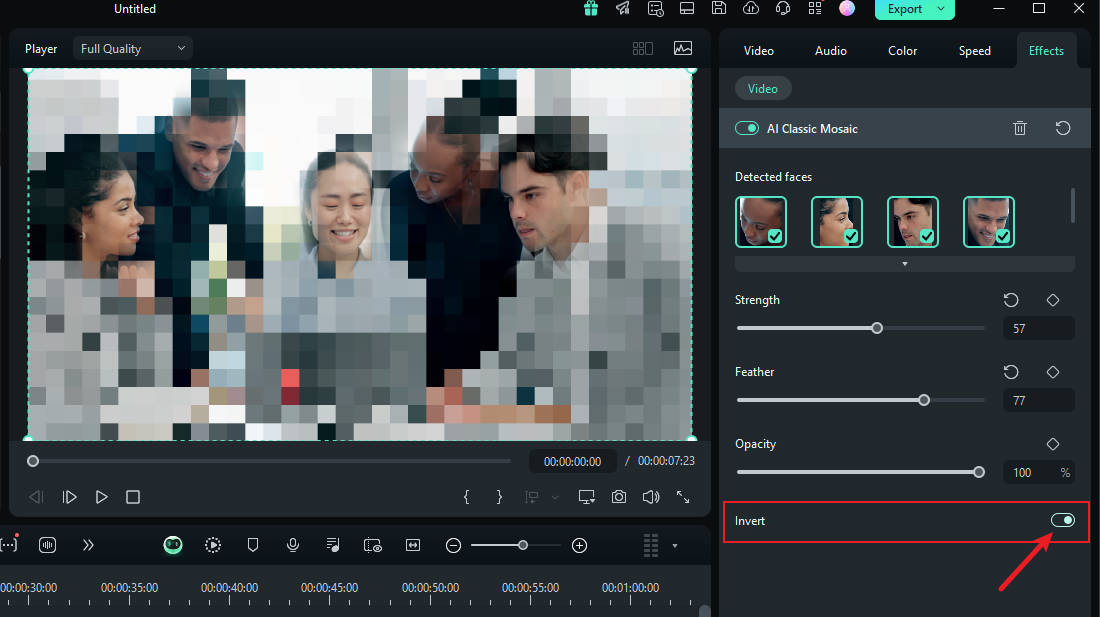
And that's it! Once you're done, preview your video and export it.
How To Blur Faces Using the Face-off Effect
Another quick and easy way to blur faces in Filmora is by using effects from the editing suite. You only need to select the face blur effect to add a mosaic to a person's face. Here is how to blur someone's face in a video using Face-off:
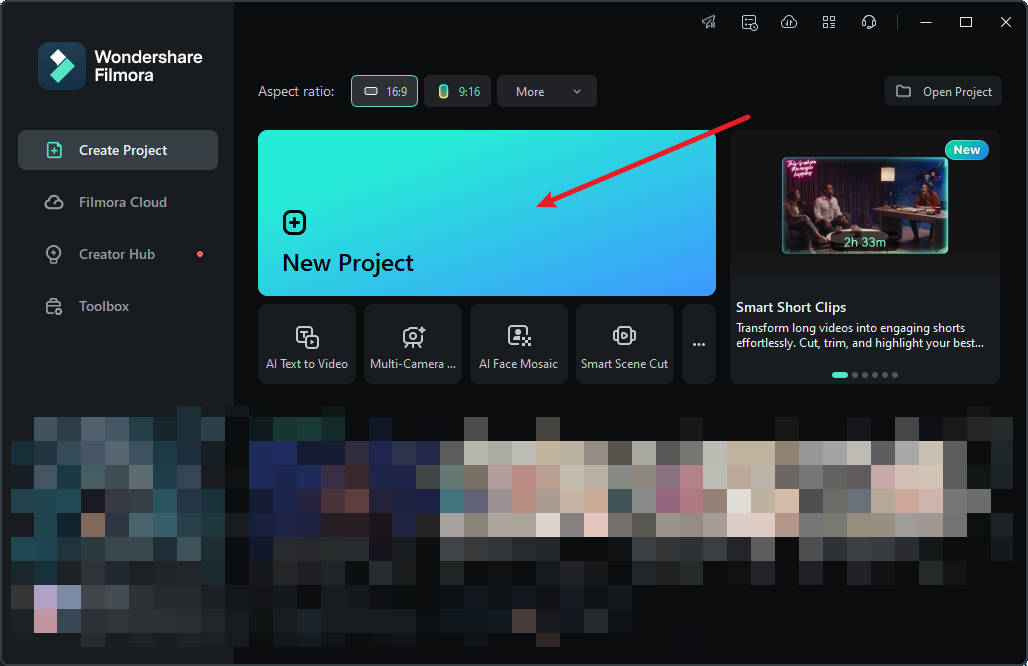
Step 1: Launch Filmora on your PC and click on "New Project".
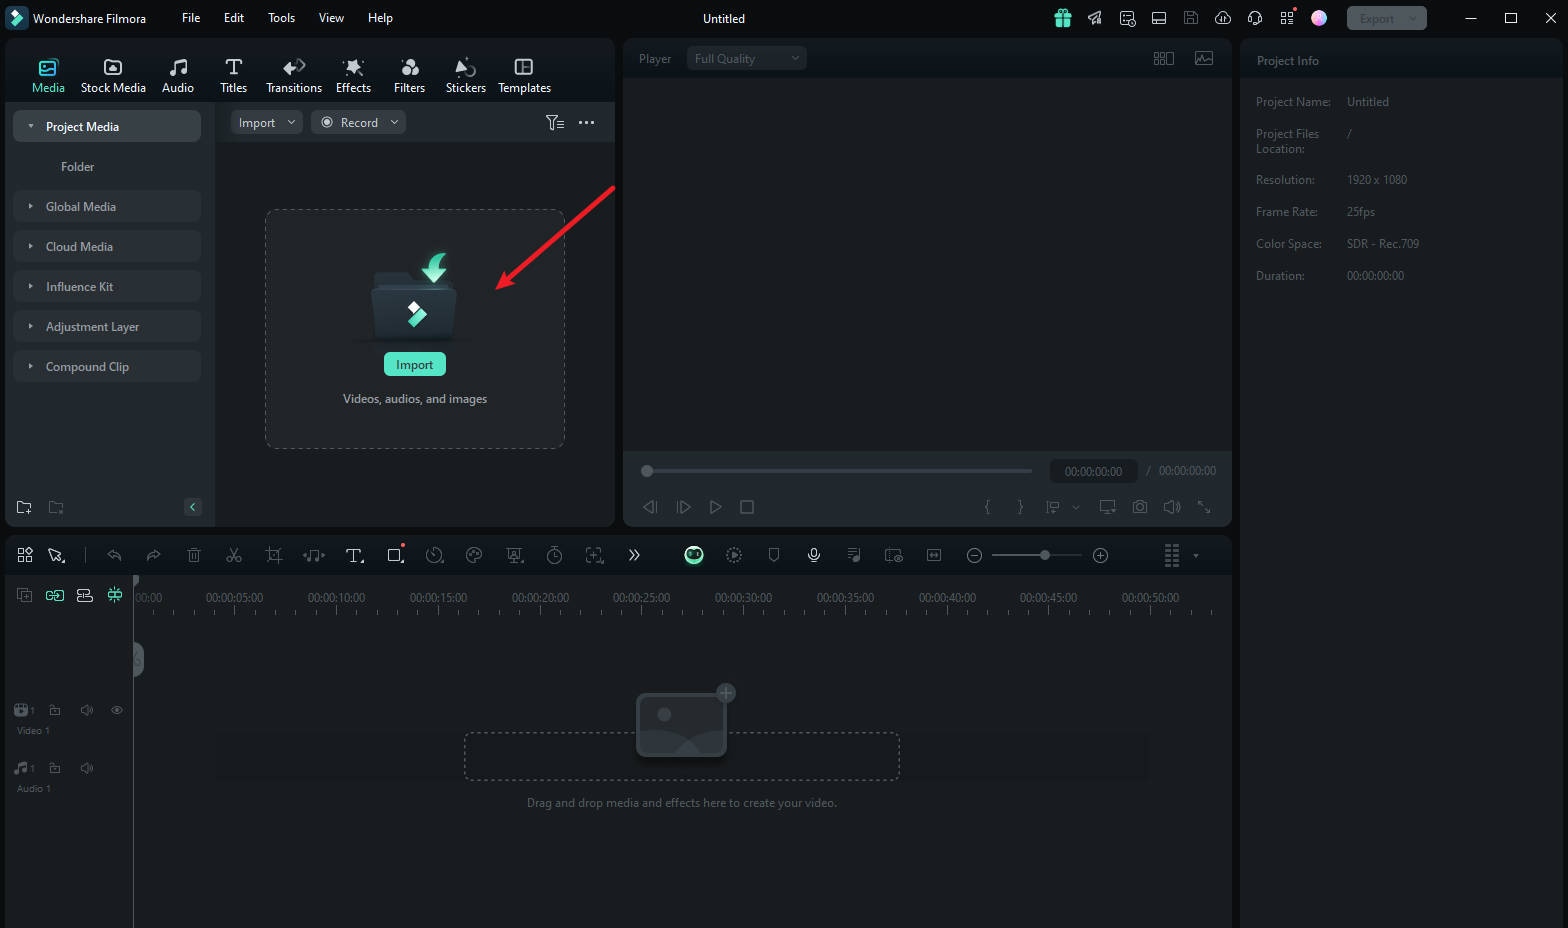
Step 2: To import your media, drag and drop it into the editing suite or click "Import".
Step 3: Tap "Effects" from the main menu at the top of the suite.
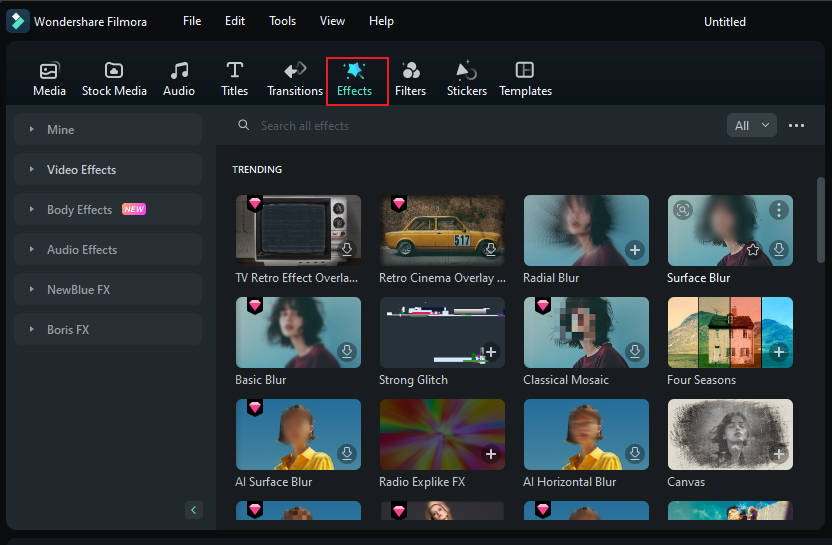
Step 4: If you don't see the Face-off effect on the first effects page, search "Face-off" in the search bar.
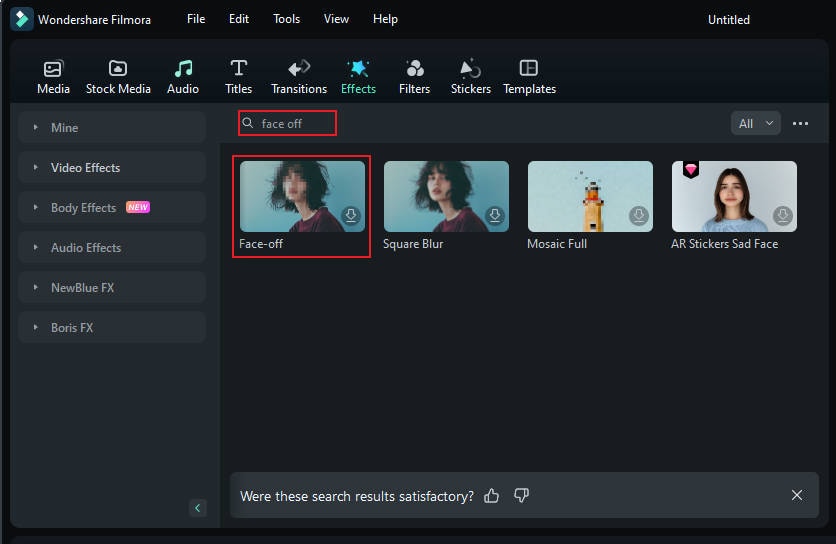
Step 5: Click on the "Face-off effect" to download it. Then, drag and drop it onto your media in the timeline. Next, preview the video to ensure the blur is in the right spot throughout it and export it.
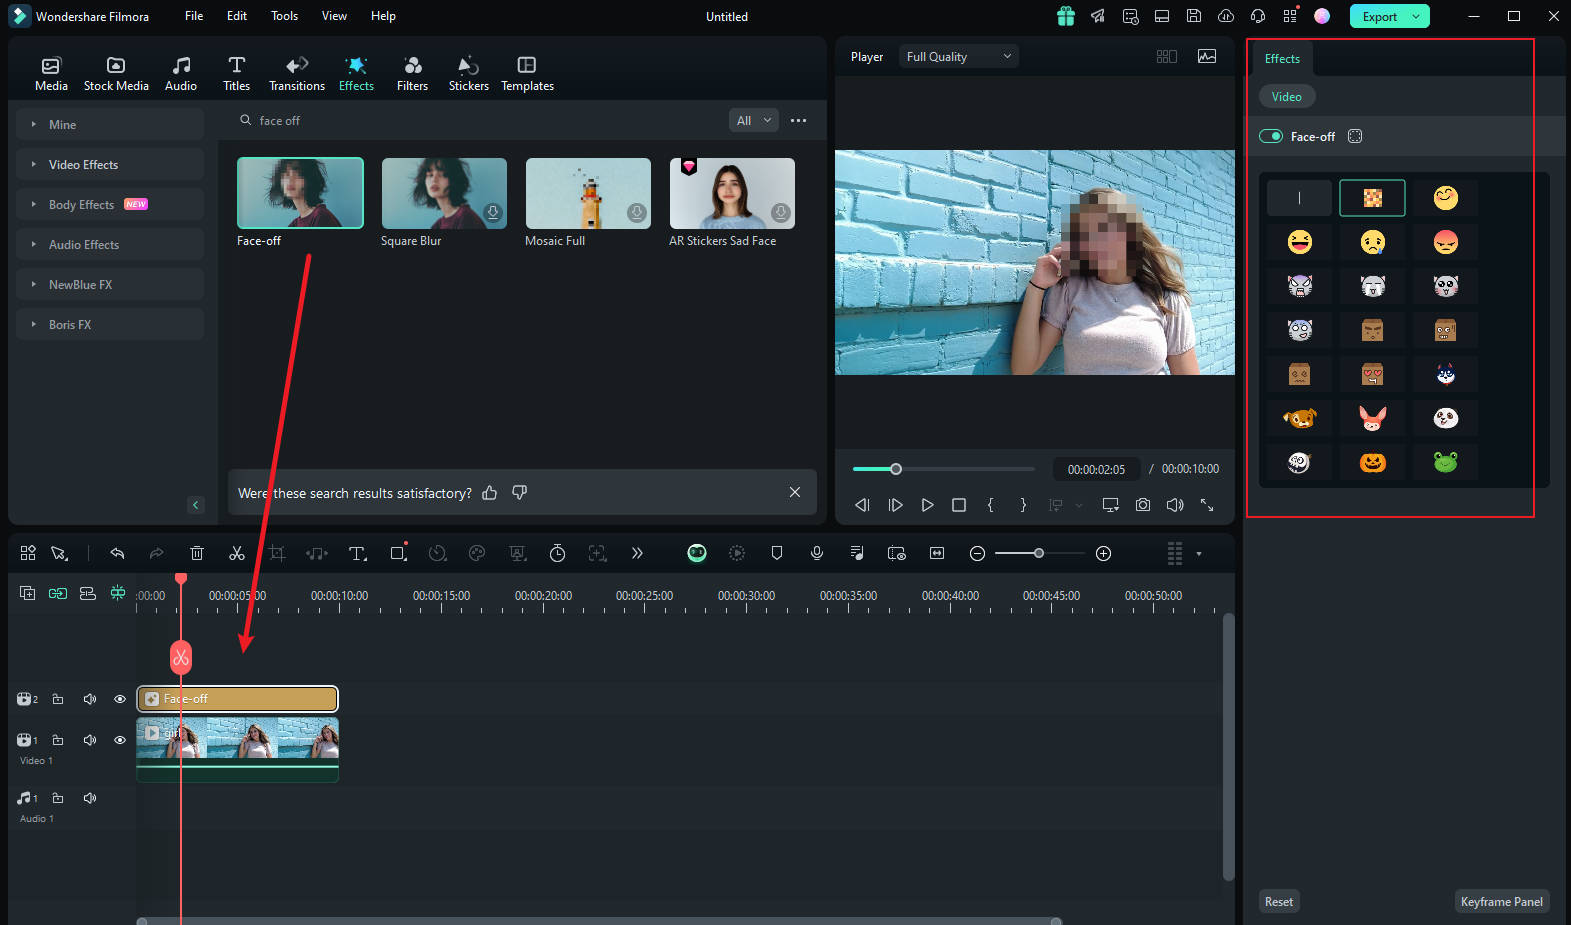
How To Blur Faces Using the Motion Tracking
If you want to apply a mosaic to a moving person's face, the motion tracking feature in Filmora is your best choice. Let's take a look at how this feature can be used to mosaic a face.
Step1 Import the Video and Drag It to the Timeline
Once you are done launching Filmora, select "Create New Project". Afterward, import and drop the video into the timeline.
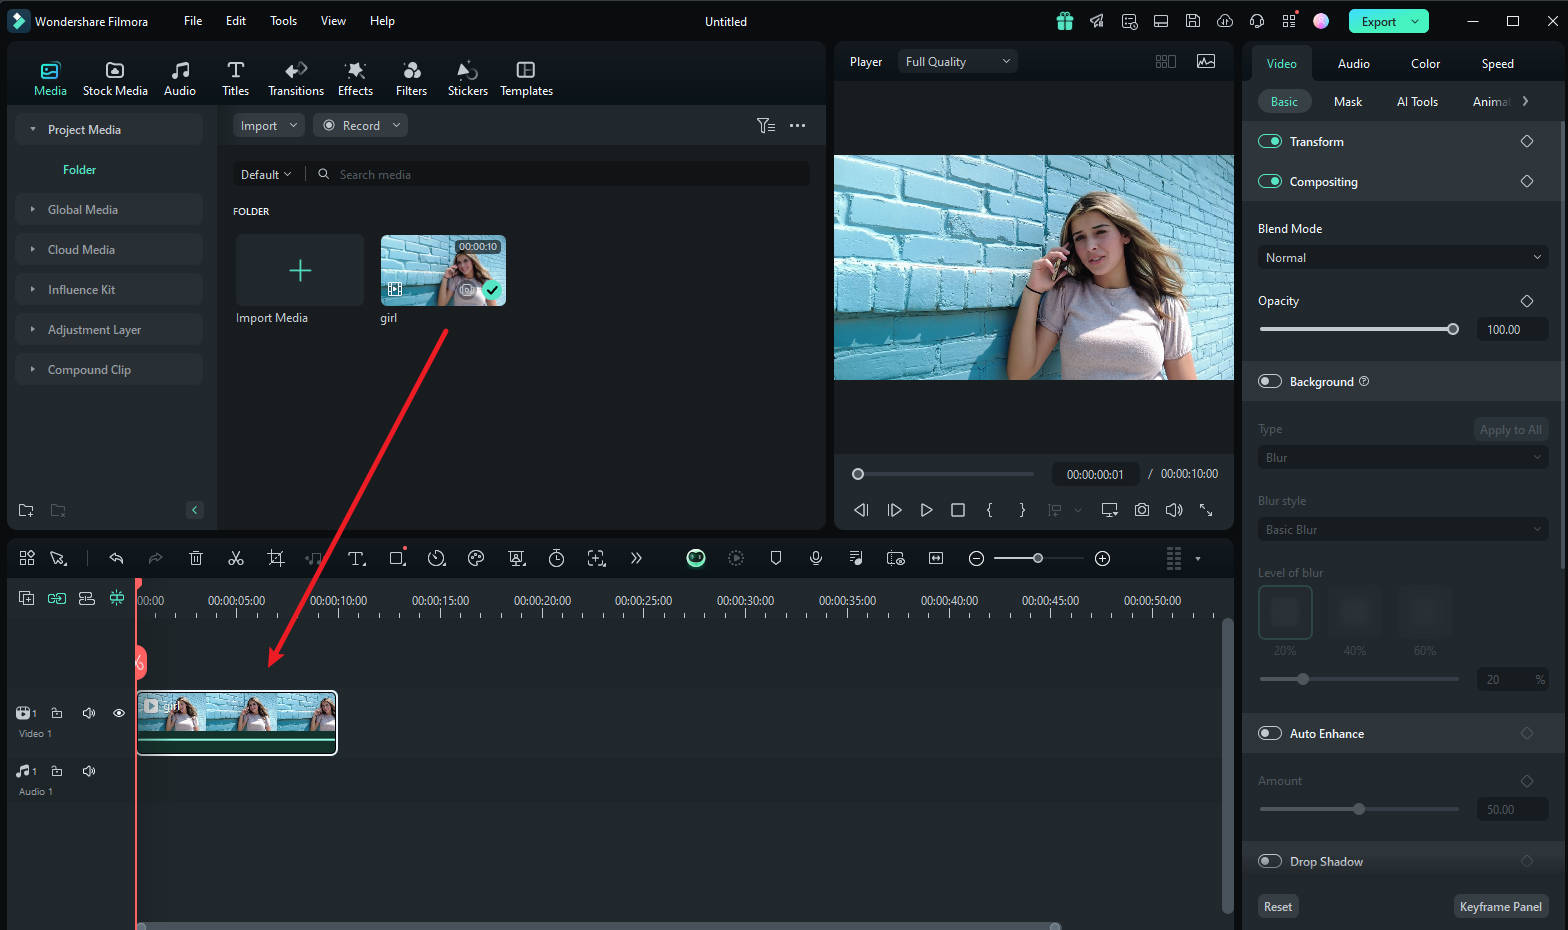
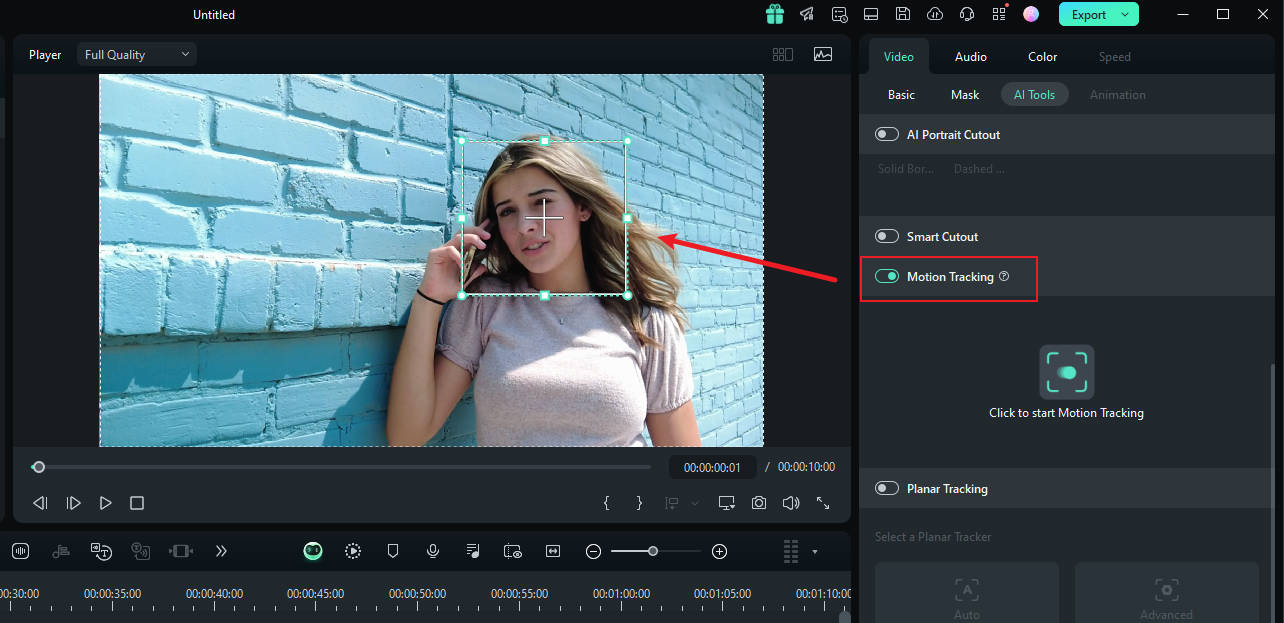
Step2 Adjust the Motion Tracking Space
Now place the play head at the start and proceed with the "Motion Tracking" tool, and adjust the motion tracking space from your preview window.
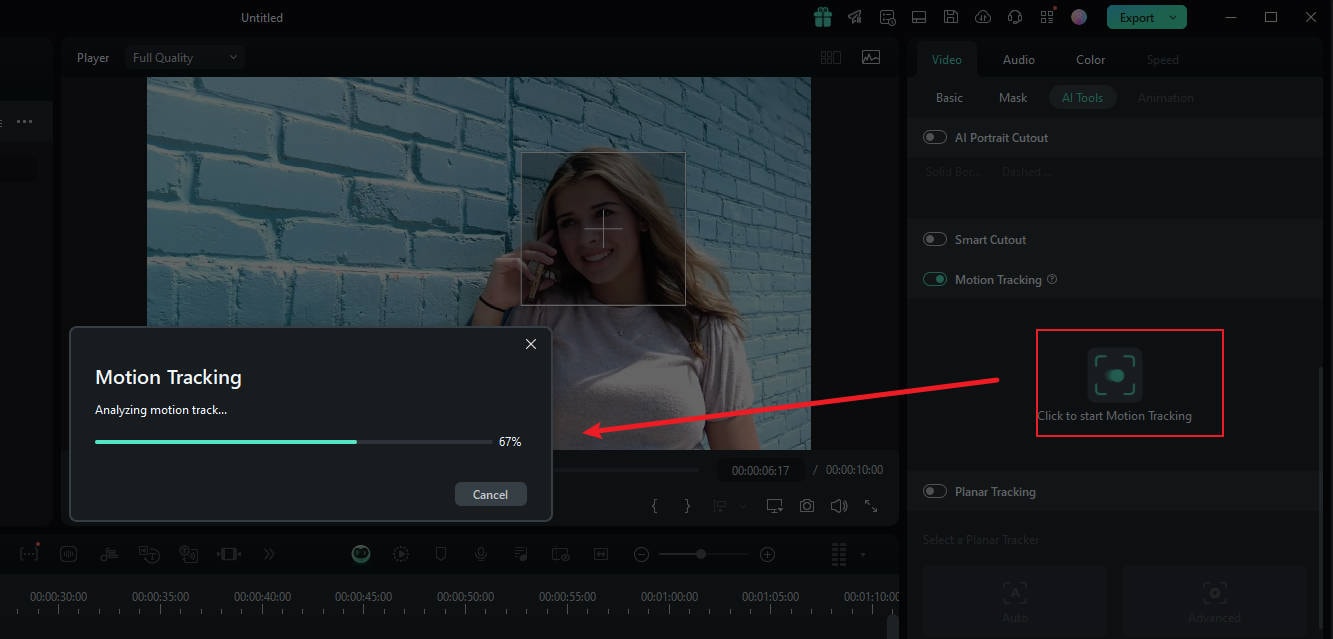
Step3 Start the Motion Tracking Process
Once done, hit the "Start Tracking" button. Within a few minutes, you will be able to finish this process.
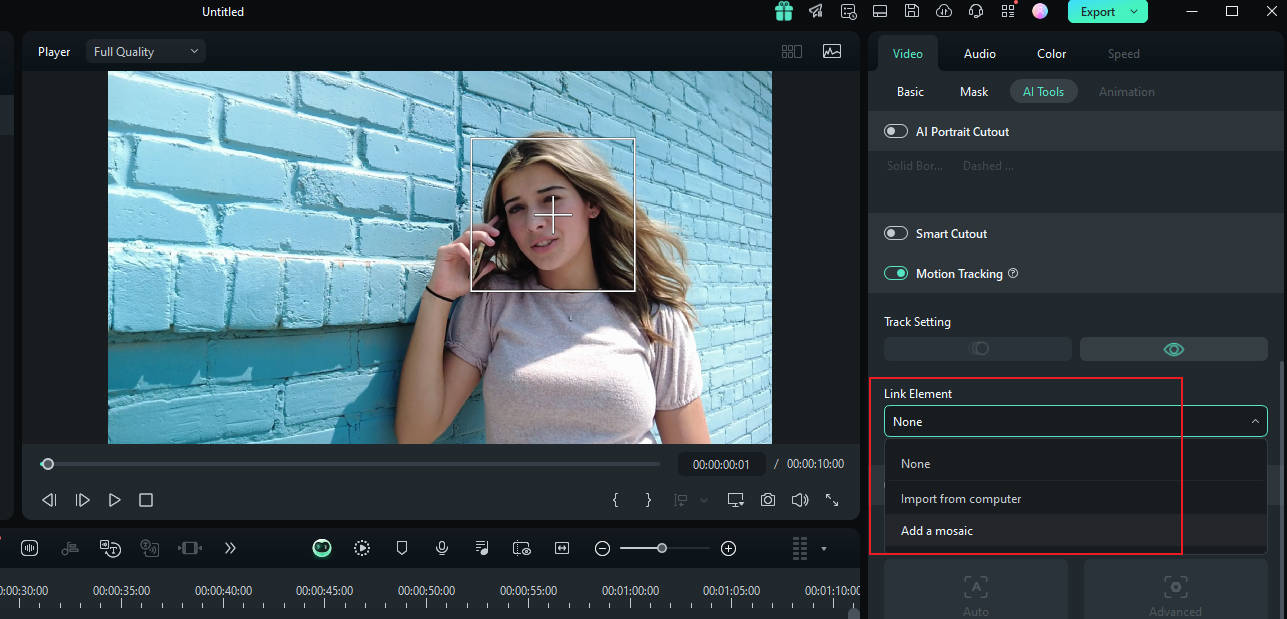
Step4 Customize the Blur Settings
Now, click the video on the timeline. In the pane on the right, under the "link element" option, you can select the overlay element you want, such as an image or mosaic.
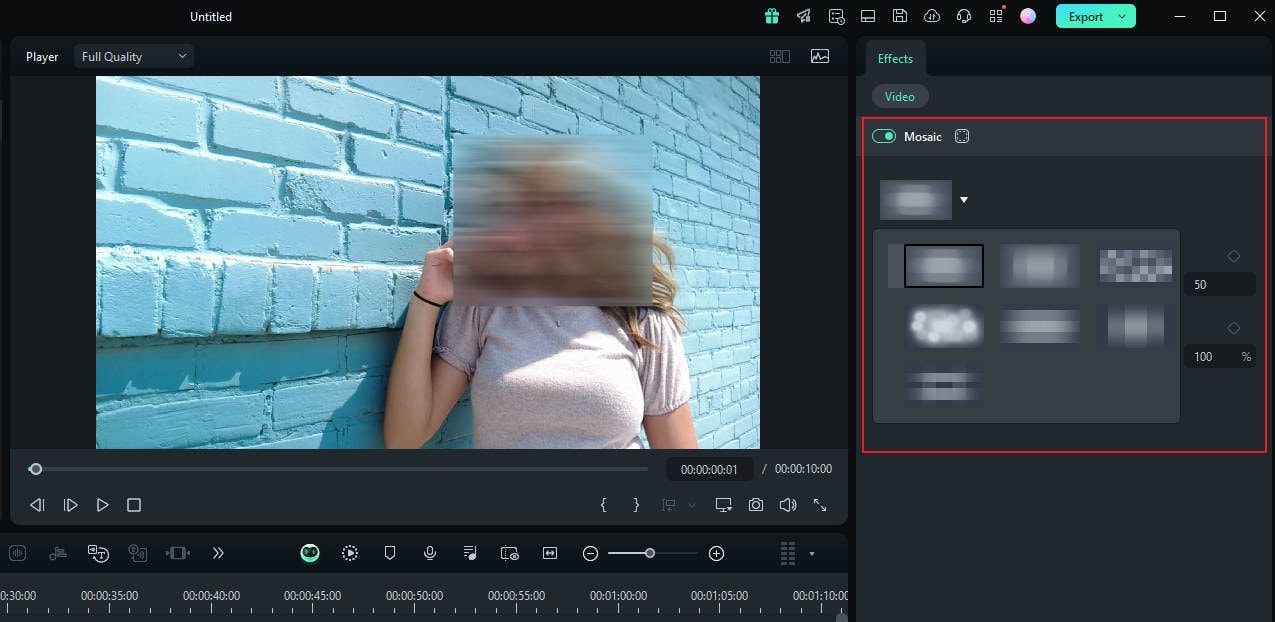
Step5 Choose Mosaic in Motion Tracking
If you choose the mosaic, a mosaic will appear over the person's face. Also, you can change the blur amount and blur opacity. Afterward, adjust the blurred space on your preview window. Once confirmed, you can export the video.
Part 2: How to Blur Faces in iMovie?
Blur face in iMovie is difficult, but we will try to describe it in the following section. To blur face, you will need to use the picture-in-picture features. Below are the steps for you to follow:
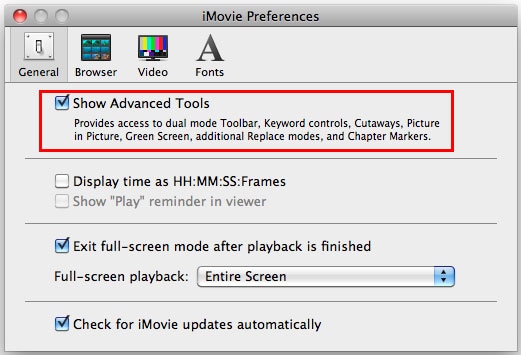
Step 1. Firstly, you have to launch iMovie software by selecting iMovie > Preferences. After this, choose the general preference, enable Show Advanced Tools, and then close the likes of iMovie.
Step 2. The second step begins with choosing the video clip displayed on the license plate. After that, the clip will be shown to iMovie's viewer.
Step 3. Take a screenshot of the face by pressing Shift + Command + 4. Once you are done with it, release the mouse button. You will hear a shutter sound, which will indicate that the screenshot has been captured and saved on your desktop.
Step 4. Now you have to open it in any image editor, like Photoshop and Gaussian, which can blur your image. You can make any change in it that you want to do. After making changes, save your image to the desktop.
Step 5. Drag it over your iMovie clip and select Picture in Picture from the menu that appears. When you complete this task, the blurred image will appear as a still in the viewer and iMovie's project pane.
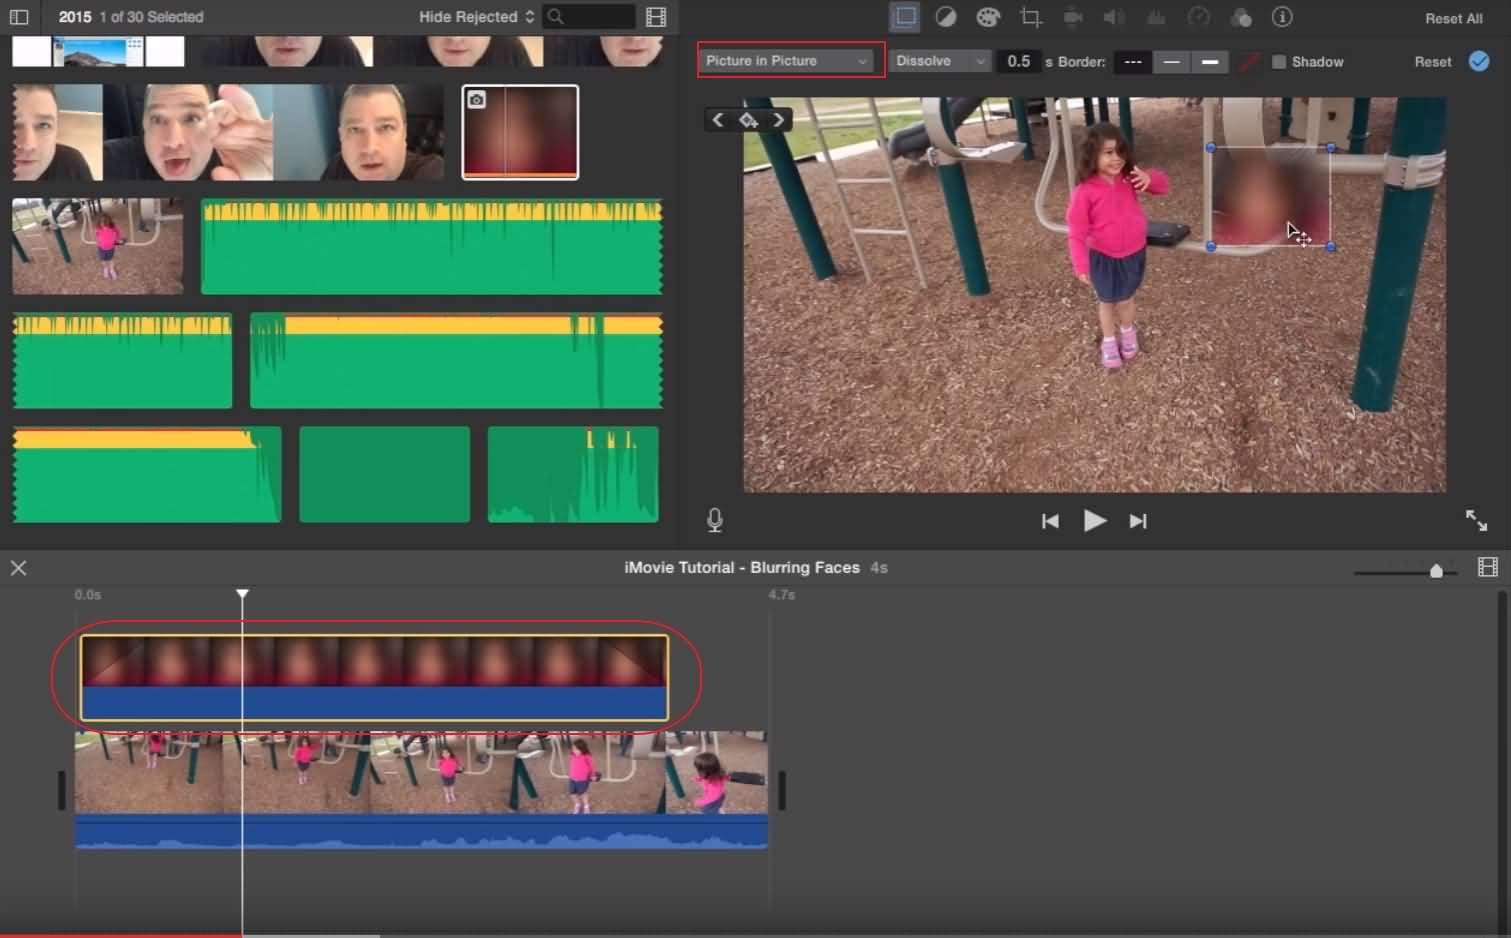
Step 6. Now adjust the length of the clip to cover the license plate for the duration of the clip.
Step 7. The last step is resizing the image and placing it in your desired location.
If the above step is not clear for you, you can watch the tutorial below to check how it works.
Conclusions
In conclusion, blurring faces in iMovie is a simple process that is perfect for basic video editing needs and ensures privacy and security. However, if you're looking for more advanced features and greater flexibility, Filmora offers an enhanced face-blurring tool along with a host of other editing options, making it an excellent choice for those who want to take their video editing to the next level.
Whether you're editing for personal or professional use, Filmora provides intuitive controls, pre-made templates, and a wide range of effects, allowing you to create polished and professional videos effortlessly. If you're serious about video editing, Filmora is a powerful alternative that can help you achieve more than just basic tasks like blurring faces in iMovie.


