- iMovie Complete Tutorial
Master iMovie Zoom In & Out: Mac, iPhone, and Advanced Techniques
Nov 18, 2025• Proven solutions
Want to emphasize a key moment or create dynamic visual interest in your iMovie projects? Learning how to zoom in and out on your videos is a fundamental skill. This comprehensive guide will walk you through the exact steps to achieve the perfect iMovie zoom effect on both your Mac and iPhone, plus introduce a powerful alternative if you need more advanced control.
- Part 1: How to Zoom in/out Videos in iMovie on Mac and iPhone?
- Part 2: The Best iMovie Alternatives (Windows/Mac/iOS/Android) for Zooming in/out Videos
- Part 3: Tips for Creating an Amazing Video Zoom Effect
Part 1: How to Zoom in/out Videos on iMovie on Mac and iPhone?
iMovie allows users to zoom in/out video clips that have been imported into it. To zoom in/out videos with iMovie on your macOS or iOS devices, you can follow the tutorial below.
Method 1: Zooming Videos in iMovie on Mac (Crop to Fill & Ken Burns Effect)
If you're a Mac user, take the following steps for zooming in on a video with iMovie.
Step 1. Launch the iMovie program and then choose a video clip that you wish to zoom.
Step 2. Drag the video clip into the timeline, and Split (Apple Key + B) the footage into parts if you only want to apply the zoom effect to a specific segment of your clip. Select the part you want to apply the zooming effect, and it will be shown in the preview window.
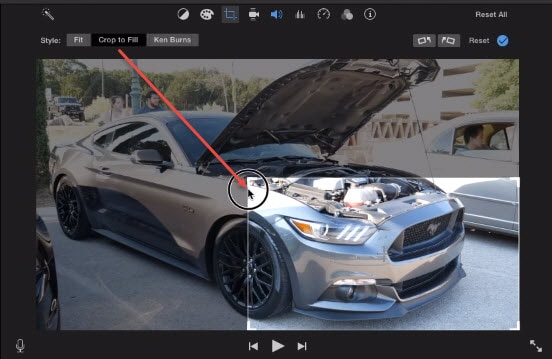
Step 3. Tap the "Crop" button present on the top of the preview window. This will reveal options including Fit, Crop to Fill (often used for a direct iMovie zoom in effect), and Ken Burns (for a smooth pan and zoom).

Step 4. Now select "Crop to Fill", and this will bring up a white rectangle. Drag the edge of the rectangle to crop the video.

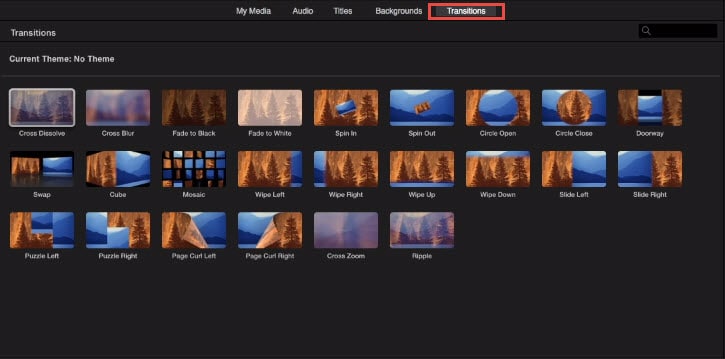
Step 5. Add transitions to make the jump more smoothly. Go to Transitions, and choose a transition effect you like, then drag it into the beginning/end of the zoom part.

Step 6. Click on the "Play" button to preview the zoom effect. If you are satisfied, then hit on the "Done" button to apply the effect.
You May Also Like: How to Crop and Rotate Photos/Videos in iMovie
Check this video to know more details:
Method 2: How to Zoom In/Out on iMovie for iPhone & iPad
For users wondering how to zoom in on iMovie on iPhone or iPad, the process is slightly different but equally straightforward:
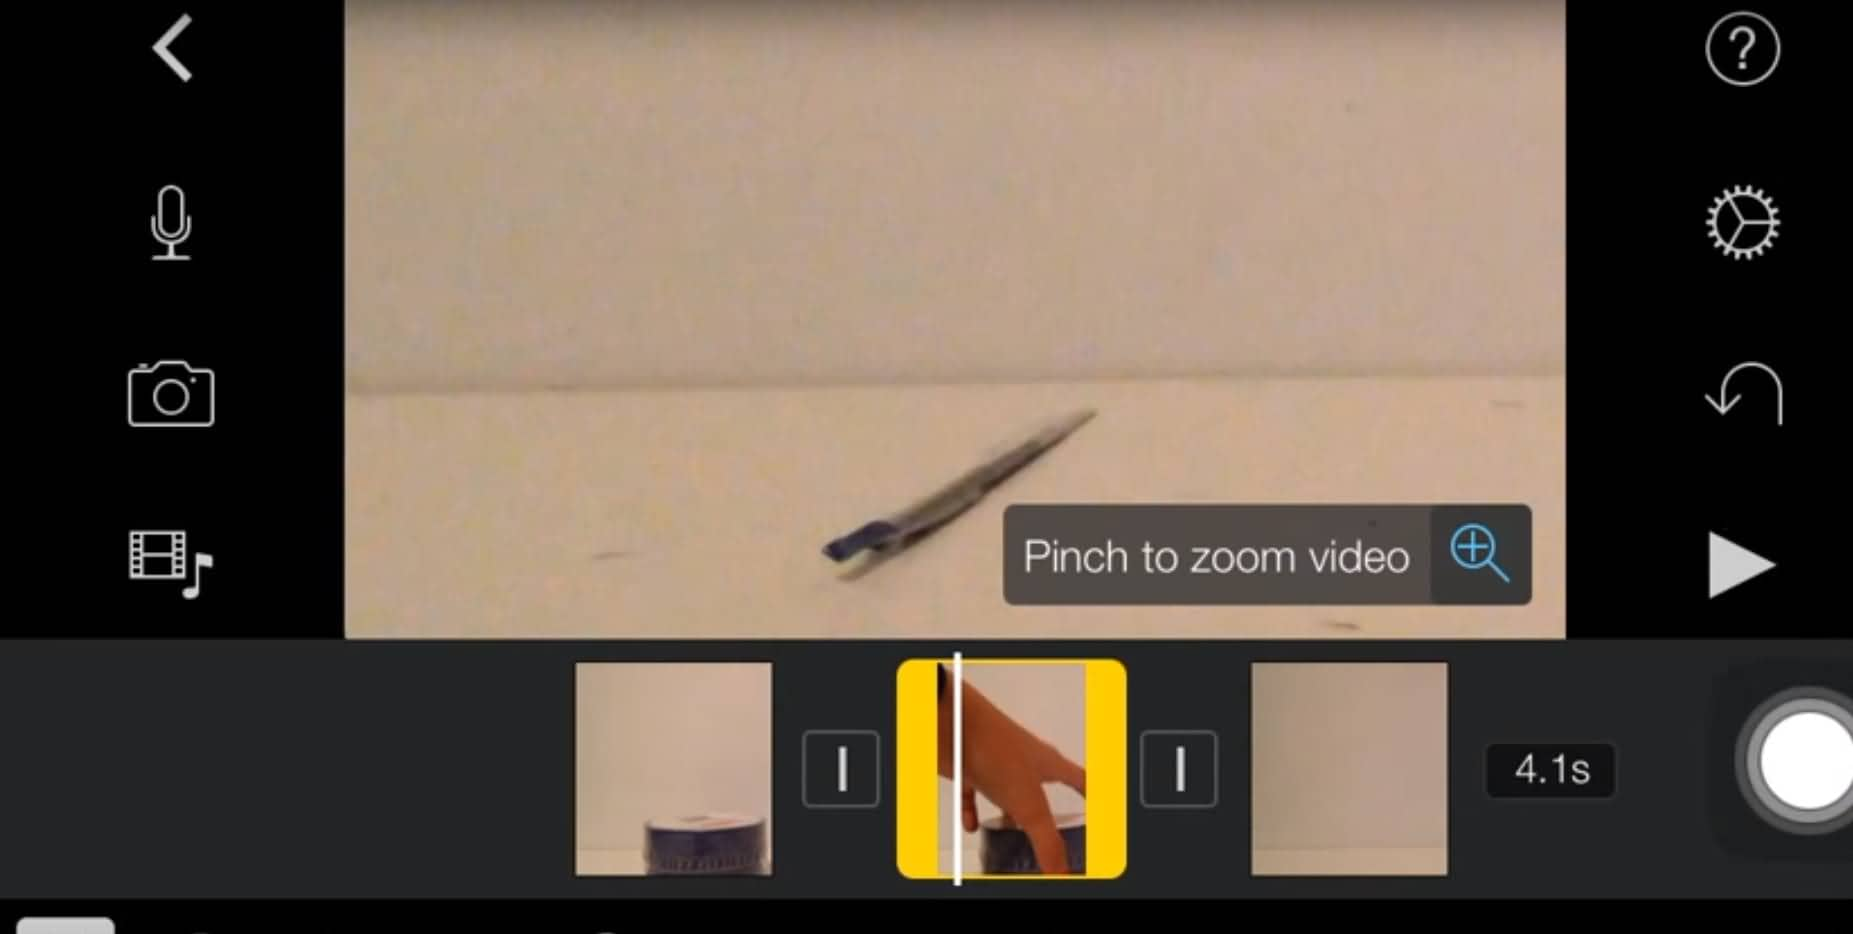
Step 1. Click on the iMovie application and choose the required video to add a zoom effect.
Step 2. Now select the frame of your own choice.
Step 3. Click the magnifying glass button to apply the cropping.

Step 4. Preview the video and make suitable adjustments if needed.
Step 5. Once you are satisfied with the effect, click on "Done". In this way, the effect will be applied to your clip.
Part 2: The Best iMovie Alternative for Zooming in/out Videos
Wondershare Filmora is a multifunctional video editor for both Windows and Mac users. It is one of the best iMovie alternatives to zoom in/out videos quickly and easily. This macOS video editor also supports adding some special effects, audios, background music, text and titles, transitions, and more to your video footage.
The tutorial below is about how to make a pan and zoom effect within one minute. Just click on the "Try It Free" button below to get Filmora directly and make a cool pan & zoom effect right now!
The steps of making a Pan & Zoom effect in Filmora for Mac are similar to that of Filmora for Windows.
Step 1. Drag the video/image to the timeline, then right-click the video/image and select Crop and Zoom.
Step 2. In the popup window, select the Pan and Zoom option. Set the start and end area as you need, and then click OK to save the settings.
It's really pretty simple, isn't it? Want to know more about Filmora? Do not miss the video below to check out what Filmora can do for you.
Learn more about: How to Zoom Videos Easily
How To Make a Pan and Zoom Effect on Videos in Filmora Mobile
As a bonus, here’s how to make a pan and zoom effect on your mobile device with Filmora. If you’re using an iPhone or iPad, this might be a handy alternative to iMovie because Filmora offers more editing features. Meaning you can do more than zoom in and out of videos.
Here’s how you can pan and zoom on certain parts of videos with Filmora; it’s similar to the Windows & Mac versions.
Step 1: Make a New Project and upload the video you want to edit.

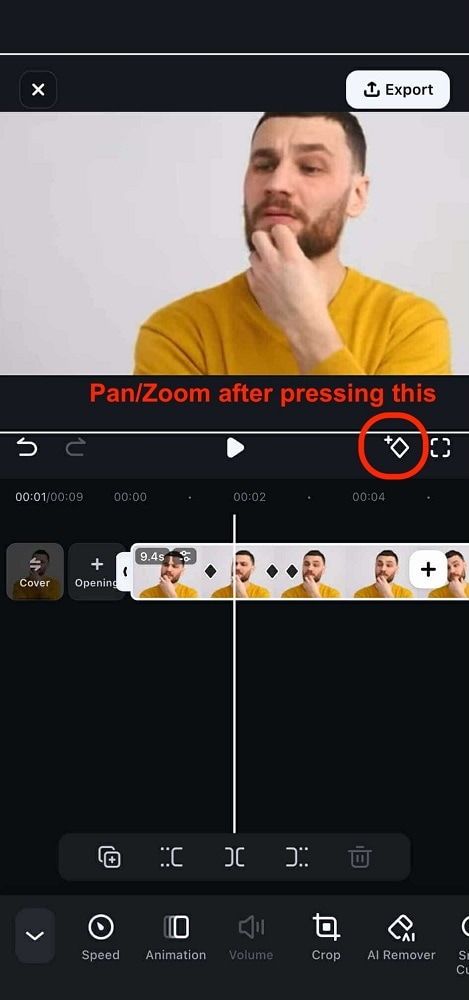
Step 2: Tap the keyframe button on the specific part of the video when you want it to pan and zoom. Then, perform the appropriate operations to make the zoom or pan effect you want:
- Zoom in/out: Pinch in/out on the video to zoom in/out.
- Pan: Slide the video with your finger in the appropriate direction to pan.

Pro Tip: You can set another keyframe later in the video so the pan and zoom animations occur and connect naturally.
Try out Filmora for more editing capabilities!
iMovie vs. Filmora: Advanced Zoom & Pan Capabilities Compared
| Feature | iMovie Zoom & Pan | Filmora Pan & Zoom (Advanced) |
|---|---|---|
| Control Method | "Crop to Fill" (Mac for static zoom), "Ken Burns Effect" (Mac for smooth pan/zoom), Pinch/Magnifying Glass (iPhone/iPad for cropping). | Keyframe-based control: Define precise start and end points for pan and zoom. Explicit keyframe button on mobile for multi-point control. |
| Precision & Easing | Basic crop adjustment; Ken Burns offers smooth motion, but limited direct control over zoom speed or easing effects. Relies on transitions for smoothness. | Precise control over zoom areas and duration, allowing for natural and smooth animations between keyframes (easing effects) for a professional look. |
| Multiple Zooms in One Clip | Typically requires splitting the video clip into multiple segments to apply distinct zoom effects to different parts. | Easily apply multiple, distinct pan and zoom effects within a single continuous clip using successive keyframes. |
| Ideal Use Case | Quick emphasis, fundamental visual interest, and simple video editing tasks on Apple devices. | Complex, dynamic, and cinematic camera movements; advanced storytelling; and more comprehensive video editing features on various platforms. |
As this comparison illustrates, while iMovie is user-friendly for basic tasks, Filmora truly excels when it comes to sophisticated pan and zoom effects. Its keyframe-based system offers unparalleled precision and flexibility, allowing creators to achieve professional-grade animations and dynamic storytelling that go beyond simple cuts and crops. If your projects demand advanced control over motion and timing, Filmora provides the tools you need.
Part 3: Tips for Creating an Amazing Video Zoom Effect
If you want to create a stunning video zoom effect during shooting, check out the following tips:
1. Move the camera manually
You can move your camera manually away or towards your subject if your camera is not allowing you to zoom when the shutter is open, or you do not possess a zoom lens.
2. Keep your camera still
The movement of the camera can greatly affect your shot while utilizing a slow shutter speed. You can prevent camera shake by setting your camera on a still surface or using a tripod.
3. Focus on smooth zooming
You have to lay stress on "smooth zoom" for getting fine, smooth lines in your photo. A lot of practice is needed for mastering this technique.
4. Lights
Any kind of light whether it is a neon sign or city light plays an important role in the zoom effect. Lights can produce stunning effects if they are applied effectively.
5. Reverse zooming
If you have a moving object, then zooming in on a subject can provide better results in comparison to zooming out. So you should try this experiment also.
Related: How to Reverse Video in iMovie
6. Partial zoom
You can also zoom partially, as some zoom lenses have broad focal lengths.
Related: How to Add Video Effects in iMovie
That's it. Have you learned how to zoom in/out videos with iMovie and its alternative - Wondershare Filmora? If you need further assistance, please leave your comments below to let us know.
You May Also Like: Get Best iMovie Alternatives for Mac
Frequently Asked Questions
How can I zoom in or out of a video using iMovie on my Mac?
On your Mac, open the iMovie program and drag your desired video clip into the timeline. To apply a zoom effect, select the clip and click the "Crop" button located above the preview window. You can then choose "Crop to Fill" to manually define a zoom area with a white rectangle, or select "Ken Burns" for a smooth pan and zoom effect across your clip. Remember to add transitions for a smoother visual change if needed.
Is there an alternative video editor to iMovie that offers advanced zoom and pan features for both Windows and Mac?
Yes, Wondershare Filmora is a highly recommended iMovie alternative for both Windows and Mac users that offers powerful pan and zoom effects. To use it, simply drag your video or image to the timeline, right-click, and select "Crop and Zoom." In the pop-up window, choose the "Pan and Zoom" option, then set your desired start and end areas to create dynamic camera movements.


