
"How to record a Skype call?" Recording Skype calls has become essential for various reasons—whether for business meetings, online interviews, or personal conversations. Knowing how to record Skype calls with the most appropriate free Skype call recorders can be a lifesaver in many situations.
This article will guide you through different methods to record Skype calls on Windows, Mac, iPhone, Android, or using an online tool. Let's dive in.
| Methods | Pros | Cons |
| Built-in Skype Call Recorder | Free | Requires permission; No recording settings; No video editing features. |
| Wondershare Filmora | Free with no time limits; Record without permission; A lot of customizing options; Powerful video editing features. | The free version may leave a watermark. |
| RecordCast | Requires no installation. | The free version can only record 5 minutes. |
| iOS Screen Recorder | Free | Saves the video in the phone gallery will occupy a lot of internal storage; May not record audio correctly. |
| Android Built-in Skype Call Recorder | Free | May occupy internal storage on the Android device. Possible audio recording issues. No video editing features. |
In this article
How to Record Skype Calls Using Built-In Skype Call Recorder?
As a communication application, Skype provides an inbuilt feature that enables you to record a call and include voice and video. Let's see how it works.
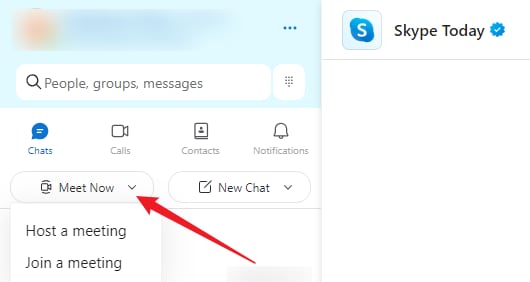
Step 1: Get the Skype App on your computer
Open the Skype application on your computer and join the call you would like to record through the Meet Now option.
Step 2: Make a call to record
For making a call, in the lower left-hand corner of the application, there is a Record button which is used to record a call.

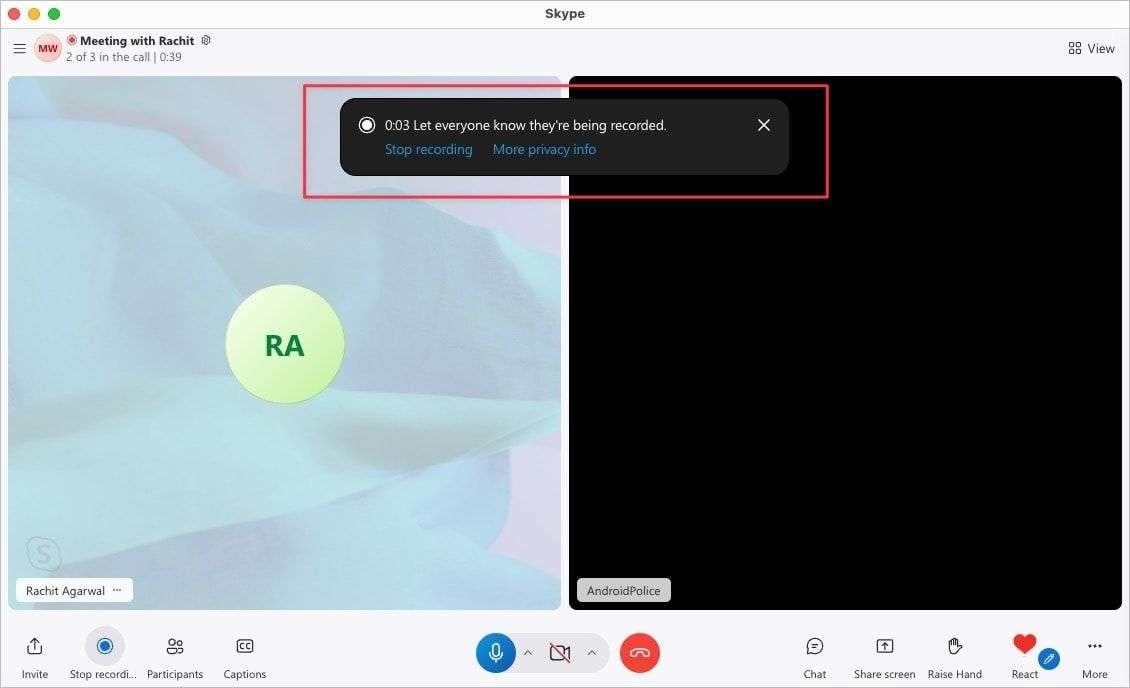
Step 3: Start the recording
Another overlay appears with a message indicating that we have begun recording. All the participants will be informed by Skype when the recording commences.
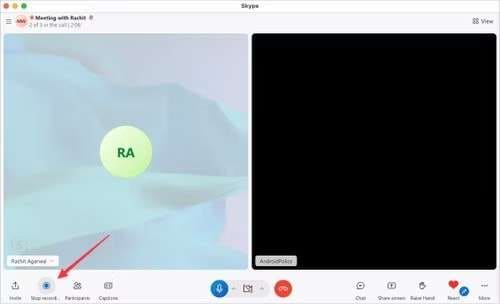
Step 4: Stop the recording
To stop the recording click the stop recording button this removes the circle around the buttons and stops the grid from recording.
Any recorded call can be accessed and downloaded from the meeting chat window once the call is over.
That's all to record a Skype call using its built-in tool, although useful, it still has some drawbacks.
- It will notify the other person before recording.
- It doesn't allow you to set recording parameters, such as recording area, or recording time.
- The call recording can only be accessible within 30 days.
- No video editing features.
So, a better alternative is needed when you want to record Skype audio or video calls without letting others know and by maintaining your parameters. For these types of situations, third-party tools like Wondershare Filmora may be more appropriate.
How to Record Skype Video Calls Secretly on Windows and Mac?
While Skype's built-in recording tool is simple, some users may prefer to record Skype calls without the other party knowing. Whether you're conducting an interview or want to save an important conversation, Filmora Screen Recorder can help. Here's how to do it:
- Download and install Wondershare Filmora on your computer.


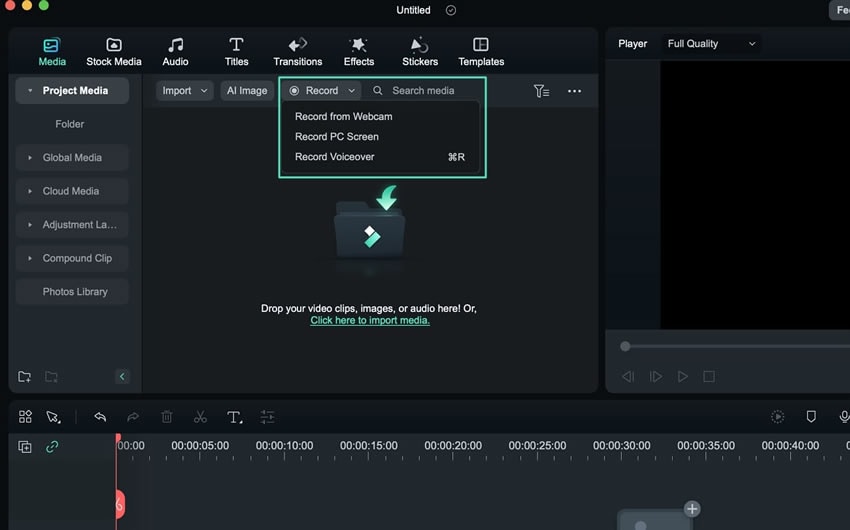
- Open Filmora and click on New Project.
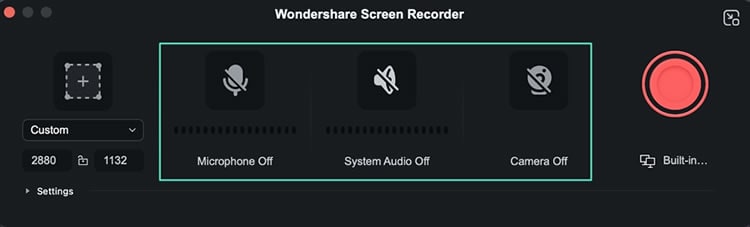
- Go to the Record menu and choose from a variety of options, you can choose to record PC screen > Target Window.
- Set recording parameters, and choose whether to enable a microphone, system audio, or camera or not according to your needs.
- If you want to schedule a recording ending time, you can extend Setting > and navigate to Record Timer.
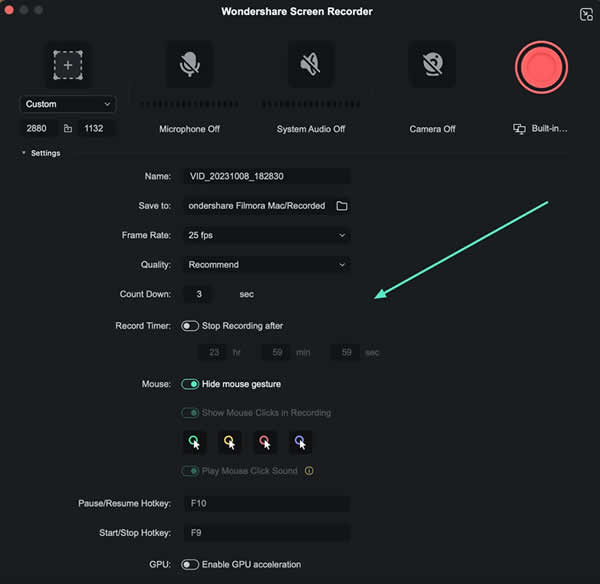
- Click on the "REC" button on the right side of the application to start recording. Press F9 to stop recording.
After finishing recording, results will be presented at the filmora video editor timeline. You can choose to make further edits or export to your videos.
How to Record Skype Video Calls Online Free with RecordCast?
If you also want to know if you can record Skype calls online for free, here is a free online screen recorder you can try - RecordCast.
Step 1: Open RecordCast screen recorder
Click the RecordCast website and start screen recording.
Step 2: Start a Skype Call
Launch Skype, go to your contacts and call the person you want to record through video or phone call.
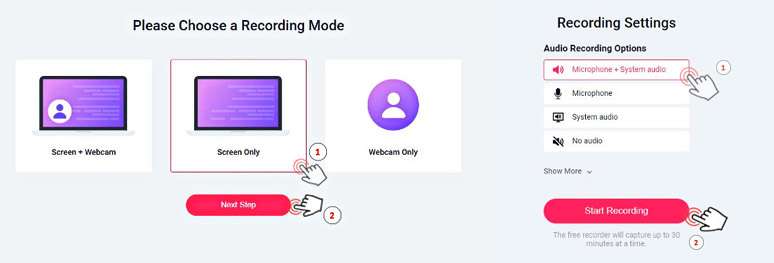
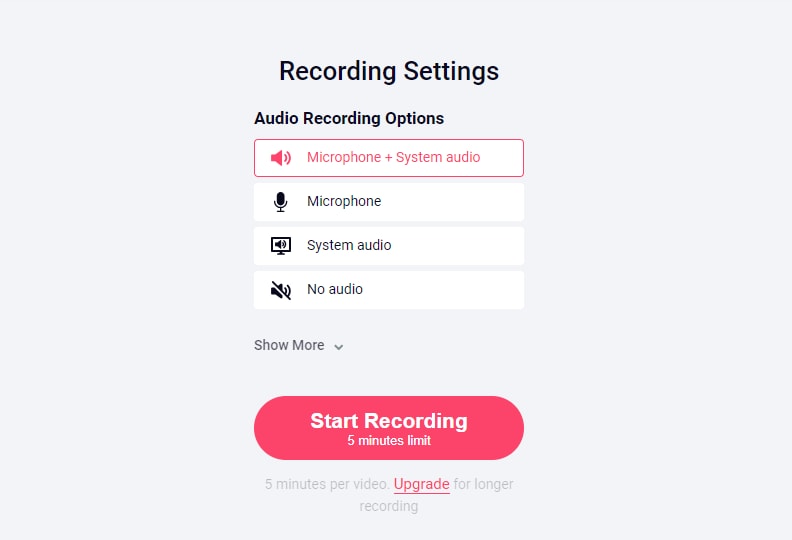
Step 3: Set the Recording Mode
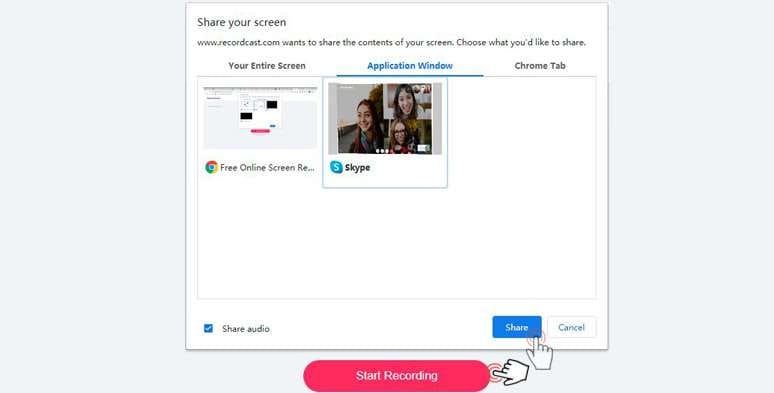
In RecordCast, click on Screen Only > enable Microphone + System Audio > Start recording. Choose your Skype application window and tab sharing to start recording.
Step 4: Stop and Edit the Recording
At the end of the sharing, click on Stop Sharing. After the recording is complete, you can download it instantly, and use the Recordcast video editor to trim it before exporting it in MP4 format.

These steps should enable one to record Skype calls and even trim them if necessary.
How to Record Video Calls from Skype on iPhone?
Skype calls can be quickly recorded On the iPhone with the help of the new screen recording feature of iOS. Follow these steps:
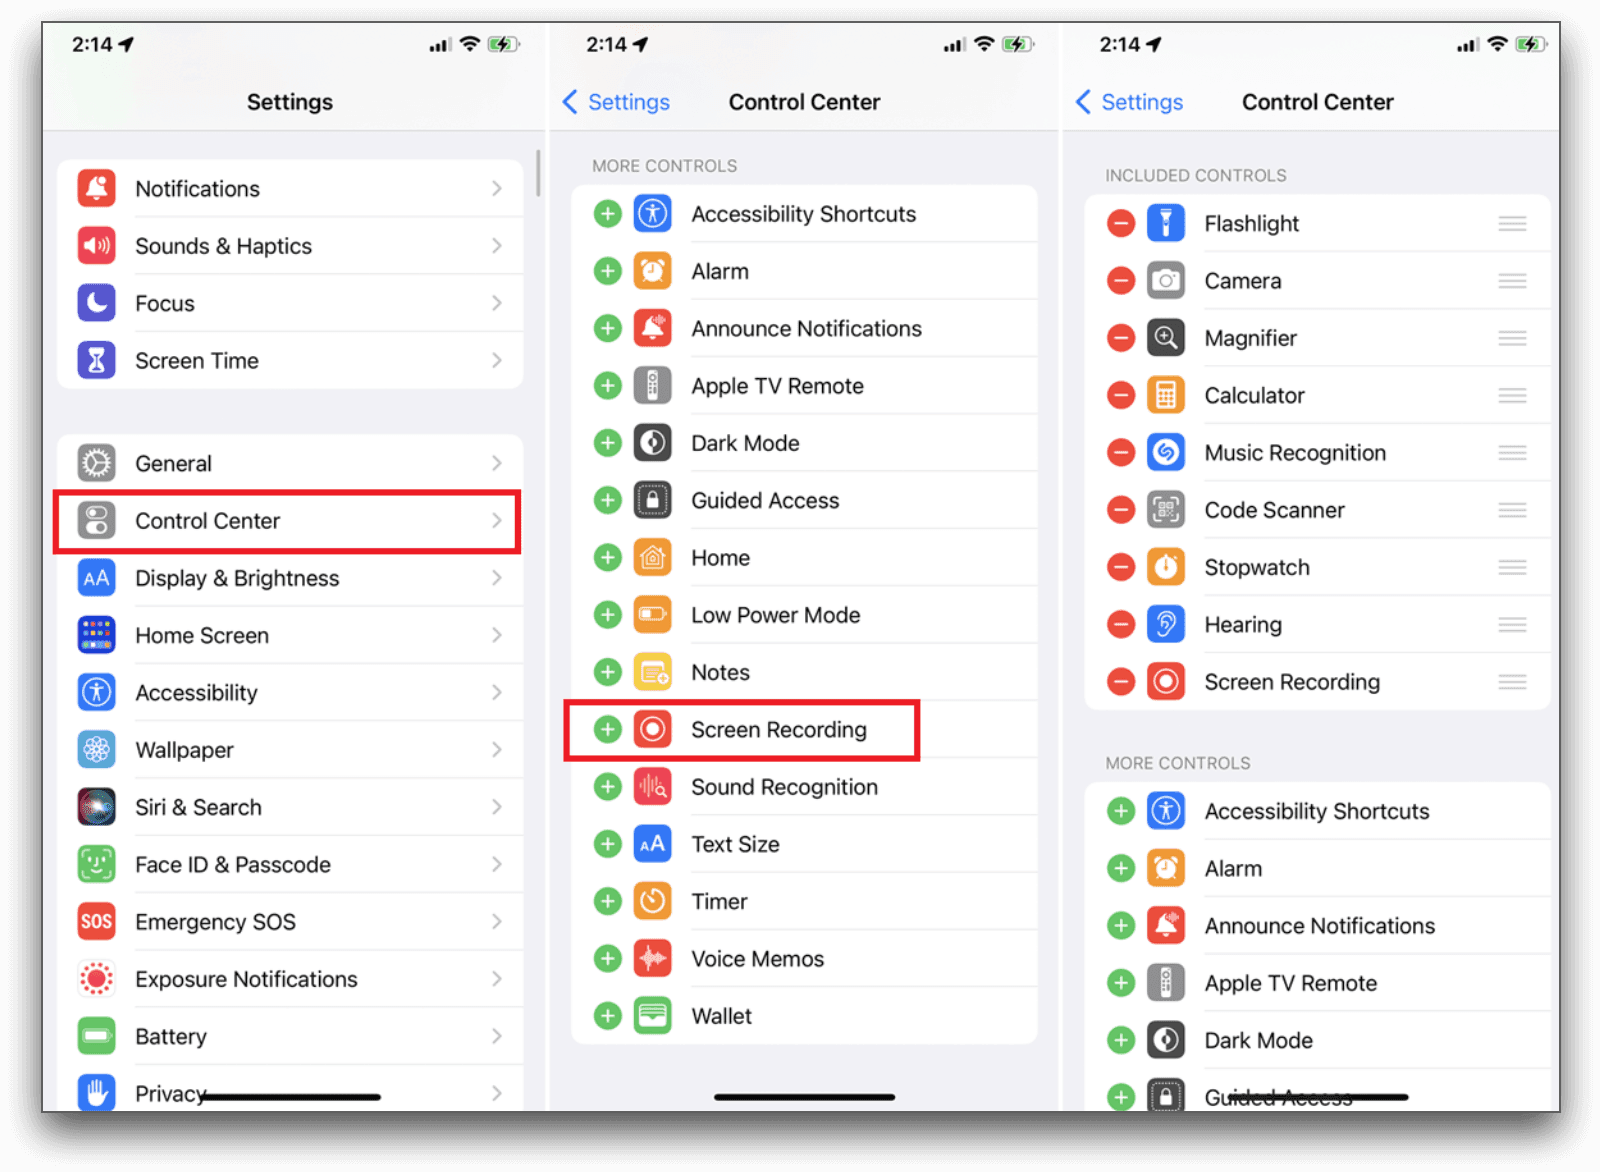
Step 1: Enable Screen Recording
First, ensure the screen recording option is authorized on the Control Center. Accessibility > Control Center > Screen Recording.
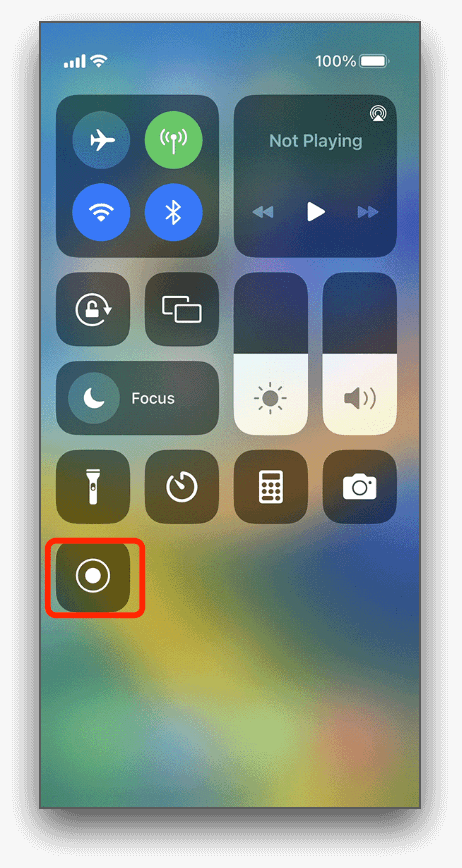
Step 2: Begin Recording
Go to the Control Center – swipe up from the bottom of the screen – screen recording – Tap on the icon. Before your recording starts, you will get a three-second countdown notice.
Step 3: Start Your Skype Call
Go to Skype and start your video chat.

Step 4: Stop Recording
When you are done the Control Center will come back on and by pressing the Screen Recording button the recording will be complete. The recording will be stored in your Photos app.
How to Record Skype Calls on Android?
Like on the iPhone, you can record Skype videos on Android. Initially, recording Skype video calls on Xiaomi, Samsung, or any other Android device was only possible with a third-party app. However, today, you can do that directly from within the app.
- Browse and locate your Skype application in the tray and click on it to start using it.
- Start a video call with your friend on the top right-hand corner of Skype
- Click the start recording button. The app will notify the other person on the other end of the conversation that you are recording the session.

- Hit the Stop Recording to finish recording.
- If you wish to watch a video you have recorded, go to the chatbox and play the thumbnail of the video.

- You can choose to download the video recording calls in case they disappear 30 days later.
Conclusion
In conclusion, we have provided a step-by-step guide about how to record Skype calls on different devices, whether you want to use its built-in tools, or record without the party knowing (using Wondershare Filmora). Follow our steps and no worry about don't know how to record Skype calls anymore!
FAQs
-
How to Record a Skype Call without the other party knowing?
You can use Wondershare Filmora to record a Skype Call without notifying the other party. Here are the steps:- Download and install Filmora on your computer.
- Launch Filmora and click the screen recorder.
- Choose to record the PC screen > Target Window, and make recording settings according to your needs.
- Click the Red button to start recording and press F9 to end.
-
Can I record Skype calls for free?
Yes. There are many free Skype recorders you can use such as Wondershare Filmora, its free version doesn't limit any screen recording time for your videos, and it has many powerful video editing features you can use. But the free version may leave a watermark on your video recordings.
