

 ChatGPT
 Perplexity
 Gemini
 Claude
 Grok
Grok
Videos are becoming more and more important in our lives in this digital world. They serve as a medium for entertainment, information, and much more. It gets our attention in ways that other forms of media cannot. Additionally, they can uniquely engage and communicate with us on various levels. One of the effects that the audience loves to see is the rewind effect.
It is important to make unique videos, which can be done using different effects and editing techniques. The video playback effect is among those that provide a system of playing the video in reverse. In this article, we will explore what video playback is, its utility, and its impact on our video. Additionally, we will discuss how this effect can be applied to our videos with ease.
In this article
- Part 1: When Should You Create a Video Playback or Rewind Effect Video?
- Part 2: Difficult Way: Create a Video Playback Effect Video Using Premiere Pro
- Part 3: Wondershare Filmora: A Video Editor Design to Promote Ease-of-Use
- Part 4: Simple Way: Generate a Glitch Rewind or Video Playback Effect Using Filmora
- Conclusion
The best editor helps you edit and enhance videos without hassle.

Part 1: When Should You Create a Video Playback or Rewind Effect Video?
A video rewind effect can be used creatively in various situations. These effects add creativity and a narrative to your video content. Here are a few instances when you might consider creating a video using this effect:
1. Flashbacks or Memories
Video playback effects are commonly used to depict flashbacks or memories in a video. If you want to show a character recalling past events, you can use this effect. It can also be used when memorizing a specific moment. Additionally, this effect can help visually indicate the shift in time.
2. Highlighting Important Moments
You can use the rewind effect in Premiere Pro or other video editors to emphasize significant moments. Furthermore, these rewind effects can help highlight key highlights in your video. It allows you to showcase specific actions or sequences by replaying them. This further draws attention and adds emphasis on a specific interval.
3. Creative Transitions
Rewind effects can serve as unique transitions between scenes or shots. Instead of traditional cuts or fades, such effects can add a dynamic transition. These appealing transitions can create a smooth flow in the procession of the video.
4. Exploring Alternative Narratives
Playback effects can be used to explore alternative narratives or hypothetical scenarios. You can present an alternate perspective by rewinding a scene or showing a different playback. These effects can also be used in what-if scenarios within your video content.
5. Music Videos or Dance Performances
These effects are commonly used in music videos or dance performances. It also helps you to create visually engaging sequences in a video. These effects can add a sense of rhythm to your video content, making it more pleasing to watch. They also add style and dynamic movement to complement the music or choreography.
6. Comedic or Lighthearted Moments
Playback effects can be used for comedic or lighthearted purposes. You can use these effects to replay a humorous moment or action in a video. Additionally, you can emphasize its comedic timing or create a comedic effect.
Part 2: Difficult Way: Create a Video Playback Effect Video Using Premiere Pro
You can create a YouTube video playback effect or similar using Adobe Premiere Pro. Here are the steps that will teach you to add a rewind bounce effect using the tool. If you follow these steps, you can create a similar effect in your videos.
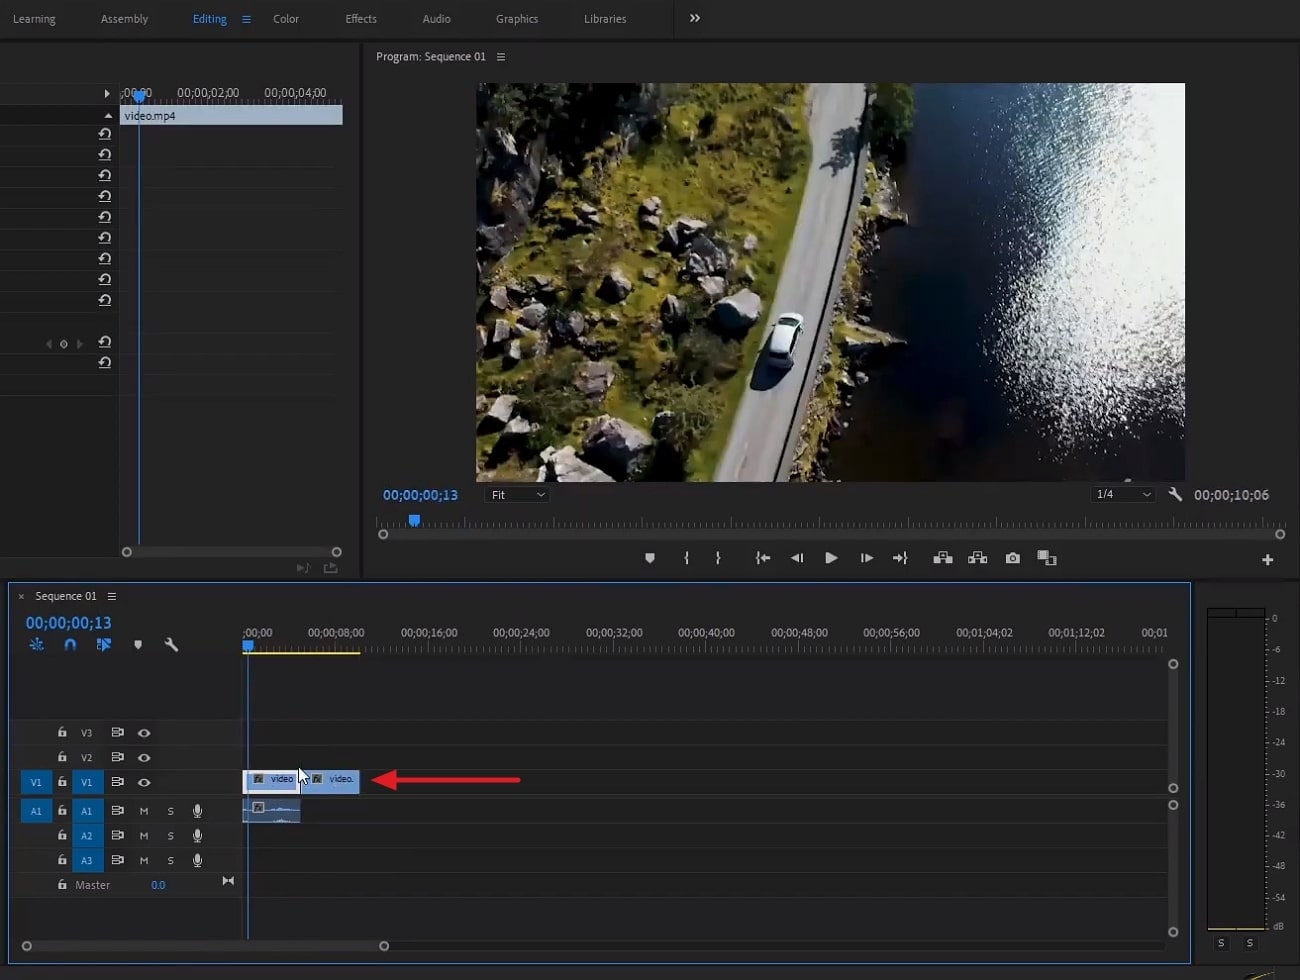
Step 1Import and Duplicate the Video
Start by adding your video to the timeline in Adobe Premiere Pro. Duplicate the video by holding the "Alt" key on your keyboard, left-clicking, and dragging the video. This will create a copy of the original video.
Step 2Link Duplicated Video and Audio
Select both the duplicated video clip and its corresponding audio file. Right-click on the selected clips and choose the "Link" option. This will ensure that the video and audio remain synchronized during editing.

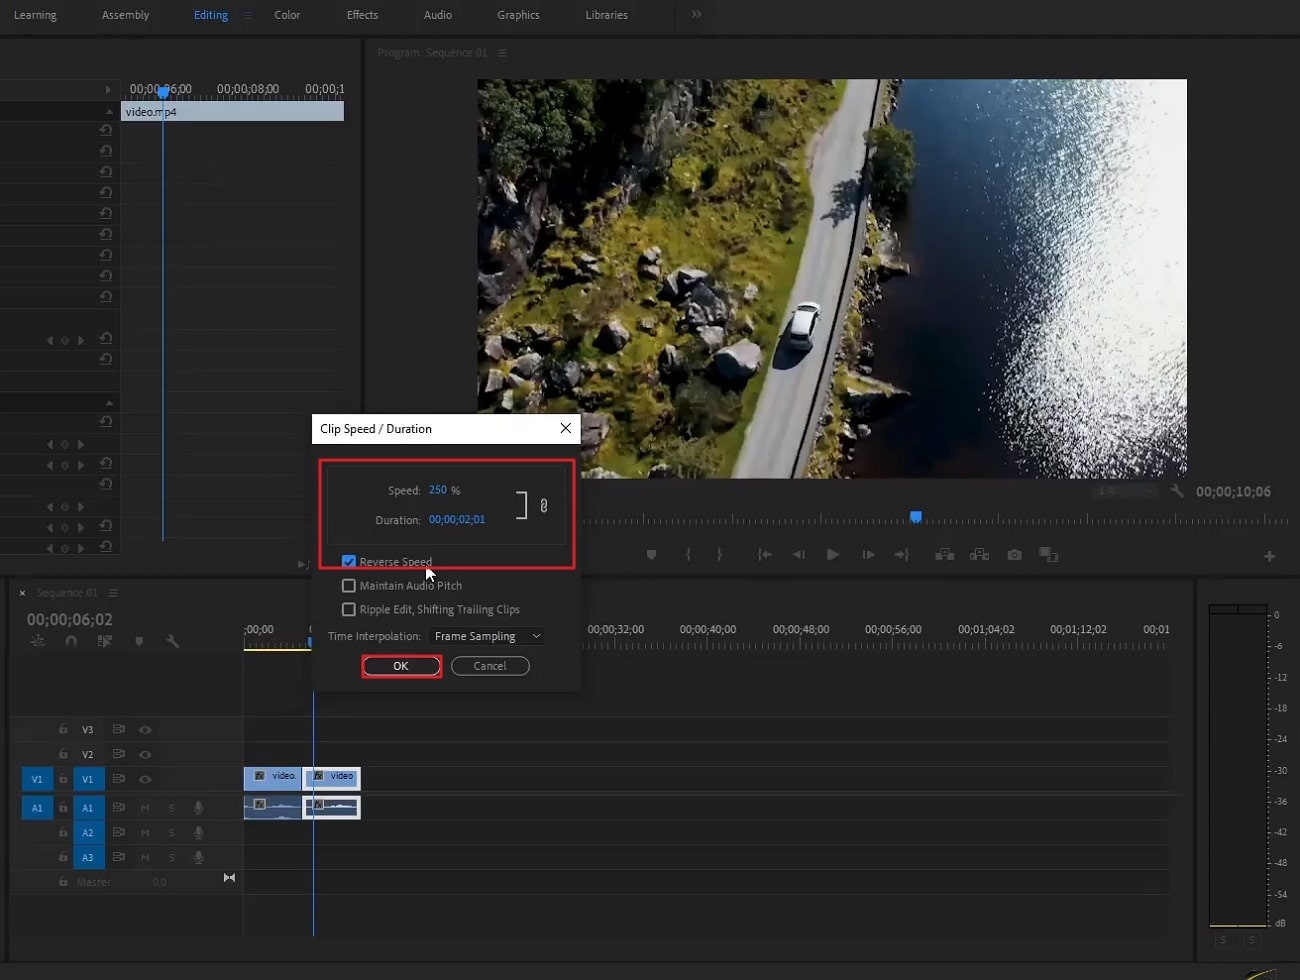
Step 3Apply Reverse Playback Effect
Right-click the duplicated video clip and select "Speed and Duration" from the menu. After that, increase the "Speed" to 250 and check the "Reverse Speed" option. Further, press "OK" to apply the reverse playback effect to the duplicated clip.
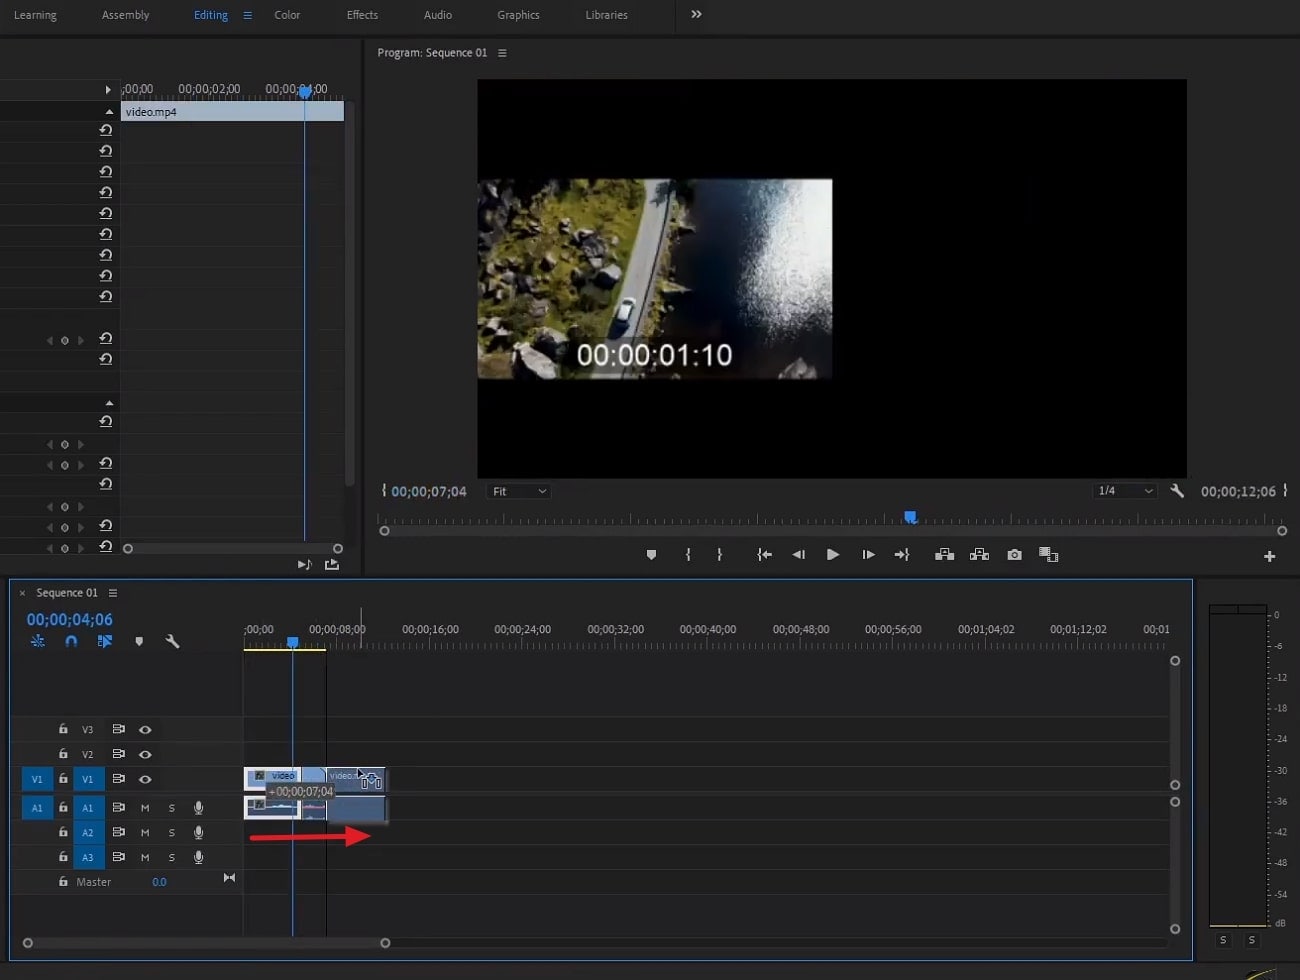
Step 4Create Rewind Bounce Effect
Hold the "Alt" key and drag the original video clip to the right side of the reversed clip in the timeline. This positioning will create a rewind bounce effect, where the video plays forward and then rewinds.
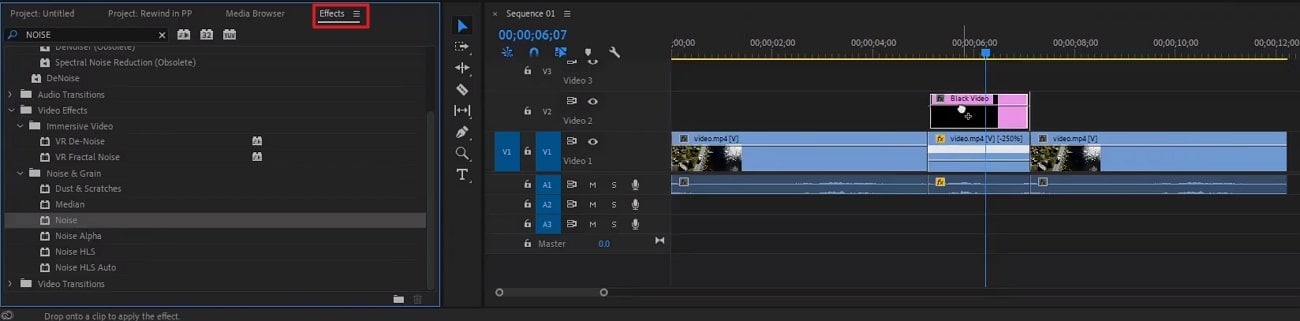
Step 5Add Effects for Enhancement
Open the "Project" window and add a "Black Video" by clicking the "New Item" icon. Continue to drag and drop the "Black Video" layer onto video track 2. Next, adjust its length to match the rewind clip. Then, go to the "Effects" tab in the "Project" window and search for "Noise."
Choose the default "Noise" effect under "Noise and Grain" and apply it to the "Black Video" layer. Proceed to adjust the "Amount of Noise" to your preference and experiment with different "Blend Mode" options. Add the "Wave Warp" or other effects to enhance your video's look and feel.
Part 3: Wondershare Filmora: A Video Editor Design to Promote Ease-of-Use
Although Premiere Pro edits your videos in high quality, its user interface is not simple. As an alternative to that, we found Wondershare Filmora, a user-friendly software. It is a video editing solution for your post-production problems. With this tool, you can edit a professional video and a simple one. It has all the capabilities to handle basic video editing to a more complex and professional one. This tool can even help you color grade and color correct your video footage.
Moreover, that's not all it does because, with this tool, you can even apply effects to your videos. Filmora offers hundreds of presets for your video content, from effects to stickers and more. You can simply search and select an effect of your choice. After that, all you need is to drag and drop your videos to apply the effect to your videos. You can even apply the rewind effect to your videos using Wondershare Filmora.
AI-Powered Features of Wondershare Filmora
With Filmora, there is no limit to productivity. In addition to the above-discussed capabilities, it has AI-powered features. These features put you at ease and do all the work. Let’s see how it can auto-edit your content through some of its AI features below:
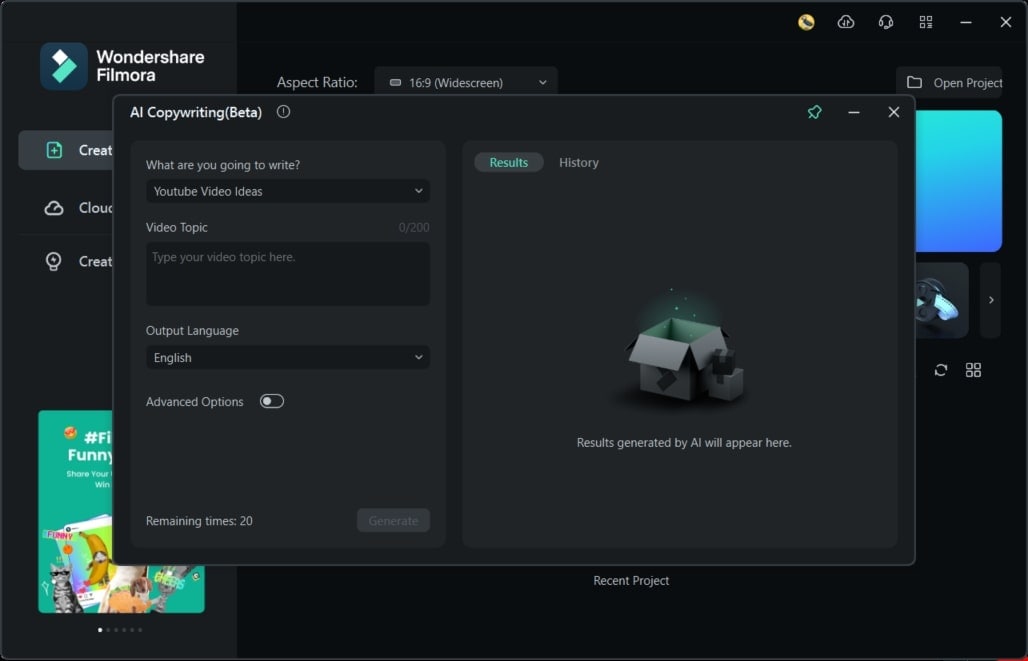
- AI-Copywriting: Have you ever doubted your ability to be a good writer or creator? We all face such situations, but with Filmora's copywriting tool, you do not need to stop. This is because the tool can auto-write video scripts or content from textual prompts.
- Remove Video Background: Do you want to add artistic and creative backgrounds to your videos? The green screen feature in Filmora lets you add artistic backgrounds to your videos to make them look cinematic and unique.
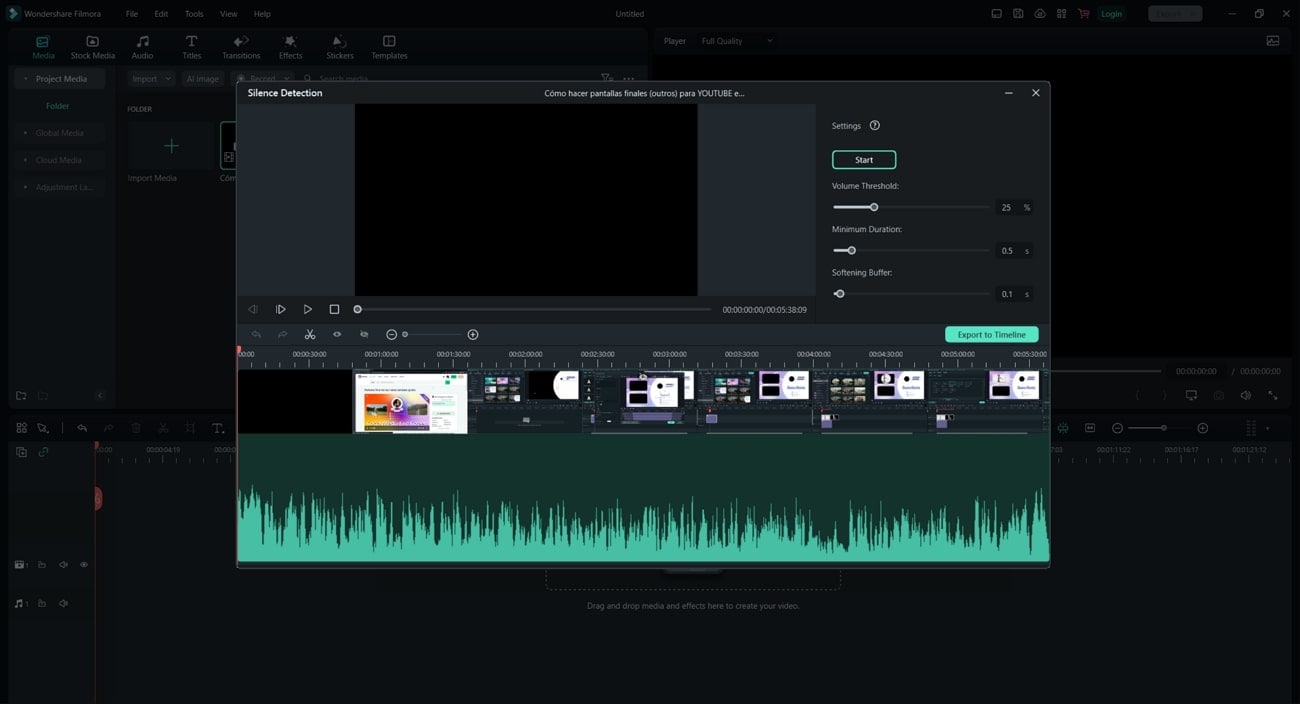
- Silence Detection: There is nothing that declines the quality of audio in a clip than silent pauses. Audiences find it a waste of their time and just skip such content. However, Filmora's silence detector can analyze and remove these pauses independently.
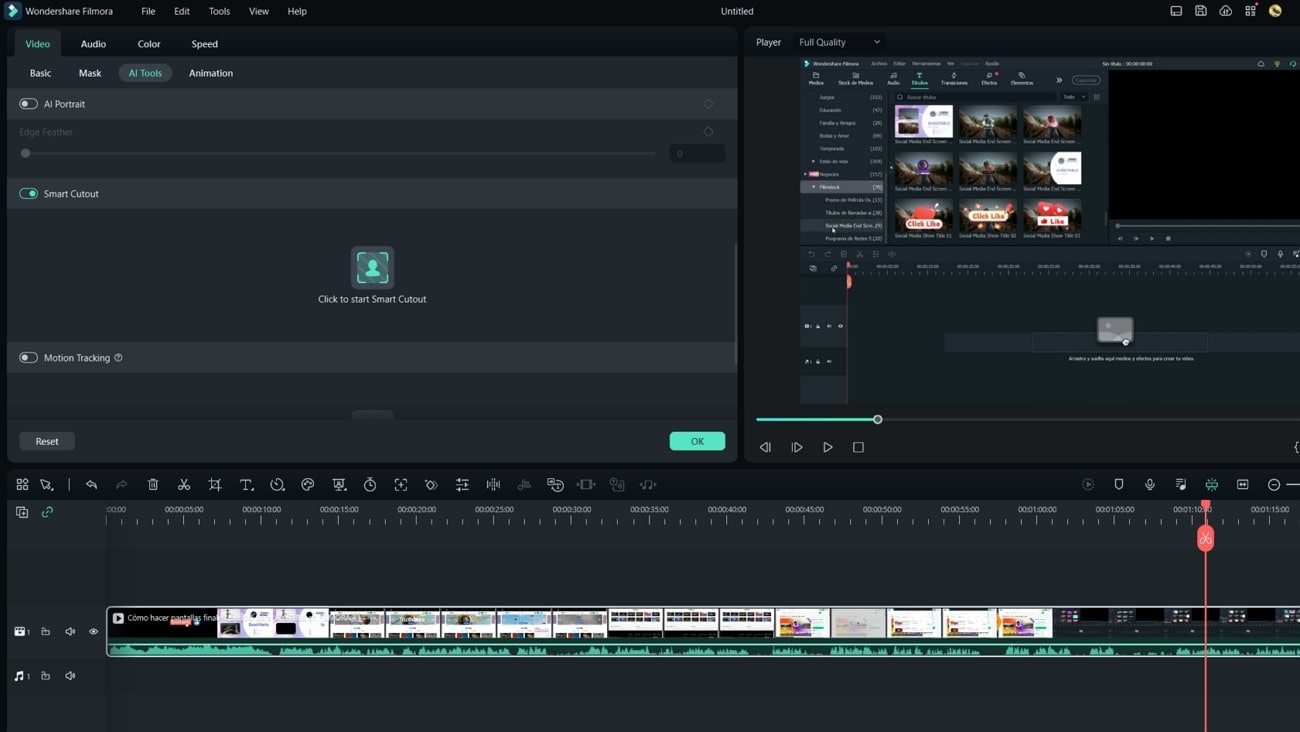
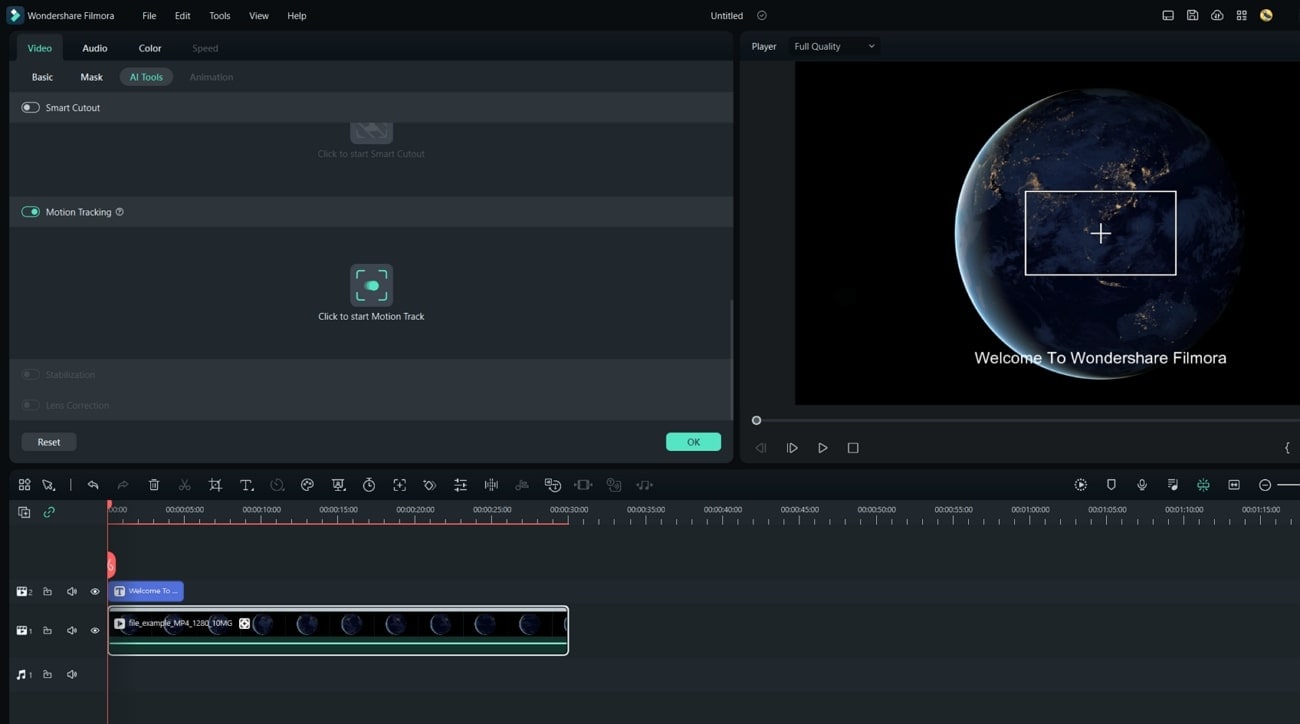
- Motion Tracking: Another amazing feature of this powerful editor is motion tracking. With this feature, your subject will never go out of focus or screen. This feature lets you link stickers and effects with a certain object in your video. After that, the applied effects follow the object’s movements.
Part 4: Simple Way: Generate a Glitch Rewind or Video Playback Effect Using Filmora
Now that you've learned the video playback effect, it's time to learn how to apply it. Filmora, yet again, is simplifying the process for you with its guided instructions. Following these instructions, you can apply the glitch rewind effect to your videos.
Step 1Import Your Files in Filmora's Timeline
After importing your video file in Wondershare Filmora, drag and drop your video file to the timeline. We can start our editing process once the video is in the timeline.
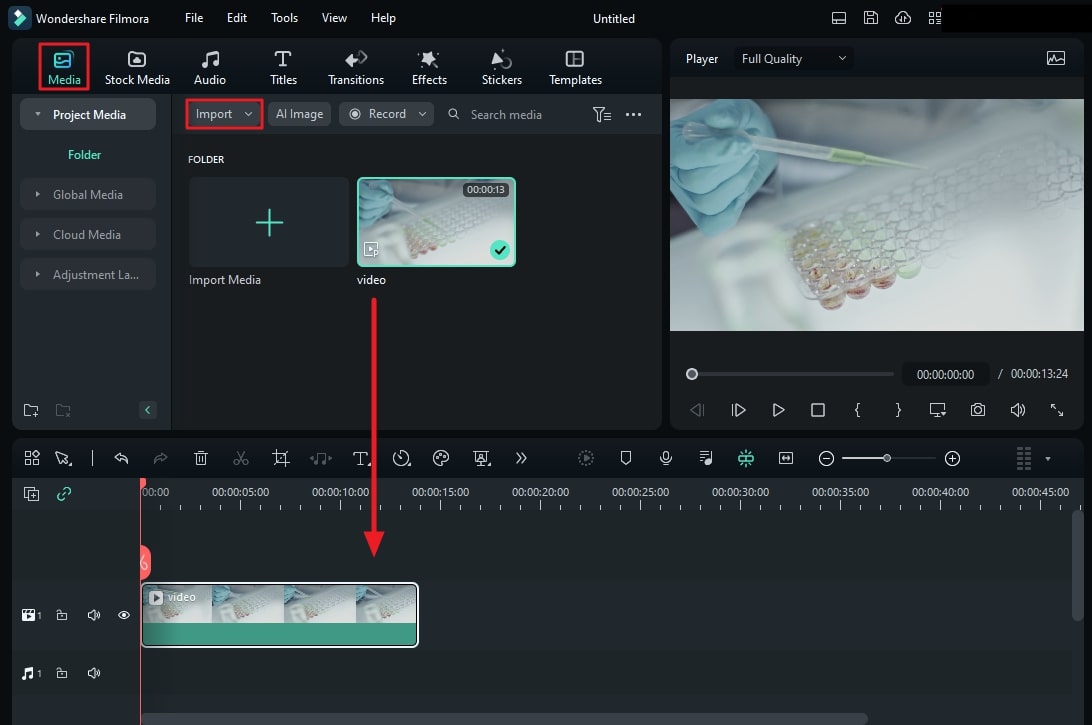
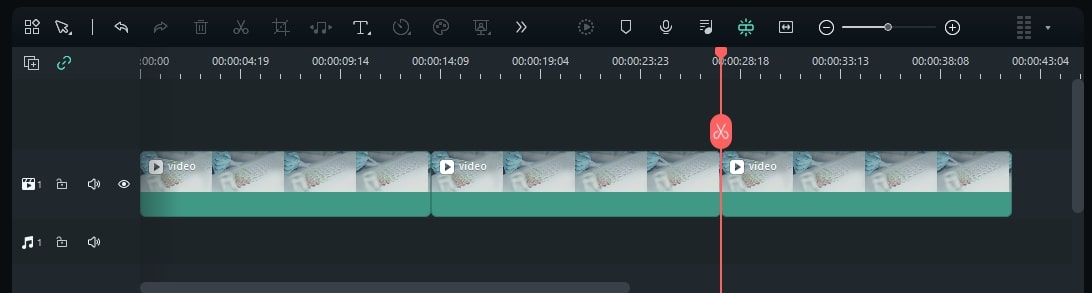
Step 2Make Duplicate Video Files
Click your video file and press "Ctrl + C" and then "Ctrl + V." Make sure the duplicated file is in the same track. Repeat this process 2 times.
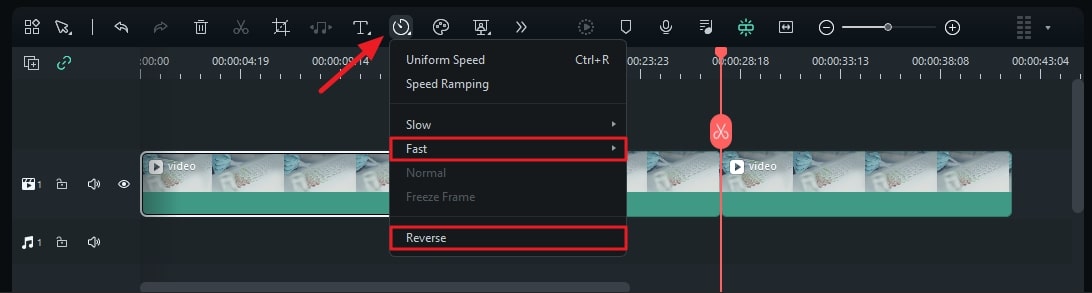
Step 3Adjust Speed and Apply Reverse
After copying and pasting 2 times, select the first duplicated file and press the "Speed" button in the timeline. Increase the speed by selecting "Fast" and then the desired speed. Repeat the process, but click on "Reverse" instead of "Speed."
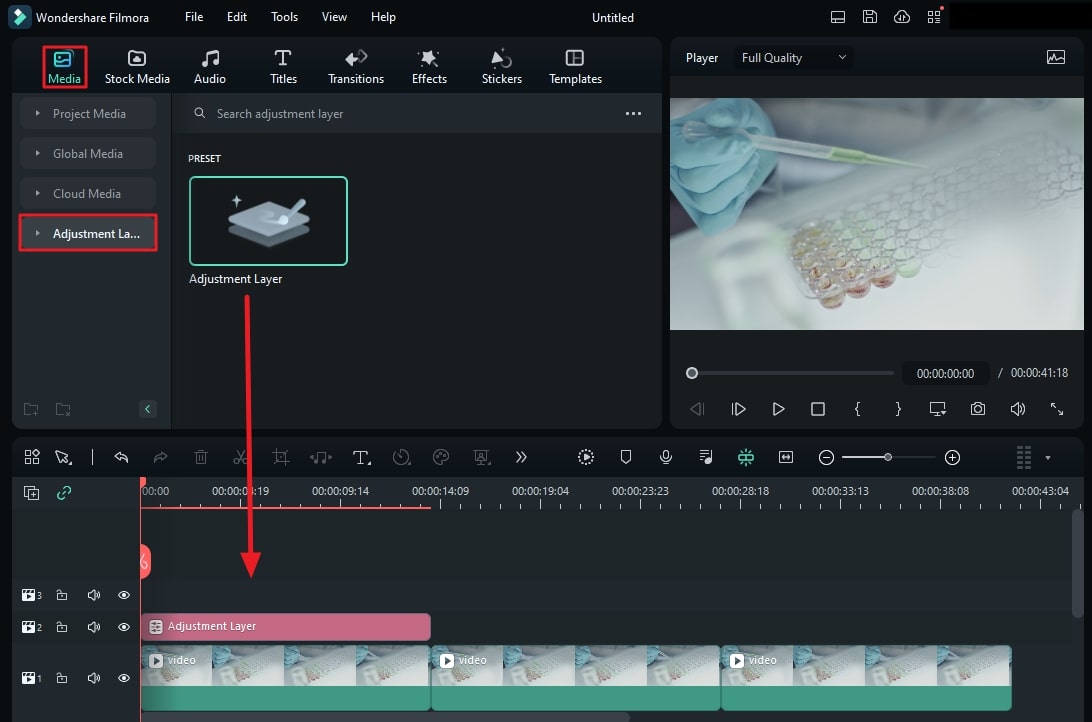
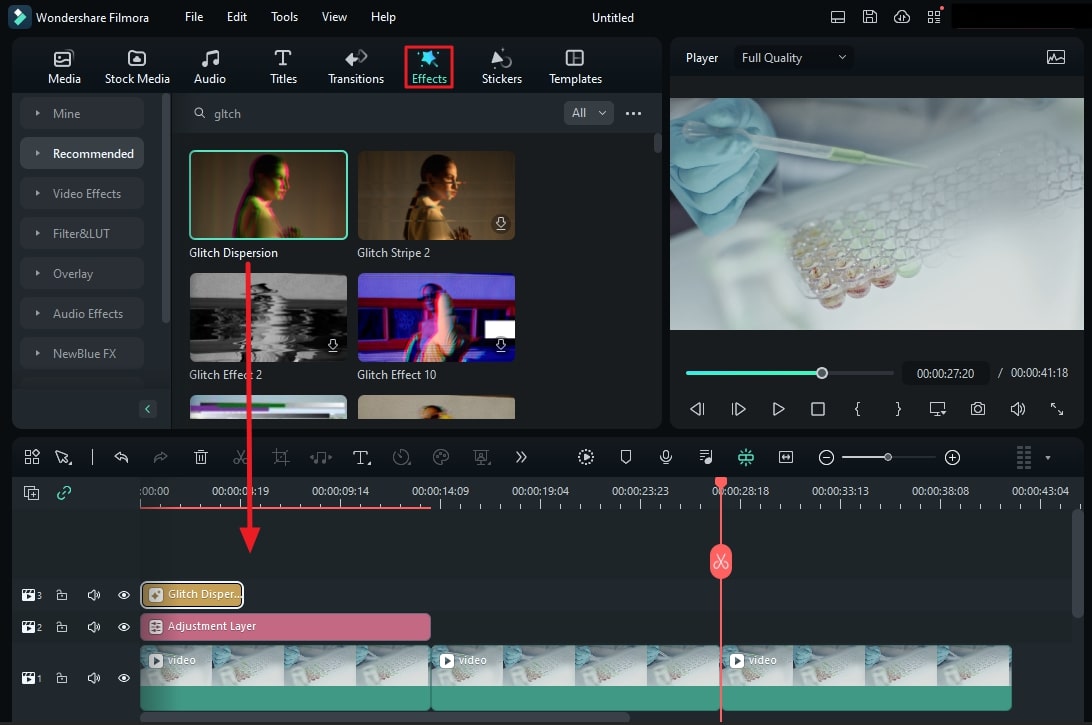
Step 4Add Adjustment Layer and Glitch Effect
Navigate to the "Media" tab and go to "Adjustment Layer." Drag and drop the adjustment layer on top of your reversed clip. Adjust the length of your adjustment layer to match the length of the reversed clip.
Proceed to "Effects," search "Glitch," then choose the desired glitch effect. Once selected, drag and drop the effect onto your adjustment layer in the timeline.
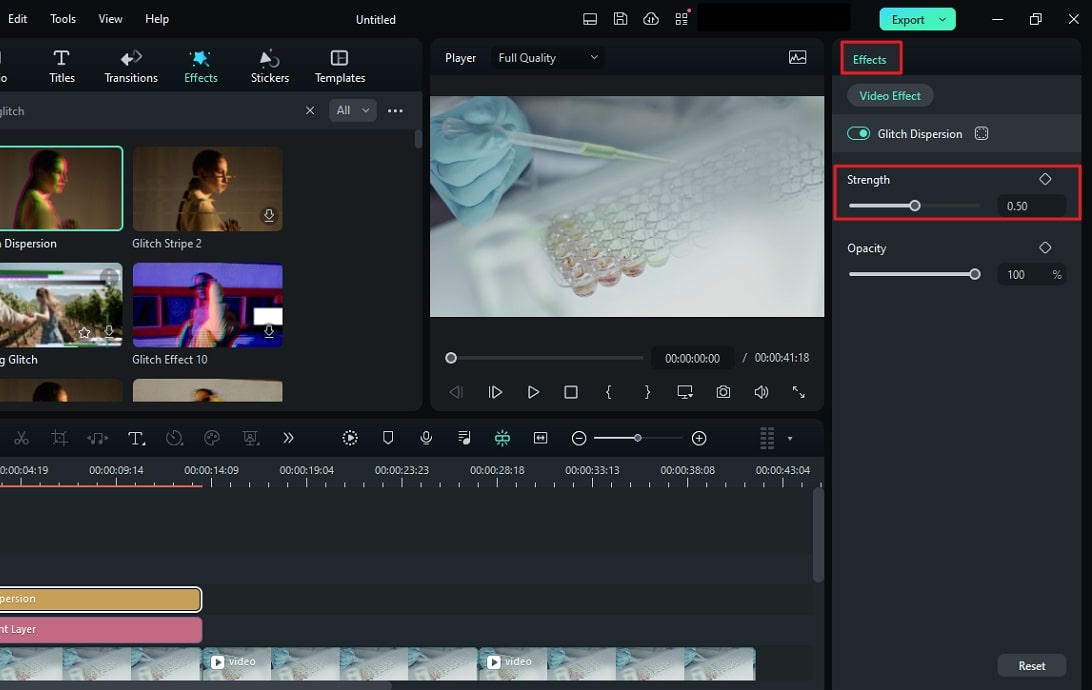
Step 5Make Final Adjustment to the Effect
Once the effect is applied, double-click the adjustment layer, and in the right panel, go to "Effects." In this tab, change the "Strength" of the effect to your liking. Your bounce glitch reversed video is ready to be exported to your system.
Conclusion
In conclusion, videos serve as a means of entertainment and information. You can improve your videos through various effects, such as the playback effect. The idea of playing the video in reverse can leave a lasting impression on your viewers. Wondershare Filmora is a video editor offering various effects, including the rewind effect.
