In the past decade, social media has made slow-motion videos wildly popular. When Apple introduced the slow-motion effect in its camera, people went crazy about it. Due to the great demand, many developers introduced this effect in their applications. Slow-mo has been trendy for years, and its use is not ending soon.
This article will guide you about the iMovie slow motion effect and explain the app in detail. Users considering creating a video across their Mac should be aware of slow-mo in iMovie. If you are fascinated by finding more, read this article about slow-down video iMovie.
In this article
Slow your video’s speed with better control of your keyframes to create unique cinematic effects!

Part 1: An Introduction to Slow Motion Videos: A Comprehensive Review
Slow-mo videos are recorded at a frame rate higher than 24 frames per second (fps). After that, they are replayed at a slower pace. This method produces an effect that can bring out special moments. Slow-motion recordings are frequently employed in sports, action, and wildlife cinematography.
What makes it so popular is how it captures fast-moving scenes in better detail. Access to the slow-motion effect was not so common, but with apps like iMovie slow-mo, the effect is accessible to everyone. You can use online video editors or desktop editing software to make slow-motion videos.
Part 2: How to Set Slow Motion Settings in iMovie Video Making?
iMovie is a wonderful choice if you want to make slow-motion videos. Also, it allows users to change the speed of video clips per their needs. With slo-mo in iMovie, you can even fine-tune the speed of a single clip by splitting it into intervals, each with a different speed. You can set multiple ranges to cause a clip to speed up and down.
You can freeze a single frame in your film to create the illusion that time has stopped. The app is a fantastic option for Apple users who want to quickly add slow-motion effects to their videos. iMovie is a pretty straightforward tool that gives quick results. Follow the step-by-step guide below to slow down video in iMovie.
Step 1
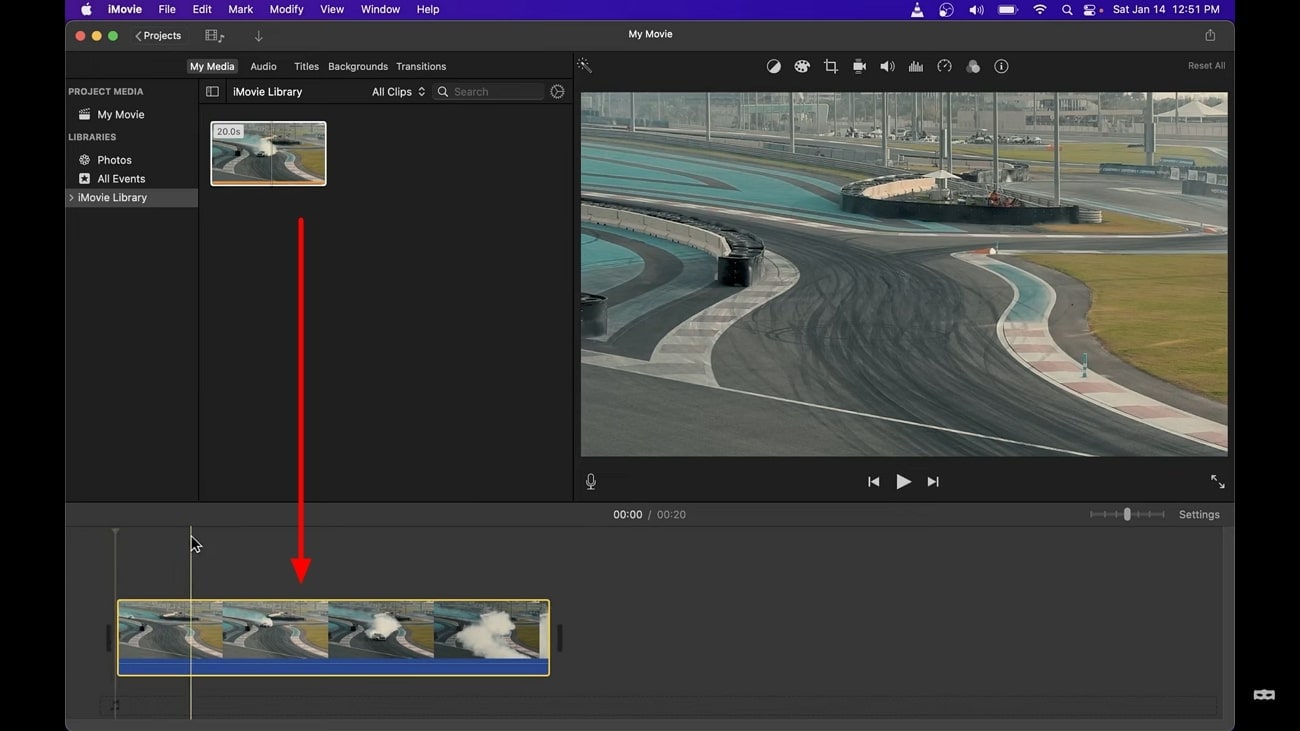
Launch iMovie in your system and click “New Project.” Go to the “Movies” option to import the video you want to edit. Drag the media in the project timeline to make changes to it.

Step 2
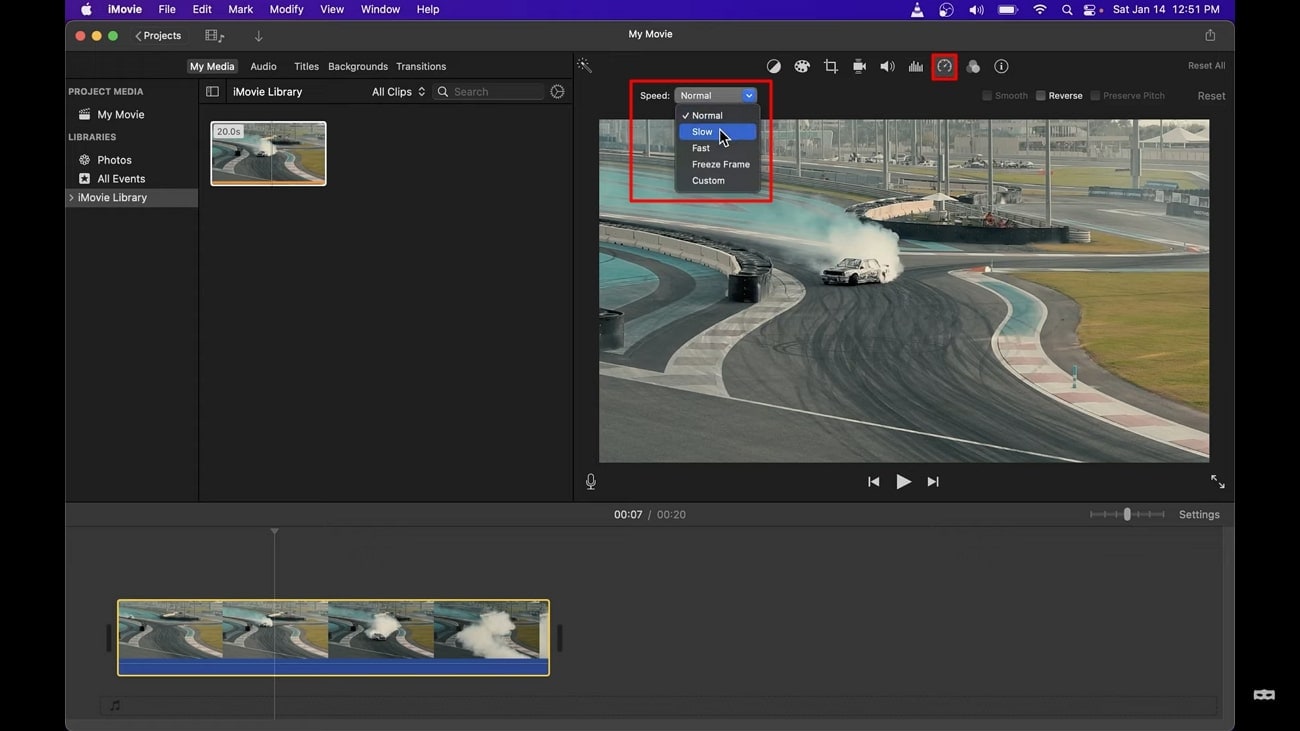
Select the video from the timeline and click the speed icon that looks like a clock. From “Speed,” select the “Slow” option and choose the percentage of slow-motion effect you want to apply in your video. To set a customized slow-mo percentage, click “Speed” again and choose “Custom.” After that, manually add the percentage of how slow you want your video to be.

Part 3: A Great Alternative to Making Slow Motion Videos: Wondershare Filmora
iMovie slow motion is undoubtedly a simple solution for creating slow-mo videos. But sometimes, you need a tool with more advanced features than iMovie. If you want to access professional features with a simple interface, Wondershare Filmora is the right platform. The tool not only provides a precise slow-motion effect, but it has many other features that will leave you amazed.
You can control your video and edit it any way you like. Wondershare Filmora gives you the freedom to be creative. For both beginners and professionals, it is an excellent choice. This software is worth checking if you want to create a cinematic masterpiece.
Step-By-Step Guide to Make Slow Motion Videos with Optical Flow
Unlike the slow-mo in iMovie, the Filmora’s effect is much more advanced and provides professional results. Look at the easy steps below and slow down your video quickly.
Step 1Ensure the Latest Version of Filmora and Import Media
Firstly, ensure that you are using the latest version of Filmora. After launching it in your system, access its editing screen through the “New Project” option in its main interface. Drag and drop your video into the timeline section after importing it. You can simply import by pressing the “Ctrl + I” keys from your keyboard.

Step 2Apply Slow-Motion and Use Optical Flow
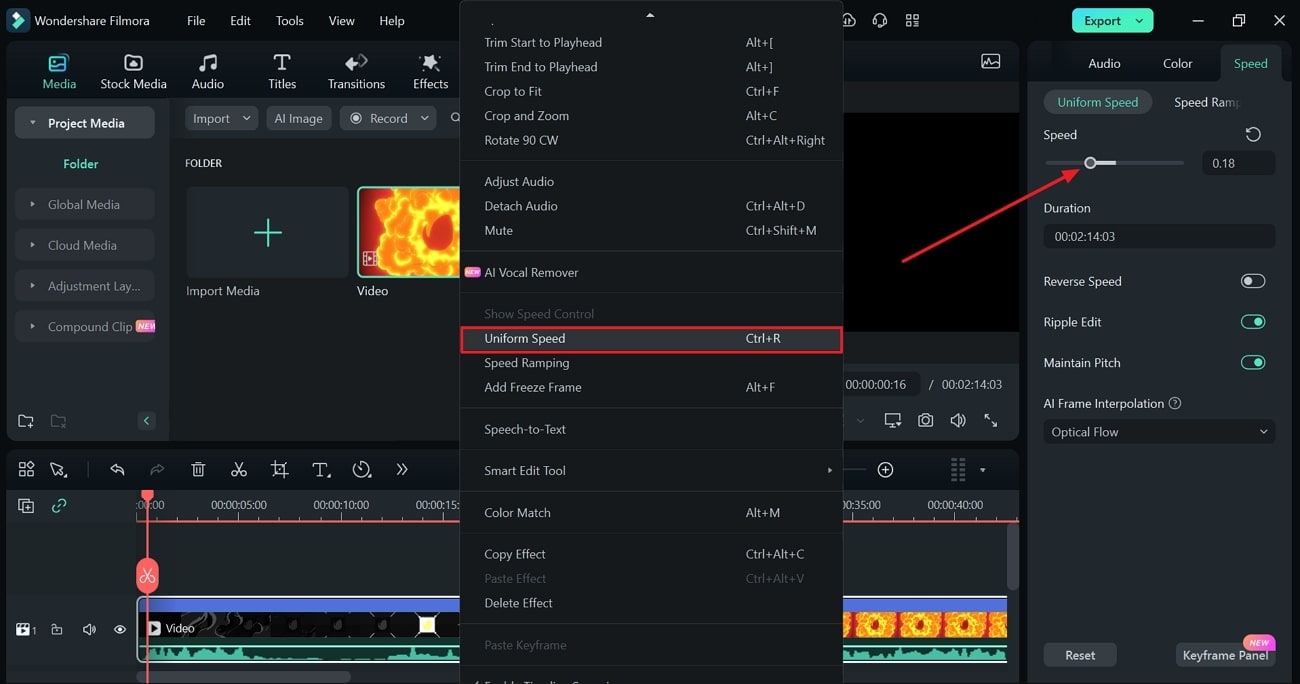
After bringing media into the timeline, right-click on it. From the displayed list, look for the “Uniform Speed” option. Tap on it and get directed toward the right-side editing screen. There, you have to use the "Speed" slider and move to the left for slow videos or to the right for fast-speed videos.

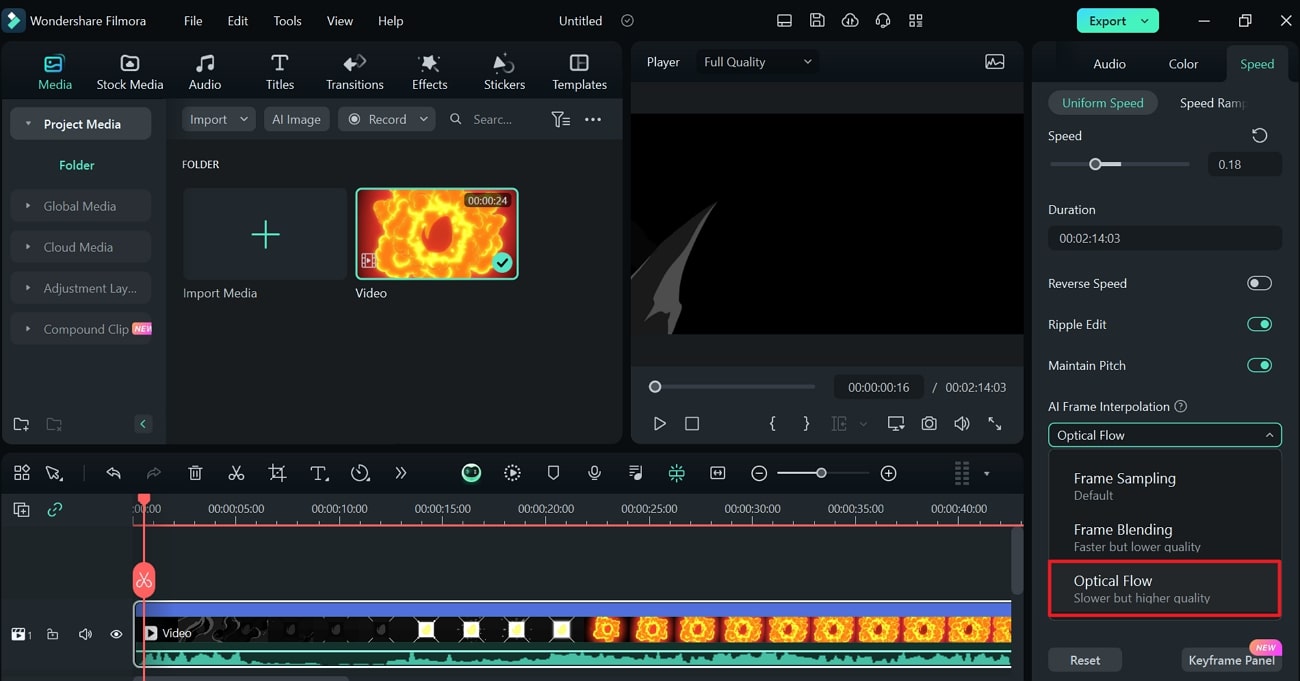
When you are done adjusting speed, head down to the “AI Frame Interpolation” option. Extend its menu and choose “Optical Flow” to reduce the speed of your video while maintaining its quality.

Step 3Analyze and Save the Video by Customizing Export Options
Check if the function has been applied by playing the video. Lastly, select the "Export" button located in the screen's upper right corner. From the “Export” window, adjust video parameters to save the video your desired way.

Key Features of Wondershare Filmora
Wondershare Filmora's impressive tools never cease to impress. Let's discuss a few of its remarkable features in video editing:
1. Instant Mode
This feature is perfect for creating quick social media videos. You can find a variety of templates and choose the one that best suits your video's concept. There are more than 115 templates from business, travel, and Vlog categories. Instant mode will help you to rearrange video clips with AI algorithms that cut your 3 hours of editing time.
2. AI Smart Cutout
Removing an object from a video can be challenging while maintaining a natural appearance. Not more with Filmora’s AI smart cutout that can automatically remove unwanted items. It can detect and refine the cutout frame by frame to maintain perfection and high quality. Besides, you get different preview modes to modify certain areas.
3. Auto Beat Sync
Music and film with wonderful rhythm add an entertaining aspect to the content. Utilizing the auto-beat sync feature in Filmora is the way to do it. With this tool, your music and video will automatically match the clips. Furthermore, it can inevitably identify dark sides in your footage to delete them.
4. AI Copywriting
It's challenging to develop exciting scripts or captions for your films. In situations like this, an AI copywriting tool is invaluable. ChatGPT integration in Filmora lets you get YouTube titles and descriptions that match your needs. To generate one, you must describe the content you want using natural language.
Conclusion
In short, the slow-motion effect is one of the most popular video effects used in movies. Thus, a good video editor is necessary whether you edit videos for entertainment or business purposes. Your video will not look good and will negatively impact the viewers if it is not edited well. Here, you have learned how to slow down video iMovie. If you want an advanced tool, try the alternative Wondershare Filmora.


