When working on complex video projects in Final Cut Pro, keeping your timeline organized can be a real challenge. That's where compound clips in Final Cut Pro come in. They can help you bundle multiple clips, audio tracks, and effects into a single, manageable unit.
Not only do compound clips make your workflow smoother, but they also help you stay organized, especially when your project starts to get a bit chaotic. In this article, we'll dive into everything you need to know about compound clips in Final Cut Pro and how this feature can make your work easier.
In this article
Part 1. Get to Know Compound Clip in Final Cut Pro
Final Cut Pro is an all-in-one video editing software designed for Apple operating systems that gives you all the tools to create professional-looking projects. But, as you work on more complex edits, you can use compound clips before your timeline can get pretty messy.
Compound clips in Final Cut Pro work like a folder, allowing you to group multiple clips, audio tracks, and effects into one neat package. Instead of managing a multitude of separate elements, you can work with a single, organized clip. This flexibility makes editing way more manageable.

Compound clips also save you tons of time. Instead of applying an effect to every single clip, you just apply it to the compound clip. One and done. And if you ever need to make changes, you don't have to hunt through the timeline—just go to the compound clip, adjust it, and you're good to go.
Part 2. How to Create Compound Clip in Final Cut Pro
Now that you know what compound clips are and why they're so handy, let's get into the fun part—creating them! Creating compound clips in Final Cut Pro X is a straightforward process, and once you get the hang of it, it'll make your editing life a lot easier. Let's walk through it step by step.
1. Creating a Compound Clip from Existing Clips
When working with multiple clips in your timeline or browser, organizing them into a single compound clip can simplify your editing process. This method is particularly useful for managing complex sequences, as it allows you to group existing clips into one cohesive unit. Follow the steps below on how to create a new compound clip in Final Cut Pro.
Step 1: Choose the clips you'd like to combine. You can do this either in the timeline or the browser by dragging your cursor over the clips or holding 'Cmd' and clicking on them one by one. The clips can be from any combination, like primary storyline clips, connected clips, or even compound clips.

Step 2: Next, you can go to the menu bar and select File > New > Compound Clip or press 'Option-G'. Alternatively, you can control-click your selection and choose New Compound Clip.
Step 3: Name your new compound clip and click OK.


Grouping Behavior:
- If you select clips in the browser: Final Cut Pro creates a new compound clip in the event and organizes the selected clips horizontally within it.
- If you select clips in the timeline: Final Cut Pro maintains the layout and properties (like frame size and frame rate) of the selected clips when grouping them into the new compound clip.
2. Create Independent Compound Clips from Existing Compound Clips
Want to break the connection between a compound clip in the Final Cut Pro timeline and its parent in the browser? Here's how.
Step 1: Select one or more compound clips in the timeline.
Step 2: Choose Clip > Reference New Parent Clip from the menu. Final Cut Pro will create a new parent compound clip for each clip you selected in the timeline, breaking the link between the original parent compound clip and its child clips.

3. Create an Empty Compound Clip
Another way to create a new compound clip on Final Cut Pro is to start with an empty compound clip. This method gives you a clean slate to work with. You can add clips, audio tracks, and effects to it as you go.
Each compound clip is like a mini-project with its own settings, such as resolution and frame rate. It's especially helpful if you want to experiment with different sequences or reuse the same group of clips in different parts of your project.
Step 1: In the Libraries sidebar, select the event where you want to add the compound clip.
Step 2: Choose File > New Compound Clip from the menu.

Step 3: A window will pop up where you can name your compound clip. Enter a name, and if you want to customize its settings (like timecode, video, audio, etc.), click Use Custom Settings and adjust as needed.
Step 4: Once you're done, click OK. Your new empty compound clip will appear in the event, ready to be filled with media.
4. Break Apart Clip Items
Need to go back to your original clips after grouping them? No problem. You can break apart a compound clip to separate it back into its individual elements. Here's how to do it.
Step 1: Select the compound clip (or any standard clip) in the timeline.
Step 2: Choose Clip > Break Apart Clip Items from the menu, or press 'Shift-Command-G'. Final Cut Pro will split the compound clip back into its individual components. The original clips will reappear in the timeline, but the parent compound clip will remain intact in the browser.

Part 3. Create Compound Clip Easier with Filmora
While Final Cut Pro gives you the ability to create compound clips, it can sometimes feel a bit clunky, especially if you're new to editing or working with large, complex projects. If you are looking for an alternative, you can try Wondershare Filmora. This tool simplifies the entire process of creating compound clips, making it a more user-friendly alternative without sacrificing creative flexibility.

In Final Cut Pro, creating compound clips often requires multiple steps and careful attention to the relationship between your parent and child clips. You have to manage this dynamic, which can get a little confusing if you're trying to make quick adjustments or if your project is loaded with clips. It's a great feature, but for some editors—especially beginners or those looking for a faster workflow—it can feel like too much.
Filmora, on the other hand, is designed to keep things simple while still offering powerful editing options. With Filmora, you can easily combine multiple clips into a compound clip, edit them as one unit, and reuse them across different projects. It's beginner-friendly, quicker to master, and still offers the flexibility you need to produce professional-quality videos.
How to Create Compound Clips in Filmora
There are a few methods to create compound clips on Filmora, each offering a different approach to suit your workflow. You can create compound clips using options in the top toolbar or through the timeline control menu.
Method 1: Using the Top Toolbar
Step 1: Create a New Project
After downloading and logging into Filmora, head to the left panel and click "Create Project." This will open a new editing window.

Step 2: Import Clips and Place in the Timeline Panel
You can click Import or press 'Cmd+I' (for Mac) or 'Ctrl+I' (for Windows) to import your clips. Drag and drop the clips into the timeline to start working with them.
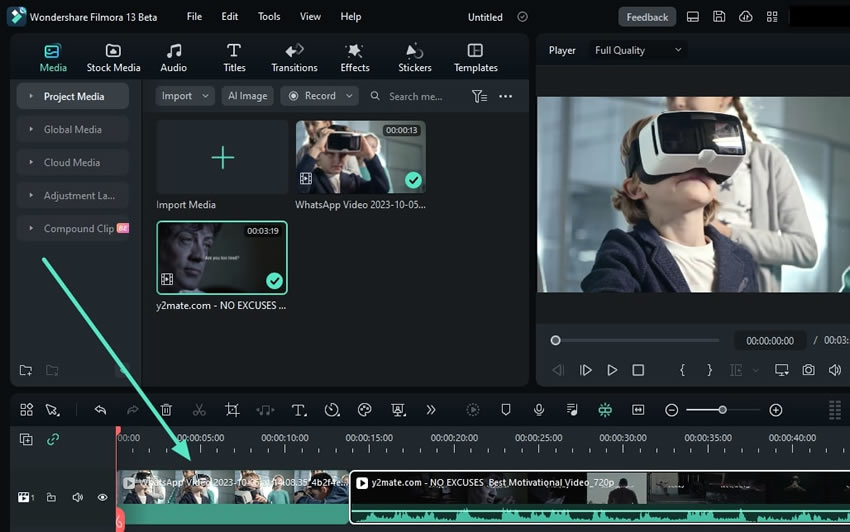
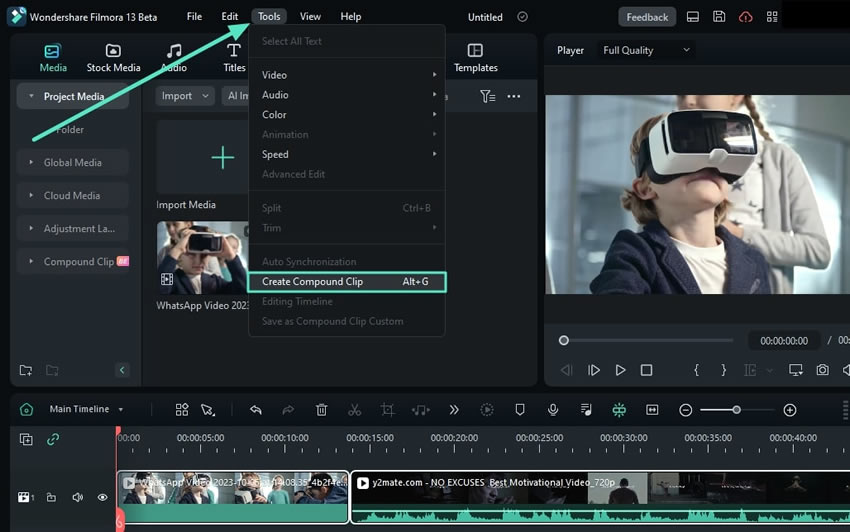
Step 3: Create a Compound Clip
Once your clips are in the timeline, select them, then navigate to the top toolbar. Click Tools > Create Compound Clip from the dropdown menu. Name your compound clip, then hit OK to bundle them into one neat clip.
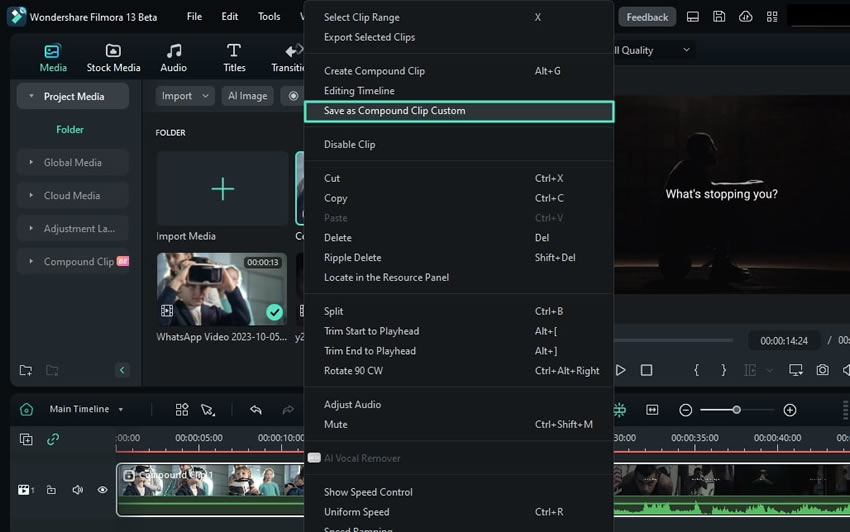
Step 4: Save the Compound Clip
To save the newly created compound clip, right-click on it in the timeline. Choose Save as Compound Clip Custom from the menu, and Filmora will save it to cloud storage.
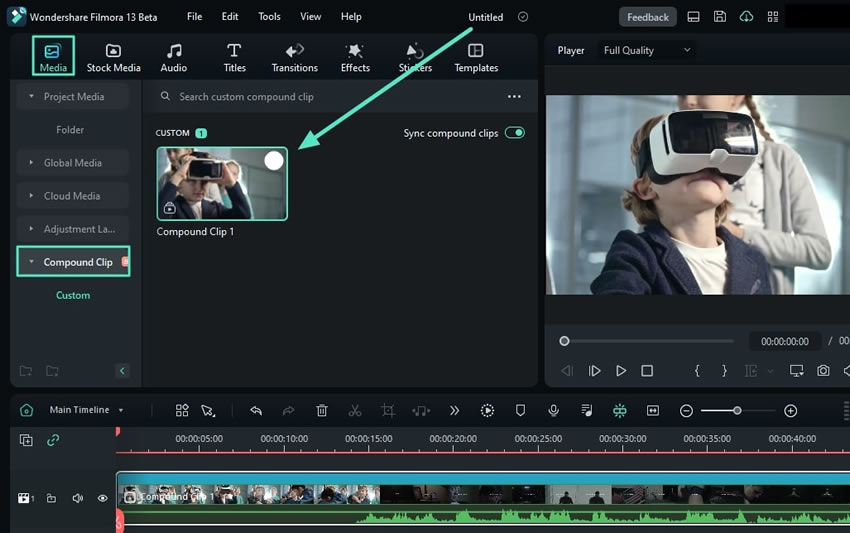
Step 5: Access Your Saved Compound Clip
To find your saved compound clip, navigate to the top left panel, and select Compound Clip. All your saved compound clips will be listed here.
Method 2: From the Timeline Control Menu
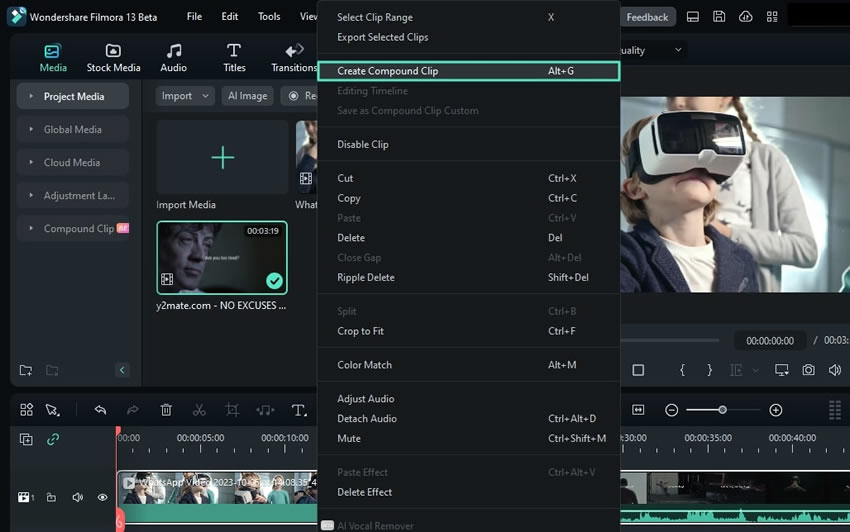
If you're more of a right-click person, you can use Compound Clips on Filmora from the timeline control menu.
Step 1: After dropping your media into the timeline, select the clips you want to combine.
Step 2: Right-click and select "Create Compound Clip" from the menu.
Step 3: Name your compound clip, click OK, and you're done!
Navigating Through Compound Clips in Filmora
Step 1: Navigate to Compound Clips in the Main Timeline
After creating a compound clip, you'll see it displayed in both the media tab and the timeline. Filmora automatically organizes your clips into layers for easy management.

Step 2: Open Up the Compound Clip in the Timeline
Click on your compound clip in the timeline to access the individual clips inside. Filmora will present them just as they were combined, making it easy to make any changes you need.

Conclusion
Both Final Cut Pro and Filmora offer great compound clip features, but Filmora simplifies the process, making it more accessible, especially for beginners. Final Cut Pro is powerful but can get a bit complex with its parent-child clip relationships.
Filmora, on the other hand, streamlines everything, allowing you to merge, edit, and manage multiple clips effortlessly. Filmora's compound clip feature provides flexibility and ease of use whether you want quick edits or more creative freedom.


 100% Security Verified | No Subscription Required | No Malware

