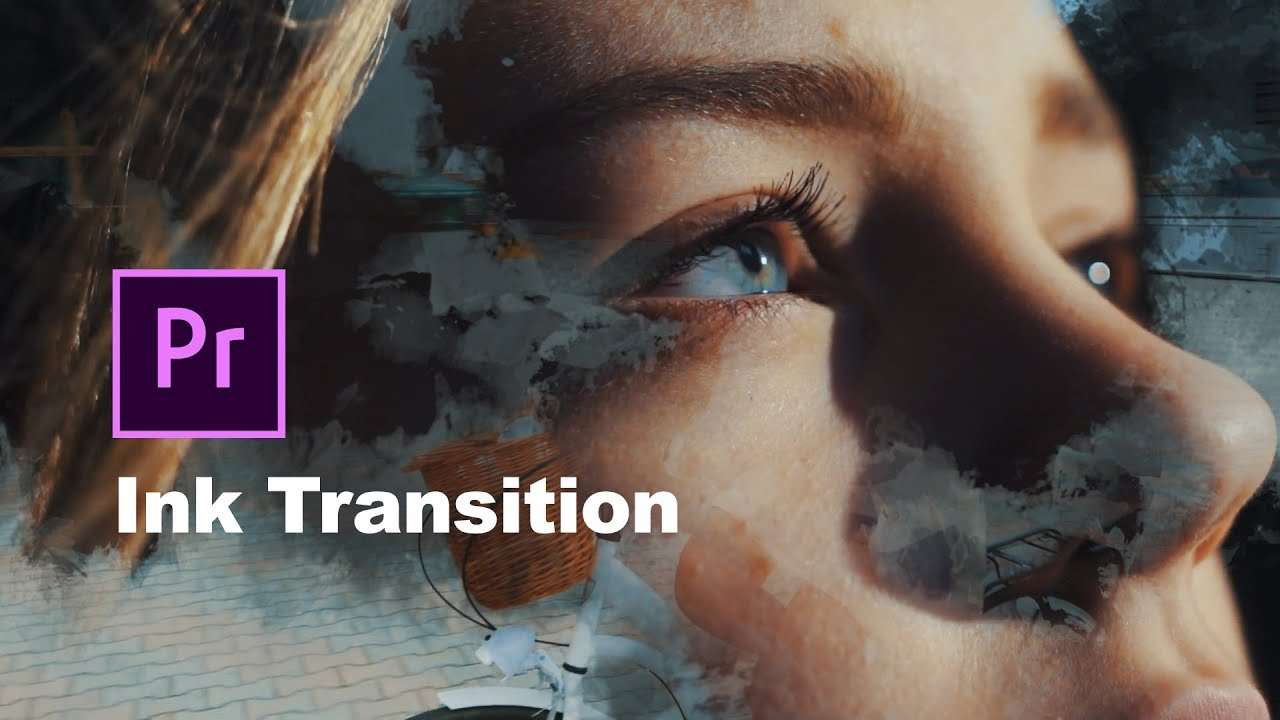
You can’t go wrong with Adobe Premiere Pro. It’s got everything you need: powerful color management, excellent audio editing capabilities, an exceptional video editor, and, perhaps most importantly, fantastic effects.
Its ink transitions, in particular, can make your footage more dynamic, exciting, and artistic.
Whether you use it to make your wedding footage more romantic, your documentaries more exciting, or your music videos more immersive, the ink drop effect in Premiere Pro is sure to impress your viewers. The key is learning how to master it.
Premiere Pro can be overwhelming for newcomers, but this guide should help you get started with its effects.
In this article
A Step-by-Step Guide to Add Ink Transitions in Premiere Pro
If you’re just getting started, using the ink transition in Premiere Pro might be more than what you had bargained for. It takes a while for new users to master this tool and all its effects. However, if you follow these steps to a T, you should have no trouble creating footage you’re proud of:
Step 1: Go to your favorite stock website, download an Ink Splash or Ink Drop asset you like, and add it to your project.
Step 2: Add the two videos you want to merge to the timeline in Premiere Pro.
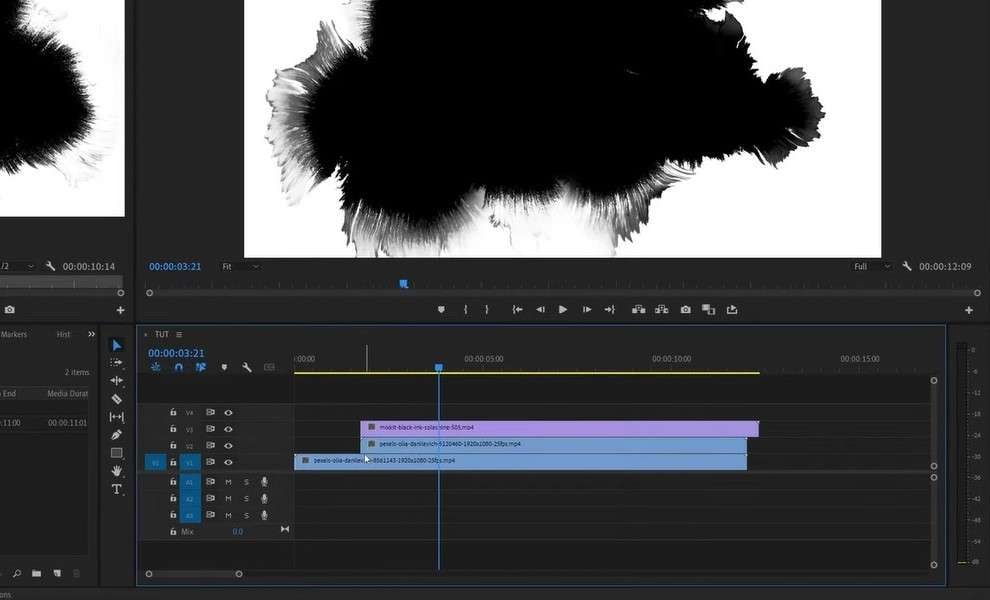
Step 3: Make sure that the videos are added to separate tracks, with one right above the other.
Step 4: Drag and drop the Ink Asset above the two tracks.
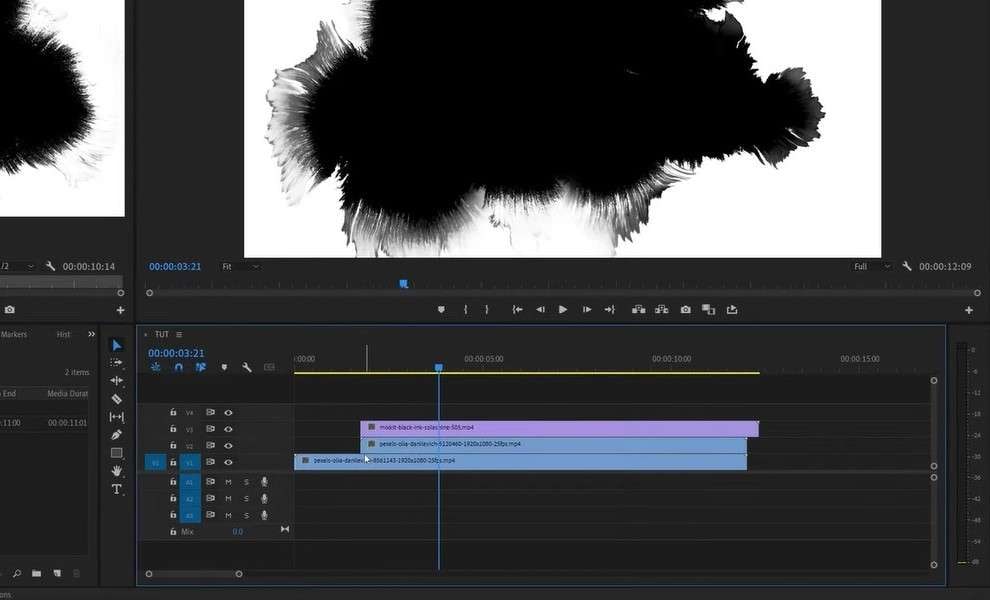
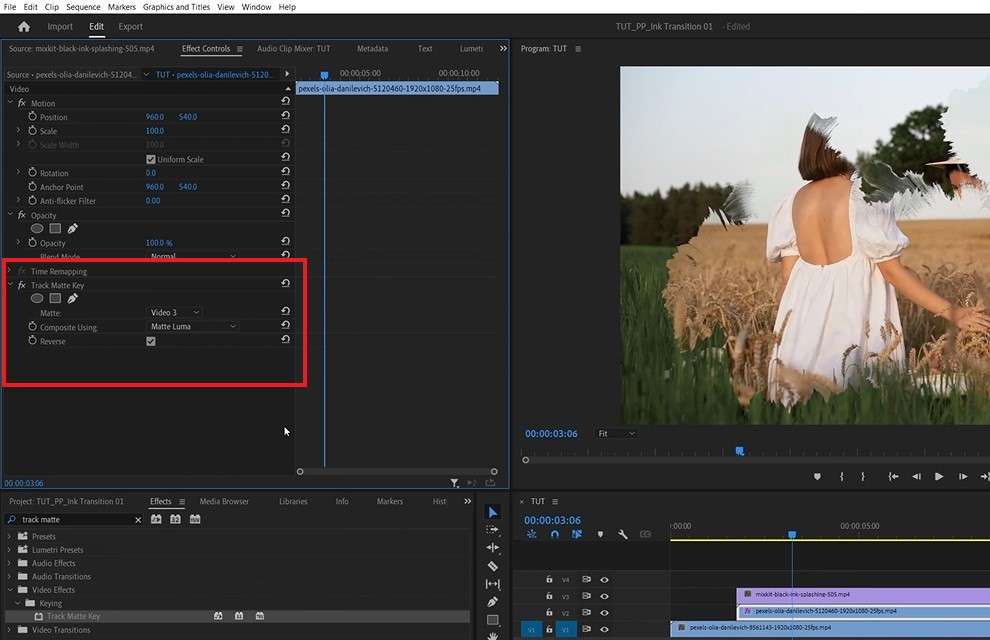
Step 5: Go to Effects > Track Matte Key and drop it over your second video.
Step 6: Open the Effects Control Panel and go to the Track Matte Key settings.
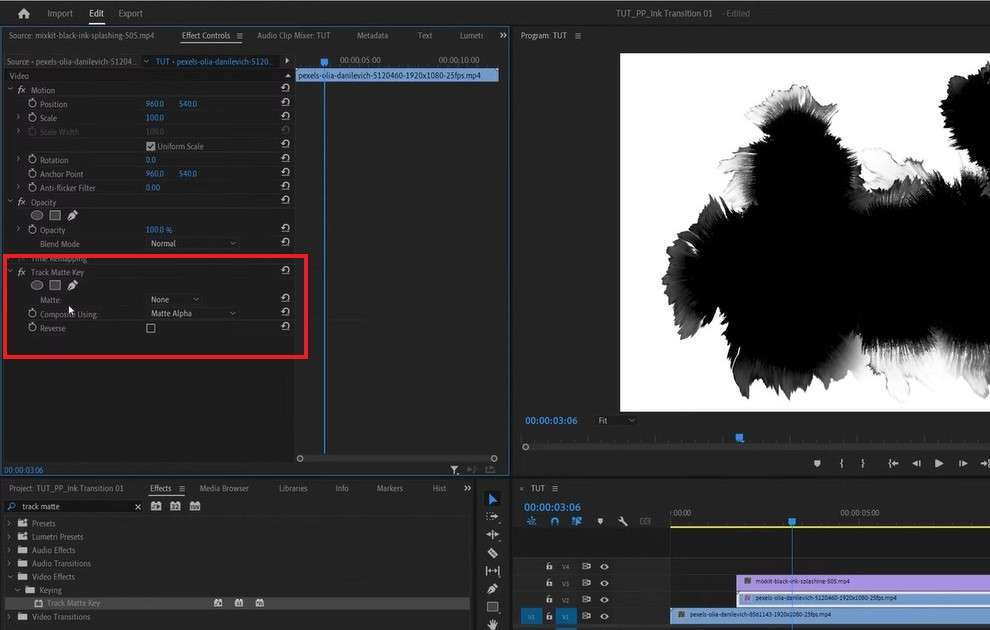
Step 7: In the Track Matte Key settings, set Matte to be the track where the ink asset is located.
Step 8: Under Composite Using, select Matte Luma and mark the checkbox by Reverse.
Step 9: To fully reveal the second video, duplicate it, and then drag it above the Ink Asset Track in the timeline.
Step 10: Select the duplicate video, go to the Effects Control Panel, select the Track Matte Key, and press Delete.
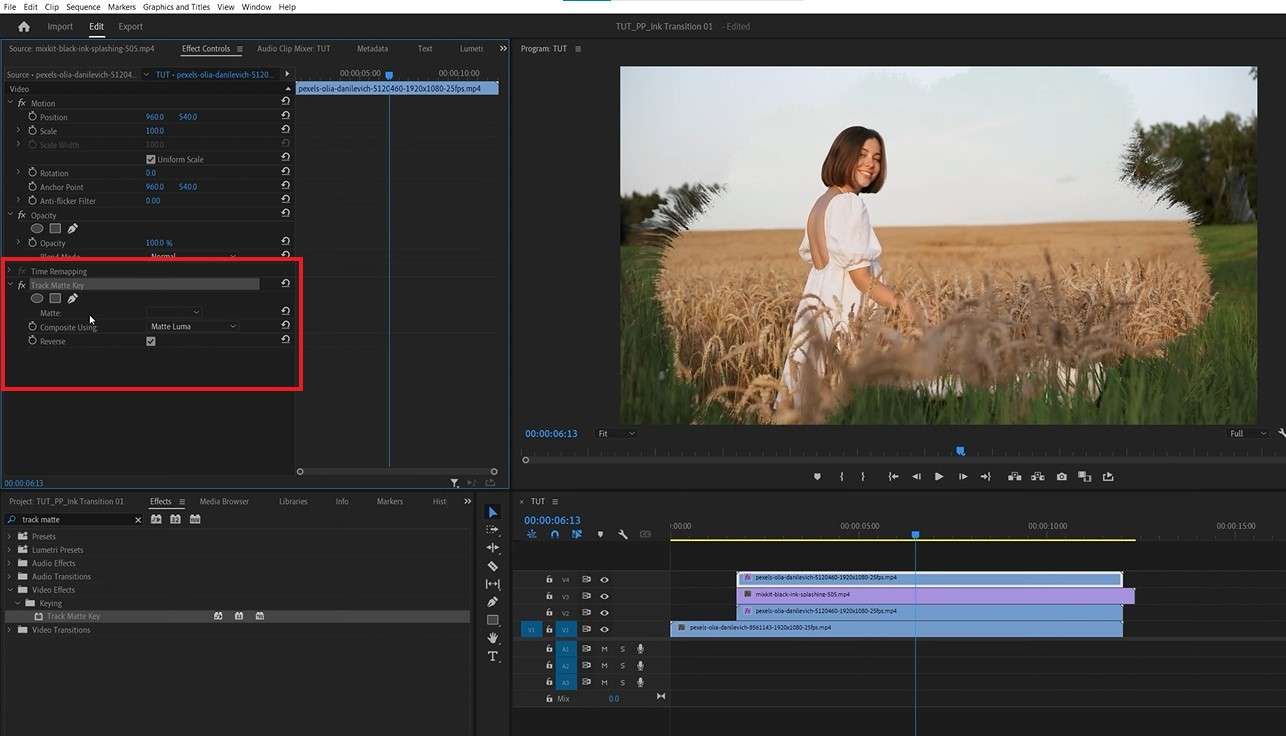
Step 11: In the timeline, find the moment where you want the full reveal of your second video to start and place the Playhead there.
Step 12: Go to the Effects Control Panel and expand the Opacity settings.
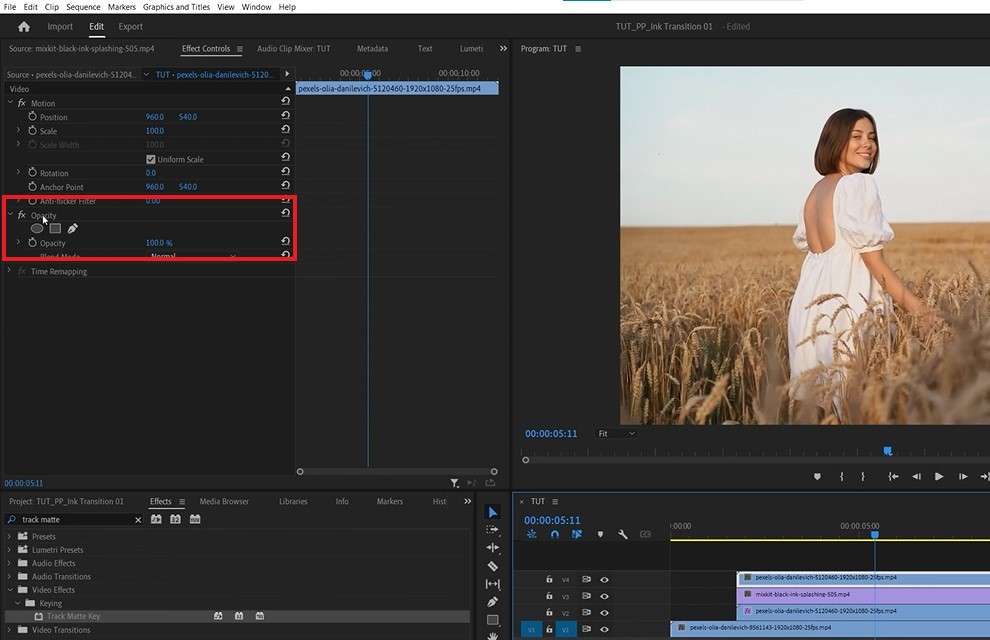
Step 13: Click the Stopwatch by Opacity and set the value to 0.
Step 14: Place the Playhead a few seconds forward in the timeline.
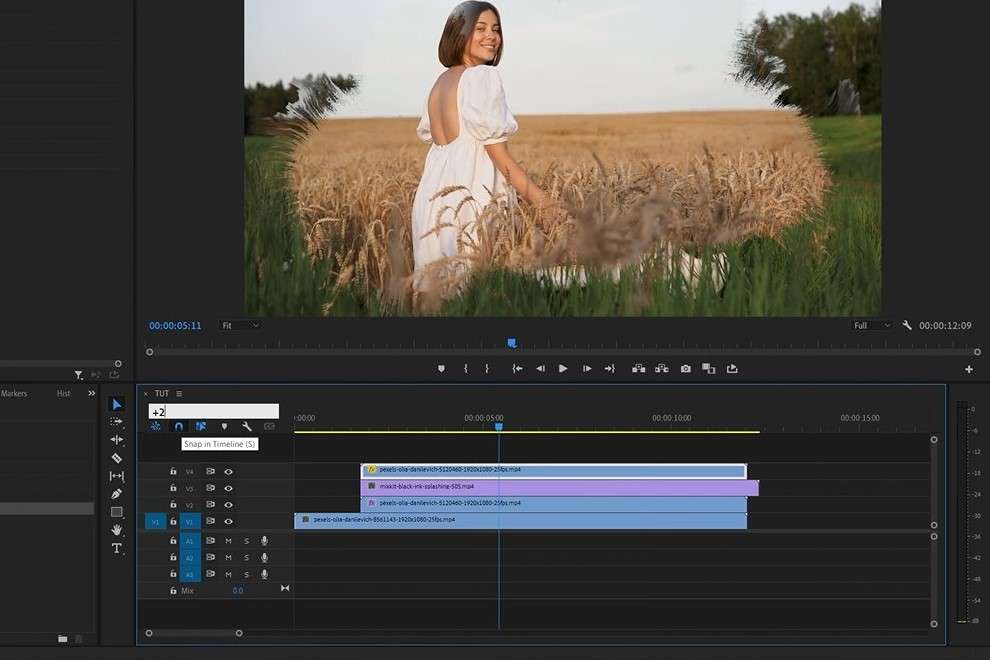
Step 15: Click the Stopwatch by Opacity and set the value to 100.
Step 16: If needed, select the Ink Asset track on the timeline to adjust its position, scale, and more.
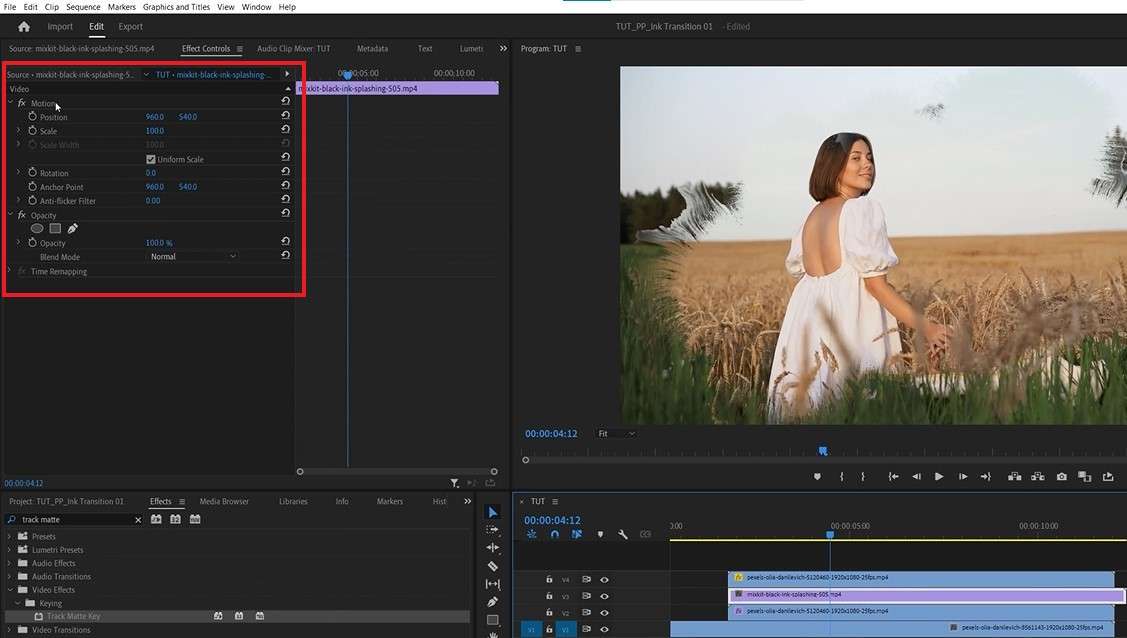
Save the project, and you’re good to go.
Though it’s a bit of a convoluted way to add a simple transition, it should get you the results you’re after.
If you’re still struggling and can’t seem to get an ink transition in Premiere Pro or don’t have time to repeat this process for every single video, then the next best thing you should do is use a reliable alternative.
Wondershare Filmora is one of the most user-friendly video editors out there. It has powerful capabilities that let you express your creativity, as well as an intuitive interface that makes it easy for you to do so. It has a desktop version you can use on your Mac or Windows device and a convenient mobile version compatible with Android and iPhone for editing on the go.
Add Ink Transitions with Filmora on Desktops
Filmora for desktops is a professional-grade video editor that’s just as suitable for beginners as it is for professionals. It has extensive editing capabilities, allowing you to let your imagination run wild and create visually striking content that can’t but turn heads.
With a complete suite of image and video editing features, powerful AI tools, and best-in-class effects, it’s the ideal solution for content of any kind, from amateur nature documentaries to professional films.
Its intuitive interface means that it has a virtually nonexistent learning curve, ensuring you can master it in a matter of minutes.
If you want to create a stress-free ink transition in Wondershare Filmora, there are just a few steps you’ll need to follow:
Step 1: Install Filmora for desktop on your device, launch it, and select New Project.
Step 2: Select Import Media, add the videos you want to work on, and drag them to the timeline.
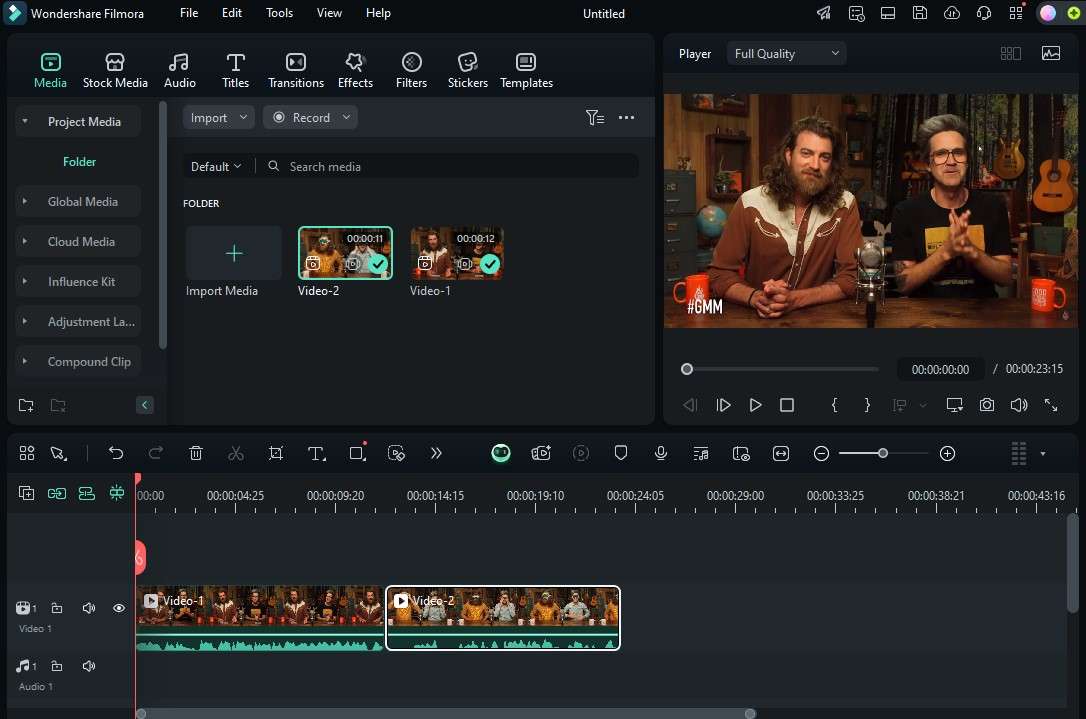
Step 3: Go to the Transitions tab and type Ink drop in the Search Bar.
Step 4: Find the ink drop transition you like, download it, and add it to the timeline.

Step 5: Select the Transition in the timeline to adjust its duration and transition mode (Prefix, Overlap, or Postfix).
Step 6: Alternatively, adjust the transition duration by hovering your mouse over it in the timeline and dragging its edges left/right.

Step 7: Make additional edits as needed.
Step 8: When you’re ready, select Export and save your video.
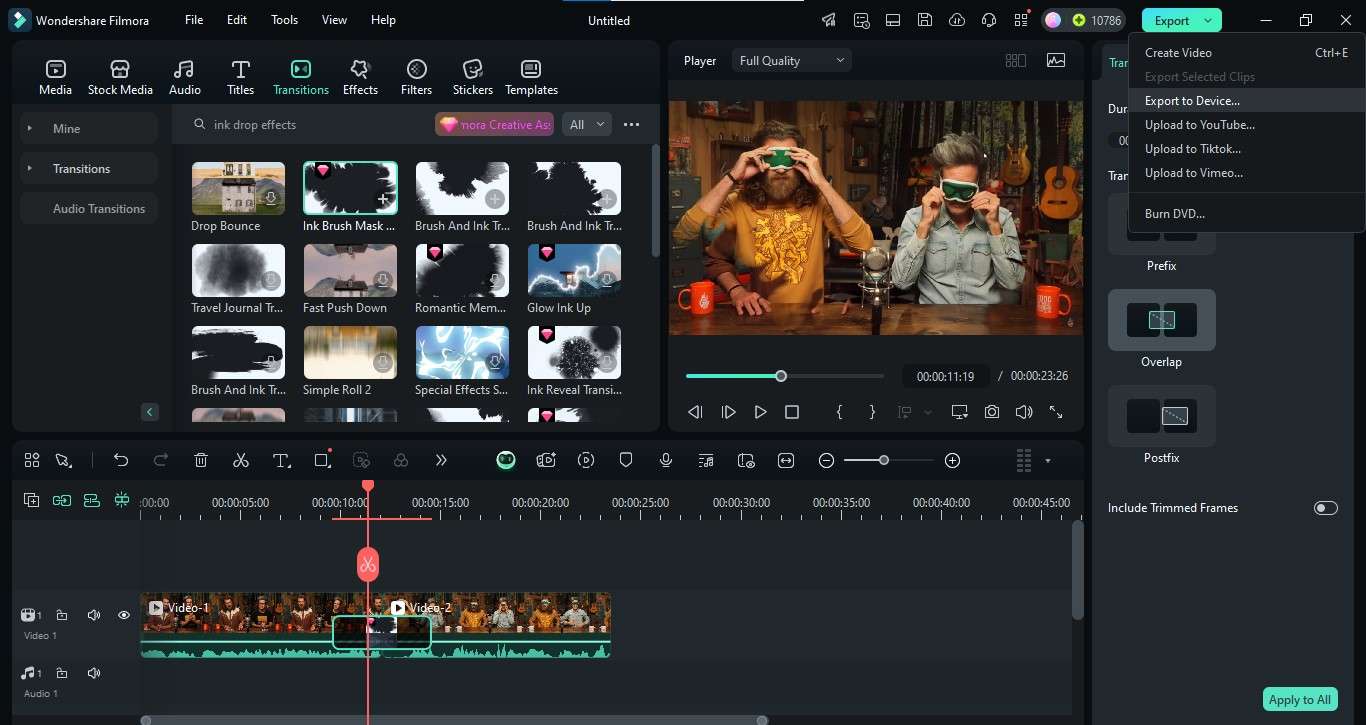
You can add as many videos and as many ink transitions (or other transition kinds) as you want. The process is simple and streamlined, enabling you to complete it in just a few seconds.
Add Transitions Between Videos with Filmora Mobile
Start with a short intro about the mobile version. Add steps to add transitions on mobile devices.
If you want to make ink transitions on the go, you’ll need Filmora Mobile. Though the app’s lighter on features than the desktop version to make it easier for your phone to handle, it does have everything you need – all essential editing features, great effects, and even greater transitions.
Like the desktop version, however, it remains user-friendly and convenient. Here’s how you can add ink transitions using the app on your phone:
Step 1: Go to the Google Play Store (for Android) or the Apple App Store (for iPhones) and install the Filmora app on your device.
Step 2: Select New Project, choose the videos to work on, and tap Import.

Step 3: Go to Effects and search for an Ink Drop/Ink Splash effect.
Step 4: Choose the effect you like and tap the Checkmark button to add it.

Step 5: If needed, tap the Effect track in the timeline and drag its edges to adjust its starting point and duration.
Step 6: Preview the results, and if satisfied, tap Export to save the video.
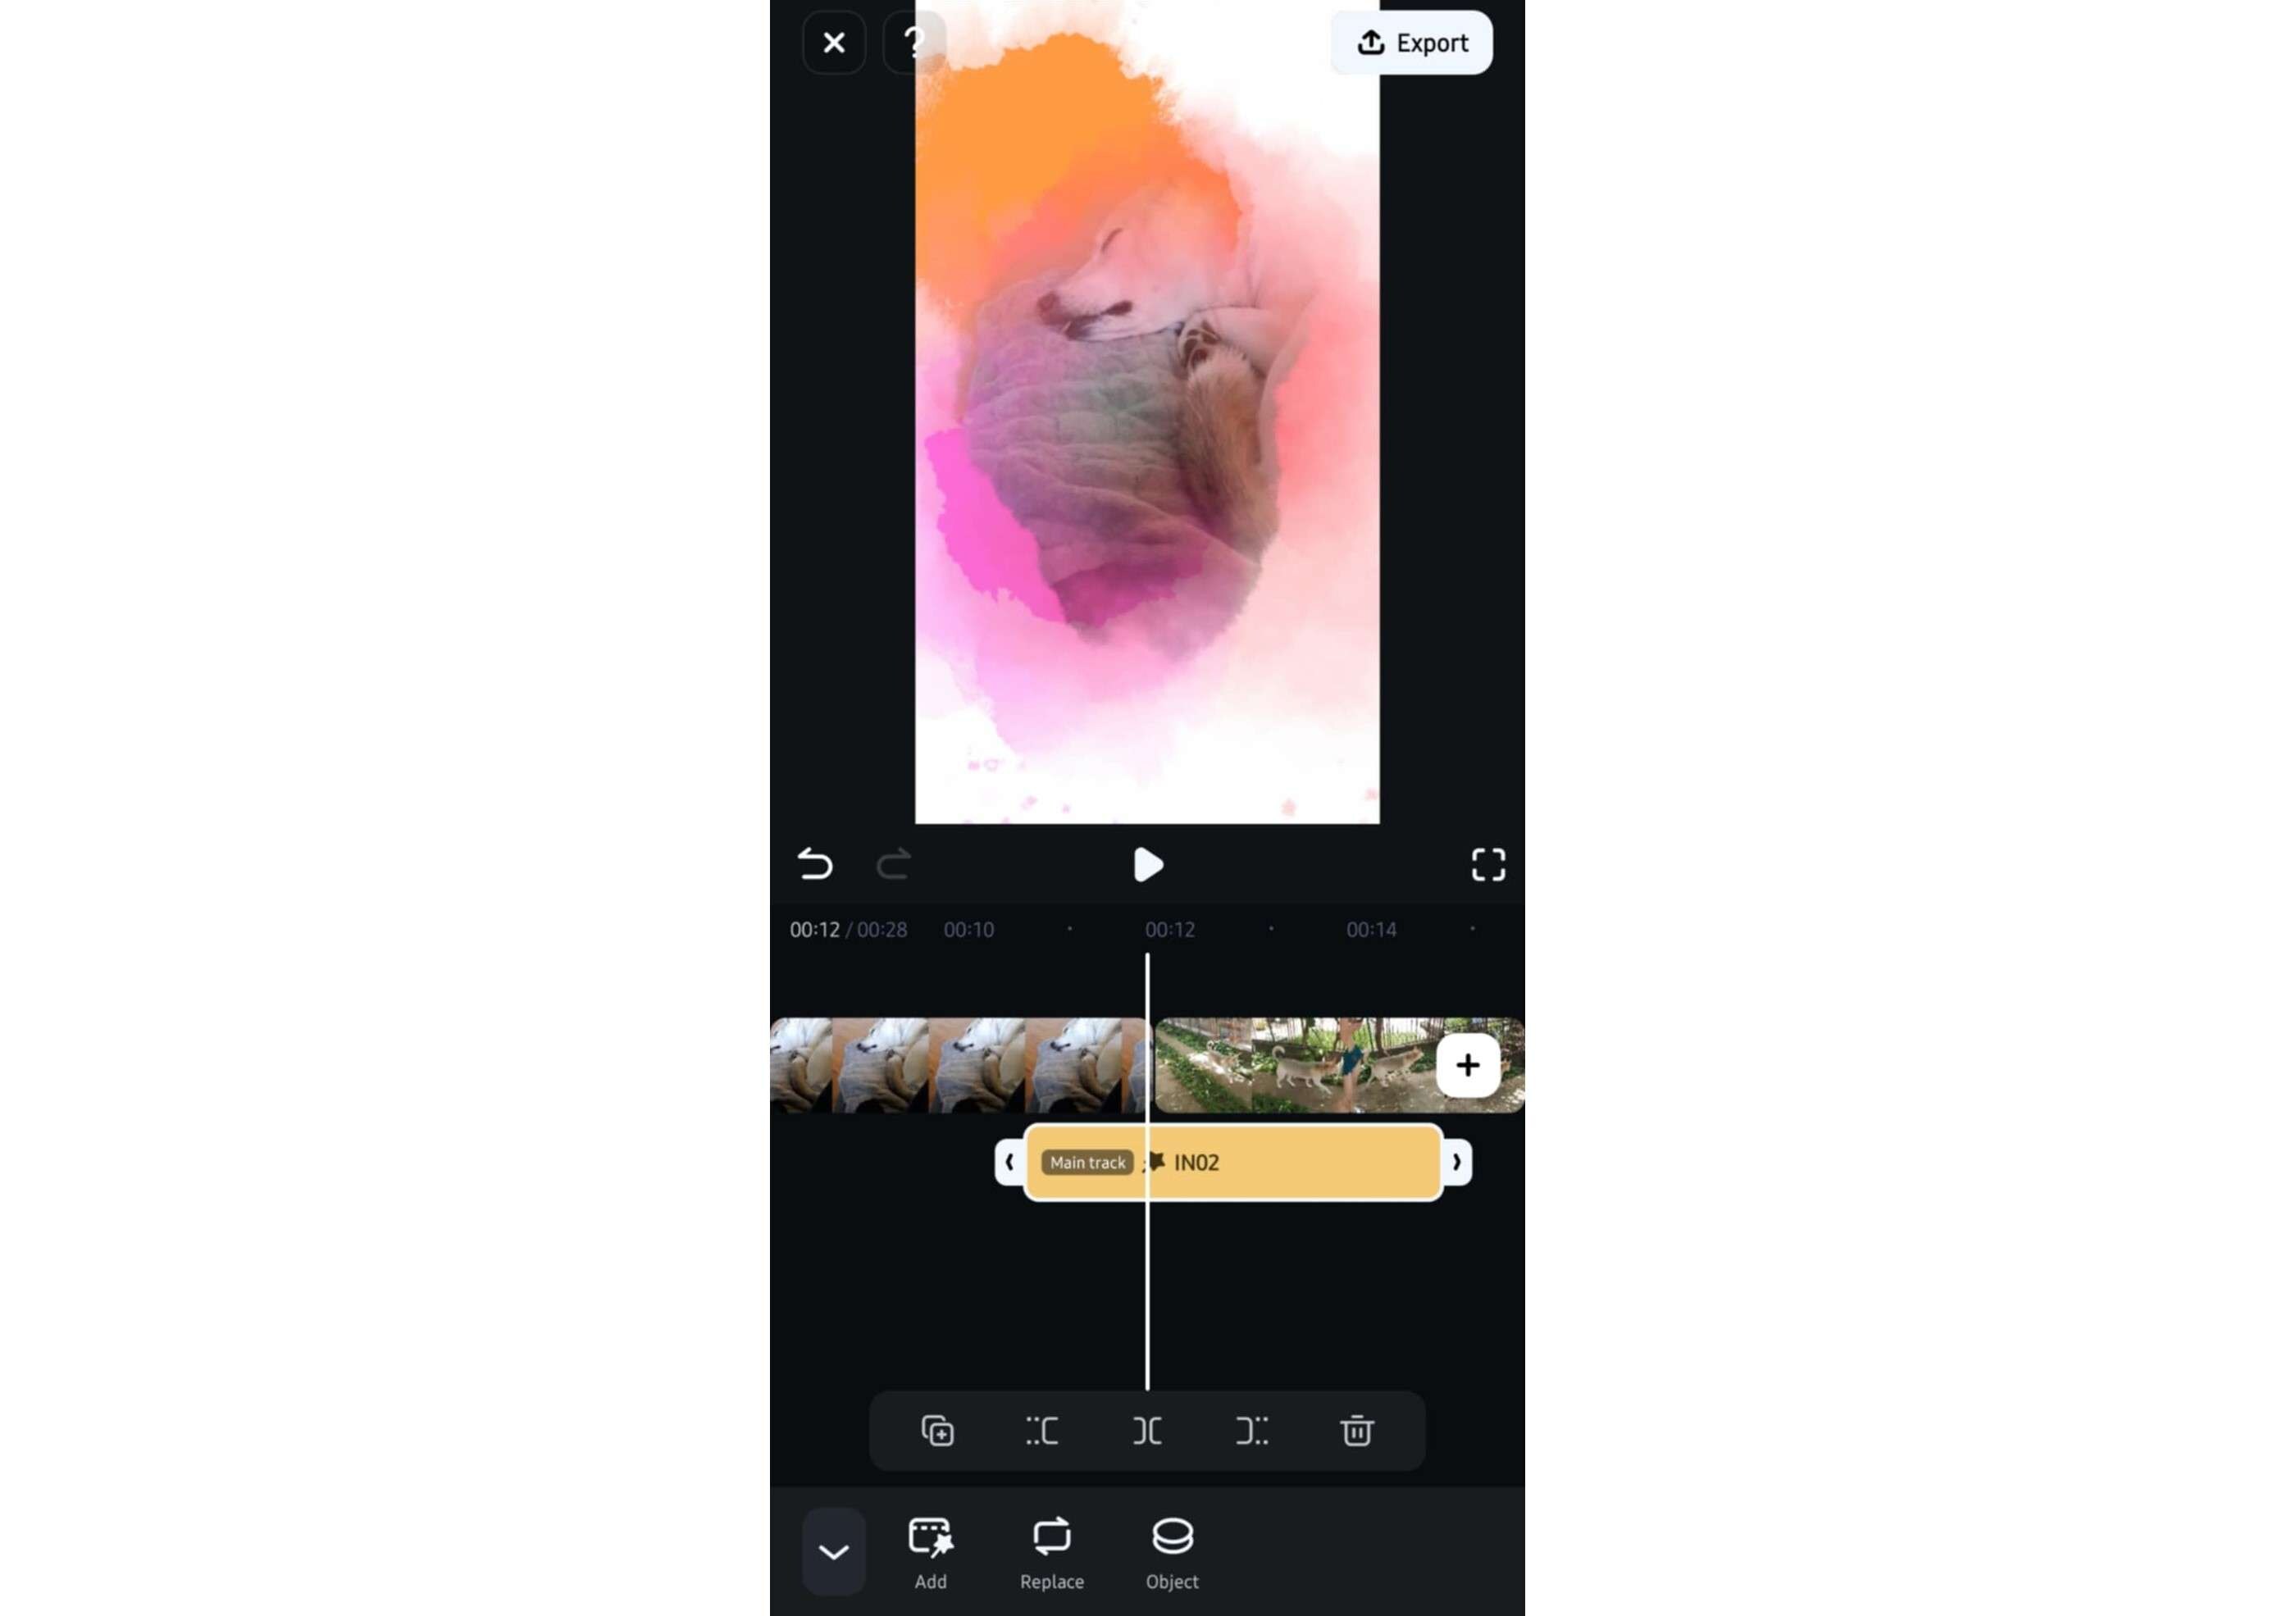
Of course, as needed, you can always further edit your videos before saving. Play around with all the options available, and don’t be afraid to let your creative juices flow.
Enhance Your Video with AI Features
If you want to make your content even more engaging, just using a few transitions isn’t enough. Fortunately, Filmora makes enhancing your videos as simple as can be with the help of powerful AI tools.
Using next-gen AI, Filmora lets you accelerate your video editing process and get stunning results in just a few seconds. Make your ink transitions ever more eye-catching with the help of useful AI features like smart short clips, smart scene cut, and video denoise.
Smart Short Clips
Smart Short Clips is an excellent feature if you need to make your long-form content more suitable for sharing on social networks. It automatically extracts highlights from your long videos and creates several short clips that are perfect for increasing your engagement levels.
Let the AI analyze and extract suitable short clips from your longer video, add your ink drop transitions, and share your work on TikTok, YouTube Shorts, or Instagram Reels.
Smart Scene Cut
If you want to create highlights from multiple different videos, use Filmora’s AI Smart Scene Cut. Similarly to Smart Short Clips, the AI will analyze your footage to extract key moments and let you delete unnecessary clips.
Use Smart Scene Cut on all your videos to extract highlights, then combine the clips into a single video with some nice ink drop transitions.
AI Video Denoise
If you want your ink transitions to be smooth, you need to work with high-quality footage. However, that doesn’t necessarily mean you need to invest in equipment that will set you back thousands of dollars.
If you’re working with grainy footage, all you have to do is use FIlmora’s AI Video Denoise to enhance its quality and improve your transitions. The AI will remove unwanted grain, whether it’s caused by filming in low-light conditions, with high ISO settings, or old, lower-quality devices, and give you high-quality footage where you can add ink transitions seamlessly.
Conclusion
Adobe Premiere Pro has a long list of exceptional features that allow you to create video content worthy of attention. It gives you access to hundreds of transitions and effects you can use to enrich your content and start turning heads.
Unfortunately, it’s not a suitable option for beginners.
Even adding a simple ink drop transition can take you hours of work in Premiere Pro if you don’t know what you’re doing.
If you want to make things easier on yourself and still get high-quality content you’re proud of, choose Wondershare Filmora instead.
With desktop and mobile versions, Filmora gives you powerful editing tools that are easy to use. Add ink transitions and share your content to any platform in a few steps!


 100% Security Verified | No Subscription Required | No Malware


