
 100% Security Verified | No Subscription Required | No Malware

In the evolving world of filmmaking, new video editing features are introduced every day. These features are essential to keep the viewers glued to the video, and one of them is masking. Be it sci-fi, horror, or action, the video masking technique is being used in every movie that you watch.
Masking a video means selecting your desired part from the video or using video overlays to hide, clone, reveal, or modify your footage. This allows you to create animations in your video that look real, but it is almost hard to believe that they are not real. This article will guide you about masking in Premiere Pro.
In this article
Part 1. What Are the Practical Uses of Masking in Video Editing?
The advantages of masking include giving video clips a professional and polished look. This feature gives life to raw footage and keeps the viewers hooked to the video till the end. Because of these benefits, video masking is used in various fields of work. To name a few, some of the practical applications of masking on Premiere Pro are as follows:
1. Censorship or Privacy Protection
By blurring faces, phone numbers, and number plates, the video masking feature helps us protect the anonymity of the people in videos. Masking a video also aids in censoring profanity and 18+ content, making it watchable for a larger audience. You can hide sensitive information in the footage to be free of any legal constraints.
2. Green Screen Effects
Masking in Premiere Pro is most widely used in filmmaking and video production for animations and visual effects. By masking out the green color, you can place another clip or image and create an illusion of the object being placed in a different setting. This creates an impactful effect in the footage and makes unrealistic visuals look real.
3. Focus Pulling and Selective Effects
If you want to edit or modify just a selective part of the video, then the video masking technique is your friend. On the other hand, if you want the complete video to be modified except for a single part, you can still use the masking technique. This feature can also shift focus to and from an object, directing the viewers' attention toward the desired area.
4. Overlays
An overlay is a subtle and transparent image or a video that can be added to footage. Using the masking technique, you can add overlays to the video and create a layered effect. The overlay can either be an image, a video, a logo, or a text that can be added to your footage. Through masking in Premiere, you can give a creative look to the text in a clip with various text overlays.
5. Transitions
Video masking can be used to add smooth and subtle transitions to footage. Disparate pieces of videos are compiled together to create a bridged look. Transitions aid the audience in noticing a shift in time or location and maintain the pace and rhythm of the video. Compared to conventional transitions, video masking creates stylish and creative transitions that captivate the viewers.
Part 2. A Comprehensive Guide To Masking in Adobe Premiere Pro
Adobe Premiere Pro is a top-of-the-line video management tool providing explicit features. From managing videos to audio, Premiere Pro is embedded with multiple AI-enhanced tools. Furthermore, its unique qualities allow you to set up the perfect frame-by-frame video management. However, if you are in search of how to mask in Premiere Pro, we’ve set up a guide to help you execute it:
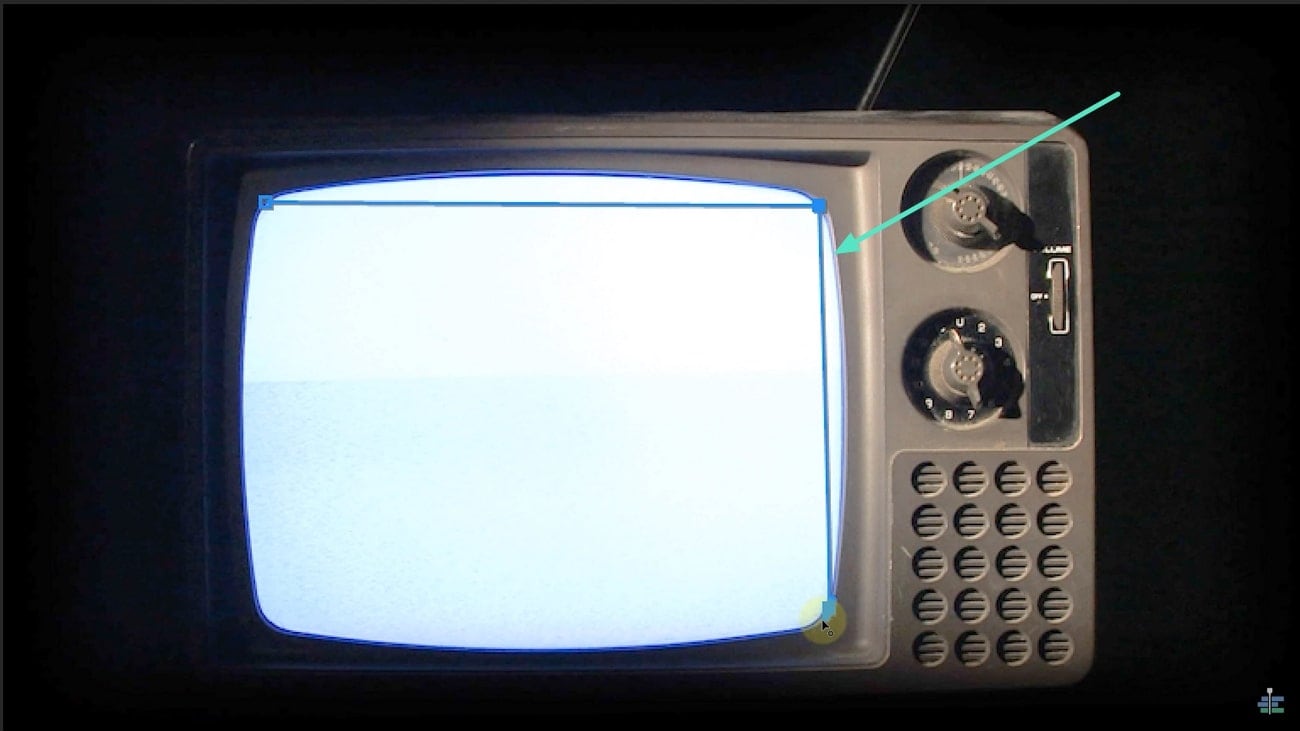
Step1Place and Select the Clip to Be Masked
You need to place the clip that needs to be masked in the second track and the other clip on the first track of your video project. Once you've added both projects to the timeline, proceed to select the clip in the second track and look for the "Pen" tool in the "Effects Control" panel. Add boundaries across the area in the clip across the preview window that needs to be edited.
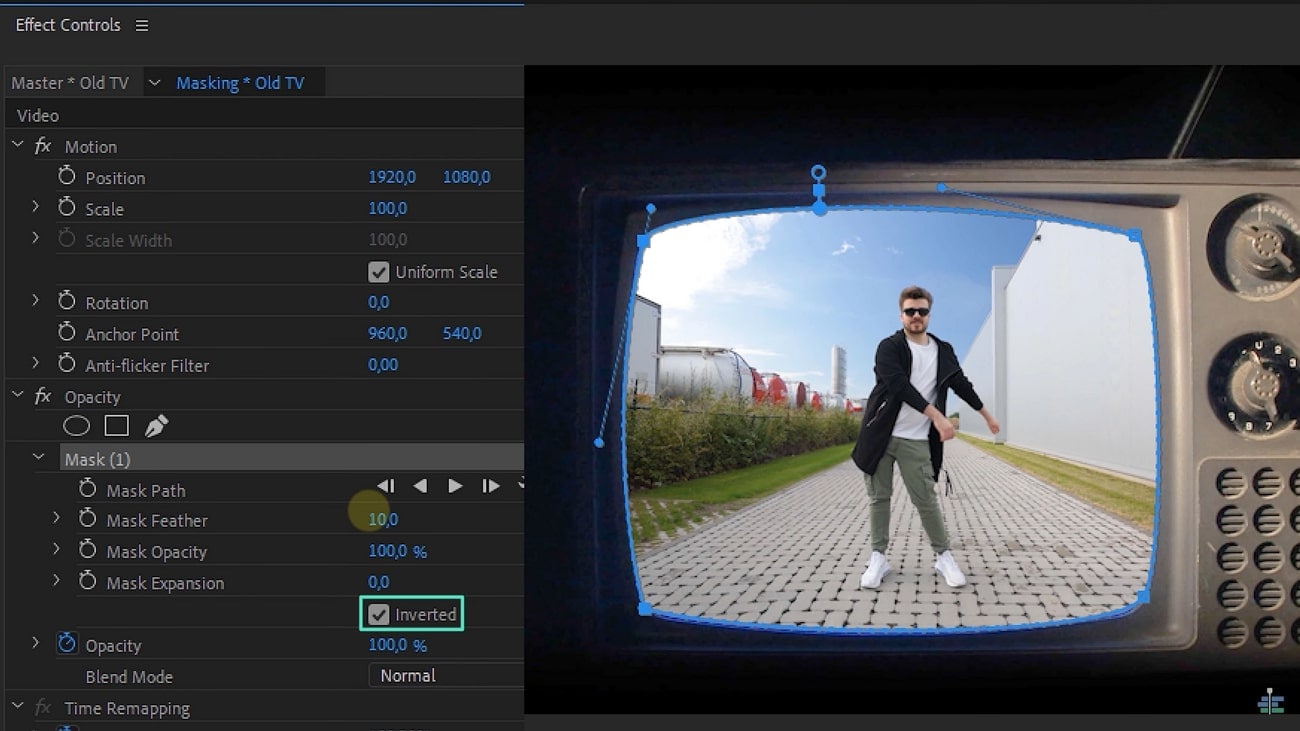
Step2Refine the Mask with Invert and Feather Options
While you use the handles to create a curve across your masking area, proceed to the "Effects Control" panel again. Look for the "Inverted" checkbox to invert the selected mask and use the "Mask Feather" option to manage its border.
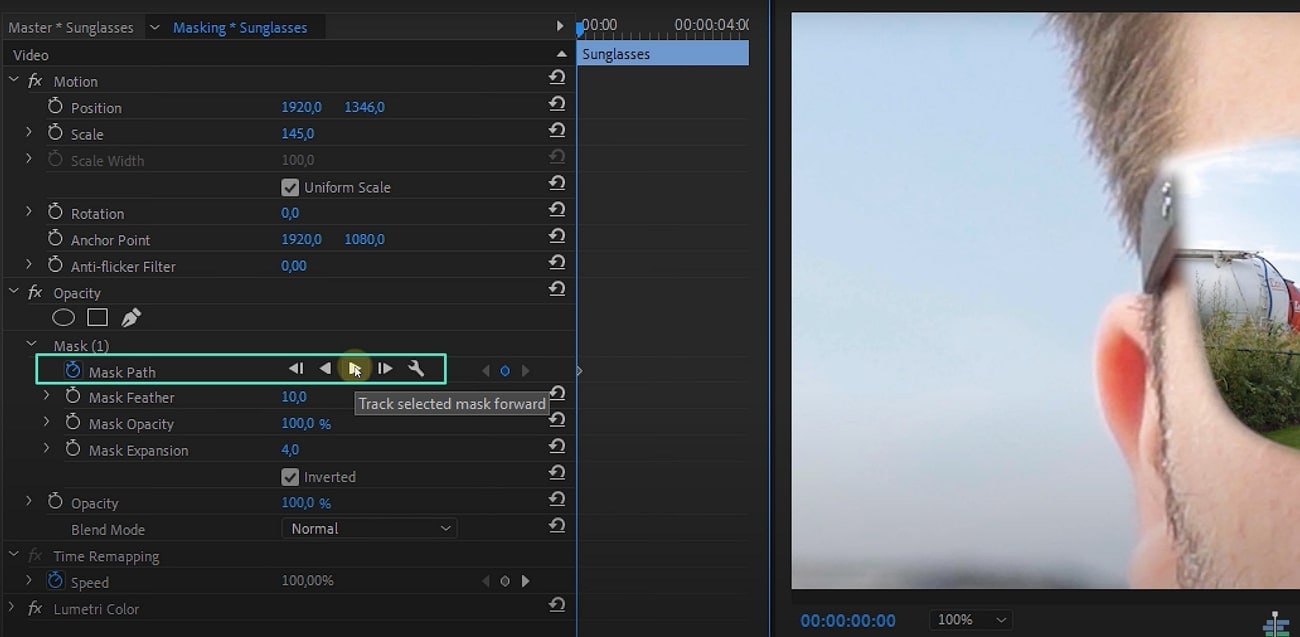
Step3Enable Mask Tracking for Dynamic Movement
You can also set up a mask and track the object for a more advanced look within the mask. Select the “Stopwatch” icon adjacent to the “Mask Path” option. As it creates the keyframe, look for the "Wrench" tool, which shows the tracking options. After selecting one option, select the "Track selected mask forward" to apply tracking on the object.
Part 3. [Manual + Automated] Masking Objects in Wondershare Filmora
It is true that Adobe Premiere Pro provides a wholesome experience of masking objects; however, the provided steps show that it has its complexities. To counter this, Wondershare Filmora comes as the perfect alternative to masking instead of masking on Premiere Pro. Its futuristic features allow users to make perfect videos, assisted with AI enhancements.


Furthermore, to make video-making easier, you can utilize the ability to add different enhancements and effects across your videos with Filmstock. This ultimate resource pack library provides a diversity of effects and other elements.
Filmora works not only on PC and Mac, but also on mobile phones. You can see how you can use the Mask feature to create cool, professional videos on your smartphone.
Solution 1: Basic Masking (Manual Draw + AI Mask)
For quick and straightforward masking, Filmora's built-in tools are incredibly efficient.
Step1Add Your Video Files
Start a "New Project," import your videos, and place the clip to be masked on the timeline.
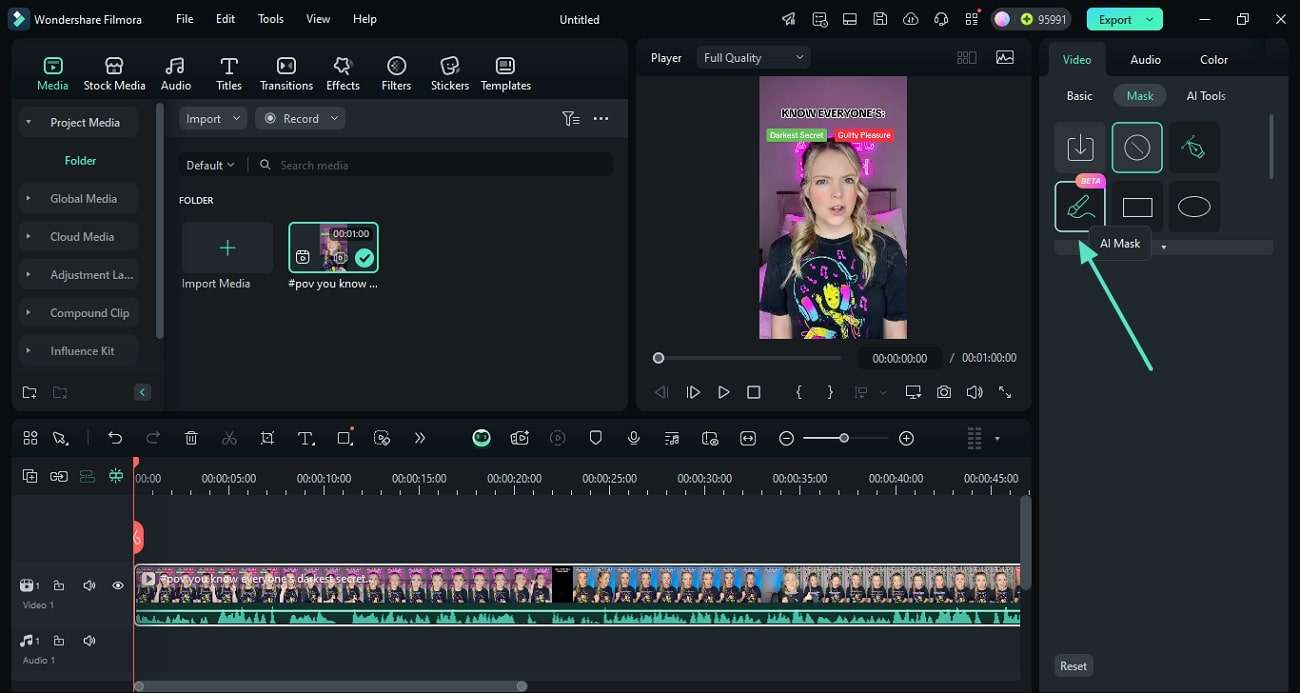
Step2Apply a Mask
Double-click the clip to open the settings panel. Under the Video > Mask tab, you can either use "Draw Mask" to create a custom shape with points or switch to "AI Mask" and use the "Smart Brush" to have AI automatically detect the object's edges.
Step3Adjust and Export
Fine-tune the mask using settings like "Blur Strength" and "Opacity." Once finished, click the "Export" button to save your final video.
Solution 2: Pro-Level Masking for Moving Objects with Mocha Filmora
This is where Filmora truly outshines the standard workflow in Premiere Pro. For complex shots with moving, rotating, or perspective-shifting objects, Filmora integrates the industry-leading Boris FX Mocha engine. This tool automates the tedious process of tracking masks frame-by-frame.
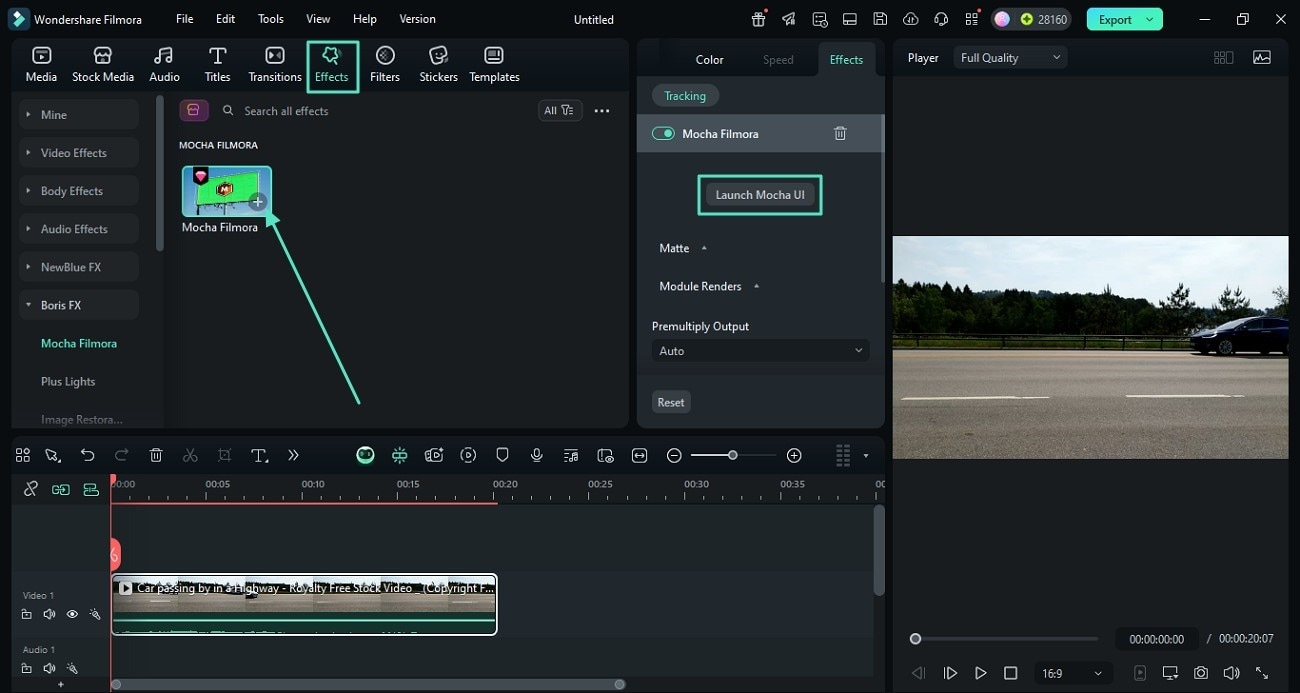
Step1Launch Mocha Filmora
From the "Effects" panel, drag the Mocha Filmora effect onto your clip. Then, in the clip's settings, click "Launch Mocha UI" to open the professional tracking interface.
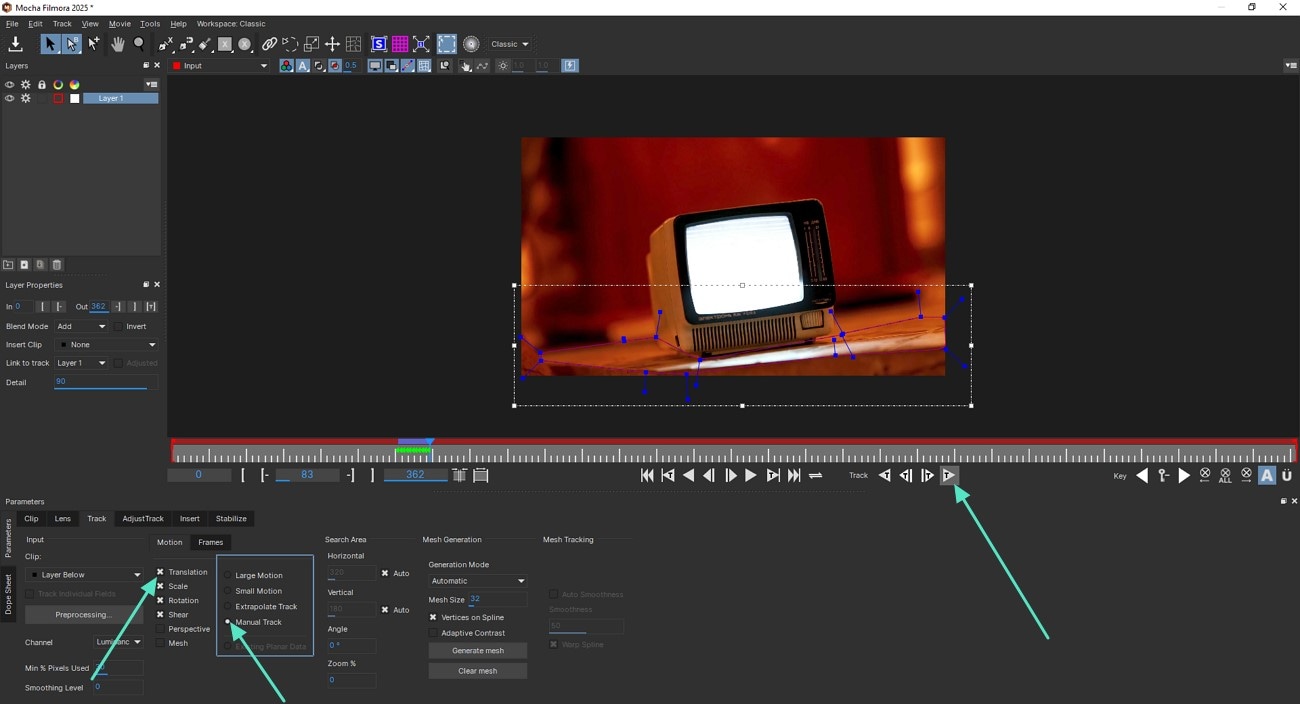
Step2Draw and Track
Inside Mocha, use the "Create X-Spline Layer" tool to draw a shape around your object. You don't need to be perfect. Then, simply click the "Track Forward" button. Mocha's powerful planar tracking technology will analyze the motion and lock your mask to the object automatically.
Step3Apply the Mask and Export
Once tracking is complete, save and close the Mocha window. The tracked shape is now a precise, moving mask in Filmora. You can then add effects, change the background, or simply export your professionally masked video.
This automated, high-precision tracking capability for complex motion is a significant advantage over the manual keyframing required for similar tasks in Premiere Pro.
Conclusion
This article has shown how to perform video masking, covering the standard process in Adobe Premiere Pro. While Premiere Pro is functional, its workflow can be challenging, especially for dynamic scenes. For a more streamlined and powerful experience, Wondershare Filmora emerges as an excellent alternative. It not only simplifies basic masking with its AI tools but also offers professional-grade motion tracking with the integrated Mocha Filmora plugin, providing a superior solution for both simple and complex masking tasks.
