One of the Adobe products you may already know about in video editing is Adobe Premiere Rush. Adobe Premiere Rush is a versatile and beginner-friendly video editing app designed for creators who want professional-grade tools on the go. Available for both mobile and desktop devices, the app is perfect for creating high-quality content for platforms like YouTube, Instagram, and TikTok. Premiere Rush has become a go-to tool for content creators.

For those of you who need Chroma Key Premiere Rush to edit green screen videos to remove and replace the green screen background, having access to Chroma Key is essential to achieving professional results. In this article, you will find the best solution to remove the green screen, other methods to try, and how to make the most of them for your video projects.
In this article
Part 1. How to Make a Green Screen for Videos
Green screen technology is a game changer for video creators. It allows you to replace the plain green background with almost any image or video. This opens up endless creative possibilities, whether you're producing content for YouTube, social media, or professional projects. Here are the two main ways to create green screen videos:
- Shoot your own footage using a green screen background
Creating your own green screen settings is ideal if you want to take full control of your recordings. Here's how to do it:
- Set up a green screen: Use a green screen and hang it behind your subject. Make sure it is wrinkle-free and well-lit to avoid shadows.
- Lighting tips: Use soft lighting to eliminate harsh shadows on the green screen and subject. Consider separate lights for your green screen and subject to maintain clarity.
- Use quality equipment: A good camera or smartphone with a high resolution will help capture clear footage, making it easier to remove the green screen during editing.
- Record your scene: Place your subject in front of a green screen and ensure no part of their clothing matches the background color.
- Download from online resources
If you don’t have the time, equipment, or space to shoot your own footage, you can download high-quality green screen videos from online platforms, such as Wondershare Filmstock. A popular resource for green screen assets, Filmstock offers a vast collection of pre-made green screen footage, templates, and effects.
How to Use It: Visit Filmstock and browse their library of green screen assets. Download the clips you need and import them into a video editor that supports Chroma Key.
This method saves you time, provides professional-quality assets, and gives you access to a wide variety of themes and styles.
Both methods are effective, and your choice depends on your resources, time, and creative goals. Once you have your green screen footage ready, use a video editor with Chroma Key functionality to bring your project to life.
Part 2. Chroma Key on Premiere Rush
Chroma Key is a powerful video editing technique that allows creators to replace a specific color in a video (commonly green) with a new background, enabling endless creative possibilities. Widely used in filmmaking, social media content, and video production, this feature lets you seamlessly integrate subjects into different scenes, such as a bustling cityscape, an exotic location, or even a fantasy world.
The process involves selecting the green background in the footage and digitally replacing it with the desired image or video. It requires precise tools to achieve smooth integration.
However, while Adobe Premiere Rush is a versatile video editing app, it does not currently support Chroma Key Premiere Rush functionality for removing green screen backgrounds. This limitation makes Premiere Rush unsuitable for projects requiring green screen effects, prompting users to explore alternative tools for their green screen editing needs.
If you’re working with green screen footage and need Chroma Key functionality, consider these best solutions which will be explained in the next section.
Part 3. Best Solution to Remove Green Screen with Chroma Key
If you're looking for an efficient tool to remove green screen backgrounds, Wondershare Filmora stands out as one of the best solutions. While many creators search for options like Chroma Key Premiere Rush, it's important to note that Premiere Rush currently does not support green screen editing. Filmora, on the other hand, offers a powerful Chroma Key feature, making it ideal for creators of all skill levels. With just a few clicks, you can replace a green screen background with any image or video to bring your creative goals effortlessly.
| Feature | Filmora | Premiere Rush |
| Chroma Key Functionality | Powerful, one-click, effortless. | Currently not supported. |
| Ease of Use | Ideal for all skill levels. | Designed for on-the-go editing. |
| Alternative BG Removal | AI Smart Cutout, AI Portrait, Masking. | / |
| Creative Goals | Effortlessly replace with any image/video. | Focuses on quick, social content. |
Powerful AI video editor for all creators
Step by step on how to use the Filmora chroma key to remove background:
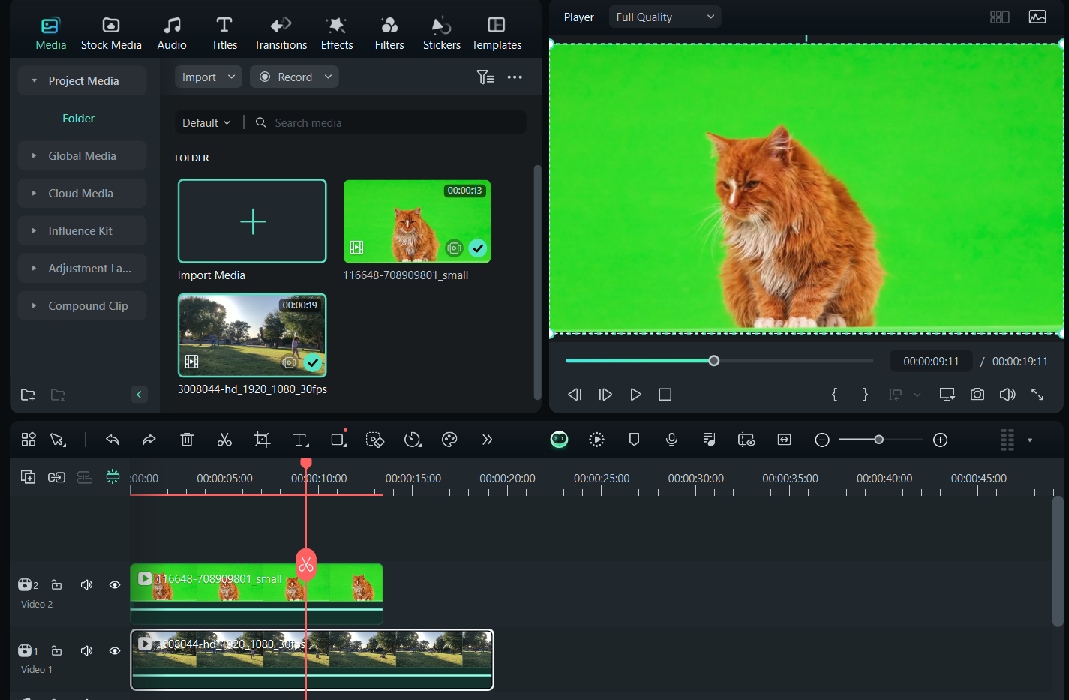
Step 1. Open Wondershare Filmora and create a new project, then import your green screen video.
Step 2. Drag both clips into the timeline, and place the green screen video on the top track and the background media on the track below it.

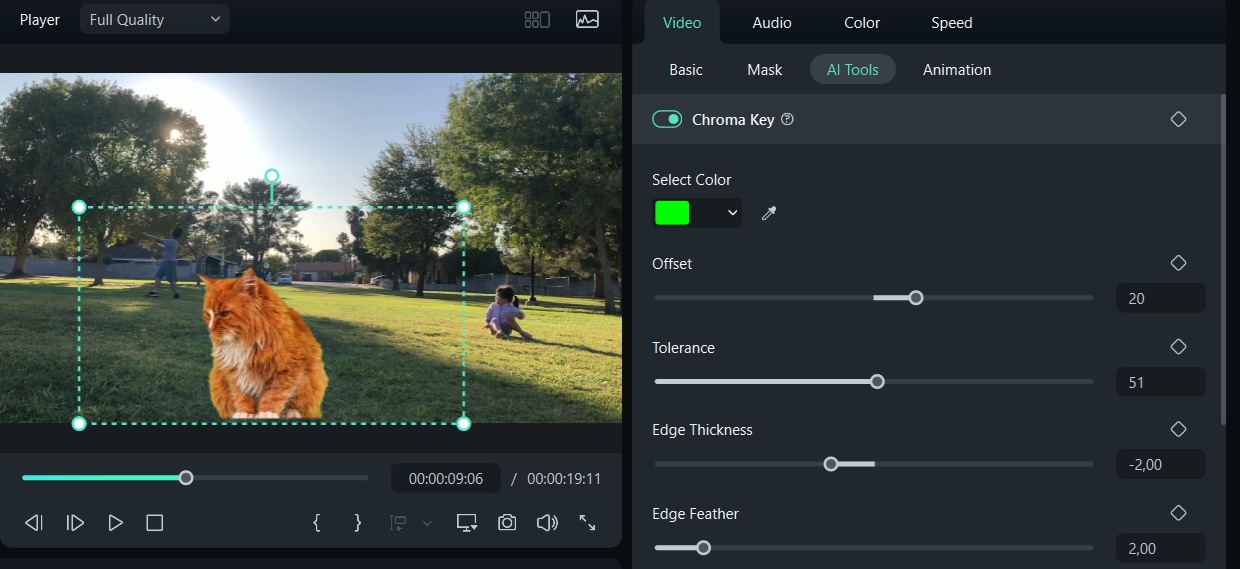
Step 3. Click on the green screen video in the Timeline to select it. In the toolbar above the Timeline, tap on the Chroma Key (Green Screen) option or find it in the AI Tools panel on the right. Enable the Chroma Key toggle to activate the effect.

Step 4. Fine-tune settings such as Offset, Tolerance, Edge Feather, and Edge Thickness to ensure the subject blends in with the new background. Adjust blur and shadows if needed for a smoother look.
Step 5. Click the Play button to preview your video and ensure the background replacement looks seamless. If satisfied, click Export to save your video in the desired format and resolution.
Part 4. Other Ways to Remove a Background from a Video
In addition to the main Chroma Key technique, Wondershare Filmora offers several advanced methods to remove background from videos. These methods utilize AI-powered tools for precise and efficient editing, making it easier to achieve professional results without the need for a green screen. Here are three other ways to remove video background in Filmora:
Method 1: Using AI Smart Cutout
The AI Smart Cutout tool allows you to eliminate and remove the background from a video by manually selecting the subject. This method is best for videos without a green screen or for situations where the subject has a complex environment.

Step by step using AI Smart Cutout
- Open Filmora, create a new project and import your video into the library. Drag it onto the timeline.
- Click on the video on the timeline, and select Smart Cutout from the AI Tool panel. Enable the Smart Cutout toggle to activate the feature.

- Use the brush tool to mark the subject you want to keep. Filmora’s AI will automatically detect and highlight the subject. Adjust the brush size for precision and refine the selection as needed.

- Click Preview to see the results and make further adjustments if necessary.

Method 2: Using AI Portrait
The AI Portrait tool automatically detects and isolates human subjects. It's perfect for videos that focus on individuals, such as vlogs, interviews, or social media content.

Step by step using AI Portrait Cutout
- Add your video to the timeline in Filmora.
- Select a video on the timeline, then click the AI Portrait Cutout icon on the toolbar to automatically activate the AI Portrait Cutout feature. Select the Advanced Cutout Mode to remove the background with a single click.

Once you enable the AI Portrait Cutout feature, Filmora will automatically make the background of portrait footage transparent. You can preview the video, adjust the portrait's position, and ensure it meets your needs.
- You can also select Preset Body effects in the AI Portrait Cutout panel, and adjust the parameters as you like.

- If necessary, add a new background by placing an image or video on a lower track in the Timeline.
Method 3: Using AI Smart Masking
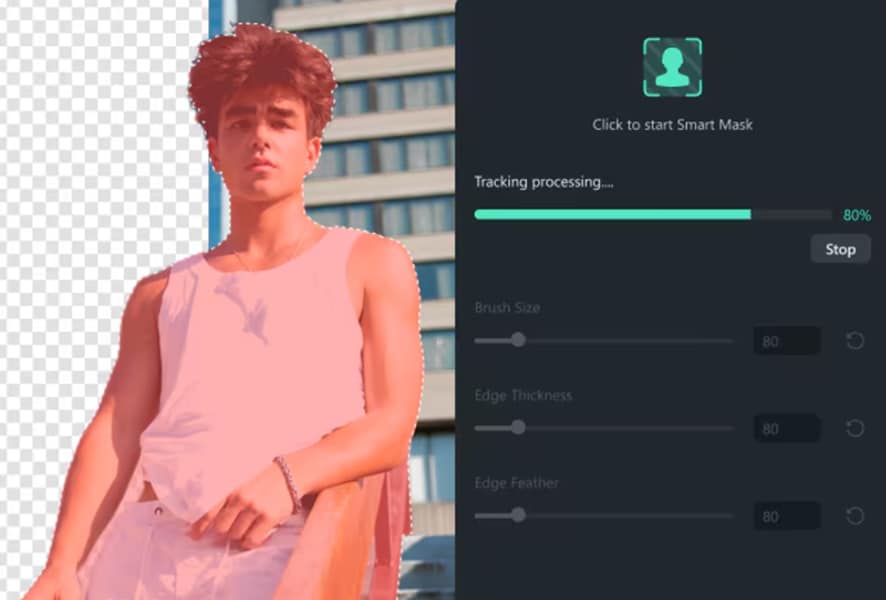
The AI Smart Masking tool is ideal for videos where the subject moves or where objects need to be isolated dynamically. It provides frame-by-frame tracking for seamless background removal.

Step by step using AI Smart Masking
- Import your video and drag it onto the timeline.
- To start the masking, select your clip on the timeline and navigate the mouse to the settings panel. On the “Video” tab, select the 'Mask' > 'AI Mask' option.

- Use the masking tools to outline the subject or object you want to isolate.

- Enable the AI tracking feature to automatically follow the movement of the subject throughout the frame. Adjust the mask if necessary to maintain accuracy.
- Save the changes, and the background will be removed in your video editor.
Powerful AI video editor for all creators
Conclusion
In video editing, using a green screen is very common. You can utilize the chroma key feature to edit your green screen to remove and replace the background. Unfortunately, if you are used to using one of Adobe's products, Adobe Premiere Rush, they currently do not provide the chroma key on Premiere Rush feature. You need to find another alternative to use this feature.
One alternative is to use an app like Wondershare Filmora, where you can use the Chroma Key feature very easily. In addition, there are several other ways to remove a background from a video, such as AI Smart Cutout, AI Portrait, and AI Smart Masking. You can experiment with all of them by using just one video editing software.
Frequently Asked Questions
Q: How can creators effectively prepare green screen footage for video editing?
A: Effective green screen preparation is crucial for seamless background removal. Creators can either shoot their own footage using a physical green screen, ensuring it's wrinkle-free and well-lit to avoid shadows, and using quality equipment for clear capture. Alternatively, if resources are limited, high-quality green screen videos can be downloaded from online platforms that offer pre-made assets, templates, and effects. Both methods aim to provide clean footage for post-production editing.
Q: What are some alternative methods for removing video backgrounds without relying on Chroma Key?
A: Beyond traditional Chroma Key, modern video editing software offers advanced AI-powered tools for background removal. These include features like AI Smart Cutout, which allows manual selection of a subject to remove the background; AI Portrait, which automatically detects and isolates human subjects; and AI Smart Masking, ideal for tracking moving subjects and dynamically removing backgrounds frame-by-frame. These methods can often achieve professional results even without a green screen.


 100% Security Verified | No Subscription Required | No Malware


