Blurring part of a video is a powerful technique that can be used for various purposes_ it can enhance privacy, focus, and creativity. Maybe you have recorded a perfect moment and later on realized that some confidential information, like a license plate or private message, is visible in the frame. Or perhaps you want to highlight a specific person in a crowd without compromising the privacy of others.
In cases like these, knowing how to blur part of a video can be a lifesaver, ensuring that your content remains polished and professional. This skill is not just for advanced editors; it's accessible to anyone with the right tools and a little guidance.
In this guide, you’ll learn how to easily blur a part of a video in simple steps. Let’s get started!
In this article
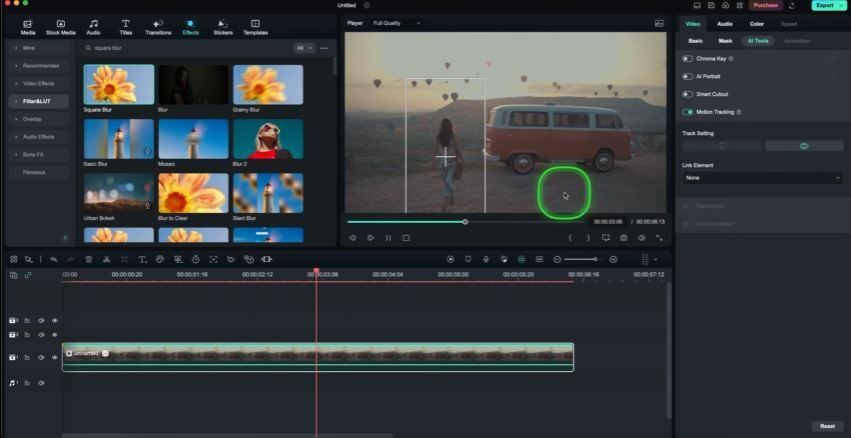
Part 1. Which of the Following is Your Current Situation?
Are you looking to blur part of the video? Here are some common scenarios where blurring can be helpful:
- Situation 1. Distracting Backgrounds
Not everything in the background adds to a video. Is your background messy or distracting? It will take away your audience from the main focus. By blurring specific areas of your videos, you can make sure your viewers stay focused on the most important elements.
- Situation 2. Privacy Concern
Privacy is a big reason to blur a part of the video. Sometimes, a face or personal information, like an address or a license plate, ends up in the shot. Blurring these details keeps them private and helps prevent any unintentional exposure.
- Situation 3. Legal and Ethical Considerations
Blurring out branded content, logos, or copyrighted material is necessary for professional and public projects to avoid legal issues. This is especially important for business or social media videos, where the risk of copyright problems is higher.
- Situation 4: Creative Effects
Want to create a cinematic or dreamlike effect? Or just want to draw attention to a specific part of your video? Blurring can also give your video a unique, cinematic feel.[b]
Part 2. The Ideal Tool for Blurring Videos
Now that you know why blurring is useful, let’s talk about how to do it. Video editing tools make it easier than ever to blur specific parts, even if you’re a beginner. Wondershare Filmora is one such tool that provides simple yet powerful options for both manual and automatic blurring.
Filmora is designed for easy use, offering a range of tools to apply blur where needed. Let’s take a closer look at Filmora’s blurring features and why they make editing simple.
Introducing Filmora: A Balanced Solution for Manual and Auto Blurring
Filmora provides a variety of ways to blur a part of the video, making it a flexible tool for any project. Here’s what it offers:
- Manual Blurring: With options like Mosaic effect, Background Blur, and Tilt-Shift, Filmora allows you to blur specific parts of a video with precision. You can choose the area and adjust the blur’s intensity, making it easy to customize.
- Automatic Blurring: Filmora’s Face-Off and Face Mosaic tools allow you to automatically detect and blur moving faces or objects in your video. This is ideal for scenes with multiple people or objects, as it saves time by tracking movement without needing manual adjustments.
Why Filmora is the Best Tool for the Job?
- Filmora video editing software offers a variety of customizable blur options, so you can blur areas as needed to suit any video style.
- The drag-and-drop interface makes it simple to apply blur effects without any technical expertise. Just select the area you want to blur and choose the desired blur level.
- Utilize AI tools like AI object remover to automatically detect and remove objects, saving you time and effort.
- You can enhance your videos with AI-driven effects like noise reduction, color correction, and motion tracking.
- Filmora helps you achieve blurring effect without compromising the video quality.
Part 3. How to Blur Part of a Video Using Filmora
Now, let’s get into the process of how to blur a part of video using Filmora. This step-by-step guide will help you apply blur to faces, backgrounds, logos and other specific objects.
Step 1. Import Your Video
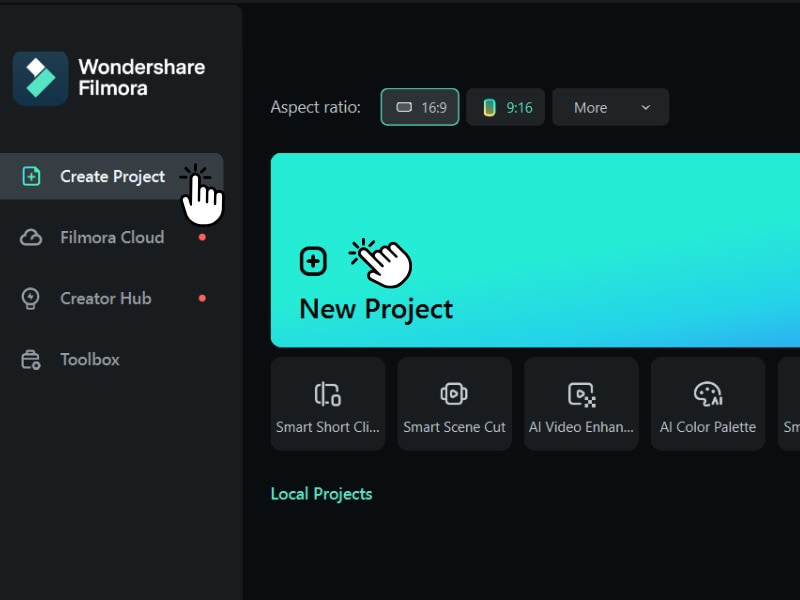
To start, open Filmora and click on “Create a new project”.
Step 2. Drag and drop
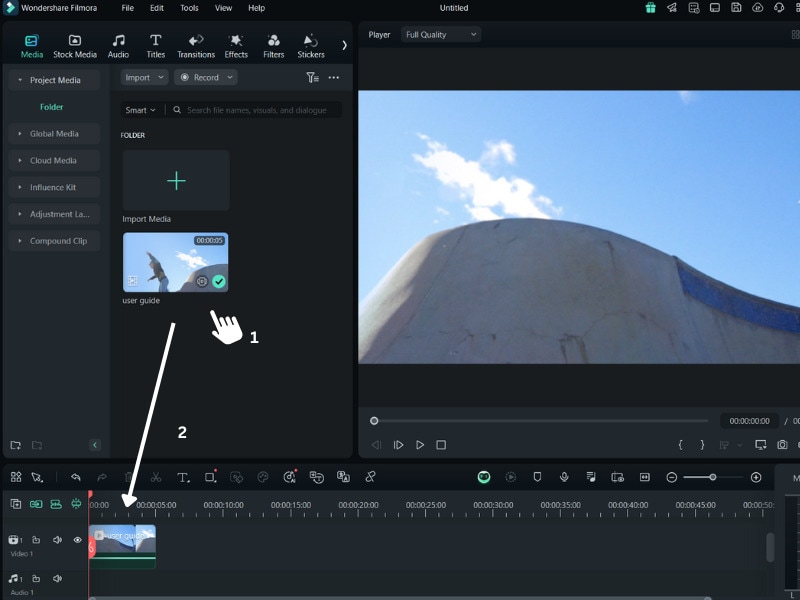
Drag your video into the editing timeline and you can easily begin editing each frame.
Step 3. Targeted Solutions on How to Blur Specific Parts of a Video with Filmora
Depending on the type of content, you may need to blur faces for privacy, soften the background, or hide logos or watermarks. Here’s how to handle each case.
- Blurring Faces
Go to the Effects tab and choose the Face Mosaic tool. Drag the effect onto your timeline, and Filmora will automatically detect and blur faces. The Face Mosaic feature is ideal for dynamic videos with moving people, as Filmora tracks each face without requiring manual adjustments.
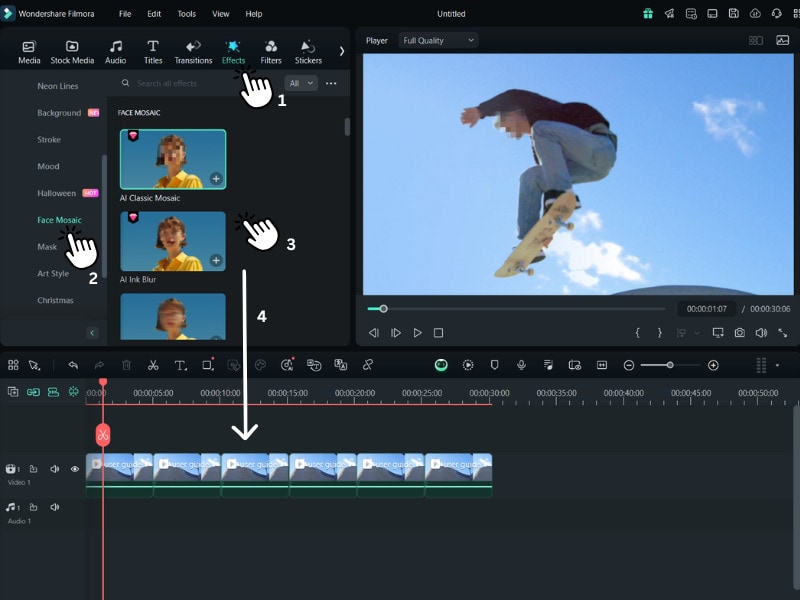
- Blurring Backgrounds
To blur the background and keep your subject in focus, select the subject using keyframes. Choose the Background Blur or Tilt-Shift tool to apply the blur effect to the background only. Then, adjust the intensity and area of the blur, so the main subject stays sharp and stands out clearly.
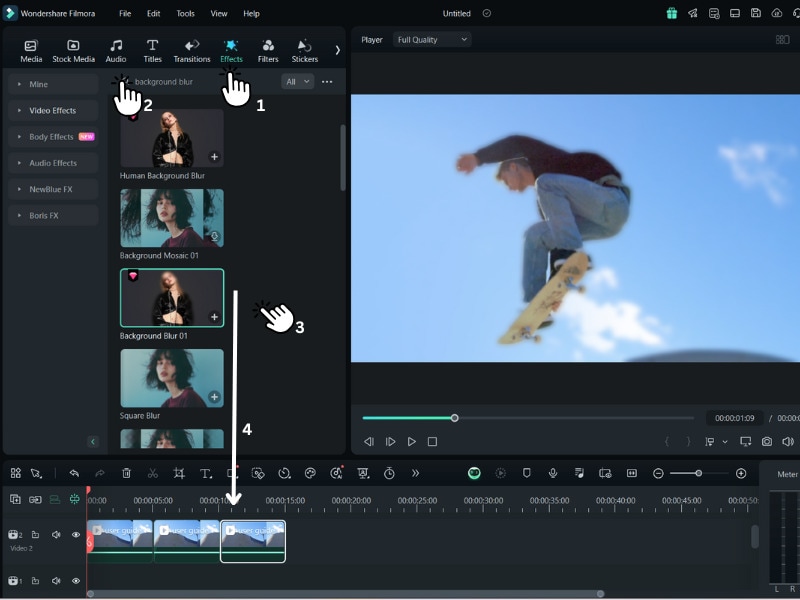
- Blurring Logos or Watermarks
Use Filmora’s Mosaic effect to blur out unwanted logos, watermarks, or other objects. Drag the effect onto the timeline and resize it to cover the object you want to blur. Then, adjust the blur’s intensity for either a subtle effect or full coverage, depending on your needs.
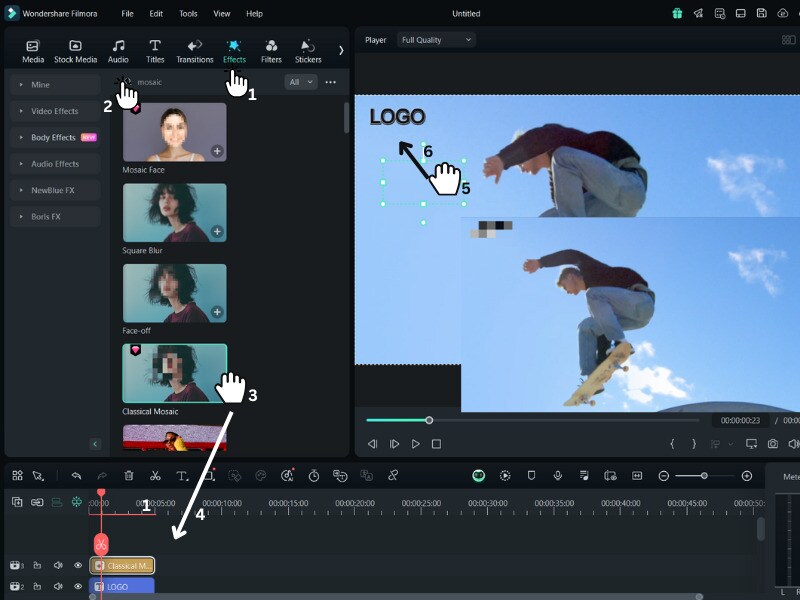
Step 4. Fine-Tuning the Blur
To ensure the blur follows any moving elements, use keyframes. Keyframes allow you to set points in the video where the blur appears or changes position. This is especially useful if the object or person you’re blurring is moving around in the scene.
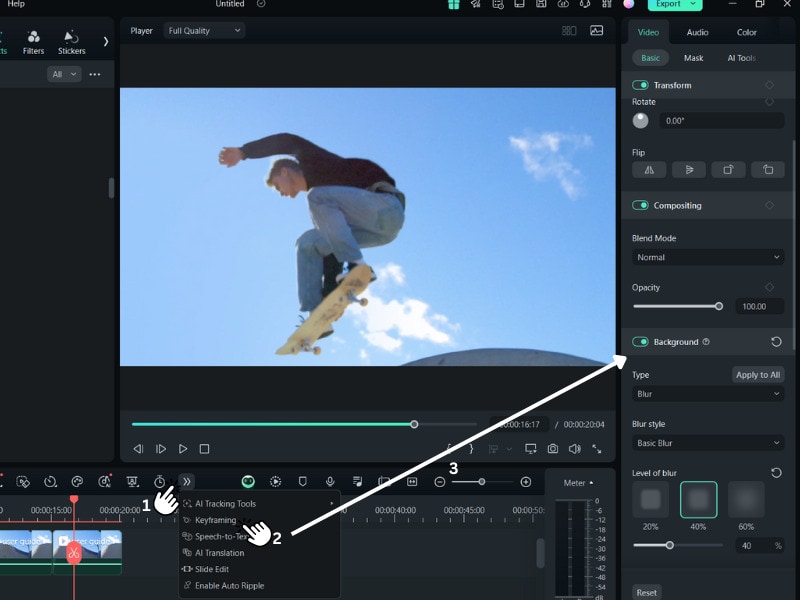
Step 5. Exporting Your Video
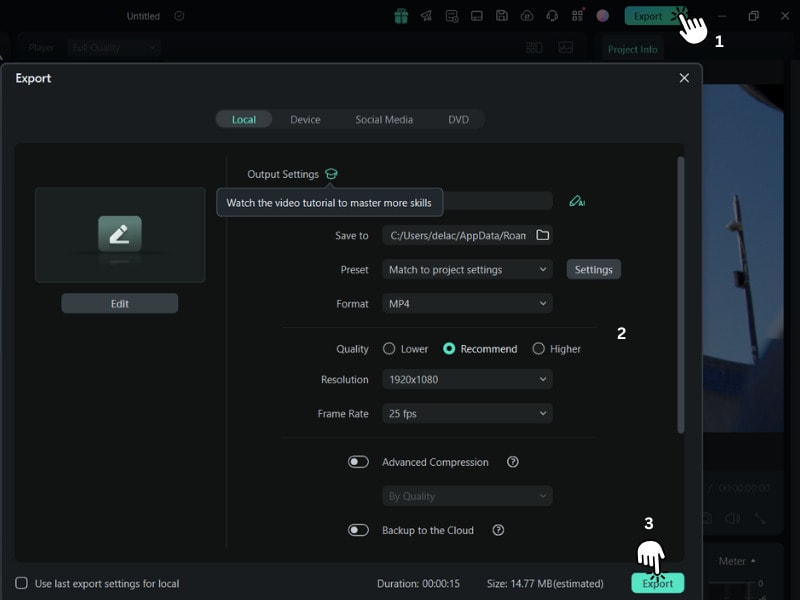
Once your edits are complete, preview the video to check for any adjustments. Then, click Export and select your preferred format, resolution, and quality settings. With one click, your edited video is ready to go.
Troubleshooting Common Issues
If you encounter any issues while editing, here are some quick solutions:
- Face or Object Not Detected: Ensure the object or face is visible and well-lit.
- Blur Too Strong or Weak: Adjust the blur’s intensity in the Effects settings.
- Software Performance Issues: Close other applications to free up resources for smoother editing.
Part 4. Enhancing Your Video with Other Creative Effects in Filmora
Now that you've learned how to blur a part of a video, why stop there? Filmora also offers many other creative effects to make your video look polished and professional. Here are some amazing effects that you can use to make your videos stand out.
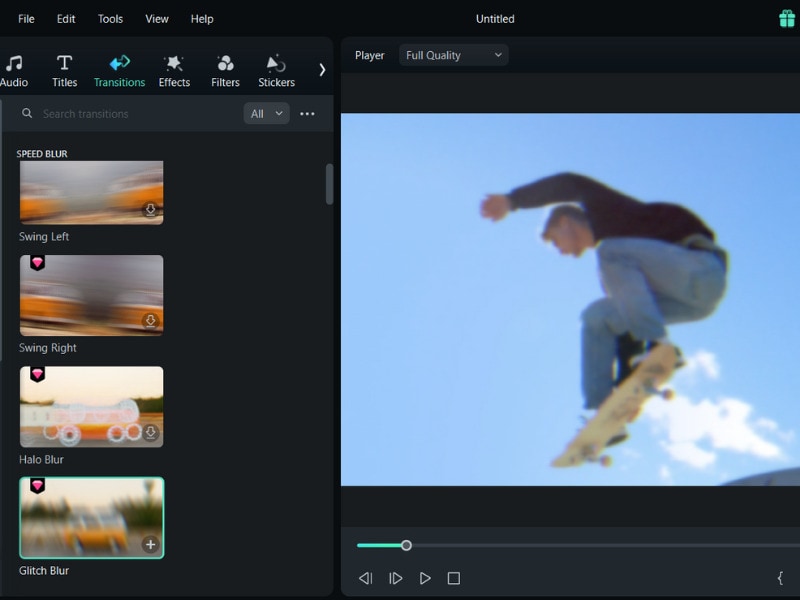
- Add Transitions to Your Videos
Transitions make scene changes smooth. You can pair blur effects with transitions, like a fade-out blur, to create an engaging flow between scenes. It’s a subtle addition, but it can give your video a refined look.
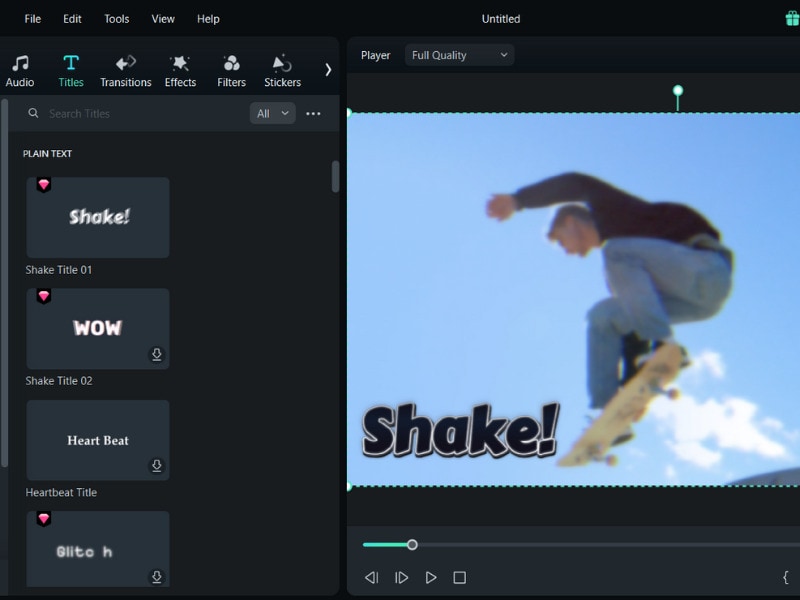
- Add Different Text Effects
Want to explain why a part of your video is blurred? Filmora’s text tools let you add captions or annotations over blurred areas. This is helpful if you need to add context or communicate something important to viewers.
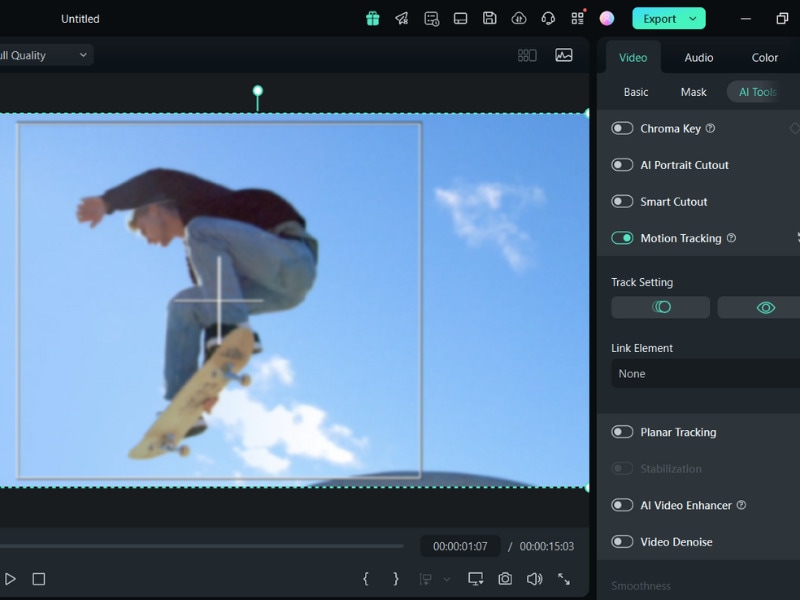
- Use Motion Tracking
Filmora’s motion tracking tool lets you blur moving objects in real-time. This is useful if you want to follow a moving object and keep it blurred as it moves across the frame, which is perfect for dynamic, action-packed scenes.
Conclusion
Blurring parts of a video can seem like a tricky task, but Filmora [c]makes it easy and accessible. Whether you’re protecting privacy, keeping viewers focused, or adding an artistic touch, Filmora’s effective blurring tools are flexible enough for any video style.
This guide has walked you through how to blur a part of the video using different blur techniques, troubleshoot common issues, and add extra effects to elevate your video’s quality. If you’re ready to try more, visit Filmora’s website to explore tutorials, tips, and other resources that can help you improve your editing skills. With these tools, creating high-quality, polished videos has never been easier.
- Superb video stabilization with low distortion.
- Vast video/audio effects and creative assets.
- Powerful AI for effortless content creation.
- Intuitive, professional yet beginner-friendly.
- Works on Mac, Windows, iOS, and Android.


