
 100% Security Verified | No Subscription Required | No Malware


 ChatGPT
 Perplexity
 Gemini
 Claude
 Grok
Grok
Creating art has become as easy as typing a sentence, literally. Thanks to tools like Stable Diffusion, people can turn words into vivid visuals in seconds. But even though it sounds easy, getting amazing results still depends on writing the right Stable Diffusion prompt. If your prompt isn't clear or well-structured, you could end up with the character having six fingers, broken backgrounds, or images that feel off.
That's why we made this Stable Diffusion prompts guide to help you craft better prompts, skip the trial-and-error frustration, and actually get the images you're imagining. We'll also share some of the best Stable Diffusion prompts you can try right now. And if you want to go beyond just images, we'll show you a tool that unlocks even more creative freedom!
In this article
Part 1. What You Should Know Before Writing a Stable Diffusion Prompt
Before you try writing prompts for Stable Diffusion, there are a few basics you should get familiar with first. It's not just about tossing in a random sentence and hoping for magic. A good prompt needs some structure so the AI knows exactly what you want and what to avoid.
Types of Prompts in Stable Diffusion:
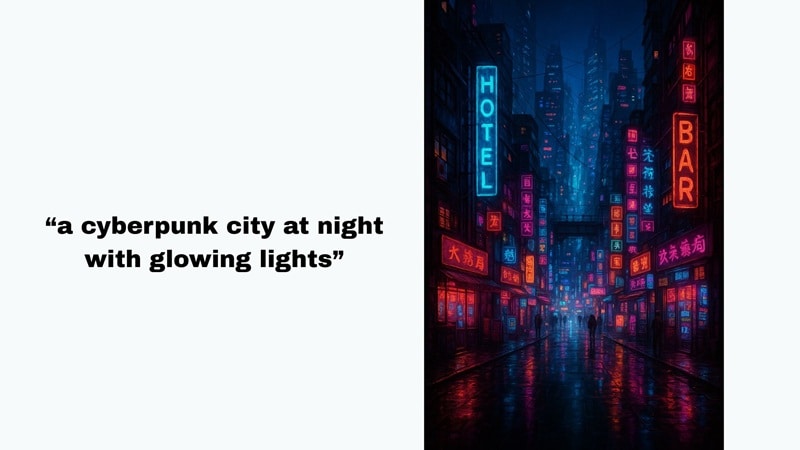
- Positive Prompts: Tell Stable Diffusion what you want in the image
Example: "a cyberpunk city at night with glowing lights".
- Negative Prompts: Tell Stable Diffusion what you don't want
Example: "blurry, distorted hands, extra limbs".
Using both in your Stable Diffusion prompts helps the AI create a cleaner and more accurate result.
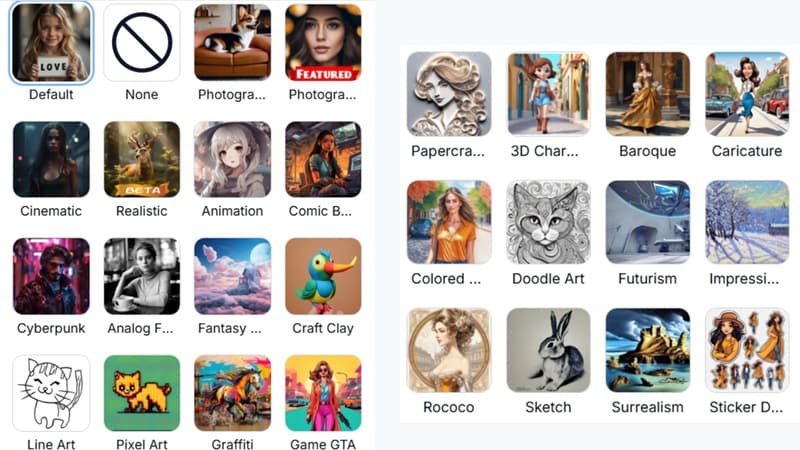
Styles Available in Stable Diffusion
Right now, Stable Diffusion offers 27 different styles to choose from. You can either click on a style or simply mention it clearly in your prompt Stable Diffusion to help guide the final image.
Part 2. How to Write the Best Prompts for Stable Diffusion (With Examples)
Now, it's time to actually write your prompt. One essential aspect from any Stable Diffusion prompt guide is to follow a solid structure.
Most prompts usually include things like Main subject, Modifiers (colors, mood, or texture), Style (cinematic, anime, fantasy, or watercolor), Camera details (close-up, wide shot, from above, macro), and Resolution (4K, ultra sharp, or 8K).
And to make sure, you really craft the best prompt for Stable Diffusion, check out a few tips below:
Tips for Writing Better Prompts:
- Paint A Clear Picture: Skip the plain stuff like "a cat" and go for something with character. Try "a majestic Maine Coon cat with golden fur, sitting on a royal throne" to give the AI a stronger idea of what you want.
- Add Style And Set The Mood: Words like dreamy, dark fantasy, vaporwave, or cinematic help shape the vibe of your image. Think of it like setting the tone before the AI starts drawing.
- Frame It Like A Photographer: Mention angles and layout in your Stable Diffusion prompt. Say things like portrait mode, close-up, wide shot, or top-down view to guide how the scene is framed.
- Clean It Up With Negative Prompts: Nobody wants messed-up hands or weird faces. Use negative prompts like no extra limbs or no blurry face to avoid those common AI mistakes.
With these tips in your back pocket, crafting the right prompt for Stable Diffusion feels way less confusing. Now, go ahead and try it out for yourself. And if you're not sure where to start, no worries. We've got some of the best Stable Diffusion prompts below to give you a head start.
Real Prompt Examples
Here are some real prompt examples you can try:
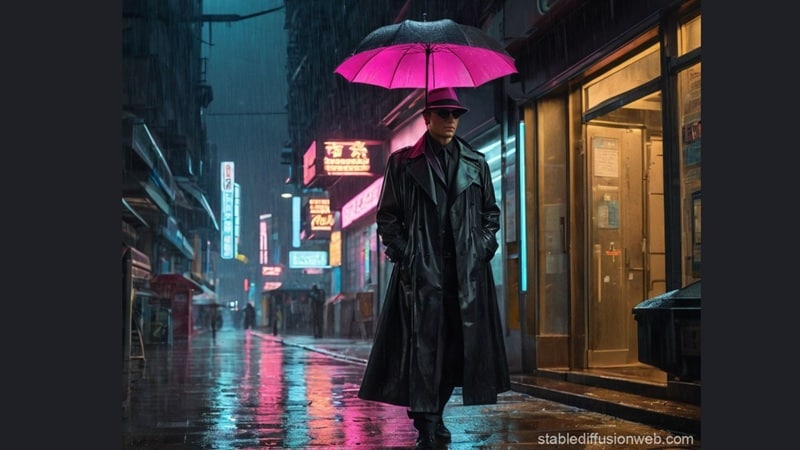
Style: Cyberpunk
Prompt Example: A futuristic detective in a neon-lit city at night, wearing a sleek black trench coat and cyberpunk visor, standing under a glowing streetlamp with rain falling, cinematic lighting, highly detailed, realistic style, portrait mode, ultra sharp, 8K resolution.
Negative Prompt: Blurry face, extra fingers, distorted hands, low quality, cartoon style.
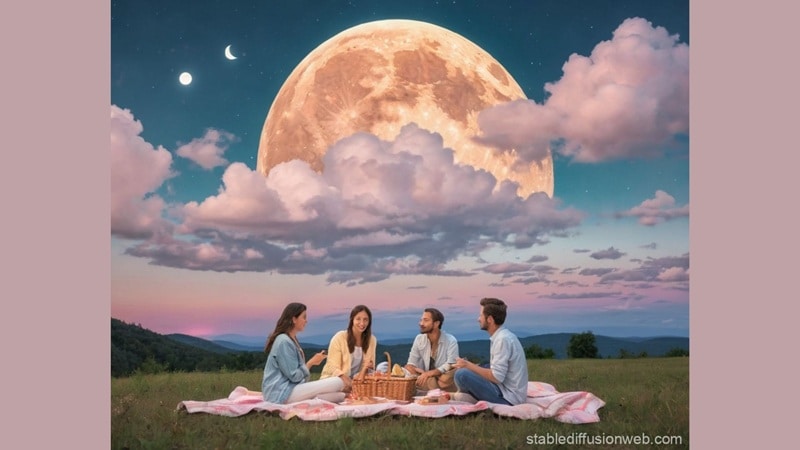
Style: Fantasy
Prompt Example: A group of friends having a cozy picnic under a glowing full moon, with warm lantern light, dreamy atmosphere, pastel colors, cinematic view, wide shot, ultra realistic, 8K resolution, high detail sky and moon.
Negative Prompt: Blurry face, extra fingers, distorted hands, low quality, cartoon style.
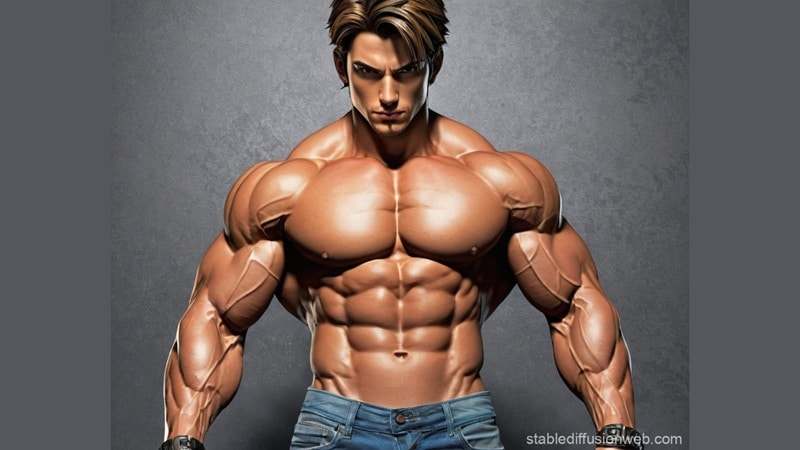
Style: Animation
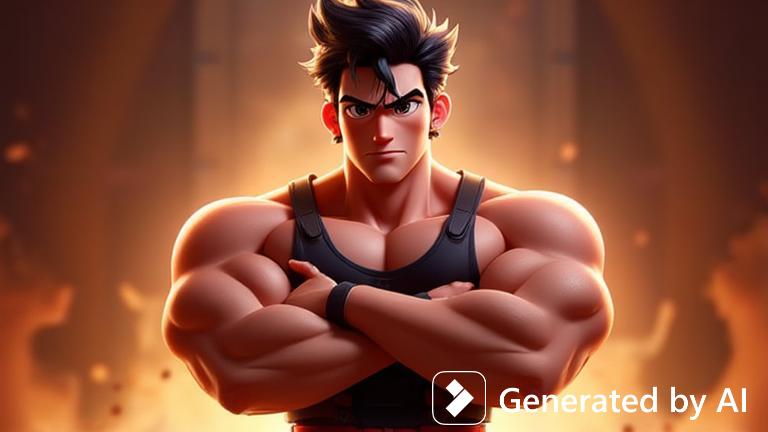
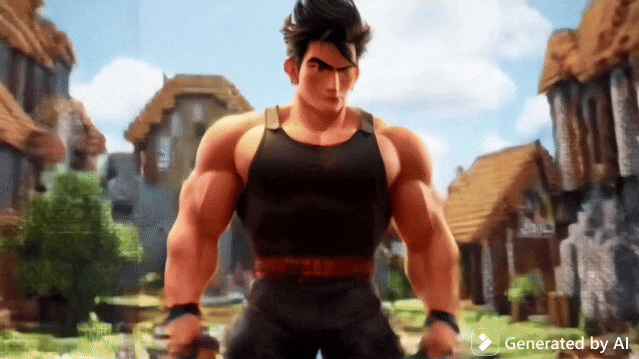
Prompt Example: Anime character of a strong, muscular man, defined six-pack abs, broad shoulders, large muscular arms, standing confidently with crossed arms, spiky black hair, wearing a sleeveless battle outfit, dynamic pose, glowing background, dramatic lighting, anime style, 4K resolution, sharp details, close-up view.
Negative Prompt: Blurry face, extra limbs, distorted muscles, low quality, realism style.
Part 3. From Still Frames to Stunning Motion: What's Next After Prompts?
Now that you've seen how to write the best Stable Diffusion prompts and explored what it can do with still images, you might be wondering where to go from here. Sure, Stable Diffusion can create some seriously stunning art, but sometimes a single frame just isn't enough. Maybe you want to bring your ideas to life with smooth motion, custom audio, or extra style control.
If you're thinking bigger than just stills, Wondershare Filmora is your next creative playground. This all-in-one video editor allows you to blend styles, shape the mood, and basically direct your own scene without needing a Hollywood budget. It's fast, fun, and gives you way more control over your creative vision.

Here's why Filmora is a more creative and complete tool for bringing your AI art to life:
Turn Text Into Art With AI Image Generator
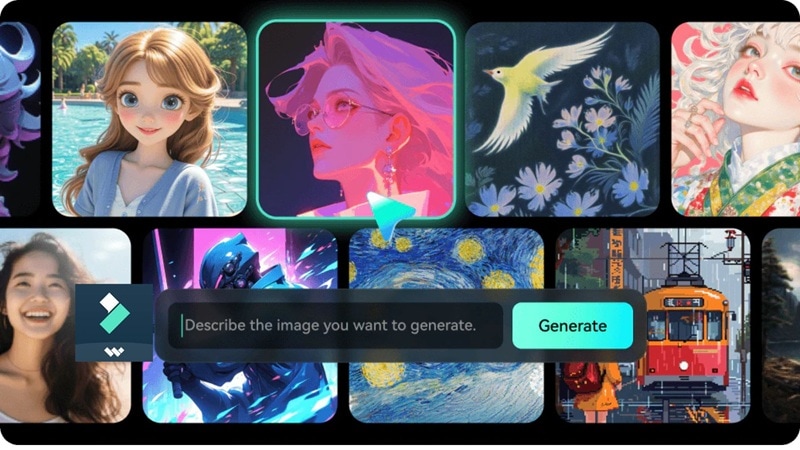
Filmora comes with its own built-in AI Image Generator that works a lot like Stable Diffusion. Just type in your prompt, pick from over 25 unique styles, and let the magic happen. In a few seconds, your image is ready to go. You can save it or drop it straight onto the timeline to start editing right away.
Check out the easy steps below to see it in action:
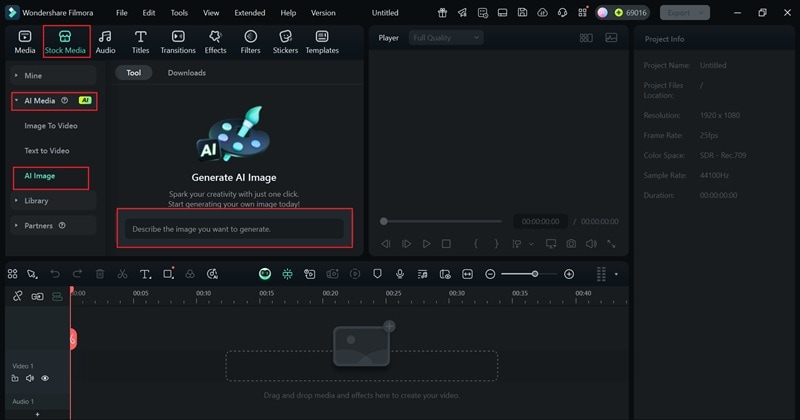
Step 1: Open Filmora, head over to the "Stock Media" menu, and click on "AI Media". Under the feature that shows up, select the "AI Image" feature.
 secure download

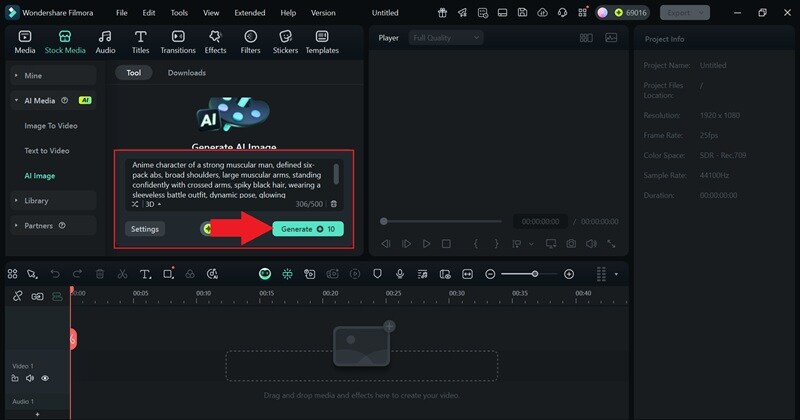
Step 2: Type in your prompt or paste one of your Stable Diffusion prompts. Pick a style you like, hit "Generate", and give it a few seconds to work its magic.
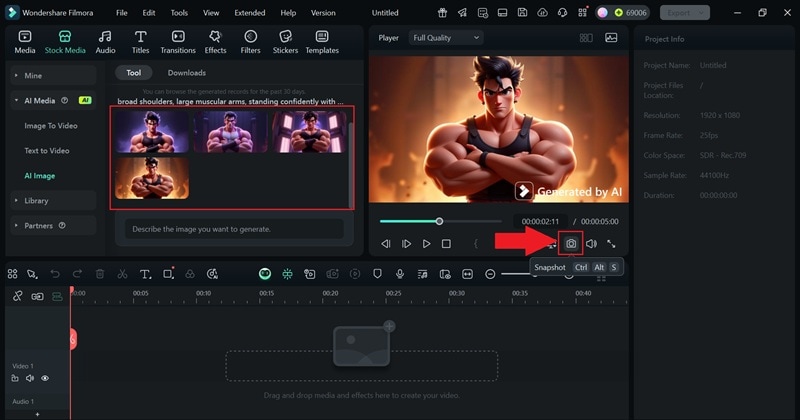
Step 3: Once your images are ready, pick your favorite and click the camera icon to save it to your device.
And just like that, you're done. Here's what the results from Filmora look like:
From Still to Motion With Image-to-Video
Filmora also gives you an AI-powered Image to Video feature that turns your static images into smooth, dynamic clips. Even better, it comes with a bunch of creative preset templates that do all the work for you. No need to write a new prompt. Just upload your picture, pick a template you like, and let it do its thing.
Check out the guide below to see how easy it is:
Step 1: Head to the "AI Media" menu and choose the "Image to Video" feature. Then go into "Video Inspiration" to explore the different template categories. Scroll through and take your time, once you find one you like, just click on it.
 secure download
 Step 2: Upload your image, hit "Generate", and let Filmora work its magic.

Step 3: When it's ready, drag the result to your timeline and click export to save it to your device.

There you have it! As you can see, the whole process is super simple, and honestly, kind of fun to watch your image come to life. Take a look at the result below.
All-in-One Editor

Filmora is more than just a video editor. It's your full-on creative playground where you can turn Stable Diffusion images into fully polished videos without bouncing between apps. Here's why Filmora should be your number one solution when it comes to video editing:
- Full Customization: Stable Diffusion gives you the image, but that's just the start. Filmora lets you bring it to life with animation, cropping, overlays, text, transitions, sound effects, B-roll, and even motion tracking when you need it.
- Cross-Platform Creative Workflow: Filmora works on Windows, macOS, Android, and iOS. You can start your AI prompt on your phone, then pick things up on your laptop without missing a beat.
- Drag-And-Drop Simplicity: You don't need to be an editing expert. Filmora's drag-and-drop interface makes it super easy to add elements, rearrange clips, or layer effects without getting lost in menus.
- AI Tools That Actually Help: Filmora includes smart AI features like auto-captioning, text-to-speech, background remover, and smart short clips. These tools save time and make your videos feel more professional without the stress.
- Creative Templates And Presets: If you're not sure where to start, Filmora has a library of templates and presets for every kind of project. Just plug in your visuals and customize the vibe.
Conclusion
When working with text-to-image tools like Stable Diffusion, getting the prompt just right makes all the difference. That's why we created this Stable Diffusion prompts guide to help new users get started with confidence. It covers easy tips for writing better prompts and also shares some of the best prompts for Stable Diffusion examples to try out.
However, while Stable Diffusion is great for generating still images, it stops there if you're looking to go beyond. If you want to turn your creations into something more dynamic, Wondershare Filmora is the way to go.
This all-in-one editor not only has its own AI Image Generator where you can paste your Stable Diffusion prompts, but it also lets you turn those images into videos in just a few clicks. With tools for animation, sound, and full customization, your creative ideas won't stay still for long.
secure download 