Video quality improvement applications have gradually emerged due to the surge in video content consumption on different platforms. Whether you are a content creator, video maker, or someone tired of watching blurry videos from the past or a "how to" maker, the proper tools for enhancing video quality are crucial. In a more traditional list of applications, it is worth mentioning a bright representative of the cutting tools – Cutout.Pro Video Enhancer.
In this article, you will learn about the Cutout.Pro Video Enhancer, how much it costs, how easy it is to use, and whether this tool is suitable for your project. Moreover, we will contrast it with another widely used application, Wondershare Filmora, to enable you to make an informed decision.
In this article
Overview of Cutout Pro Video Enhancer

Cutout Pro Video Enhancer is designed to address one of the most common problems faced by video editors and content creators: low video quality. This software tool is one of the most powerful free AI video enhancers, bringing out details and sharpness in the videos. It has a simple design and is transparent to users regardless of whether they have prior experience or not.
Whether you want to improve an old family video, make illustrations in anime material look sharper, or shoot better-quality videos for work, Cutout.Pro Video Enhancer flaunts powerful video improvement tools.
Key Features of Cutout.Pro Video Enhancer
Cutout.Pro comes with several notable features designed to enhance video quality, resolution, and overall experience:
- Video Quality Boost: With this feature, poor-quality videos can be transformed to better quality, such as 2K, or even better, with a frame rate of up to 30 frames per second. It is very helpful for videos taken on earlier devices that did not have the option of high definition or higher resolutions.
- Sharpening Magic: The sharpening magic feature is effective for hazy or fuzzy videos, as it enhances the definition, making the video clear.
- Anime Upgrade: This tool is helpful for anime or anyone interested in animating and enhancing anime videos regarding sharp edges, brightness, and contrast.
- Video Upscaling: The refined resolution feature is a critical option in video enhancement. It allows users to upscale the quality of their videos so that they are suitable for playing on a big screen without fading the quality.
- Motion Interpolation: Another technique is motion interpolation, where new frames are inserted between the existing frames to smoothen movement and decrease jitters or lags.
- Support for Multiple Formats: Cutout Pro Video Enhancer supports various popular video formats, including mp4, WebM, MOV, and gif, which allows you to edit almost any file type.
- Shake Stabilization: A valuable feature when manually correcting footage shot with a handheld or action camera since this tool can "lock" a movement and prevent it from oscillating.
Pricing and Plans
Cutout.Pro offers a flexible pricing model, with options for users to pay as they go based on the length of the video they want to enhance. Here's a breakdown of the pricing plans:
| Duration | Cost | Price per Second |
| 1 minute | $19 | $0.317/second |
| 3 minutes | $29 | $0.161/second |
| 5 minutes | $45 | $0.150/second |
| 15 minutes | $129 | $0.143/second |
| 45 minutes | $299 | $0.111/second |
| 120 minutes | $599 | $0.083/second |
| 330 minutes | $1299 | $0.066/second |
This pricing model makes Cutout Pro accessible for casual users and professionals, allowing them to choose plans based on their project needs and budget.
How to Use Cutout Pro to Enhance Video Quality?
Cutout.Pro Video Enhancer aims to be as simple as possible and has been developed that way. Here's a step-by-step guide to help you enhance your video quality:
- Sign Up or Log In: If you haven't registered yet, go to the Cutout Pro company's website and create an account.
- Upload Your Video: Proceed to the AI Video Enhancer part once logged in. Click the "Upload" button and choose the video you want to improve.
- Select Enhancement Settings: Select the required enhancement functions, such as enlarging, improving the quality of an image, or adding frames. You can also decide on the quality level of the video you intend to upscale.

- Preview the Enhancement: Cutout Pro can preview the first three seconds of the enhanced video, after which you can decide whether to enhance it further or tweak it.

- Process the Video: After being content with the settings, ensure the process is well set before you. A YouTube message from AI tutorials will start appearing and improve your video.
Pros and Cons of Cutout Pro Video Enhancer
Like any software, Cutout Pro Video Enhancer has its strengths and weaknesses.
Looking for more video quality enhancers?
A Better Alternative to Cutout Pro Video Enhancer: Wondershare Filmora
Considering that Cutout Pro video enhancer may not deliver robust results for fixing blurry videos, you might look for a more powerful alternative. Wondershare Filmora is a great choice! With the integration of Topaz generative AI video enhancement models, Filmora offers a set of tools that not only match Cutout Pro’s capabilities but also go beyond, providing advanced features for users who need higher-quality restoration, AI-driven upscaling, and enhanced visual detail.
Compatible with Windows and Mac, when it comes to enhancing video quality, Filmora offers comprehensive solutions.
- One-click AI Video Enhancement: Fix blurry videos with one single click.
- Video Denoise: Remove grain from your videos and customize the smooth level from weak, normal to strong.
- Auto Enhance: Enhance videos automatically to become more apparent with higher resolution and sharper details.
- Color Correction Tools: Customize the parameters with large flexibility from brightness, contrast, and saturation.
- AI Stabilization: Enhance shaky videos with the help of Filmora's powerful AI tool to make the videos look stable and professional.
How to Enhance Video Quality Using Wondershare Filmora:
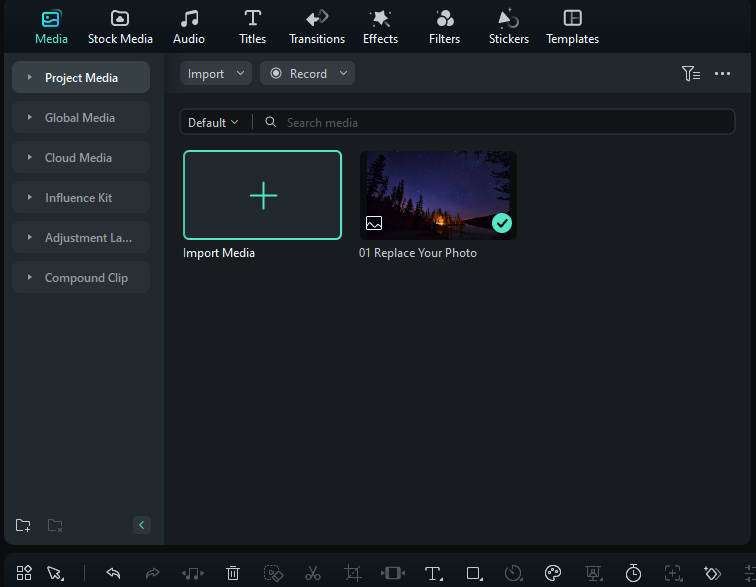
- Download and Install Filmora: Visit Wondershare's official website to download and install the Filmora software on your Windows or Mac device.
- Import and drag the video to the timeline: Click the import button to upload the video to filmora, then add it to the timeline.

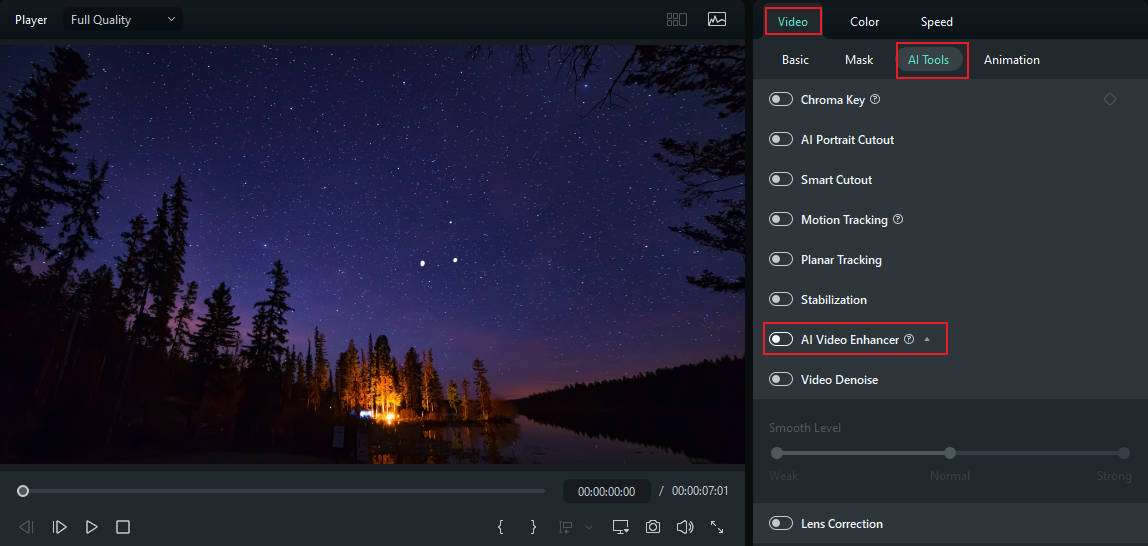
- Go to AI Tools: By clicking on the video you will see a window on the right-hand side with an AI tools option on it.

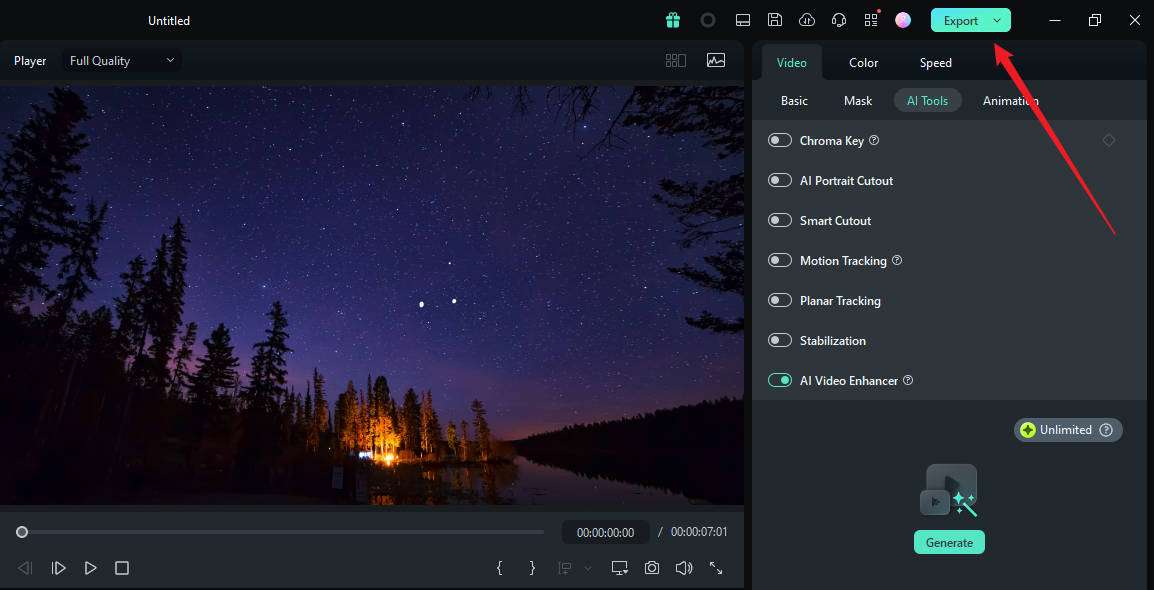
- Apply AI Video Enhancer: Click on the Generate button to automatically enhance video quality.

- Tweak Settings Manually: If needed, manually adjust the video settings under color for brightness, contrast, saturation, and sharpness.
- Preview and Export: Preview the enhanced video without any watermarks. Once satisfied, export the video in your desired format.

Why Is Filmora Considered a Better Choice than Cutout Pro Video Enhancer?
- Better output quality: Filmora offers better quality than Cutout Pro Video Enhancer in text edges, human portraits, and night scene enhancement.
- Real-Time Frame Interpolation: Uses AI to create intermediate frames, increasing frame rates smoothly and reducing motion blur without introducing artifacts
- Mac Compatibility: Filmora has versions for Windows and Mac, and more options for their usage are always available.
- Supports All Popular Formats: While Cutout Pro does not support several video formats, such as AVI, MKV, FLV, MP4, and others, Filmora does.
- Scene Detection and Adaptation: AI analyzes video content in real-time to apply different enhancement techniques based on scene characteristics.
From color correction to stabilization, Filmora features are way ahead in offering better and easily customizable options to users who want to tweak their videos to the core.
Conclusion
In this article, we have discussed the key features, pricing plans, and pros and cons of Cutout.Pro Video Enhancer, along with the steps to enhance video quality by using it.
All in all, if you only want to enhance video quality, you can give it a try. But during our test, it doesn't provide good results in unblurring videos. We also recommend you use Wondershare Filmora, which is a more comprehensive and effective solution to enhance video and edit videos.


