If you have an audio file with an annoying echo, Audacity echo reduction can help you eliminate all audio disturbances and enhance the quality and volume of your file. Audacity is a fantastic, user-friendly, and free program that helps Mac, Windows, and Linux users edit, modify, and adjust audio files according to their needs.
The program offers four top-grade echo removal methods to empower you to eliminate the echo and background noise from audio clips. Today, we’ll discuss the most effective ways to remove echo in Audacity.
We’ll also provide step-by-step guides for four Audacity echo reduction methods. In addition, we’ll offer an alternative free solution for removing background noise from your audio and video files.
In this article
Best Methods for Reducing Echo in Audacity
Below, we’ll delve deeper into the best, most effective methods to remove echo in Audacity.
Audacity Echo Reduction With the Noise Reduction Feature
The Noise Reduction effect is an effective Audacity feature that can reduce echo and eliminate unwanted background noises like hisses, buzzes, whines, whistles, hums, fan sounds, webcast interferences, etc.
Here’s how to use the Noise Reduction feature to reduce echo from your audio in Audacity.
Step 1: Download and install Audacity on your computer.
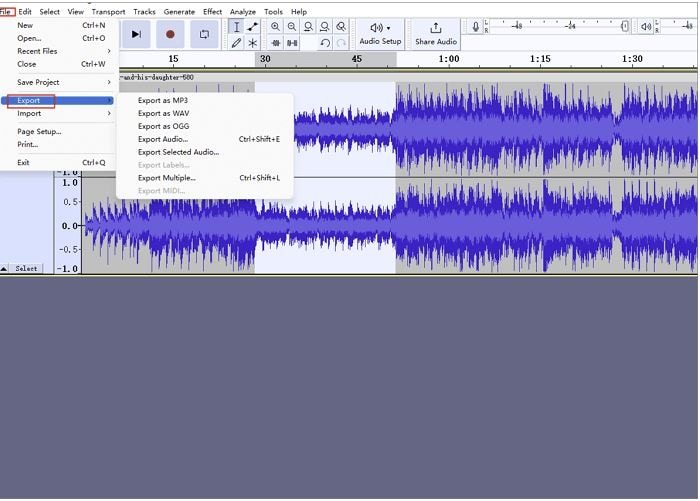
Step 2: Launch the program and navigate to File > Import > Audio to import your audio file.
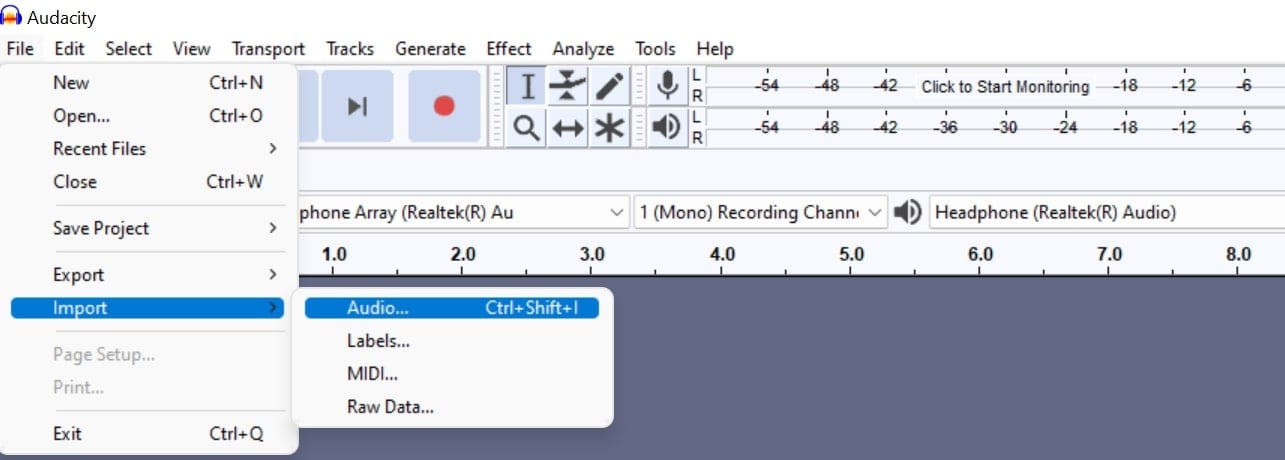
Alternatively, you can select File > Open. When a new window opens, change the Files of type to All supported types. Select the file with an echo you wish to remove and click Open.
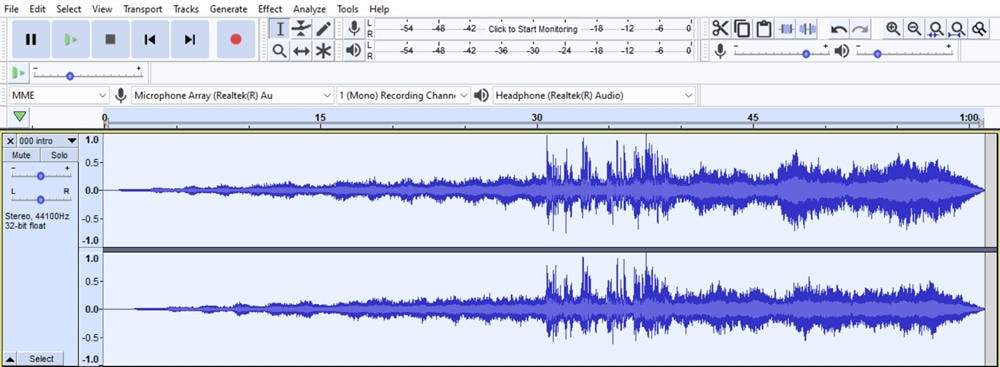
Step 3: You will see the audio track in the timeline. Navigate to the left side menu and locate the Select option at the bottom. Click Select to select the whole track. You can also select the specific segment of your file you wish to edit. Click on the one end of the audio segment and drag the mouse to the other end.
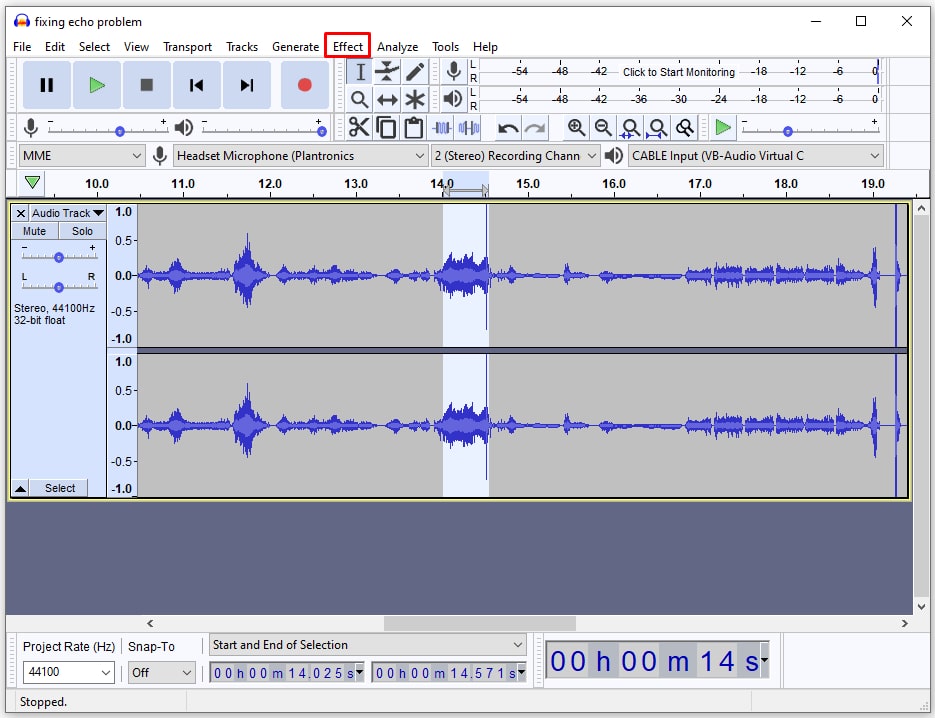
Step 4: Locate the Effect tab at the top of the screen. Click the tab to open the Effect menu and select Noise Removal and Repair > Noise Reduction.
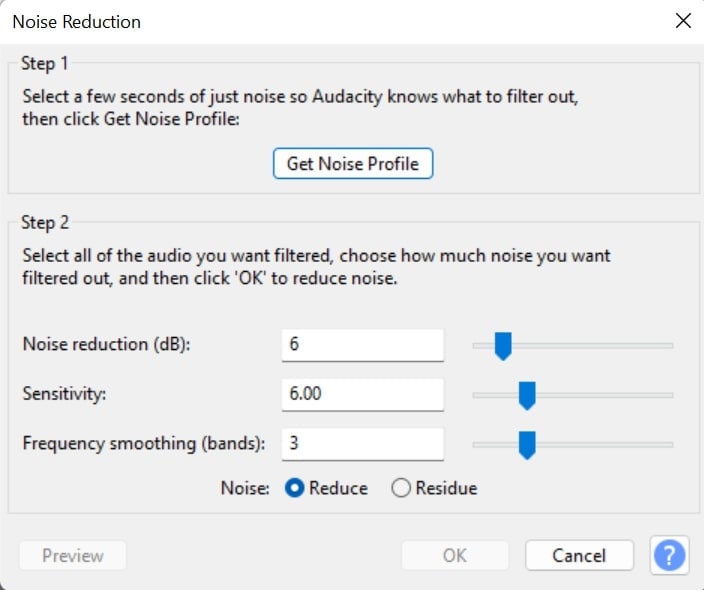
Step 5: In the Noise Reduction menu, click Get Noise Profile. The window will close after you click Get Noise Profile. Open the Noise Reduction menu again and click OK. Replay your track to check the result.
If you’re unsatisfied with the results, go to the Noise Reduction menu again and move the Noise Reduction slider to control the noise reduction effect. Higher values may remove the noise altogether, but they can make the original audio too quiet. Use the Sensitivity slider to fine-tune the noise reduction effect.
Step 6: If these changes lower the audio output volume, navigate to Effects > Amplify to increase the volume.
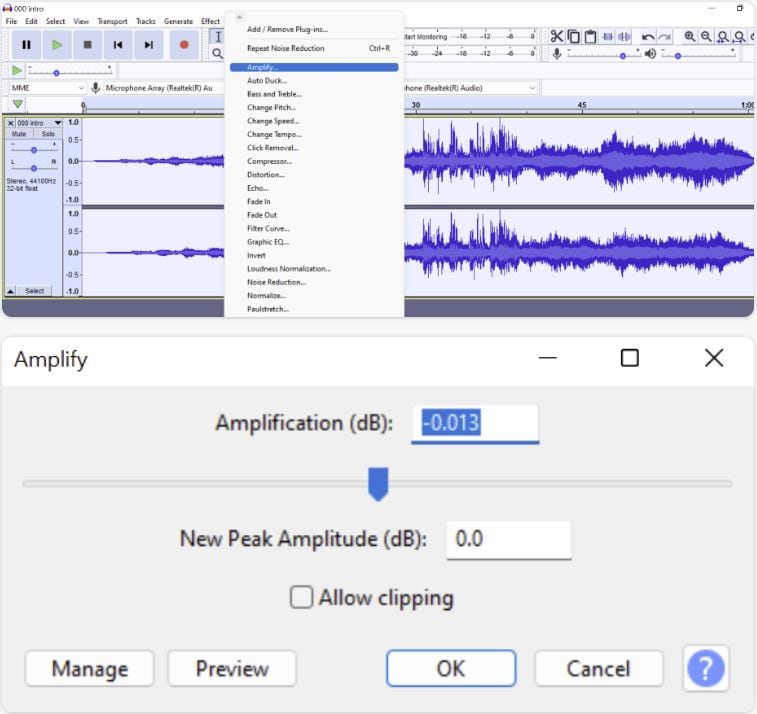
Step 7: Click OK to confirm your changes, then navigate to File > Export and save your file on your computer.
Audacity Echo Removal With the Noise Gate Feature
If the Noise Reduction effect doesn’t provide the desired results, you can tap into the Noise Gate feature in Audacity to make more fine-tuned adjustments. Noise Gate is a powerful echo reduction feature in Audacity that allows you to make more subtle modifications than the Noise Reduction effect.
Aside from removing/reducing echo, Noise Gate can eliminate all background noise between pre-determined sections of an audio track and reduce the overall audio volume to a pre-set threshold level.
It will help you contract audio levels under a predetermined threshold and decrease noise intervals within an audio clip. Here are the steps to use Noise Gate to remove echo from audio in Audacity.
Step 1: Launch Audacity, import your audio file, and select the entire track.
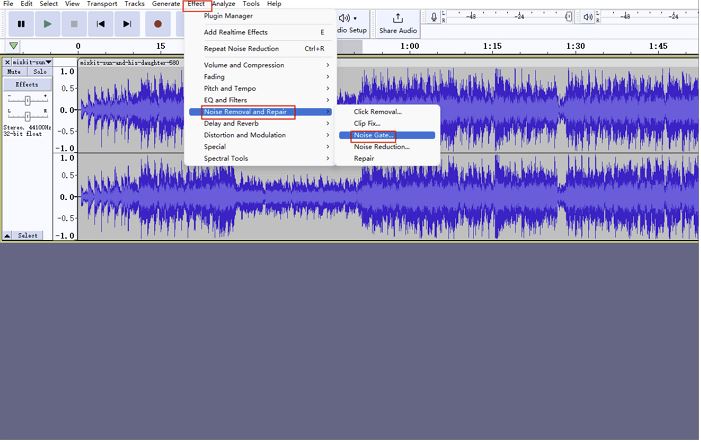
Step 2: Navigate to Effect > Noise Removal and Repair > Noise Gate.
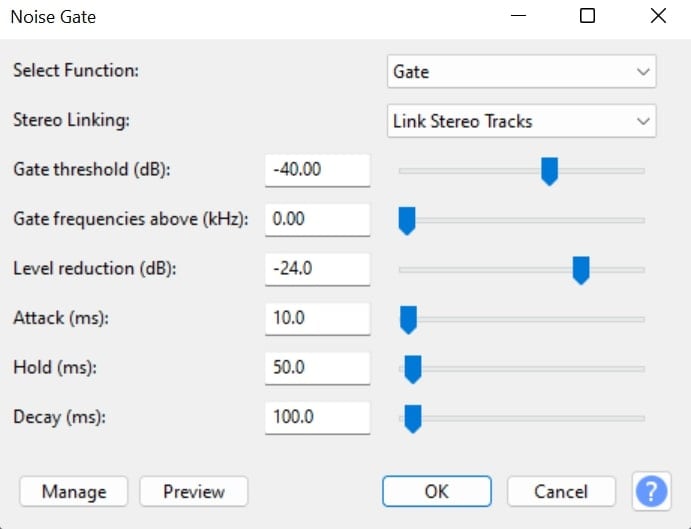
Step 3: In the Noise Gate menu, adjust the following settings to apply the echo removal effect to the entire audio clip in the timeline:
- Gate threshold – the setting helps you adjust the original input and output audio level.
- Level reduction – adjust the amount of noise reduction you want to apply to your audio. Negative values mean less noise.
- Attack – control how quickly the noise gate opens when the audio levels exceed the threshold.
- Hold – modifies the duration of the noise gate effect after the signal goes below the threshold.
- Decay – manage gradual gate closure when the audio level goes below the hold time and the gate threshold.
Step 4: Click OK to save your changes, navigate to Effect > Amplify and adjust the clip volume by dragging the Amplification slider. Export and save your audio without an echo.
Echo Reduction in Audacity With CrumplePop EchoRemover
If Audacity Noise Reduction and Noise Gate don’t help you filter out the annoying echo, try using the CrumplePop EchoRemover plugin to remove the echo noise.
Here are the steps:
Step 1: Download and install the CrumplePop plugin (close Audacity before installing the plugin).
Step 2: Launch Audacity and import your audio file.
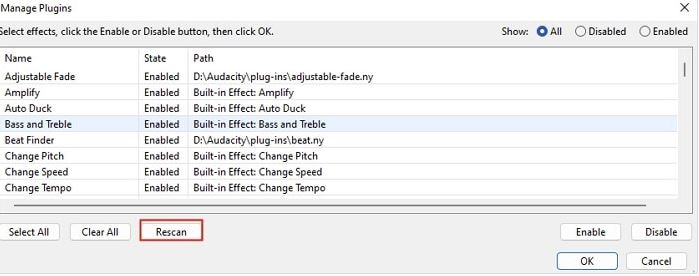
Step 3: Select the audio track and navigate to the Effect menu. Scroll down and select EchoRemover Complete. If the plugin isn’t available in the menu, go to Effect > Plugin Manager > Rescan to scan your plugins and make CrumplePop visible in the menu. Find the EchoRemover, select it, and click Enable > OK.
Step 4: Select Effect > Add Effects > CrumplePop Complete > EchoRemover Complete. The plugin will automatically detect and remove the echo from the audio track.
Audacity Echo Reduction With the Dereverb Function
The Dereverb plugin is a multi-band gate function in Audacity that allows you to adjust the reverb reduction and threshold for separate frequency bands. The feature automatically assesses the gate threshold based on the values of available frequency bands, generating a detailed reverb profile and applying the necessary adjustments in the process.
Here’s how to use Dereverb to reduce echo in Audacity.
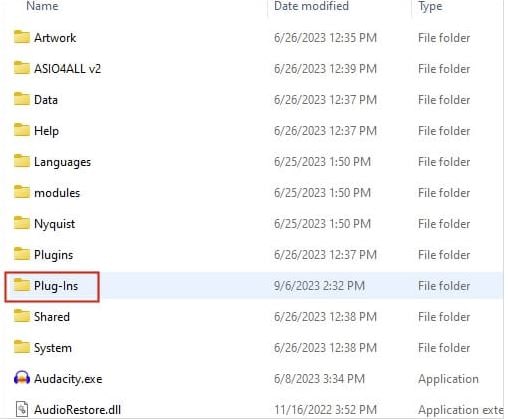
Step 1: Download the Dereverb plugin and add it to Audacity. To do so, navigate to the Audacity download location > Plug-ins and drag the plugin file to the folder.
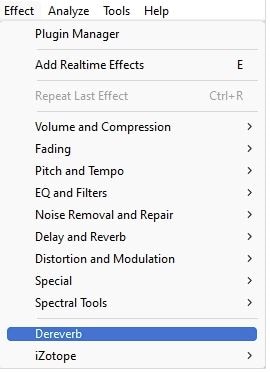
Step 2: Launch Audacity and navigate to Effect > Plugin Manager > Rescan > OK. Go to File > Open and select the audio file with an echo you want to remove. Open the file in Audacity and select it. Navigate to the Effect tab and scroll down. Select the Dereverb plugin.
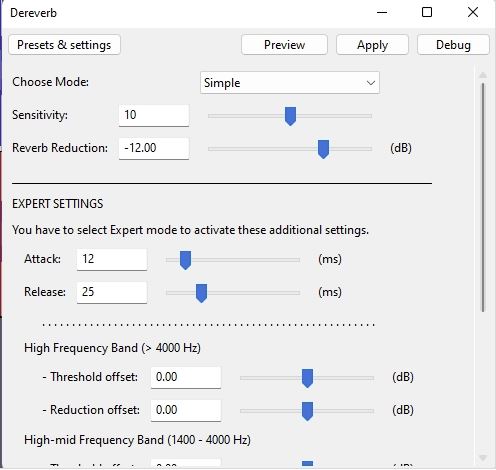
Step 3: In the Dereverb menu, set the Sensitivity and Reverb Reduction values to adjust the Dereverb effect. You can tap into Expert Settings and modify the echo reduction values in the Attack and Release sections. Click OK and export your audio without an echo.
What Is an Echo, and Why Remove It With Audacity?
An echo refers to the unwanted repetition of sound. It occurs when the sound waves reflect from obstructing surfaces such as mountains, walls, etc. It’s most obvious near its source. In audio production, echoes are interpreted as sound signals arriving more than once, offset by time.
For example, you can hear the speaker’s voice reflecting on you while recording a podcast or interview, causing audible disruption. Echoes can cause serious deterioration in the overall audio quality of your live presentation, video conferencing, online conversations, etc.
Since an echo can create a lot of frustrating background noise and lower the audio quality of your communications, you should consider removing it using any means possible. Though you can use numerous paid echo cancellation software tools to eliminate the echo noise, Audacity Echo Reduction allows you to remove the echo for free.
Audacity is one of the most commonly used free audio editors for reducing echo and improving the audio quality of your recordings. It’s a free and easy-to-use echo removal tool for Linux, Mac, and Windows that can remove background noise from your audio quickly and effectively.
How to Remove Any Noise From Audio for Free
If Audacity doesn’t meet your echo reduction expectations, consider using a professional audio/video editor like Wondershare Filmora. It’s an advanced AI-powered audio and video editing software loaded with high-end editing features, including AI-enabled noise removal.
Filmora’s free trial allows you to test its background noise removal features and functions.
Here are the things you can do:
- Tap into Filmora’s advanced AI noise reduction algorithms to effectively eliminate background noise in audio and video files.
- Enhance the audio quality of your files and create studio-quality sound for your projects.
- Effectively eliminate noise and unwanted sounds from an audio clip based on the original source of noise. The tool effectively removes wind noises, hums, hisses, etc.
- Use AI speech enhancement to reduce background noise from speech audio, boost voice volume, and upgrade the audio clarity of your content.
- Use Filmora’s DeReverb feature to enhance audio clarity, remove echo, and reduce reverberation to produce crystal-clear audio for your projects.
Whether there’s an annoying hum, buzzing traffic, or any other audio disturbance in your audio, Filmora can successfully tackle background noise, elevate the audio quality, and transform an average recording into professional-grade, editable, and shareable content.
Removing noise from audio in Filmora is simple. Download and install Filmora on your computer, then follow the steps below to denoise your audio clip.
Step 1: Launch Filmora and navigate to Create Project > New Project. Upload your audio/video file and drag it to the timeline.
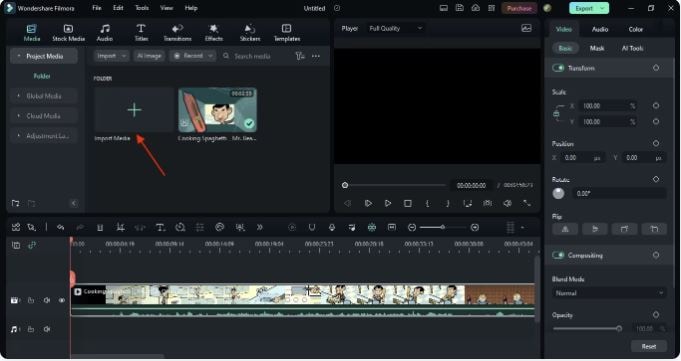
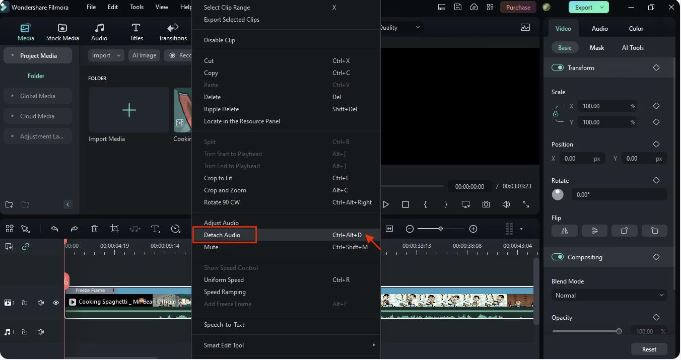
Step 2: Right-click the file in the timeline and select Detach Audio to separate the audio track from the video. That allows you to isolate noisy audio in a separate editable track.
Step 3: Double-click the isolated audio track to open the Editing menu. Select Audio > Denoise and check the Remove background noise box to denoise your audio. Adjust the effect by moving the slider from Weak to Strong.
If Denoise alone isn’t enough to remove the noise from your audio, right-click the audio track in the timeline and select Adjust Audio to open the Audio panel on the right side.
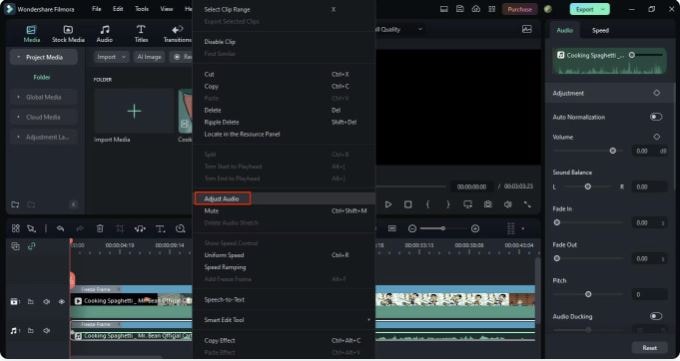
Step 4: Click the Adjustment option.
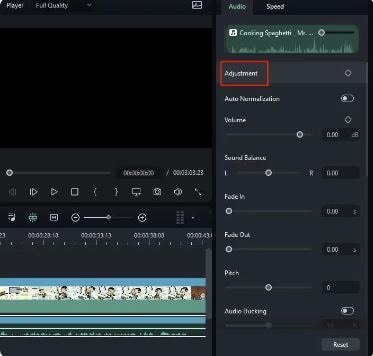
Step 5: Experiment with Normal Denoise, DeReverb, Hum Removal, and Hiss Removal settings to remove noise, eliminate the robot sound, and enhance the audio quality.
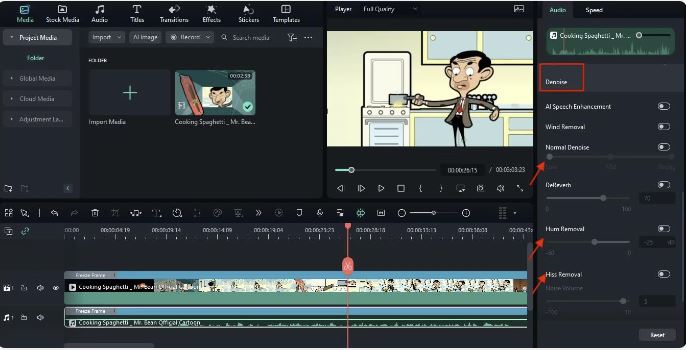
Step 6: Click Export to save the denoised audio on your computer.
Conclusion
In conclusion, reducing echo and removing reverb from your audio files in Audacity is a simple process. It helps you enhance the audio quality of your recording, allowing you to achieve professional-grade, crystal-clear audio for your projects.
However, remember that eliminating echo completely isn’t as easy as reducing it. Audacity offers multiple echo reduction methods that you can tap into to diminish echo on your audio recordings.
Though you can make background noises, including echoes, almost unnoticeable in Audacity, these audio disturbances will still be present in your files. If you wish to eliminate them for good, you’ll need professional-grade audio/video editing software like Wondershare Filmora.
Filmora uses the power of AI to detect and eliminate all sorts of background noises, including sound reflections, while maintaining the quality of the original audio. The tool automatically removes all unnecessary reverb while enhancing the authenticity, clarity, and quality of your audio/video files.


