
 100% Security Verified | No Subscription Required | No Malware


 ChatGPT
 Perplexity
 Gemini
 Claude
 Grok
Grok
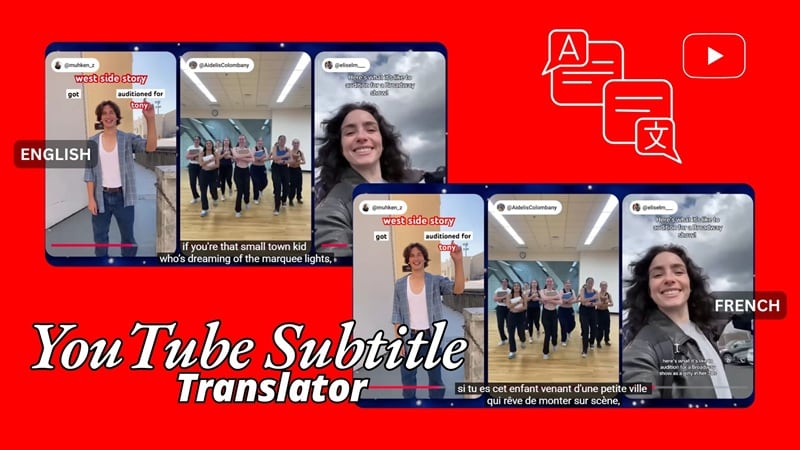
YouTube viewers rely on subtitle translation to enjoy videos in languages they don’t speak. Because of that, translating your content has become an important part of any creator's growth strategy.
Just think about how many potential viewers you might lose if your video only supports one language? If the problem is that you don't speak another language, you can still translate your YouTube videos to English subtitles or other languages with the help of some YouTube subtitle translators.
There's really no excuse not to do it anymore. Whether you're a YouTube creator or a viewer, we will share with you a few ways to make the whole viewing experience enjoyable with no language barriers in the way!
In this article
Comparison of the Methods
In this guide, there are at least three reliable ways you can use to translate YouTube subtitles:
- Using an AI tool like Speech to Text (with a built-in translation feature) for more accurate translations.
- Using YouTube's built-in auto-translate feature.
- Using a browser translate plugin for quick subtitle conversion.
Before we break them down one by one, you can take a quick look at the options you'll see next and how each method helps you translate your videos.
| Filmora's AI Tool | YouTube's Auto-translate | Immersive Translate Plug-in | |
| Accuracy | Over 95% | 60% - 70% | ~80% |
| Speed | Fast | Fast | Real-time |
| Difficulty level | Easy to moderate | Easy | Easy |
| Cost | Paid | Free | Free & Paid |
| Supported Languages | 23 languages | 100+ languages | 70+ languages |
| Best for | Accurate translations with full editing control. | Quick, built-in subtitle translations. | Instant subtitle translations while watching. |
Even if you're a viewer looking for a way to translate videos you're watching, you can still use these methods to generate subtitles in your preferred language, so you can still enjoy the content without problems.


Method 1: How to Translate YouTube Subtitles with AI (Recommended)
On YouTube, you can upload subtitle files to your videos, but you need a translated version ready before you upload. To save you time and effort, AI-powered YouTube subtitle translators can now handle the translation for you. One of the best options for you to consider is Wondershare Filmora.
Filmora features a Speech-to-Text tool with a built-in translation feature that you can use to generate subtitles in multiple languages fast and accurately. After creating the subtitle, you still get to customize and edit it until everything's perfect before saving it as an SRT file or placing it directly on the video as hard subs.
Benefits of Using Filmora
- Get Full Control Over Your Subtitles: Even though the process is automated, Filmora still lets you handle every detail of your subtitles. You can adjust the timing, rewrite lines, and clean up the text so everything matches your video.
- Generate Subtitles for the Whole Timeline or Specific Clips: When working with multi-segment videos, you can decide whether you want subtitles for your entire video or only for certain parts.
- Built Inside the Video Editor: You can handle everything in one place without switching between different apps. Along with generating translated subtitles, you can use the same workspace to refine your YouTube videos before posting them.
- Make Your Hard Subs Look Stylish: If you prefer hard subs, Filmora offers animated caption templates you can use to dress up your translated subtitles. You can switch up the font, color, size, and animation to match your videos' look.
Pros and Cons of Using Filmora's AI
Best for: Translating long, complex, and nuanced videos with better accuracy, manual tweak options, and more room for customization.
How to Translate YouTube Subtitles with AI
Make sure you have installed and updated Filmora to the latest version to enjoy every feature it offers in the best way possible.
Step 1: Create a New Project and Import Your Video
From the startup window, select New Project to start fresh. Then, import the YouTube video you want to translate and add it to the timeline.
Note: You can also use Filmora to translate YouTube subtitles if you already have an SRT file. In this case, import the SRT file into your project.

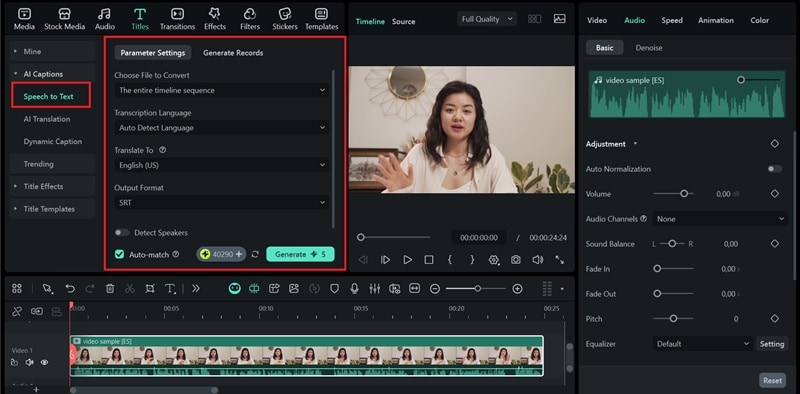
Step 2: Access the Speech-to-Text Feature
Inside the workspace:
- Head to Titles > AI Captions > Speech to Text.
- Adjust the parameter settings and select the language you want to translate to. For example, to translate YouTube subtitles to English, choose English (US or UK).
- Click Generate to start the process.
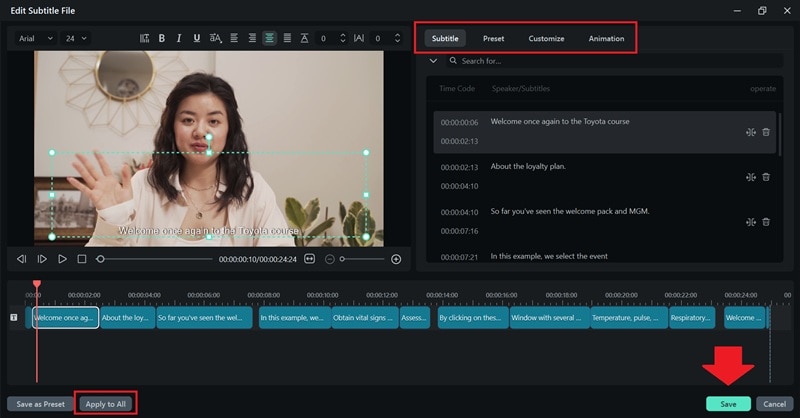
Step 3: Edit and Customize the Translated Subtitle
After a few moments, your subtitles will be ready. If you use the translation feature, you'll see two subtitle tracks on your timeline: the original speech and the translated version.
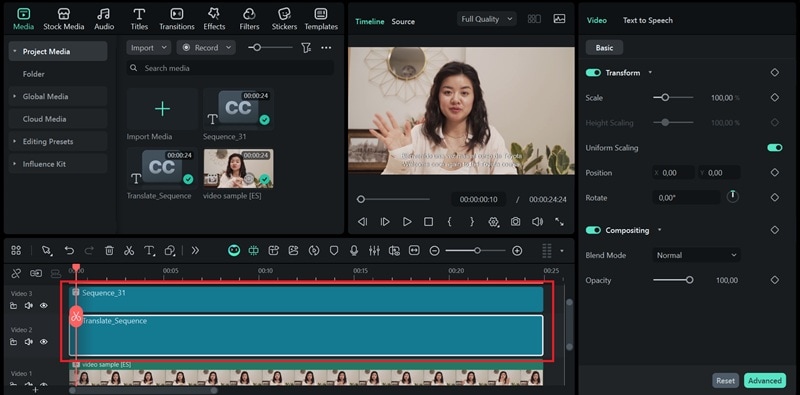
To edit or customize them, double-click the subtitle track on the timeline, and the editing window will open.
Step 4: Export the Subtitle File or Video
Once you're satisfied with the subtitles, it's time to export. Filmora gives you two options depending on how you want to use the subtitles:
- Export only the translated subtitles as an SRT file
- Export the video with subtitles embedded (hard subs)
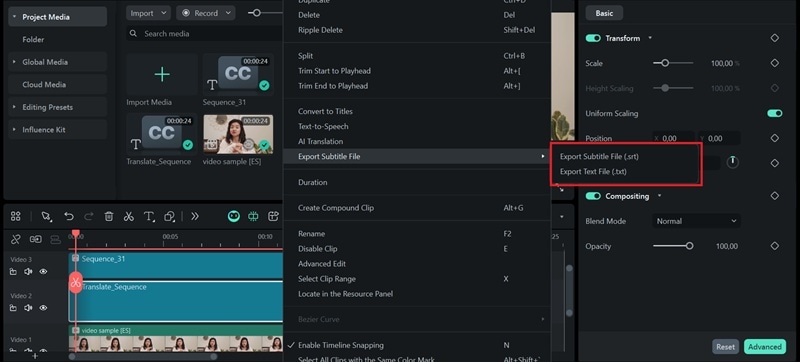
If you want to upload them to YouTube later, choose to export the subtitles as an SRT file. Right-click on the subtitle track and select Export Subtitle File > Export Subtitle File (.srt). You can also use this method to convert YouTube subtitles to text.
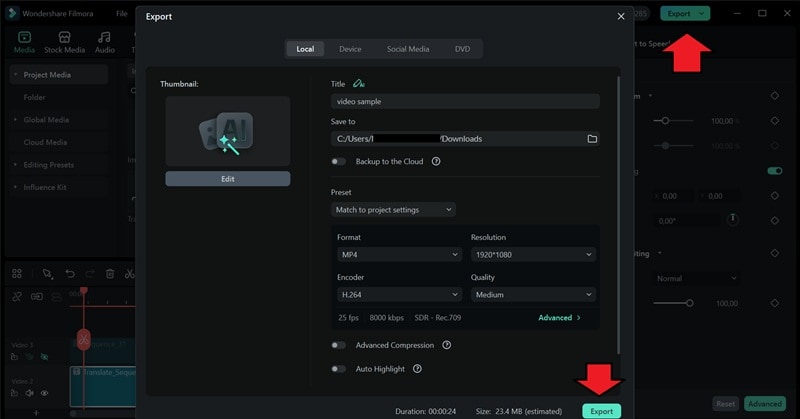
But if you want to keep the subtitles permanently visible on your video, click the Export button at the top and adjust your export settings before saving the final file.
How to Add the Translated Subtitle to a YouTube Video
With your subtitle file ready, it's time to upload it to your YouTube video.
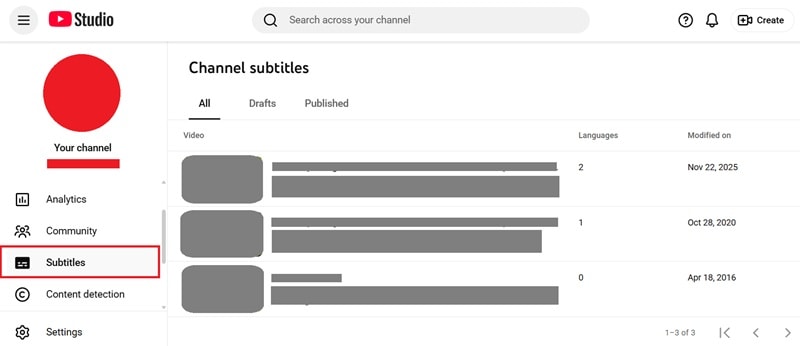
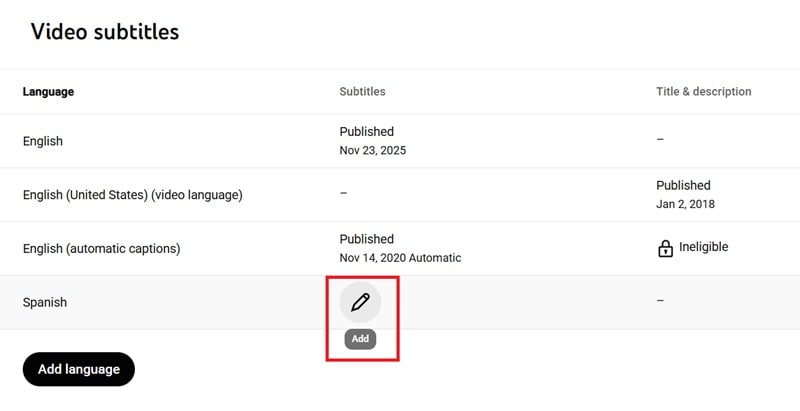
Step 1: Open YouTube Studio and select Subtitles from the left panel.
Step 2: Select and open the video you want to translate. Then, click Add Language and pick the language you want to include.
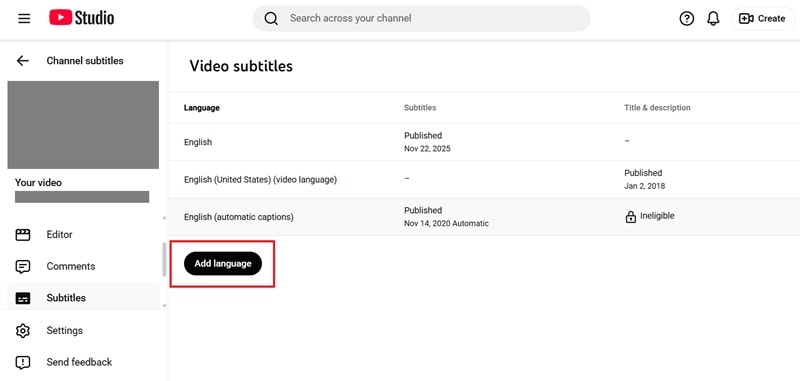
Step 3: Under the new language, click the Add button.
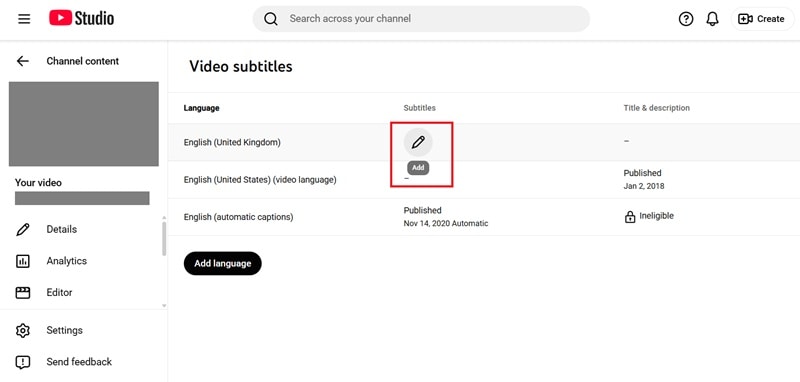
Step 4: Select Upload File and choose the subtitle file you exported from Filmora.
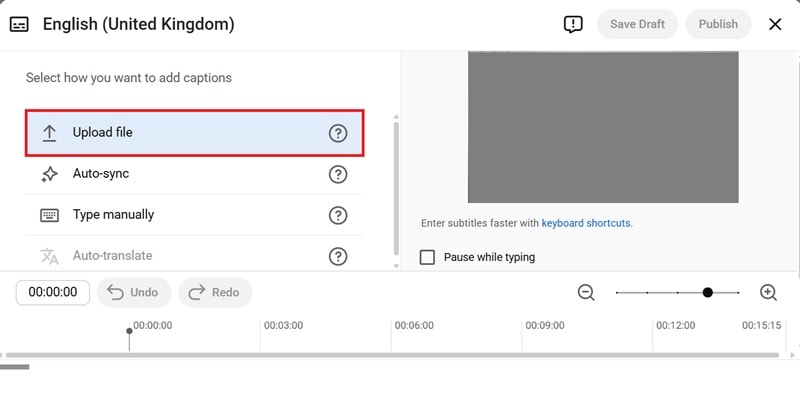
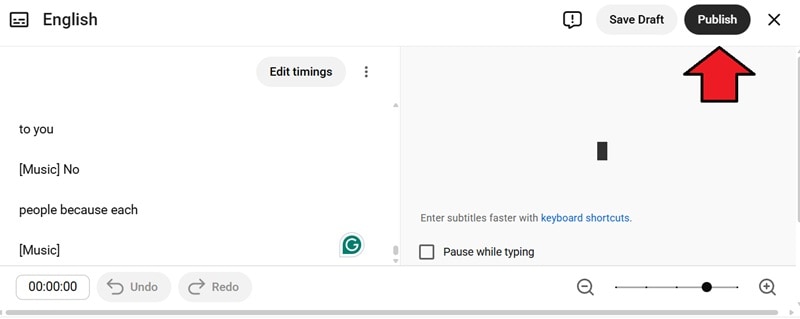
YouTube will process the subtitles and place them into the video. You can still review and edit them if needed. When everything looks good, click Publish to save your translated subtitle and let your viewers enjoy it.
Method 2: Auto-translate with YouTube's Built-in Tool
Another way to translate your YouTube video is by using YouTube's built-in auto-translate feature. It's a convenient option because you just let YouTube do the translation for you, so there's no need for any external tools to translate it beforehand.
Once you have published the translated subtitles, your viewers can choose the language you added directly from the subtitle menu on the video player, just like before.
Pros and Cons of Using YouTube Auto Translate Subtitles
Best for: Creators who already understand a bit of the language and only need quick, basic translations. Otherwise, it can be prone to errors and confuse your viewers.
Step 1: Open YouTube Studio and Select the Video Content
Log in to YouTube Studio, select the Subtitles panel, and choose the video you want to translate.

Step 2: Open the Subtitles Settings and Prepare the Original Captions
To auto-translate your YouTube subtitles into another language, you must first publish YouTube's automatic captions in your original language.
To do it:
1. Find the row that says (automatic captions) and click Duplicate and Edit.
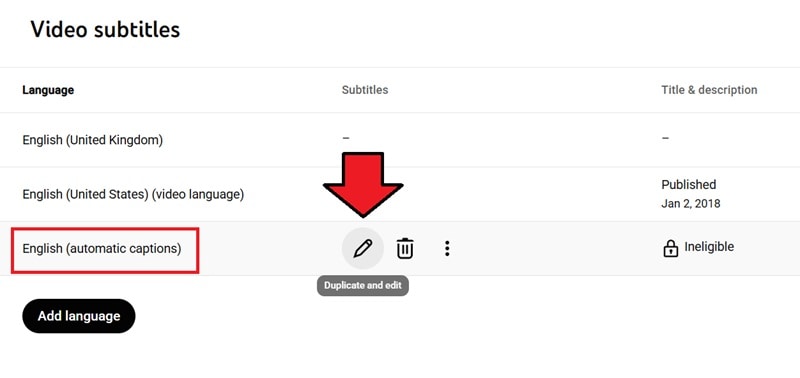
2. A subtitle editor will open. You can make corrections here if needed, since the auto-translation feature will use this version as the base. Or, just leave it as is and click Publish.
Step 3: Auto Translate Into a New Language
After your original subtitles are published, you can auto-translate subtitles for more languages.
1. Go back to the Subtitles panel.
2. Click Add Language and choose the language you want.

3. Click the Add button on the language to open the subtitle setting.
4. In the new window, select Auto Translate.

YouTube will create a translated subtitle file automatically. You can refine the text if needed, then click Publish to save it.
Note: Aside from uploading a translated subtitle file or using YouTube automatic subtitle translation, YouTube Studio also lets you type the translation manually. This method can take more time, but the accuracy depends entirely on how well you translate each line. You can use online translators or reference tools to help you get the meaning right.
Method 3: How to Translate YouTube Subtitles with a Plug-in Tool
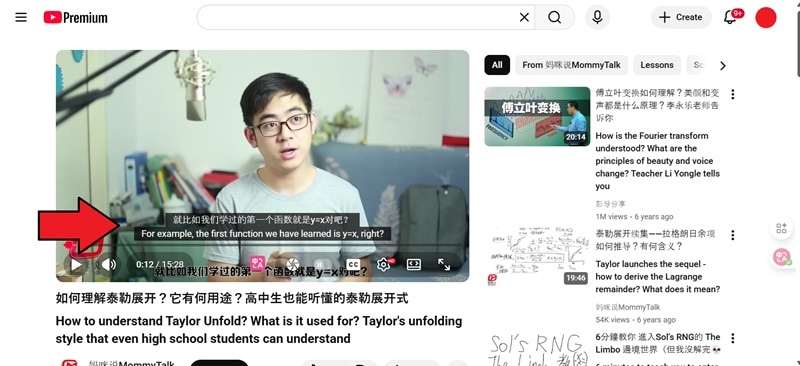
If you're a viewer looking for a quick way to translate YouTube videos to English subtitles or other languages online while watching, using a browser plug-in can be an option. The tool we recommend for this is Immersive Translate.
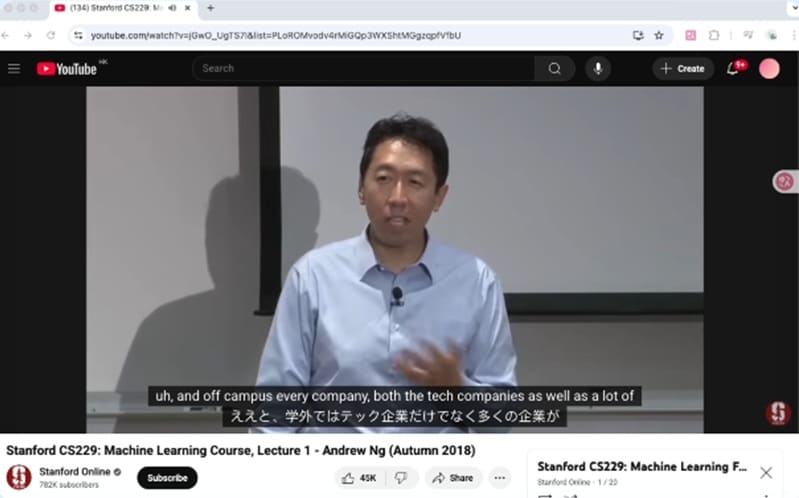
This YouTube video subtitle translator automatically translates subtitles in real time and can display both the original and translated text. It works on most major browsers like Chrome, Firefox, Safari, and Edge, and uses AI language models to deliver translations that follow the context of the video more accurately.
Pros and Cons of Using a Browser Plug-in
Best for: Viewers who want instant subtitle translations while watching videos.
How to Auto Translate YouTube Subtitles Using a Plug-in
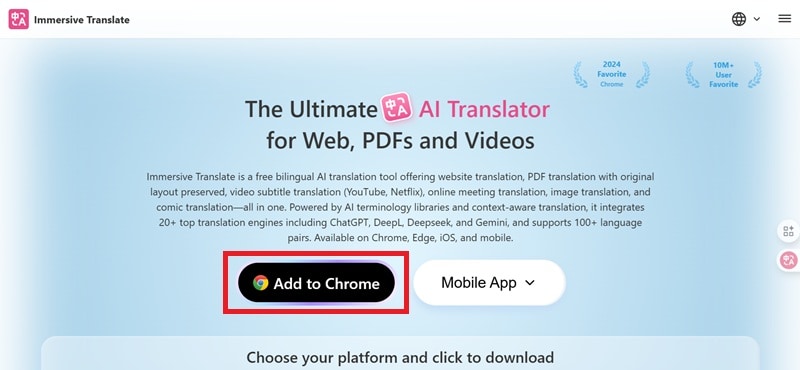
Step 1: Install Immersive Translation on Your Browser
Go to the Immersive Translate website and click Add to Chrome (if you are using Chrome) to install the extension.
Step 2: Enable Immersive Translate
Once installed, the extension should activate automatically. Open any YouTube video, and you should see the plug-in working in the background.
If not, you can open the browser extension and select it to enable the plug-in manually.
Step 3: Customize the Translation Settings
Open the plug-in settings to choose your preferred translation language. For example, if you want English subtitles, set the target language to English.
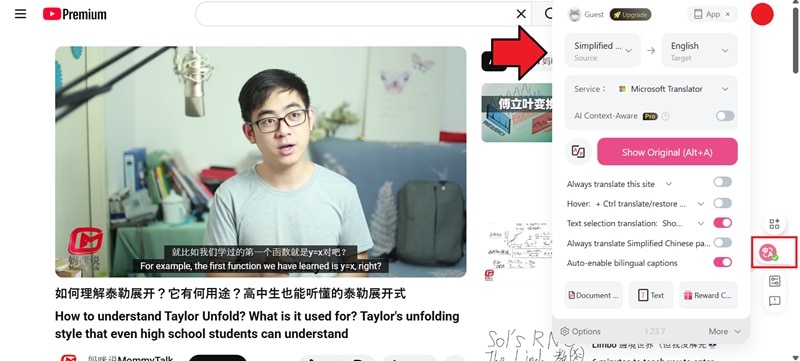
From here, your YouTube videos will show both the original captions and the translated subtitles as you watch.
How to Solve YouTube Subtitle Translation Errors
Having trouble getting your subtitles to translate properly? It's easy to encounter problems during the process. Try these fixes depending on the problem.
1. YouTube Auto-translator Not Working
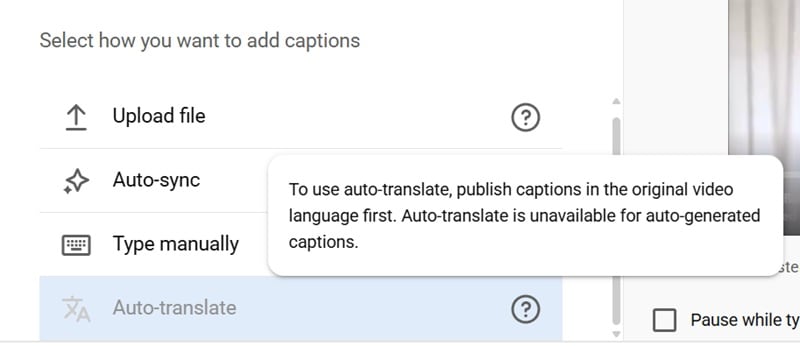
Did you get a message saying "Auto-translate is unavailable for auto-generated captions"? Or does the auto-translate option not appear when you try to watch the video? This issue usually happens when the original captions haven't been published yet. You can't auto-translate subtitles on YouTube unless the base captions in the original language are already saved and published.
Solution:
Go back to the Subtitles panel on YouTube Studio and make sure you've published the automatic captions in the video's original language. Once those captions are live, try running auto-translate again.
Refreshing the page or switching browsers can also help if the feature gets stuck.
2. Subtitles are Out of Sync or Incorrectly Timed
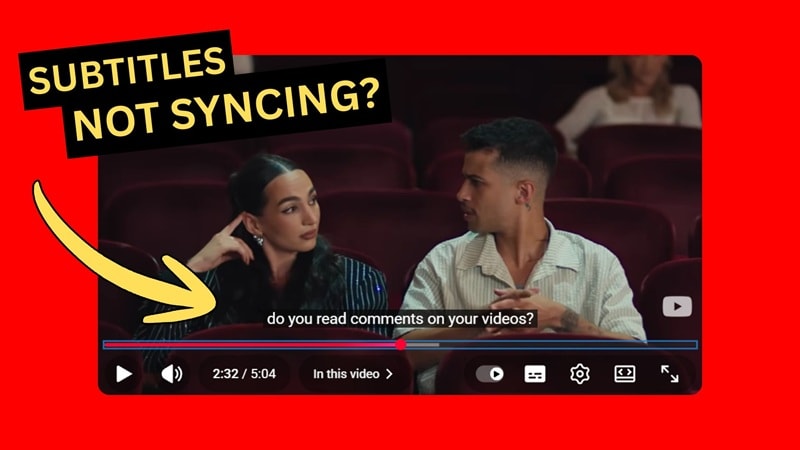
Subtitles that appear too early or too late can make a video hard to follow for your viewers. There may be a problem with your original subtitle timing, especially if the captions were auto-generated or created using a different tool.
Solution:
You can fix this by opening the subtitle editor in YouTube Studio and adjusting the timestamps manually. Or you can return to Filmora and use the AI Speech-to-Text feature to regenerate the subtitles, adjust the timing, and clean everything up before exporting a new SRT file.
3. Strange Symbols or Missing Characters in Captions

If your subtitles show odd symbols, question marks, or blank spaces, it usually means the file uses the wrong text encoding. It's pretty common when you are working with languages that use special characters.
Solution:
If possible, save or export your SRT file using UTF-8 encoding. It will ensure all characters display correctly across YouTube and most subtitle tools. After that, you can re-upload the corrected file and see if the missing characters appear normally.
Conclusion
The importance of multilingual subtitles on YouTube can't be overstated. However, you don't need to be fluent in multiple languages or hire a translator to make your videos accessible worldwide. The tools and methods we've covered above make the process of auto-translating YouTube subtitles easier for you.
The first method you can give a shot at is Filmora. Its Speech-to-Text tool delivers accurate results and gives you plenty of room to edit and adjust the subtitles the way you want. Even if you want something quicker, you can also give YouTube's auto-translate a try, or even use a browser plug-in for instant translations while you watch.
FAQs
-
What's the difference between subtitles and closed captions on YouTube?
Subtitles and closed captions are actually two different things, even though they're often used in the same way.
- Subtitles are meant for viewers who can hear the audio but need the dialogue translated or displayed on screen. They only show the spoken lines from the video.
- Closed captions, on the other hand, include extra details like background sounds, music cues, and speaker labels. They are meant to help viewers who are hard of hearing follow the full context of the video. -
How do I change the subtitle language on YouTube?
If the video offers multiple languages, you can click on the settings icon on the YouTube player, select Subtitles/CC. Then, choose the language you want from the list. If auto-translate is available, you can pick that option and let YouTube generate the subtitles in the selected language. -
How to set the default YouTube subtitle translation language?
YouTube doesn’t save a default auto-translate language, so you’ll need to pick the subtitle language each time you watch a video. What you can do is set your YouTube language and location settings, which may help guide how subtitles appear at the start. -
Why do some YouTube videos not show automatic subtitles?
When the YouTube video you are watching doesn’t have an automatic subtitle, this may be because the YouTube video uploader doesn’t enable them. In other cases, auto-captions may not show if the audio is unclear or uses a language that YouTube doesn’t support. -
Can I translate a YouTube video without subtitles?
Yes. External tools like Wondershare Filmora don’t require existing subtitles to create a translation. Filmora can generate captions from the audio first, then translate them into the language you want.
