Filters are a quick and easy way to improve the look of any video. You'll notice that your video instantly gains a different vibe when you use them. For example, adding a black-and-white filter can help make your video feel sad or old. Simple filters are perfect for everything from casual vlogs to cinematic montages.
Most phones and apps have basic filters, but their options are often limited. If you want more creative control, a dedicated editor like Filmora makes it easier to add filters to videos. Beyond that, you can customize and fine-tune filters to fit your content and platform.

Basic Ways To Add Filters to a Video
You can enhance your videos using pre-installed or built-in tools on your device. For example, there are built-in filter tools for iPhones or macOS. That said, most platforms include basic filters with just a few taps. These methods work well for beginners or when you need quick edits.
Photos App (iOS/macOS/iPadOS)
Apple's Photos app lets you add filters to videos after you record them. Open your video, tap Edit, then choose Filters. You'll find presets like Vivid, Dramatic, and Noir that change tone and contrast. This works great for fast corrections and mood adjustments across Apple devices. The changes don't damage your original video, so you can always return.

Social Media Pre-Upload Filters
Most social platforms offer filters right before you post:
The Meta apps let you apply basic color filters during upload. The options are limited but suitable for light adjustments. During the editing step, Instagram also offers filters like Clarendon, Juno, and Lark. Tap a filter again to dial down its strength.

TikTok has filters in the camera section. Tap Filters and choose from Portrait, Landscape, or Food categories. You can preview effects live or add them after recording.

Snapchat lets you swipe left or right after recording to scroll through filter styles. You can combine these with Lenses for more effects.

These tools give instant results for fast sharing but don't offer much customization.
iMovie
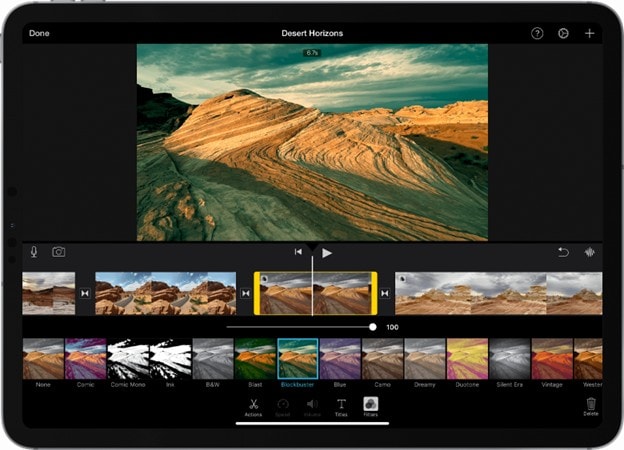
iMovie comes free on iPhones, iPads, and Macs. Import your video, tap the filter icon, and pick from clean, simple options like Silent Era, Western, and Duo-Tone. Filters apply to your entire clip unless you split it into sections. iMovie stays easy to use and handles straightforward edits well.
Clipchamp
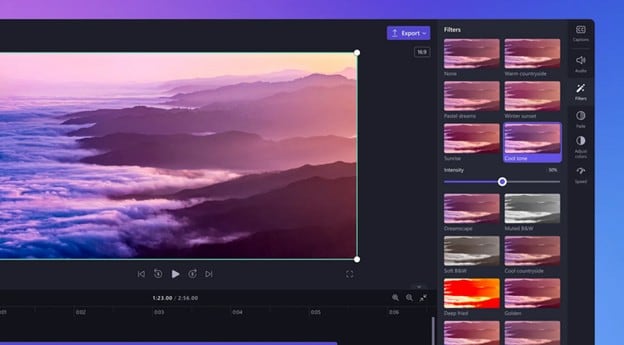
Windows users get Clipchamp built into newer versions. Open a project, add your video to the timeline, then click Filters in the side panel. It includes Black and White, Warm, and Glow effects. You can preview and adjust before exporting. It's a quick way to add filters to videos.
These basic tools handle the essentials, but you'll need something more substantial for advanced edits and creative control or in cases where you want to do something more complicated than just applying filters.
Leveling Up: Adding Filters + Overlays With Filmora
Built-in apps work fine, but they often box in your creative options. Creators who want more flexibility can get better results with Wondershare Filmora.
Filmora is a video editor that works on desktop and mobile. It targets beginners and intermediate users who want fast results without losing control. With Filmora, you can do more than apply filters; you can even add overlays to videos and more.
Filter Library
Filmora includes an extensive built-in filter collection. These span cinematic tones, retro styles, colorful overlays, and minimalist looks. Browse by category and preview each filter in real-time. You can adjust filter intensity or stack multiple filters to create custom looks.
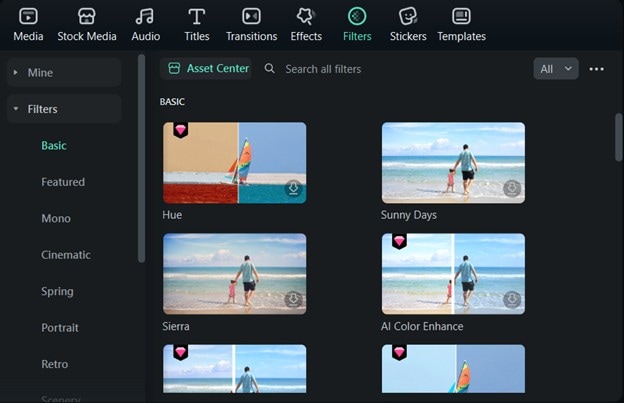
Filmora's filters stay consistent across clips. You won't get sudden color or contrast jumps because it has an AI Color Palette feature that automatically adjusts colors for you (you'll see in the following features).
Overlay Effects and Blending
Filmora goes beyond standard filters with overlay effects that add depth and personality. These include light leaks, flares, film grain, and motion textures you can layer over your footage.
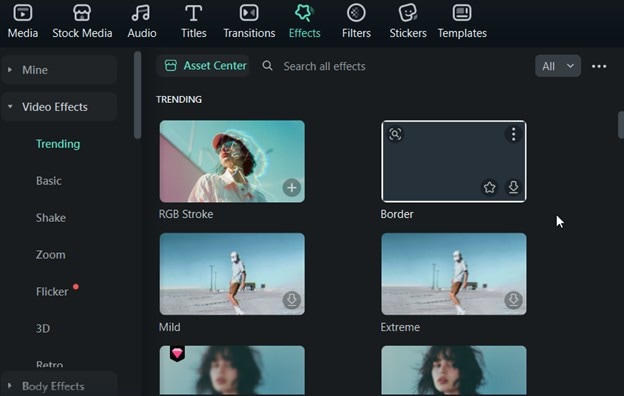
Blending modes let you control how overlays interact with your original video. You can soften footage, enhance highlights, or add subtle texture. This gives you more creative control and smoother scene transitions.
Professional Color Grading
Filmora includes professional color grading tools for creators who want complete visual control. Fine-tune brightness, contrast, saturation, and white balance. It also supports LUTs (Look-Up Tables) that apply specific film or camera looks with one click.
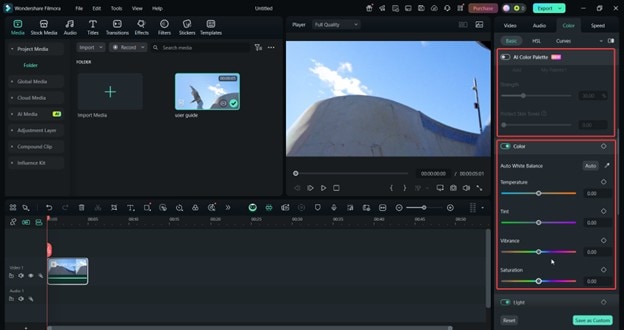
These tools stay beginner-friendly while offering enough depth for polished, studio-quality results.
Full Filter Workflow With Filmora (Step-by-Step)
A straightforward editing workflow is essential if you want more control over your videos' appearance. Filmora makes it easy to move from raw footage to a polished final product using filters, effects, and professional editing tools, all in one place. Below is a step-by-step guide on how to add a filter to a video with a complete workflow:
01of 04Step 1: Pre-Filter Prep
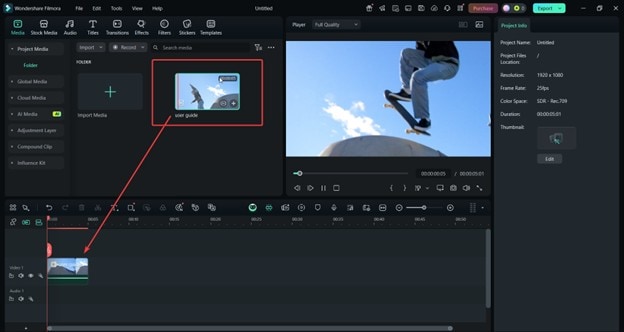
Launch Filmora and import your video clips. Drag footage into the timeline and arrange or trim scenes as needed.
Clean up your footage before adding any filters. Go to Video > AI Tools > Stabilization to smooth out shaky shots. This prevents filters and visual effects from looking distorted or ruined by unsteady camera movement.
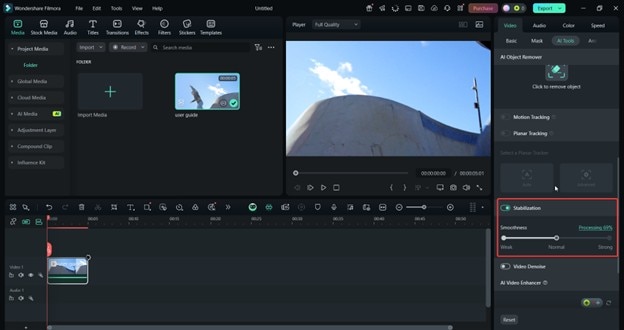
This step creates the foundation for consistent, high-quality edits throughout your workflow.
02of 04Step 2: Creative Filter Application
Browse Filmora's Filters library to explore different visual styles. Preview each filter on your clip in real-time. Drag it onto the timeline or video when you find one you like. Adjust filter strength for subtle or bold results.
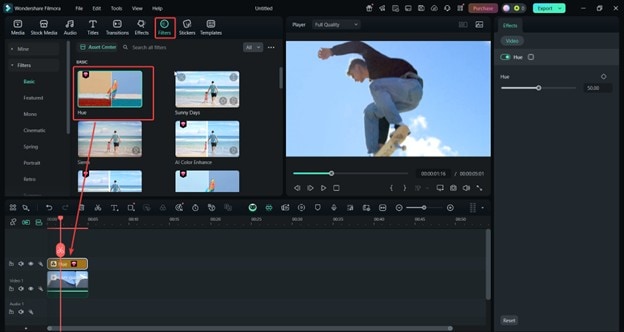
Filmora supports masks that allow you to apply filters selectively. Go to Video > Mask and apply it through the preview area. Target specific parts of the frame, brighten the subject's face or blur the background. It's an easy way to add depth to your visuals.
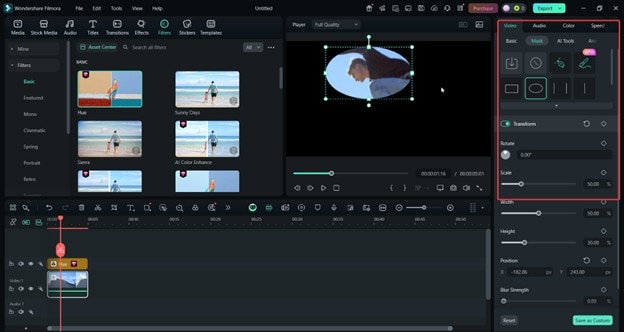
Of course, make sure to combine filters with titles, stickers, or animations for a more dynamic look. This works great for tutorials, vlogs, and social videos where layered visuals keep viewers engaged.
03of 04Step 3: Final Filter Refinement
After applying filters, go to the Color > AI Color Palette tool of Filmora. It's a lifesaver for those shots where the filter doesn't apply as consistently. This tool can automatically change the tone to make a uniform visual effect.
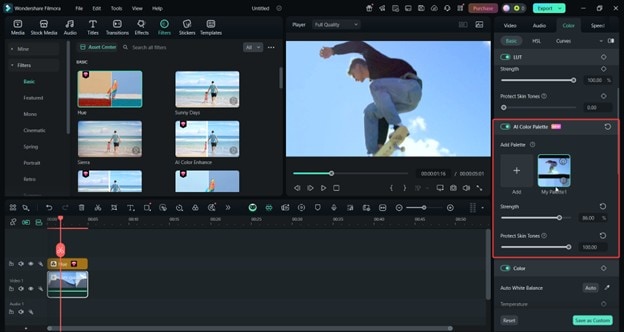
After adjusting, go to the Export menu and choose your resolution (1080p or 4K) to keep the filter and color adjustments sharp after rendering. You can also pick preset formats for different social media. This automatically adjusts the aspect ratio and bitrate for the best quality on each platform.
Other Tools Beyond Standard Filters
Filmora's power goes beyond filters. Since it's a full-featured video editor, you can enjoy features other than adding filters to video, like the following:
- Keyframing: This tool creates transitions with objects, stickers, or even masked filters.
- Motion tracking: You can mask filters and pin them to moving objects in your footage.
- Speed tools: Make slow-motion or time-lapse sequences that can look great with specific filters with up to 0.1x to 10x speeds.
- Audio ducking: When you're adding music, and there are some talking points in your video, this feature is handy as it automatically lowers the volume of the BGM.
- Audio denoise: The audio denoise removes those annoying sounds from the recording for ASMR or general cleaning-up purposes.
Conclusion
Using a filter or layering filters is a great way to enhance your videos. You can instantly change its vibe or aura with a simple click. However, it's not as simple for more professional videos as clicking a filter on your built-in tools or using your social media apps. Sometimes, you'll need a more professional tool.
This is where Filmora and its advanced AI and creative features come in. Add a filter to a video, color grade it, add symbols and text, and then do your final edits with some of its other tools like speed controls. It allows you to create beautiful content that people will love.


 100% Security Verified | No Subscription Required | No Malware


