Taking and sharing pictures is fun, but nothing hurts more than finding out that your favorite picture is blurred. Luckily, you can sharpen your photo to fix blur using a good editor like Photoshop. If you are new to it and don't know how to fix a blurry picture with Photoshop, keep reading!
In this article
How to Sharpen Blurry Images in Photoshop?
To sharpen blurry images in Photoshop, you can use filters, remove pixelation and grains, or adjust various parameters like color noise, opacity, and sharpness manually. Let's dive in.
- Download and launch Photoshop on your PC.
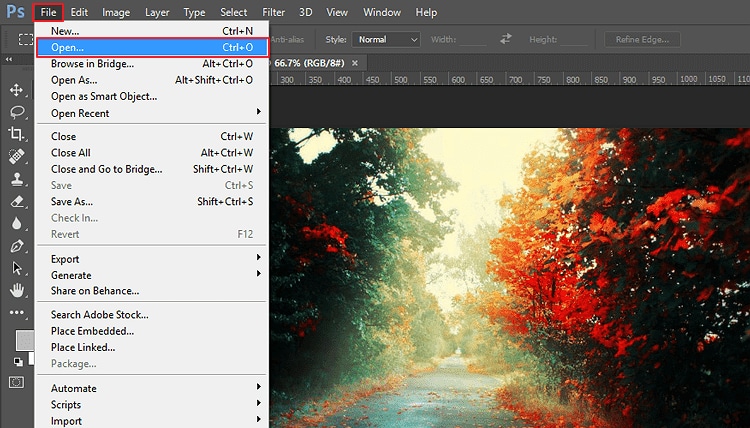
- Click on File > Open. Choose the photo you want to sharpen, then click "Open" to upload it.
- Now press Ctrl + J to create copies of your image.
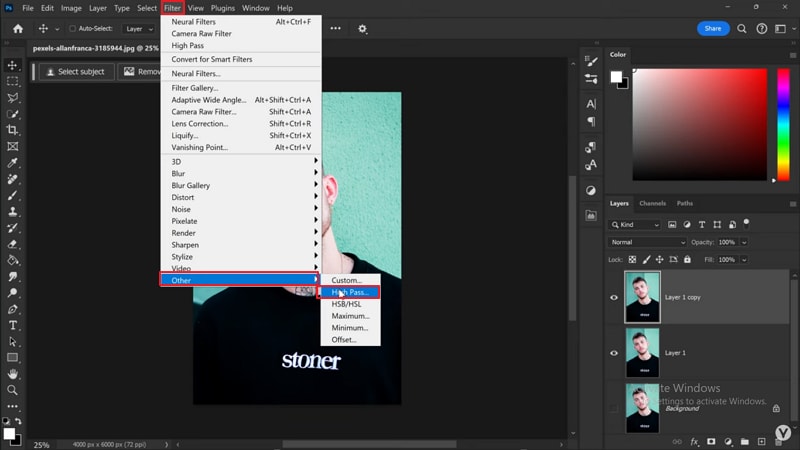
- Select one of the copies on the "Layers" section, then head to Filter > Other > High Pass.
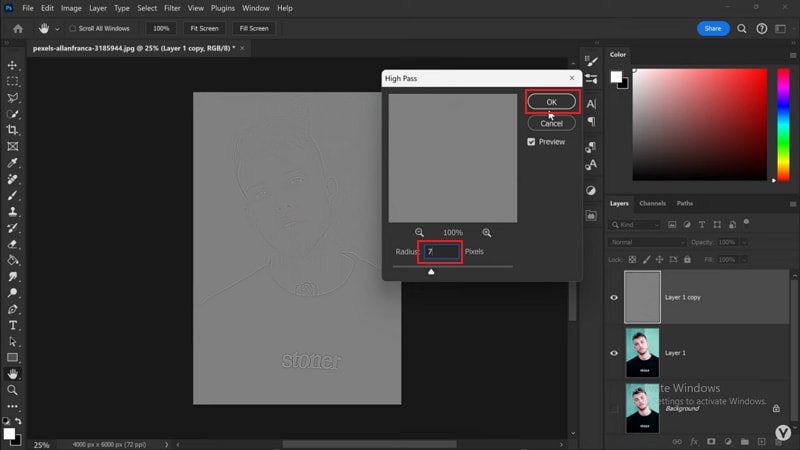
- Drag the slider to choose a suitable high pass radius of seven, then click "OK" to confirm.
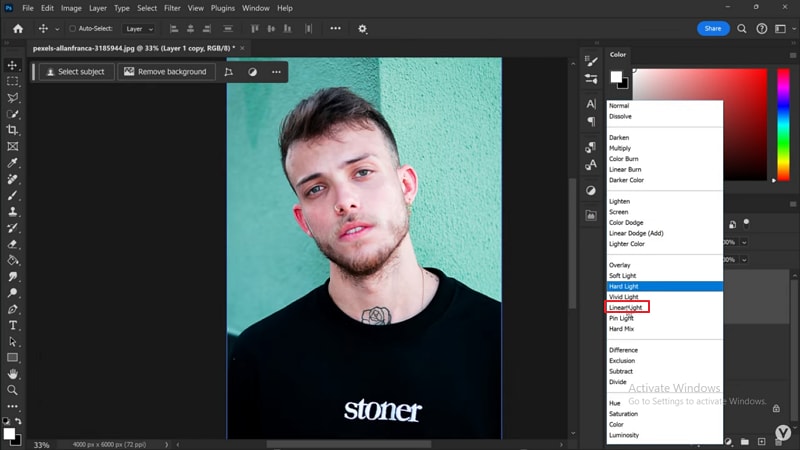
- Press Ctrl + Shift + U to make sure the layer is completely black and white. Now, go to the layers section and click the dropdown icon adjacent to "Opacity." Select "Linear Light".
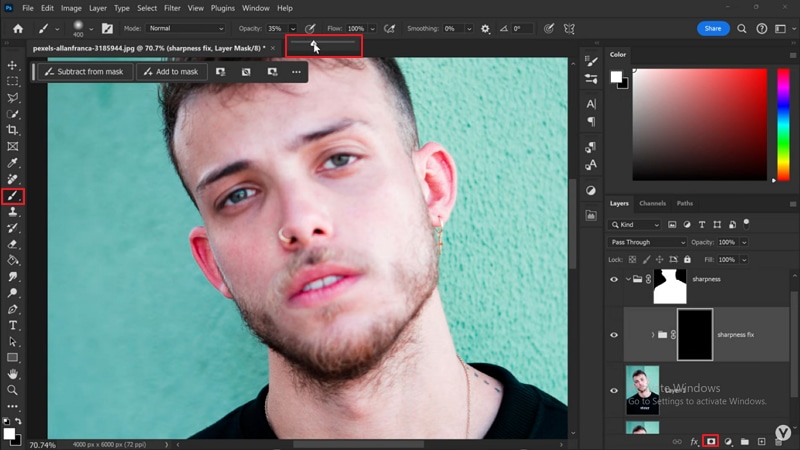
- Now, click the "Mask" icon, go to the left window pane section, and select the brush tool.
- Click the "Opacity" at the top center and select the desired value of 40%. Use the brush to select the various sections of the image where you want to sharpen.
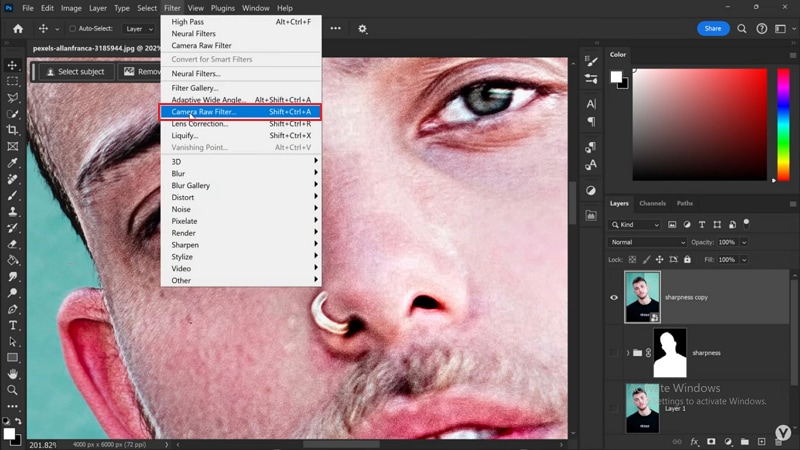
- To remove grains on your image, go to Filter > Camera Raw Filter and adjust the values of Sharpness, Noise Reduction, and Color Noise Reduction accordingly.
And that is how to make a fuzzy picture clear in Photoshop.
4 Additional Tips for Sharpening Blurry Pictures in Photoshop
While Photoshop offers some good options to sharpen blurry images, your results might vary based on various aspects. Here are a few quick tips to help you get the best out of Photoshop when sharpening blurry pictures:
1. Use Layer Masking to Sharpen Parts of the Image
Layer masking helps you sharpen only the needed parts of your picture. Using an unsharp mask to sharpen the whole picture can create some unneeded sharpening on your image sections. With layer masking, you can choose specific sections you want to sharpen based on your needs.
2. Be Cautious When Selecting Unsharp Mask Settings
Unsharp mask settings are critical in sharpening a blurry image. When you navigate to Filter > Sharpen > Unsharp Mask, you can choose values such as Amount, Radius, and Threshold. There is no one fit for all! Be sure to experiment with different values until you find a sharper image.
Tip: Avoid overshapening because it only increases the contrast of the edges of your photo.
3. Consider the Image Usage
If you are using the image on social platforms like Facebook, you probably don't need to be too thorough on blur removal. Hence, there is no need to zoom in or do pixel peep to get into the finer details. However, if you are going to print the image, then you will need to be thorough with your unsharp mask because you need more clarity and quality.
4. Try Third-Party Plugins for High Blur Images
If the image is highly blurred, Photoshop alone won't be effective. To fix this, you might need third-party plugins, especially AI-powered tools, to remove blur and make your image blur-free intelligently.
There are many premium AI-powered blur remover plugins for Photoshop, like Topaz Sharpen AI and ON1 NoNoise AI.
Limitations Of Fixing Blurry Pictures in Photoshop
While Photoshop is a useful tool for removing blur in images, it does have a fair share of limitations. Some of the common limitations of fixing blurry pictures in Photoshop include:
- The process is lengthy and complicated;
- It has limited unblur levels;
- It is relatively expensive;
If you are looking for an alternative method, check Wondershare Filmora.
A Better Alternative to Photoshop Sharpening Photos
Filmora is a nice alternative to sharpening photos in Photoshop. It gives you plenty of top-grade features to effectively sharpen extreme blurs on any type of photo or video.
To sharpen images in Filmora, you can use the auto-enhance feature to adjust the image brightness and sharpness in one click, and you can also manually adjust the sharpness parameters from 0 to 100. If you want to remove grains from images and videos, you can apply the smart denoise effect or use the AI video denoiser feature.
What's more, Filmora also allows you to unblur videos with the AI video enhancer, which could be a good choice for users who not only want to sharpen images but also fix blurry videos. Of course, Filmora allows you to do many more! Let's explore some of its features:
Key Features
- AI Photo to Video: Animate photos and convert your still image into a dynamic video.
- AI color palette: copy the colors of a reference image and paste them onto your image.
- Adjust feature: vary the sharpness of your photo.
- AI Portrait Cutout: Adjust the edge thickness and feather based on your needs.
- Lens Correction: Adjust the resolution of your image to the desired lenses.
- Image Masks: Apply effects such as blur to certain sections of the image.
- Plenty of templates and royalty-free creative resources that suit different needs and scenarios.
- AI Video Enhancer: automatically removes blur from videos irrespective of the blur levels.
How to Sharpen Photos in Filmora?
Here is how to make a fuzzy picture clear in Photoshop alternative- Filmora.
Method 1: Auto enhance
- Launch Wondershare Filmora on your computer.
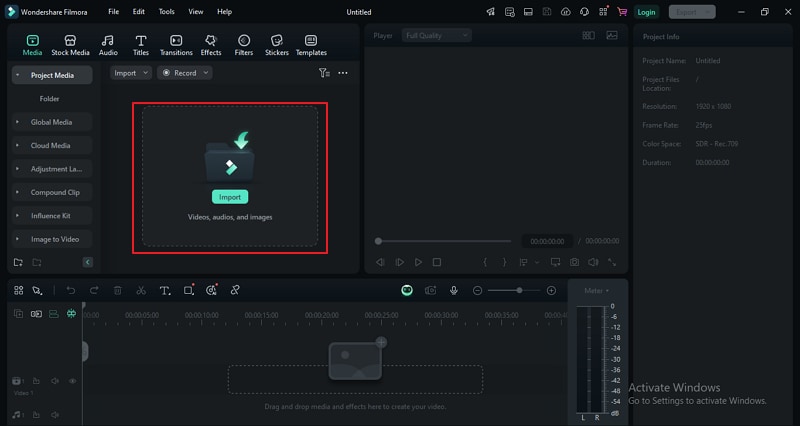
- Click "Import Media" to import the blurred image. Then, drag it to the timeline for editing.
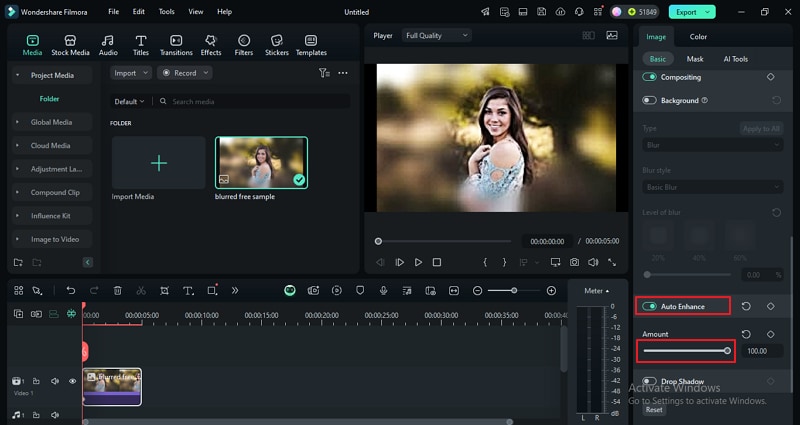
- Select the image on the timeline and head to the editing panel at the top-right of the window. Here, select the image> Basic.
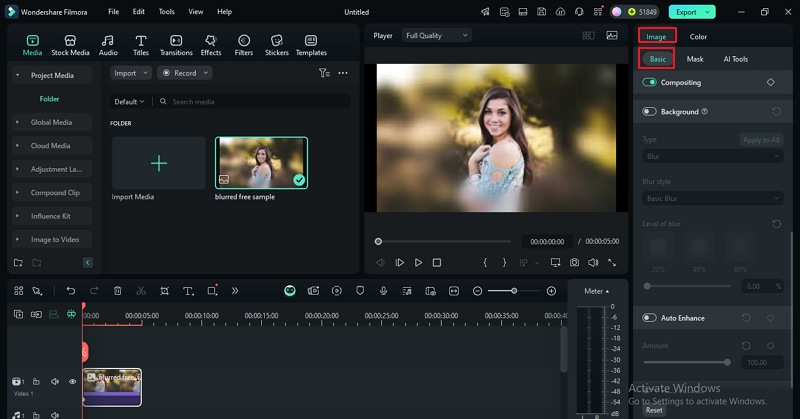
- Scroll down and enable the "Auto Enhance" feature, then drag the "Amount" slider to choose the desired sharpness.
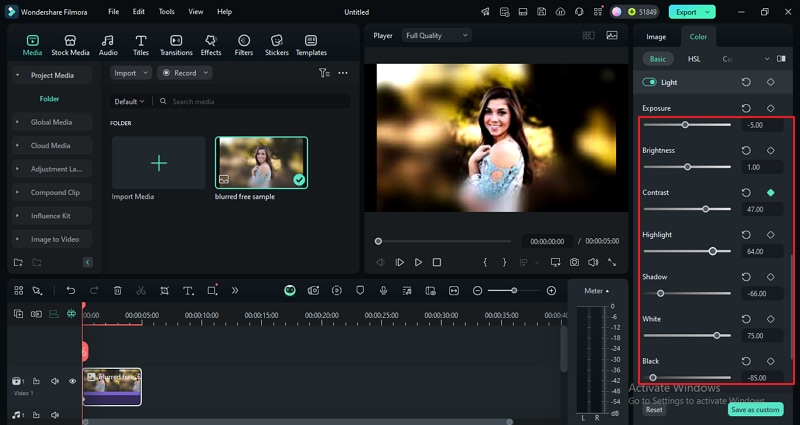
- Next, go to the "Color" tab and select suitable values for parameters like contrast, highlight, and shadow, white, black. You can preview the effect on the preview window.
Method 2: Basic editing (Adjust Sharpen)
This method lets you adjust the sharpness value of your blurred image.
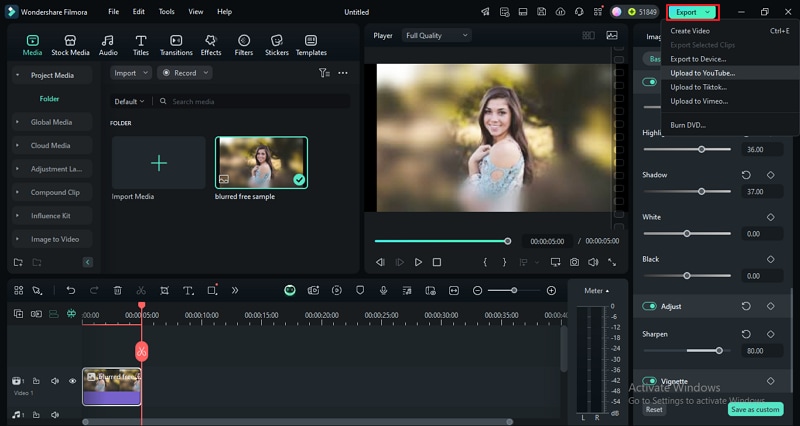
- Select the image on the timeline and head to the editing panel at the top-right. Choose the "Color" tab.
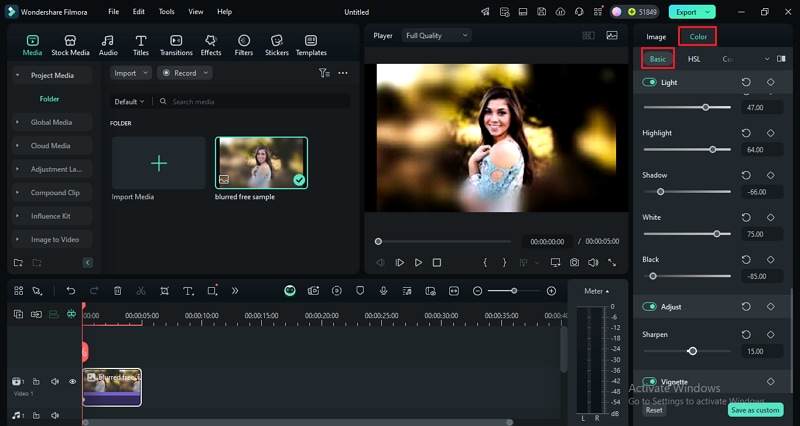
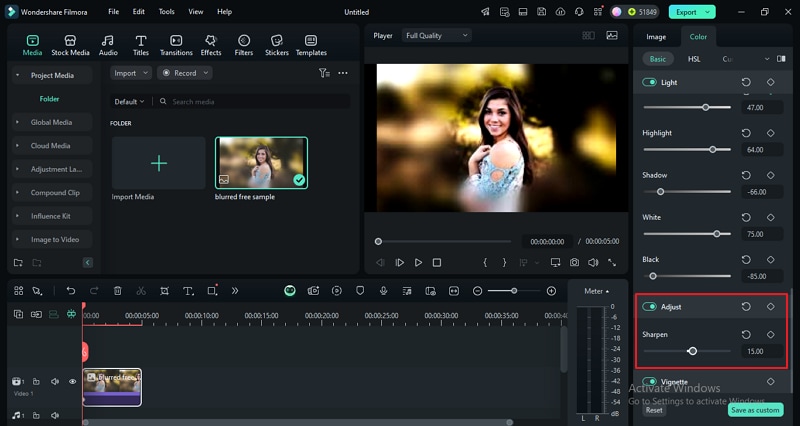
- Scroll down and enable the "Adjust" option. Drag the "Sharpen" slider as you preview the impact of this effect on your image on the preview window.
- You can also enable the "Light" tab and adjust the values of highlight, shadow, white, black, contrast, exposure, and brightness.
- Finally, click "Export" and choose suitable export options. You can save it on your local device or export it directly to video social media platforms like TikTok and YouTube.
Conclusion
Sharpening a blurry image in Photoshop is a bit complicated and relatively pricey. So, if you are looking for a powerful, easy-to-use, and affordable tool to sharpen a blurred image or video, then Wondershare Filmora is an excellent alternative. You can download Filmora on your device and be sure to transform how to make the photo clearer in Photoshop alternatives.
FAQs
-
Is there an AI for Photoshop?
Yes. There is a built-in AI for Photoshop powered by what's known as Adobe Sensei. It offers various features, including super-resolution, neural filters, and shake reduction, among others. There are also third-party plugins with AI features you can use. -
Can Photoshop AI fix blurry photos?
Yes. Photoshop AI has an enhanced AI-powered feature that helps boost the sharpness and detail of your photos. However, it can prove costly, especially if you are on a tight budget. -
Is there an AI to improve image quality for free?
Yes. You can try to use free online image upscale, such as Reminind Fotor. However, the free version may leave a watermark on the image.


 100% Security Verified | No Subscription Required | No Malware


