- iMovie Complete Tutorial
- Enhance experience with more than 2.3 million ever-evolving themed assets.
- Wide support for almost all popular video formats.
- Trim, split, cut, combine, crop, rotate and pan & zoom videos in a few clicks.


 100% Security Verified | No Subscription Required | No Malware
How to Make Cinematic Videos Using Color Grading in iMovie?

Apr 14, 2026• Proven solutions
 TL;DR:
While iMovie enables basic cinematic color correction using built-in filters and manual sliders, it natively prohibits custom LUT imports, requiring users who need advanced grading to use alternatives like Wondershare Filmora.
● iMovie relies strictly on its native Multislider Control to manually adjust brightness, saturation, and highlights across Mac, iPad, and iPhone, making it suitable for beginners but incompatible with external LUT files.
● Wondershare Filmora provides a desktop alternative for Win 7 or later (64-bit) and macOS 10.14 or later that unlocks grading tools absent in iMovie, specifically HSL adjustments, RGBY balancing curves, and color wheels.
● When exporting graded footage, ProRes 422 is the recommended format for 100 Mbps videos, whereas ProRes 422 HQ is preferred for high-end cinematic projects.
Ask AI for a summary
 ChatGPT
 Perplexity
 Gemini
 Claude
 Grok
Grok
iMovie color grading enhances storytelling by adjusting tones, contrast, and colors to evoke specific moods. While iMovie doesn't support importing custom LUTs, it offers built-in filters and manual adjustments to achieve cinematic effects. If you're wondering, "Can you use LUTs in iMovie?", the answer is no; however, you can still perform effective color correction in iMovie using its available tools. For those seeking more advanced options, exploring free LUTs for iMovie alternatives or iMovie color grading presets can provide additional creative flexibility.
Part 1: How to Color Grade in iMovie to Change the Look of Videos?
Color grading in iMovie helps you change your videos' overall look and vibe. It is a free video editing application by Apple that facilitates Mac, iPad, and iPhone users with basic or no editing experience. Its color correction features can make your simple footage visually appealing by adjusting its color properties.
If you want to achieve a specific style for a clip, such as vintage or dramatic, iMovie also lets you achieve that. You can ensure iMovie color grading without installing complex software. We will discuss making your videos look cinematic by changing color grading through iMovie.
Instructions for Using iMovie to Fix the Color Grading of Your Videos
iMovie uses color grading to make your videos look cinematic without needing you to learn professional-level editing or purchase an expensive subscription. Let’s learn how to make the color of your clip match the message you plan to convey through your content step by step:
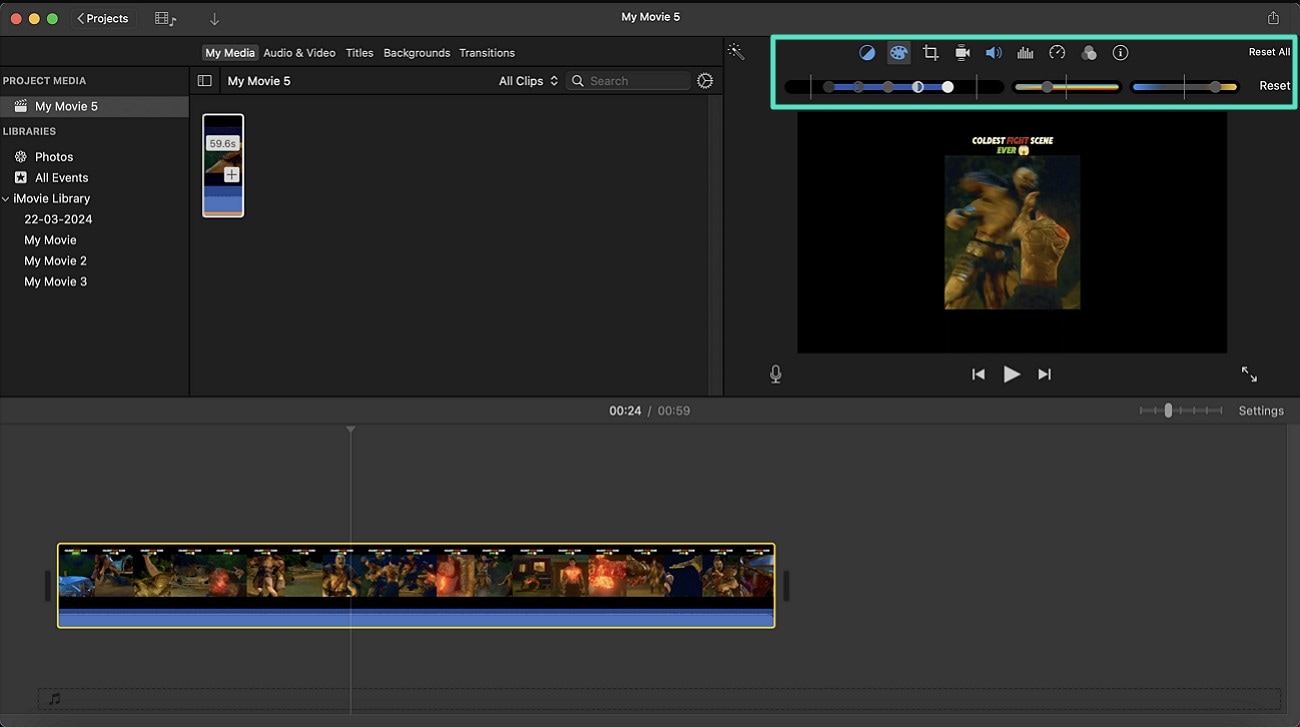
- Step 1. To begin, import your video into color grading iMovie and drag it to the editing timeline to start fixing its color balance. Next, click the “Color Balance” icon from the top panel on the right side to access different color shades.

- Step 2. Use the “Color Correction” panel to reset the color according to the mood and the message conveyed in the video. After making all the color settings, hit “Reset All” from the right above to save your changes.
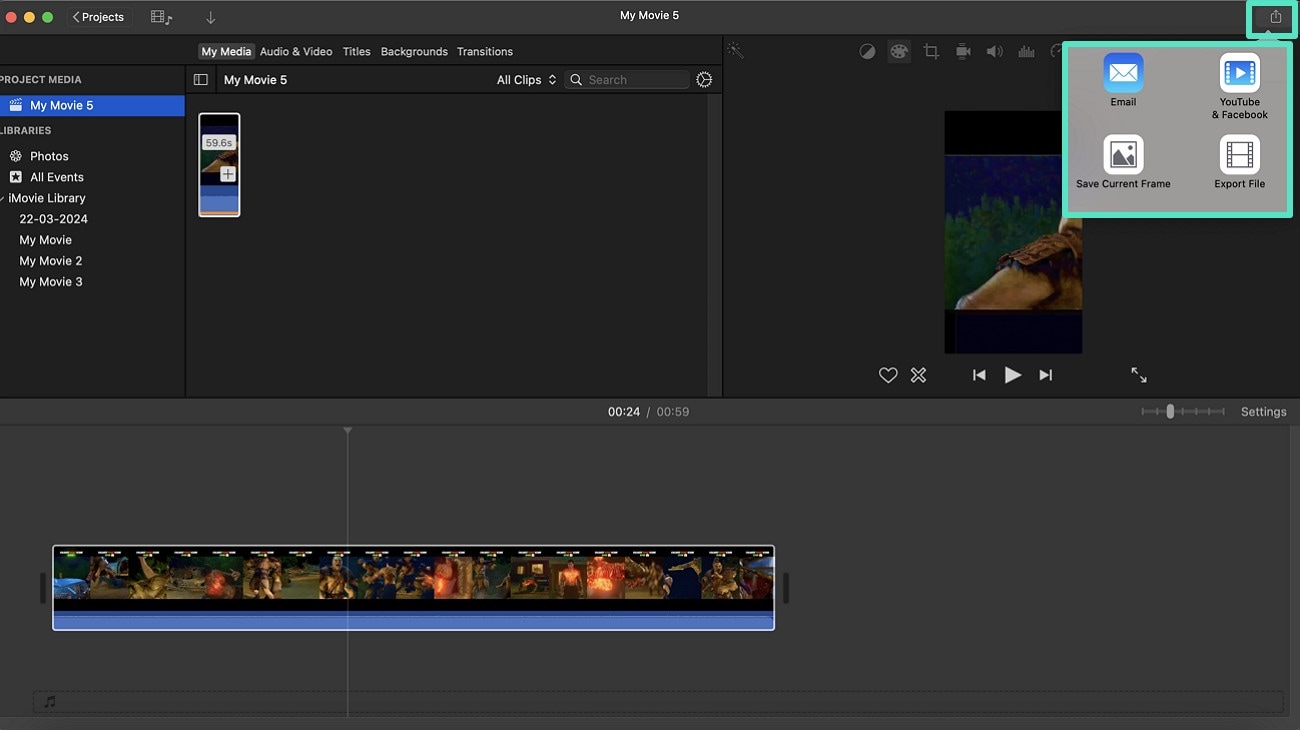
- Step 3. Lastly, click on "Export" from the top right corner after checking the changes. From here, you can email your file and upload it directly to YouTube or Facebook or select the relevant option, such as “Export File,” to your device.
Part 2: Make Your Videos Look More Cinematic with iMovie's Desktop Alternative
One can ensure iMovie color grading without iMovie by using Wondershare Filmora. Users can access the tool’s desktop version and edit their videos perfectly using its different color features, such as HSL, balancing curves, and using the color wheel. With Filmora, you can adjust the tones according to the genre, such as dark tones for thrillers, warm tones for romance.
Filmora is a beginner-friendly tool that provides a before-and-after comparison to highlight the changes. It lets you change clips color grading by adjusting basic color settings and making it look professional. Whether you have a recorded video lacking colors that don’t pop up, Filmora can fix them with the following steps.
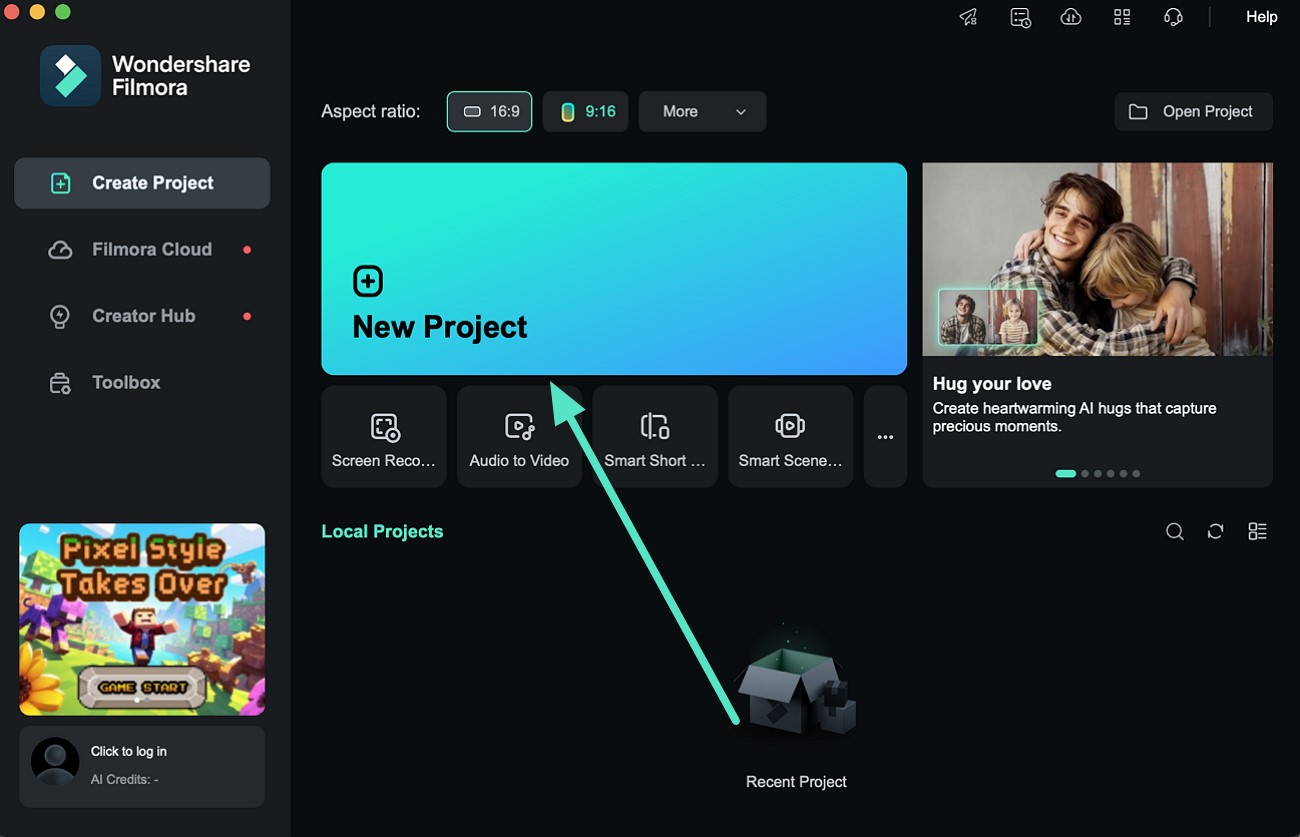
- Step 1. Start a New Project and Import Media. From the tool’s homepage, click “New Project” and import your video, and then drag and drop it to the editing timeline below to start fixing it.
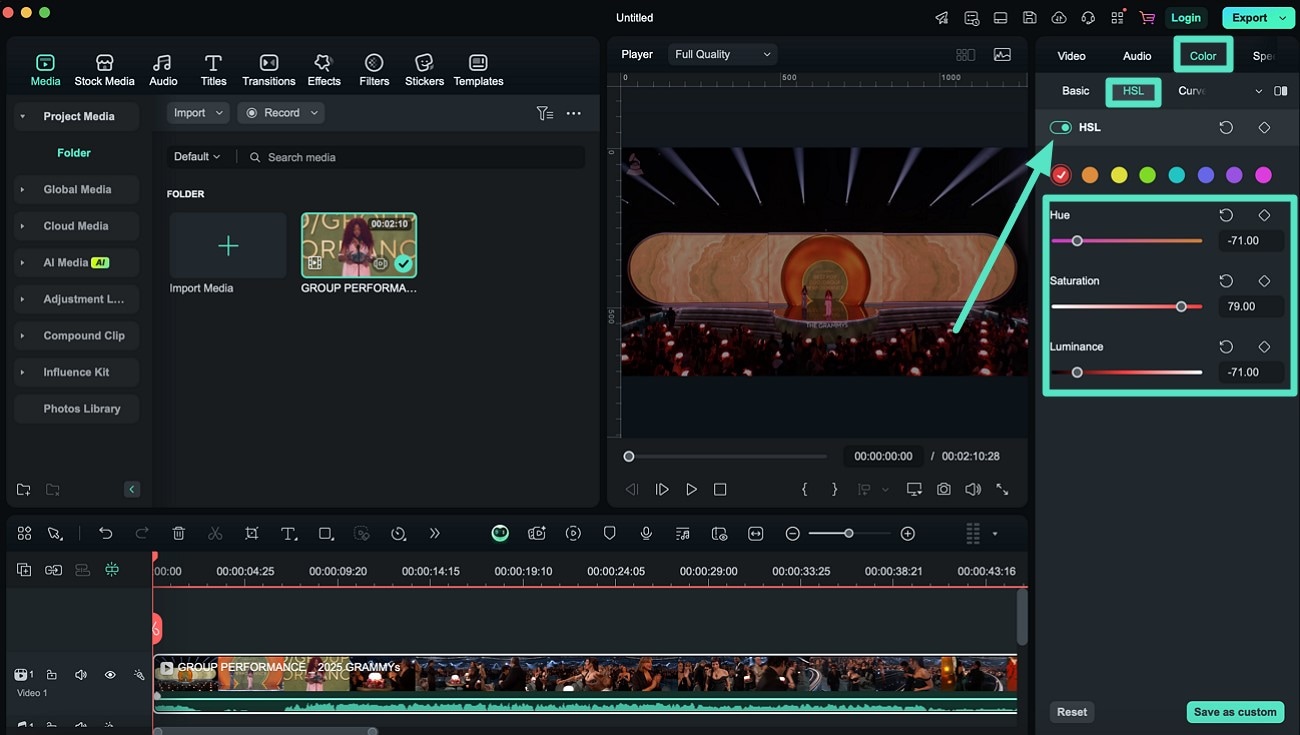
- Step 2. Turn the Color Toggle on. Next, head to the “Color” panel on the right side and toggle it to adjust “HSL” underneath it. By turning on the “HSL” toggle, you can fix Hue, Saturation, and Luminance according to the color of your choice.
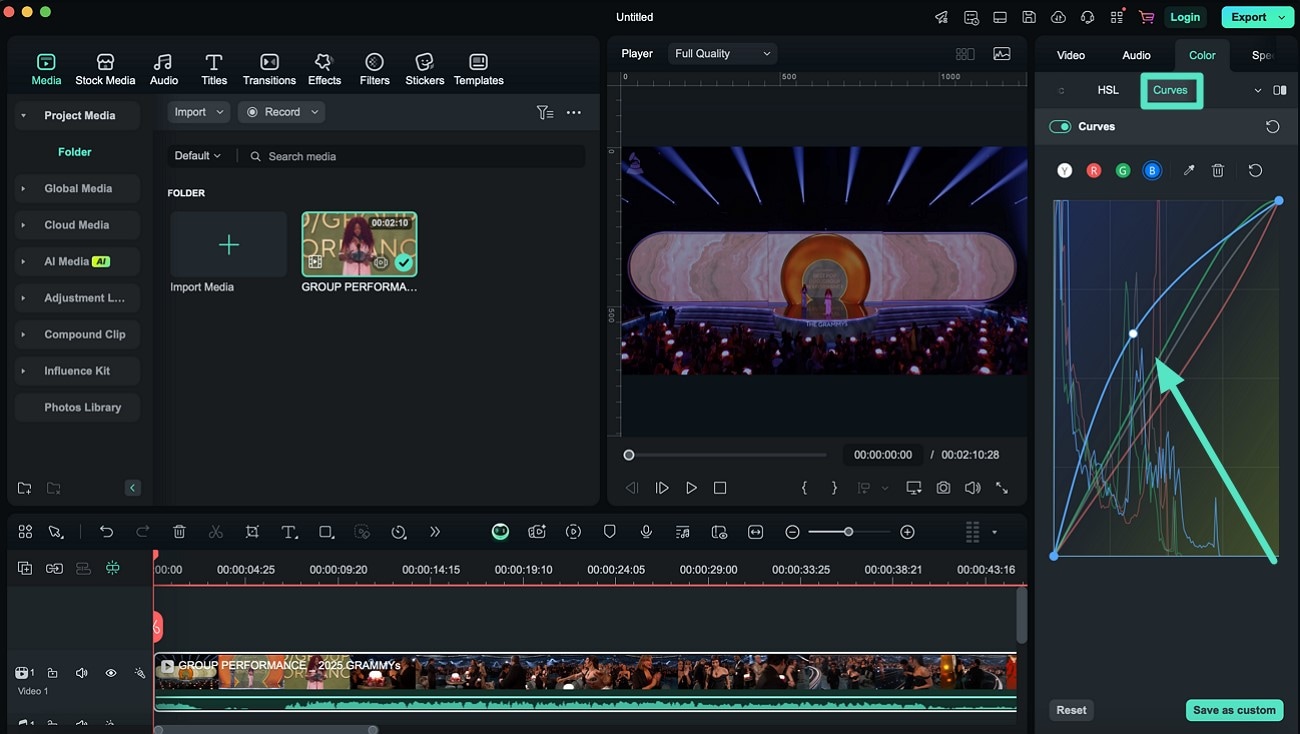
- Step 3. Balance Color Through Curves. You can balance red, green, blue, and white colors by adjusting the curves under the “Curves” section. “B” stands for blue, “G” for green, “R” for red, and “Y” for white, so hit the alphabet to adjust their shades.
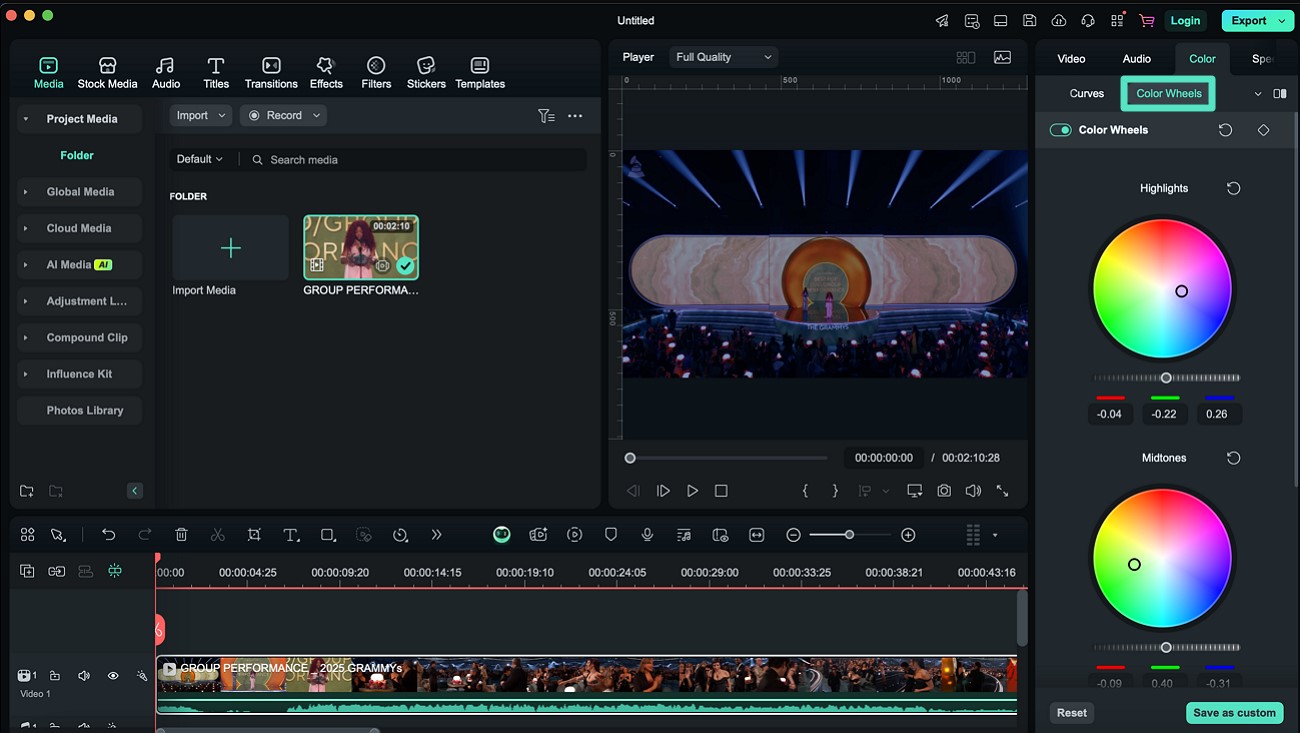
- Step 4. Pick a Color Through the Color Wheel. To make color fixes through the “Color Wheel,” turn on its toggle from the right side. Afterward, adjust the circles in it to change the color grading of your video.
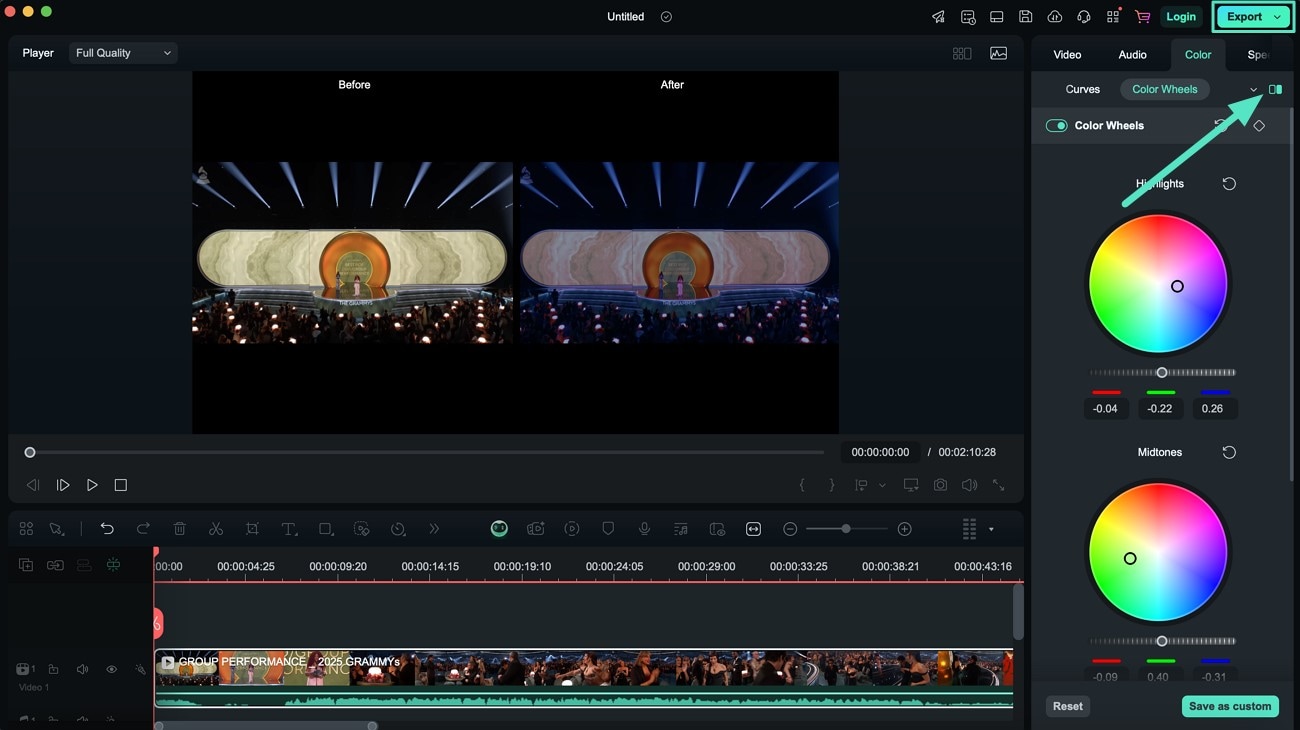
- Step 5. Compare the Before and After Results. After making all the changes, the tool shows the before and after versions, click on the “Compare” icon. As a result, they help you understand whether your edit looks better than the original or how the new color grading with iMovie looks. Use the “Export” button to save your video to desktop.
Part 3: How to Make Cinematic Videos Using Color Grading in the Filmora App
Having discussed how to make your videos look cinematic with iMovie and Filmora on Mac, we’ll now discuss the Filmora App [iOS/Android]. It is a savior for beginners when they need to do quick edits and are away from their workplace. Use the Filmora App to adjust the HSL of your clips from your mobile if you’re traveling, because you only need an internet connection.
If you want to export in HD format, you can choose 3 formats before downloading your final output. The following guide explores how to fix the LUTs for iMovie in Filmora App to change your boring video to a cinematic one.
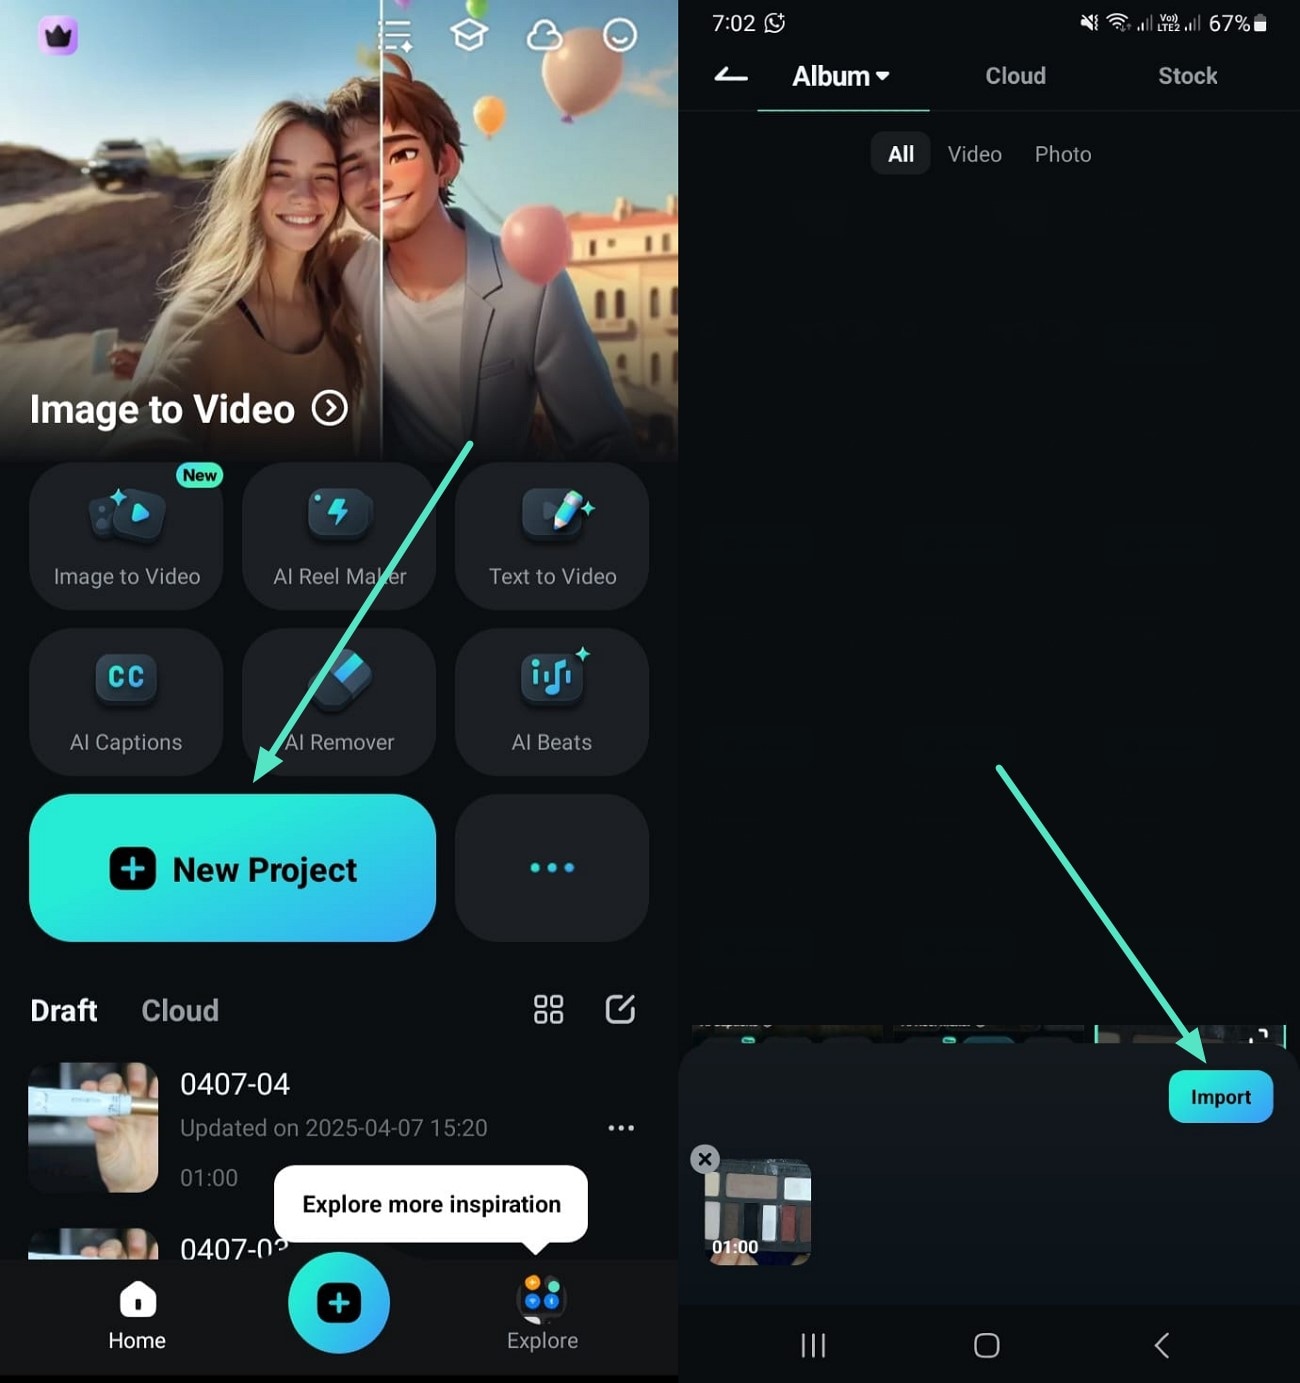
- Step 1. Use the New Project Option to Import a Video. To initiate, select the “New Project” option from Filmora App’s main screen. Choose a video from your gallery, use the “Import” button from the bottom right, and let the clip appear.
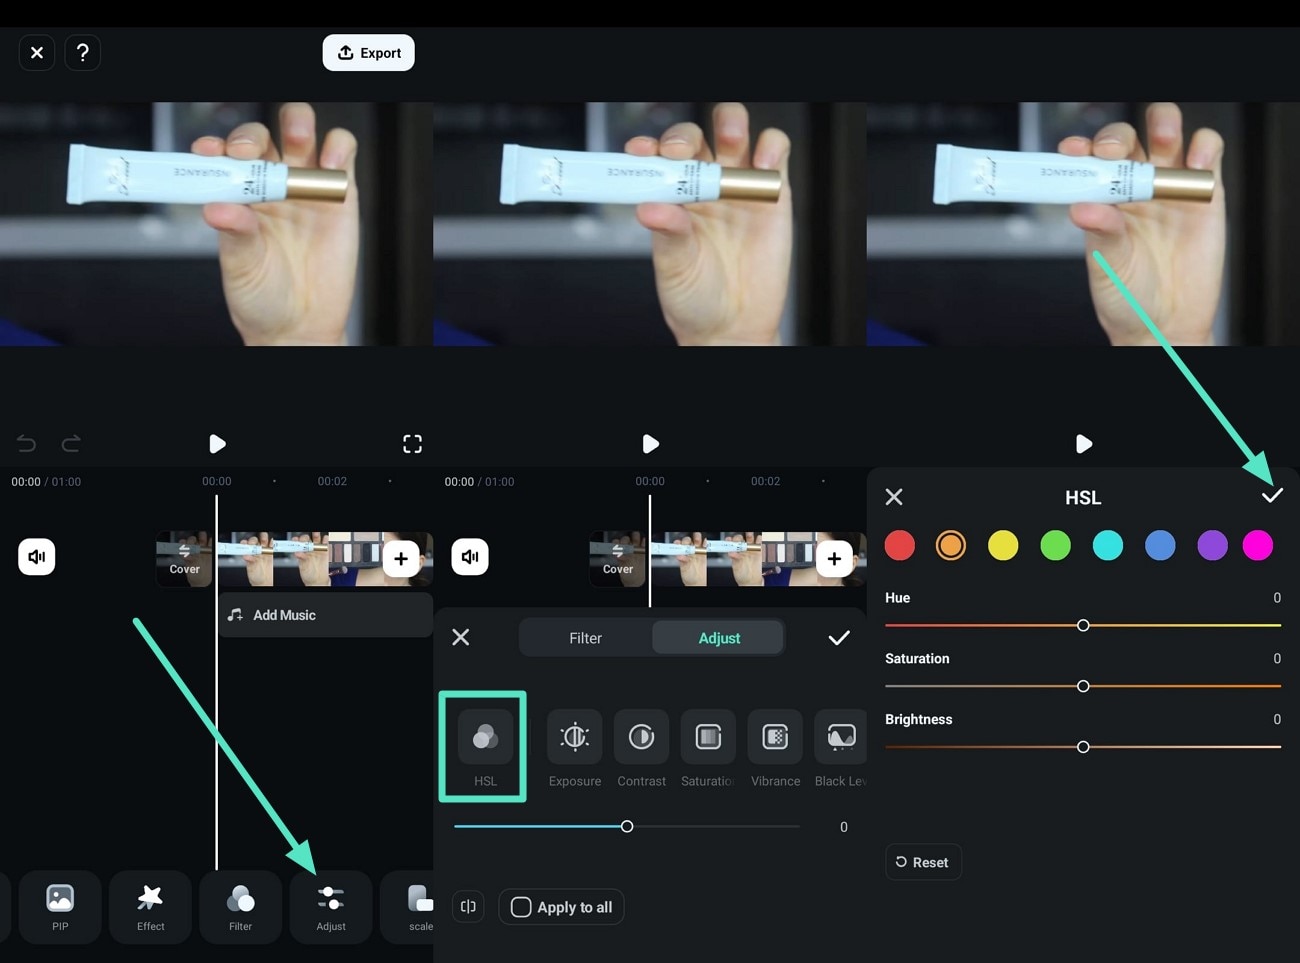
- Step 2. Utilize the Adjust Option to Add Matching Color. Next, use the “Adjust” option from the toolbar below to access the “HSL” option and press “Tick” after picking a shade of your choice.
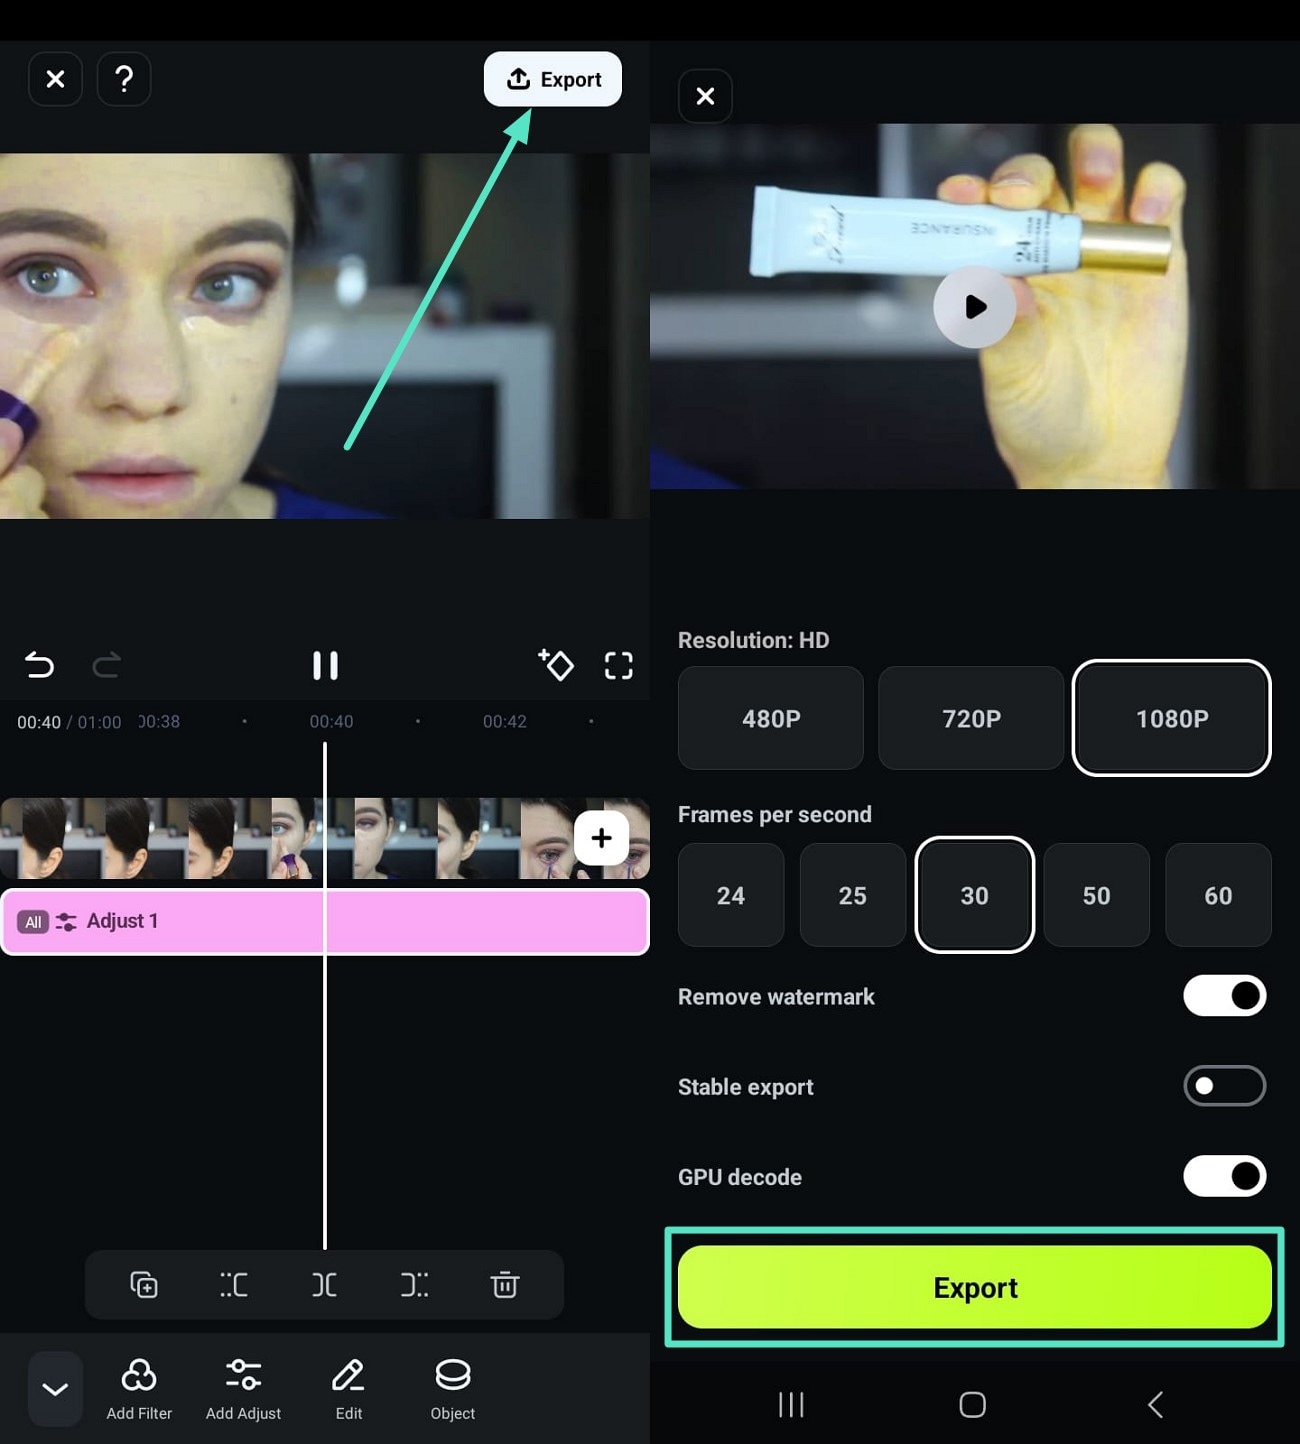
- Step 3. Export Your Color Combination Matching Video. Lastly, play your video to check its color shades and use the “Export” button at the top right. Select your preferred HD resolution and download the video to your phone using the “Export” option below.
Part 4: Frequently Asked Questions about Color Grading in iMovie
Here are some common questions about color grading in iMovie for your information.
1. What Does Color Correction Do in iMovie?
In iMovie LUTs, you can adjust a clip’s color through the “Multislider Control.” It helps you fix its brightness, saturation, and highlights, and gives your content a new look by changing its overall color.
2. Does iMovie Have Special Effects?
Yes, iMovie has special effects that can upgrade your shot. Preset filters help you give your clip a specific look that makes it stand out.
3. Which Video Format Is Best for Color Grading?
If your video format is 100 Mbps, ProRes 422 is suitable, but for high-end projects, you must prefer ProRes 422 HQ. Although these take time, Filmora is perfect for beginners and quick edits.
Conclusion
To summarize, this article explained how to make cinematic videos by improving color grading in iMovie LUTs. It also explored an iMovie alternative, Filmora, which you can use for quick edits through your phone and desktop. Filmora is also a beginner-friendly platform that lets you change the color grading of your travel vlog and socials. Whether you want to adjust a clip’s shadows or apply a different filter, Filmora does it in minutes.

Marion Dubois
staff Editor