Guide to Creating Head Spinning Effect in Filmora
Get an overview of all the important features that are involved in creating a head-spinning effect in Wondershare Filmora. The video below provides a clear guide to all the features and their functionality.
Key Steps of This Video Tutorial To Follow
Start the process by shooting three different videos. Import the background video in Filmora and bring it to the timeline to add a freeze frame. Select the video on the timeline and proceed to the main toolbar of Filmora. Select "Tools" and look for the "Add Freeze Frame" option in the dropdown menu.
By selecting the “Add Freeze Frame” option, a freeze frame will be added to the video on the timeline. You can adjust the length of the freeze frame on the video by simply dragging it over the video. Remove the other parts of the video which are no longer required.

Proceed forward to bring the reaction shot to the timeline. Place this video right above the first video on the timeline on a different track. Similarly, bring the third video, including the green screen, and place it on another track on the timeline.

Cut the parts of the videos that are not required for the editing process. Likewise, you need to crop all the unwanted areas of the video that are not required. For this, choose the “Crop” icon from the toolbar of the timeline after selecting the video. Crop the green screen video and keep the required part.

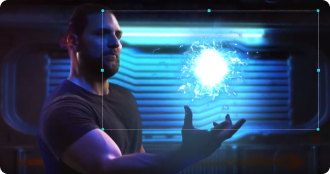
Now, double-click this video, and the settings window will appear. Go to the "AI Tools" section under the "Video" tab. Enable the "Chroma Key" button and continue to add a circular mask from the "Mask" tab, and adjust the size according to the size of your head in the reaction video. You can change the "Blur Strength" to soften the edges of the mask.

Adjust the “Position” of the mask by adding keyframes from the “Video” tab. From the “Position” option, add keyframes at the points of the video where your head drifted apart. Cut the video right after your head completes one round.

To increase the speed of your mask, double-click it on the timeline. Navigate toward the “Speed” tab in the settings window and increase the speed by moving the slider.

Cut the reaction video right from the point of the facial reaction and remove the first part of the video. Now adjust the position of the mask video right above the reaction video at the same timeframe. Add a freeze frame at the reaction video and cut it again.

Select the other part of the video, including the hand reaction, and place it at the end of the first reaction video. Move the mask video above the second reaction video. To replace the head from the reaction video, you can add a mask on the head area.
Double-click the video and head toward the "Mask" tab under the "Video" tab. Select the circular mask, place it on the head area, and enable the "Invert Mask" button by scrolling down this window. Your head will be completely removed from the background.

To create the head spin effect, you need to add rotations to your video. To do so, copy the mask video and paste it multiple times on the same track. Adjust their position on the reaction shots on the timeline. Adjust the camera movements and motion blur to get the final results.

Adding multiple motion effects has been a constant challenge throughout the video editing process. This article has explained the step-by-step process to create the head-spin effect in the video. Before this, you might have just seen this in the movies and wondered how this effect is created. Now you are also able to create such effects by following this guide.
Josh's Other Filmora Master Lessons