Do you wish to record your webcam without format or codec restrictions? Are you looking for a cross-platform, open-source recorder and wouldn't mind using a command-line interface? FFmpeg may be right up your alley.
Buckle up as we walk you through this software and show you how to use FFmpeg to record a webcam. We'll also cover its use cases and challenges and introduce an excellent alternative, so keep reading.
Table of Content
How To Prepare for Recording Your Webcam With FFmpeg
FFmpeg requires specific commands in a command-line interpreter (CLI) like the Command Prompt (CMD). Don't let that discourage you; you can quickly get the hang of it. Let's dive into the installation, configuration, and recording steps.
Installing FFmpeg is the first step to using it for webcam recordings. You can download the source code, but that's more suitable for developers. Therefore, we'll show you how to get a binary package and configure it on your computer. Here's what to do:
- Visit the official FFmpeg website, click Download, choose an operating system, and select the desired build. Remember that all libraries support a 64-bit architecture.

- Right-click the archived file in your Downloads folder and click Extract All.

- Rename the folder to FFmpeg and copy it.

- Paste it into your C: drive.

- Type "Edit the system environment variables" into the search box in the Taskbar and open the result.

- If the System Properties dialog box opens, click Environment Variables in the Advanced tab.

- Double-click the Path under System Variables.

- Click New and hit Browse to find the relevant folder.

- Go to Local Disk (C:) > FFmpeg, select the bin folder, and click OK twice.

- Search for the Command Prompt and click Run as administrator.

- Run this command to verify the installation:
ffmpeg. If you see the following screen, you've set up everything correctly and can now use FFmpeg.
Basic Webcam Recording Commands in FFmpeg
Using FFmpeg to record a webcam or another video input device requires specific commands. You can access the list by typing -h for help or man ffmpeg for the entire manual and hitting Enter.
That's the beauty of CLI tools; you can run these help-related commands anytime to see the available options. Another helpful FFmpeg command is ffmpeg -formats. It lists all supported file formats. The same goes for ffmpeg -codecs.
As you'll see in the manual, specifying such a flag modifies the operation. For instance, flags can tell FFmpeg which video input device to use and in which format to save the file.
FFmpeg has built-in Windows DirectShow (dshow) support for audio and video input devices. It's Microsoft's COM-based multimedia framework for streaming and playback. You'll use it in nearly all commands to capture and process media streams. Check the official FFmpeg's DirectShow input device documentation for more details.
Here's how to record a webcam with FFmpeg:
- Run the following command in the CMD. You'll see a DirectShow video and audio device list, including your webcam. This example shows one integrated camera and a third-party recorder, but your results will differ. They may also contain your camera's default and alternative name.
ffmpeg -list_devices true -f dshow -i dummy - Run this command to instruct FFmpeg to record a video from a webcam. However, use your webcam's default or alternative name and replace "mp4" with the desired output format.
ffmpeg -f dshow -i video="Camera" out.mp4 - Run this command to capture your microphone while recording the webcam. Again, use the correct device names and the wanted format.
ffmpeg -f dshow -i video="Camera":audio="Microphone" out.mp4 - You can wrap the video and audio device in a single quote (like in the screenshot below). It's more straightforward.
ffmpeg -f dshow -i video="Integrated Camera":audio="Microphone name here" out.mp4 - Type
qin the Command Prompt to finish recording.
Advanced Webcam Recording Commands in FFmpeg
FFmpeg supports dozens of commands and various flags. For instance, you can instruct FFmpeg to record your camera at 60 frames per second and use a specific video codec.
Here are some advanced commands for recording your webcam with FFmpeg:
- Run the following command (replace "Camera" with your webcam's name) to check your webcam's options. You'll see the supported codecs and minimum and maximum size and fps values.
ffmpeg -f dshow -list_options true -i video="Camera" - Here's an example command to capture the webcam in a raw pixel format at 7.5 fps and output it as AVI. Again, use the correct camera name and the desired format.
ffmpeg -f dshow -video_size 1280x720 -framerate 7.5 -pixel_format yuyv422 -i video="Camera" out.avi - This command tells the program to capture your camera using an MJPEG video codec and the minimum supported fps:
ffmpeg -f dshow -video_size 1280x720 -framerate 15 -vcodec mjpeg -i video="Camera" out.avi. - Here's an example command with the
-tflag to record a webcam and microphone for ten minutes:ffmpeg -f dshow -video_size 1280x720 -framerate 30 -t 00:10:00.00 -vcodec mjpeg -i video="Camera":audio="Microphone" out.avi.
As you can see, FFmpeg has straightforward commands; you can quickly remember them. Review the manual for more information and make test recordings to see FFmpeg in action.
Known Problems When Recording a Webcam With FFmpeg
The most prominent problems when recording your webcam with FFmpeg include the following:
| 🔣 No GUI (Graphical User Interface) | FFmpeg uses a command-line interface, making it intimidating for novices. It offers extensive documentation, but beginners still need time to master it. |
| 🙁 Occasional crashes | As open-source software, FFmpeg encounters periodic bugs and glitches. Its developers resolve them quickly, but what if the program crashes during recording? Since it records in the background, you'll be none the wiser until it's too late and you've wasted time and effort. |
| ⚠ Latency issues | FFmpeg records and encodes videos simultaneously, making it problematic for slow computers. Also, it sometimes discards video frames (if it receives a new one before processing the previous one) to keep up with the real-time video input. |
Here's an alternative to consider if you think the drawbacks outweigh the benefits.
An Alternative to Consider: Wondershare Filmora
Wondershare Filmora is a prominent video recording and editing program with AI-powered features, making it perfect for all content creators. It lets you add effects, transitions, animations, subtitles, and captions, denoise and enhance videos, auto reframe them for social media, remove and replace backgrounds using Smart Cutout, create scenes and highlights, and tweak many other elements. It even offers an AI text-to-video, AI copywriting, and AI text-based video editing.
As for recording capabilities, Filmora lets you record your webcam, screen, or both and capture your microphone and system audio. Here's how to record your camera:
Record your screen and webcam, then create pro-level videos easily and quickly with AI tools, stylish templates, effects, music, and other creative assets.

- Download, install, and launch Wondershare Filmora to your computer.
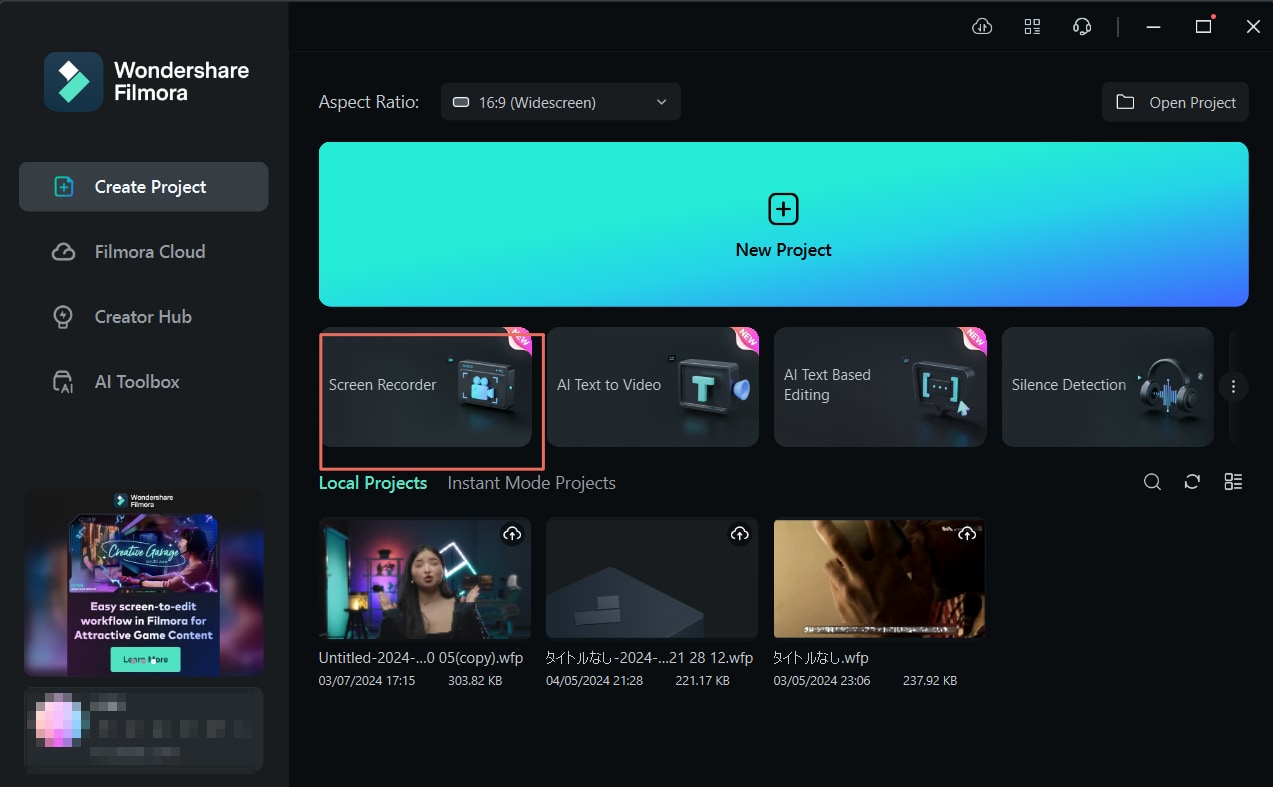
- Select Screen Recorder in the menu.

- Enable the Camera in the recording settings to record your webcam and click the red REC button

- It will start recording the webcam.

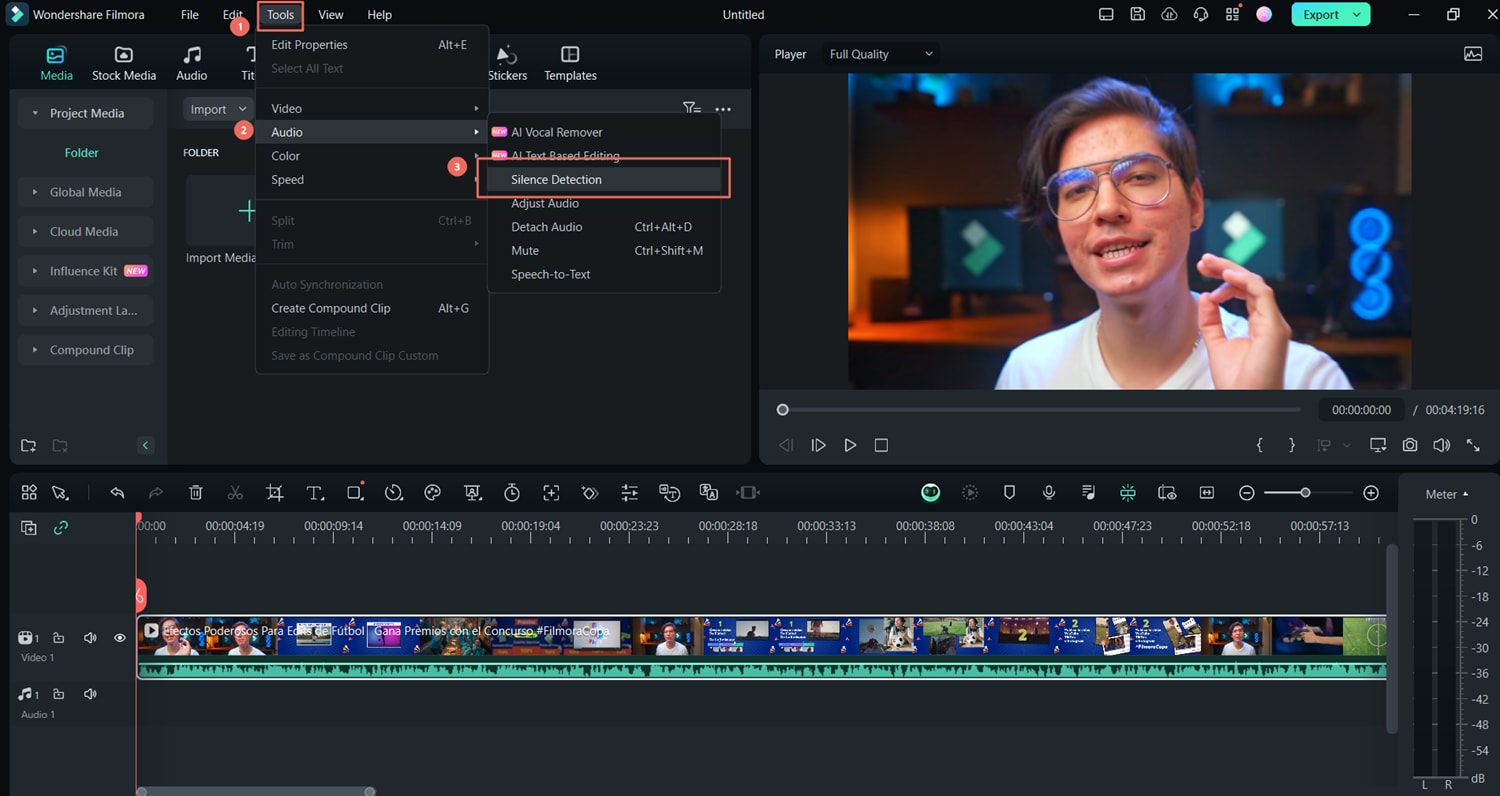
- Click the Stop button to finish recording and hit OK. Then, drag and drop the video onto the timeline and leverage Filmora's editing tools. For instance, you can click Tools > Audio > Silence Detection to remove silent segments. Once you polish your recording, click Export.

- Choose the format, modify other output settings, and click Export to save the file to your device. You can also share it directly on YouTube, TikTok, or Vimeo.

Conclusion
You can record your webcam with many tools, including FFmpeg and Wondershare Filmora. However, FFmpeg doesn't have a GUI and requires learning specific commands for a CLI like the Command Prompt.
On the other hand, Filmora is user-friendly, seamlessly captures your camera and screen, and offers advanced editing capabilities, including AI-powered features. We recommend trying both to see how they fit your needs, but we're confident you'll love the latter.


