


 100% Security Verified | No Subscription Required | No Malware


 ChatGPT
 Perplexity
 Gemini
 Claude
 Grok
Grok
Are you stuck in an effort to master keyframe animation and make your visuals more engaging and dynamic in After Effects? Adding keyframes is an advanced approach to creating lifelike designs. Keyframes empower you to control motion and add smooth transitions that can vivify your animations.
However, constantly shifting back and forth between layers and menus to add keyframes can be annoying and tedious. Thankfully, After Effects will help you streamline your workflow and simplify your efforts using an array of powerful shortcuts.
By getting ahead of the essential After Effects shortcut techniques, you can transform the time-consuming process of adding keyframes, cutting it down to a few taps on your keyboard. Today, we'll discuss everything you should know about using keyboard shortcuts in After Effects. We'll also guide you through the process of adding keyframes in After Effects using shortcuts.
In this article

How Difficult It Is to Add a Keyframe in Adobe After Effects?
Adobe After Effects specializes in visual effects and animation, giving you a world of possibilities through its extensive selection of tools, features, functions, and options. Though AE comes with a streamlined, easy-to-use user interface, navigating it requires time and effort.
The interface may be intuitive, giving you transparent options, but it's still complex enough to confuse you in a heartbeat. Thankfully, mastering the time-saving shortcuts helps you speed up your navigation efforts to expedite the animation creation process.
After Effects shortcut techniques let you harness the full power of keyframing to enhance your content by fine-tuning all the critical parameters and polishing your animations to perfection.
They help you streamline keyframe management by allowing you to make swift adjustments to the essential parameters with a few strokes on your keyboard, thus saving time and effort and giving you complete control of the animation creation process.
Add Keyframe Shortcut in After Effects and Other Hotkeys
Below, we'll guide you through the process of adding a keyframe using a shortcut in After Effects. In addition, we'll share some of the most common hotkeys you can use to streamline your creative workflow and keyframe management, ensuring you get the best outcomes faster.
Here's how to insert a keyframe in After Effects using a shortcut:
Step 1. Select the current time marker where you wish to add a keyframe;
Step 2. Press Shift + Alt + P to add a keyframe for the selected position in real time.

This shortcut allows you to bypass constant clicking on the stopwatch icon and going through menus. It helps speed up the process of adding keyframes, saving you time and improving your overall efficiency.
Other essential keyframe hotkeys for accessing vital keyframing functions you should know about:
| Shortcut | Keyframing function |
| T | Activates the Opacity property of a keyframe layer |
| P | Gives you access to the Position parameters |
| S | The Scale property for the selected layer in your timeline |
| R | The Rotation property |
| Shift + P, S, R, or T | View multiple properties by holding the Shift key and tapping on any of the keys |
| J & K | Tap J to move forward or K to move backward by shifting the current time indicator between keyframes in your timeline |
| I & O | Use the I and O keys to shift between the in point and out point on a selected layer (ideal for shortening/lengthening layers and setting the length of a preview page) |
| Ctrl + Alt + A | Select all visible keyframes and properties |
| Shift + F2 or Ctrl + Alt + Shift + A | Deselect all keyframes, property groups, and properties |
| Alt + Right Arrow or Alt + Left Arrow | Move a keyframe one frame later or earlier |
| Alt + Shift + Right Arrow or Alt + Shift + Left Arrow | Move a keyframe 10 framers later or earlier |
| F9 | Easy ease the selected keyframes |
| Shift + F9/Ctrl + Shift + F9 | Easy ease the selected keyframes in/out |
| Ctrl + Shift + K | Adjust velocity parameters for the selected keyframes |
Other Essential Adobe After Effects Shortcuts to Remember
Here are the other essential shortcuts for workspace and timeline navigation, preview, playback, etc.
Timeline navigation
Adding keyframes in Adobe Effects requires navigating the timeline by clicking and scrolling through multiple menus.
Streamline your navigation using these optimized shortcut techniques:
- Spacebar – move the timeline around by accessing the Hand tool;

- Page Up/Page Down – seamlessly move between markers or keyframes in your timeline;
- Home/End – jump to the beginning/end of your animation.
Copy keyframes
Copying/pasting keyframes helps you save time on common actions such as duplicating complex animation patterns. These simple tasks help you maintain consistency throughout complex projects.
Here are the copy/paste shortcuts:
- Ctrl + C – use the cursor to copy the selected keyframes
- Ctrl + V – paste the keyframes to the desired position (move the playhead to select where you want to paste the keyframes).
These shortcuts simplify the process of copying and pasting keyframes, allowing you to duplicate animations more efficiently.
Speed Ramping/Time Remapping
Speed ramping allows you to create visually stunning motion graphics using speed ramps to gradually slow down or speed up the specific segments of your animation.
Here are the essential shortcuts for seamless speed ramping:
- Ctrl+ Alt + T – add keyframes to the time remapping property by applying Time Remapping to the selected layer
- Ctrl + Alt + R – time-reverse the selected layer.

Preview keyframes
Here's a shortcut to preview all keyframes and their properties:
- U – select a layer and hit U to reveal and preview any property with keyframes in it (perfect for managing multiple keyframes with lots of effects and properties);
- UU – preview all edited keyframe properties for a specific layer
- Shift + 0(zero) – preview animations twice as fast.
Setting New Keyframe Hotkeys with AE Shortcuts Editor
Here are the key steps for customizing keyboard shortcuts in After Effects using the Visual Keyboard Shortcut Editor:
Step 1. Launch After Effects and press Ctrl + Alt + ' to open the AE Shortcuts Editor;

Step 2. Navigate to the Command list shortcut column to see all the commands without shortcuts (gray-shaded keys do not have shortcuts assigned to them);
Step 3. Select the command and type your shortcut for it in the text field.
Bonus Part: Hassle-Free Keyframing in Wondershare Filmora
Though After Effects offers advanced keyframing controls through its interactive and intuitive interface, new, inexperienced users may find After Effects too complex to use and navigate. Even with all these shortcuts, After Effects still requires some know-how to navigate its complex menus and layered options.
If you don't have the time or want to bother with AE, consider using a somewhat more user-friendly alternative to After Effects, such as Wondershare Filmora. Filmora excels where After Effects falls short. It replaces overwhelming dropdown menus, and complicated layer controls with streamlined, easy-to-use, AI-enabled tools that you can access with a few clicks.
Filmora's advanced keyframing capabilities empower you to produce immersive, captivating, and mind-bending visual animations using customizable settings, features, and options. The interface is designed to help beginners find their way around without too much hassle.
Filmora allows you to customize your animation projects using advanced keyframes to adjust various settings such as opacity, color, rotation, size, and more. Instead of editing one keyframe at a time, Filmora lets you batch-edit multiple keyframes simultaneously to streamline your workflow and expedite animation production.
In addition, Filmora enables you to spice up your animations using an extensive range of effects, animations, and visual assets, from animated split-screen clips and color adjustments to tweaked LUTs, tint, temperature, white balance, and shape marks.
Adding animation keyframing in Filmora is a simple process. Download and install Filmora on your computer, then follow the steps below to add and edit keyframes in your video.
Why Choose Filmora for Keyframing?
While After Effects offers professional depth, the learning curve for shortcuts can be steep. In Wondershare Filmora, keyframing is visual and simplified:
- One-Click Keyframing: No need to remember complex Alt+Shift+P combinations.
- Visual Path Editing: Drag and drop keyframes directly on the preview window.
- AI-Powered Motion: Let AI handle the tedious pathing that takes hours in AE.
Step 1. Launch Filmora and navigate to the main menu;
Step 2. Select New Project and import your video;
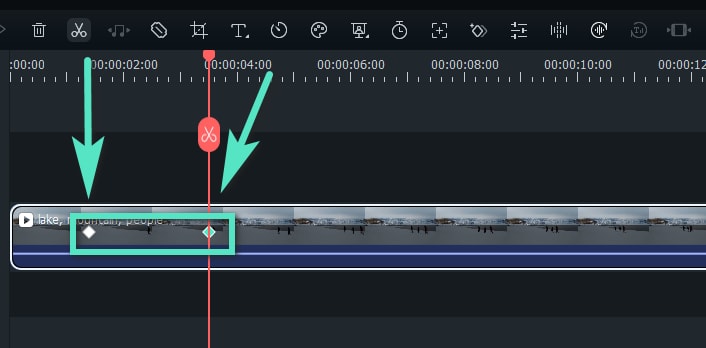
Step 3. Drag and drop your file to the timeline;
Step 4. Click the clip to access the Property menu;
Step 5. Navigate to Video > Basic;
Step 6. Click the diamond icon to set a new keyframe;
Step 7. Drag the progress slider to the position where you wish to add the start keyframe;
Step 8. In the Property panel, click the diamond icon to set the keyframe;

Step 9. Edit the added keyframes by adjusting the individual parameters across the Video, Audio, and Titles menus. These menus allow you to manipulate the keyframes using animations, AI tools, masks, enhancements, and more.
You can make audio adjustments using equalizer, pitch, fade-in/fade-out, and volume controls. The Titles menu allows you to customize your keyframes using various animation effects.
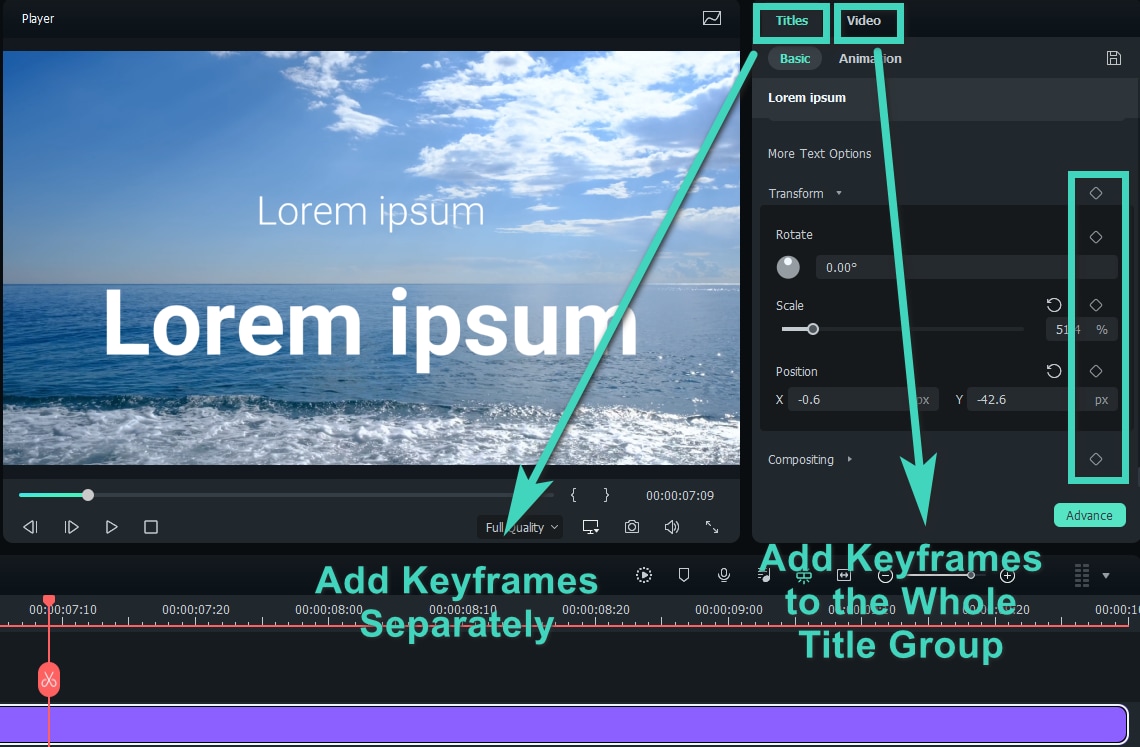
Step 10. Add additional keyframes according to your requirements by dragging the progress slider to the specific points where you wish to add another keyframe;
Step 11. Click Ok to save and export your project.
Conclusion
Getting ahead of the shortcut techniques for adding keyframes can help you become a master user of After Effects. It empowers your animation creation skills with useful and effective workarounds that can help you streamline your workflow, improve efficiency, boost productivity, and save time.
These shortcuts are time-saving tools, allowing you to focus on refining your animations by unleashing the full potential of your creativity. By applying these guidelines to your animation process, you'll speed up your work and expedite the production of professional-grade motion graphics without breaking a sweat.
After Effects shortcuts can help refine your keyframe animation skills, taking your expertise to the next level with streamlined navigation. They drastically reduce the time you need to conquer After Effects and harness its keyframing power to use it to your advantage.
We've outlined the essential keyframing shortcut techniques for adding and managing keyframes in After Effects that you should keep on your radar in 2024. In case you prefer a more user-friendly alternative to After Effects, we recommend tapping into Wondershare Filmora keyframing software.
Filmora offers a fully streamlined interface with user-friendly navigation and intuitive keyframing options that empower you to add, remove, and manipulate animation keyframes according to your specific needs and preferences.
