
Jack of all trades but master of none is a proverb we've learned many times in different scenarios. However, when it comes to mastering the art of video editing, one has to learn color grading. If you've to master one, go and learn color grading. This is more like cleansing or a makeup filter in simple terms of a video project.
The video color grading technique cleans your video and adds perspective. So, before you learn other stuff in video editing, learn color grading video techniques first. This article will discuss the concept of color grading in a video. Moreover, you will also learn about the three main things used in color correction or grading a video.
In this article
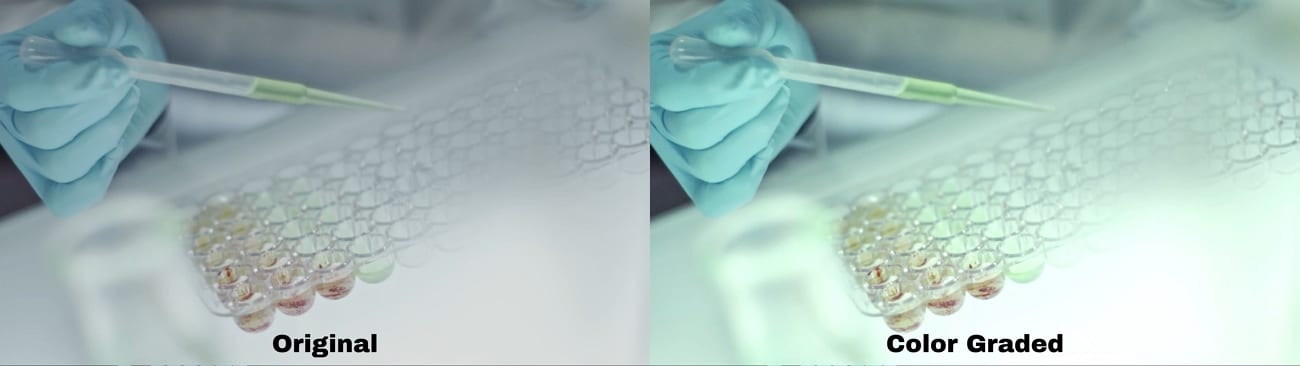
The best editor cleans your video and adds perspective with video color grading technique.

Part 1: What is Color Grading in Video?
Color grading in a video refers to adjusting and manipulating a video's colors and tones. It involves enhancing or altering the color and contrast of your video footage. This will also help to create a specific style to improve the emotional impact of your video.
Additionally, color grading goes beyond basic color correction and modifications. This involves fixing exposure, white balance, contrast issues, and much more. It is typically done in the video editing phase and is an essential step in video-making. Additionally, it contributes significantly to your recorded video's final look and feel.
Key Aspects of Color Grading
Color grading is a necessary factor in uplifting the outlook of your video. In this section, we are going to discuss some of the many elements of color grading. Read them and learn how they contribute to building a perfect video outlook:
1. Right Amount of Color Balance
Adjusting the balance of the primary colors helps to achieve a neutral color palette. Color balance also helps you to set a specific tone for your video.
2. Fixing Brightness and Adjusting Contrast
You can enhance the contrast between shadows and highlights to create depth. Moreover, to improve the visual appeal, you can adjust the brightness of your video as well.
3. Experiment With Vibrance and Saturation
Changing the intensity of colors to make them more vibrant or muted also helps. You can increase or decrease the saturation and vibrance depending on your requirements.
4. Color Consistency
Ensuring consistent color tones across different shots can make your video better. Color matching helps to maintain the visual consistency of your video. Moreover, color grading ensures that every shot has the same color composition. In cases with multiple shots from different locations and lighting conditions.
5. Relevant Color Correction
Applying color adjustments to specific parts of the frame is also essential. This includes enhancing skin tones, changing the color of an object, or highlighting certain elements.
Learn More about Filmora Video Editor

Part 2: Three Things To Master Color Grading
Mastering color grading is an art and skill almost everyone should know and learn. There are so many video color grading options, but we will talk about the three key aspects of it:
1. Color Consistency
Achieving color consistency is vital for maintaining a consistent color flow in your video. This consistency ensures that colors remain uniform in every single shot. It will provide a better viewing experience and additionally maintain the uniformity of your video.
To master color consistency, pay attention to the overall color palette and temperature. Ensure that your color adjustments don't create edgy transitions or distract from the narrative. Moreover, use tools like color charts and scopes to match colors accurately across different scenes.
2. Contrast and Dynamics
Contrast plays a pivotal role in guiding the viewer's attention and creating an amazing video overall. Mastering contrast involves balancing highlights and shadows to improve the mood of your video. Skillful contrast management can breathe life into dull scenes and emphasize key elements.
You can also experiment with adjusting the black-and-white points. Moreover, you can change the mid-tone contrast to achieve the desired drama and visual interest level. Remember that dynamic range and contrast may differ based on the medium of display, so modify accordingly.
3. Color Grading Subtlety
Subtlety in color grading involves improving the mood and narrative without overwhelming the viewer. A light touch can often yield more powerful results than heavy-handed adjustments. You need to pay attention to skin tones because they must appear natural-looking.
Moreover, subtle adjustments can create a subtle emotional impact in your video. You can also use techniques like targeted color correction to change specific areas. You can make localized adjustments to specific areas for selective portions for a balanced look.
Part 3: Wondershare Filmora: Color Grading To Perfection
Choosing a complete video editor is a compulsion to color grade a video professionally. When it comes to a complete and professional video editor, no one is near Wondershare Filmora. You must think there are several other tools than Filmora, so why this? The answer is that Filmora has many color grading and correction options compared to others.
Anyone from a professional to a layperson can easily edit and color grade their videos using Filmora. Presets and overlays are available for those who know little about video editing. Apart from that, there are tons of color grading video options for enthusiasts and professionals. So, it doesn't matter whether you have the skills; video color grading is easy with Filmora.
Key Features Of Wondershare Filmora
In addition to color correction and color grading, Filmora offers other features. Some of these are AI-driven, while some offer manual editing. Here is how you can make your videos interesting using its other features:
- Mask and Blend: Wondershare Filmora has a blend and mask feature that allows you to hide or reveal objects in your video. This great feature helps you hide or reveal any object or subject in your video layer.
- Adjustment Layer: Filmora provides an adjustment layer that can be used for applying effects and modifications. This layer is used when you don't want to make changes directly to that particular video layer.
- Motion Tracking: Using Wondershare Filmora, you can detect the motion of any object or person in a go. Once tracked the motion, you can then apply effects or make modifications according to your liking.
A Complete Guide to Color Grade Using Wondershare Filmora
Filmora is a professional video editing platform with several graphic-enhancing features. However, it has a simple user interface that amateurs can learn to operate. To help you with color grading, here is your guide after reaching its main interface:
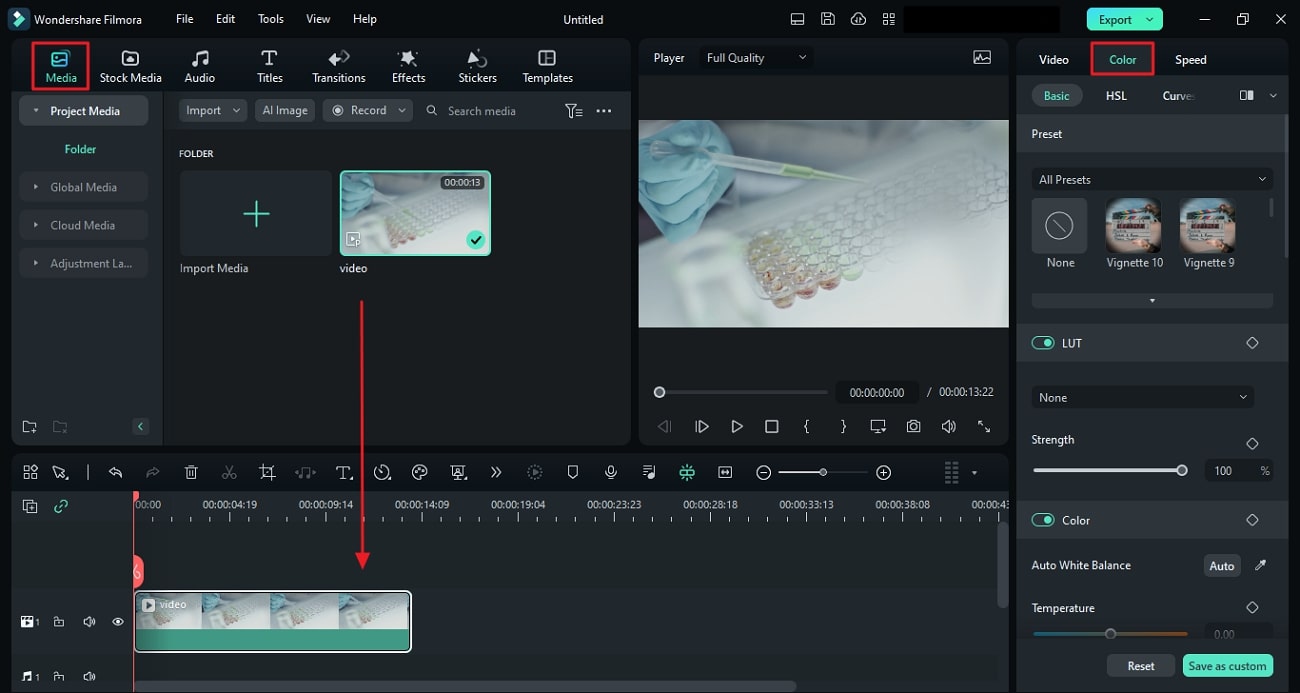
Step 1Import Media and Select the Color Tab
After installing and downloading, create a project by clicking "New Project" in Filmora. Once in the editing screen of Filmora, import your media with "Ctrl + I" and drop it into the timeline. You will notice a panel on the right corner of the interface where you can locate the "Color" tab. Make sure to left-click on the tab to open other color adjustment options.
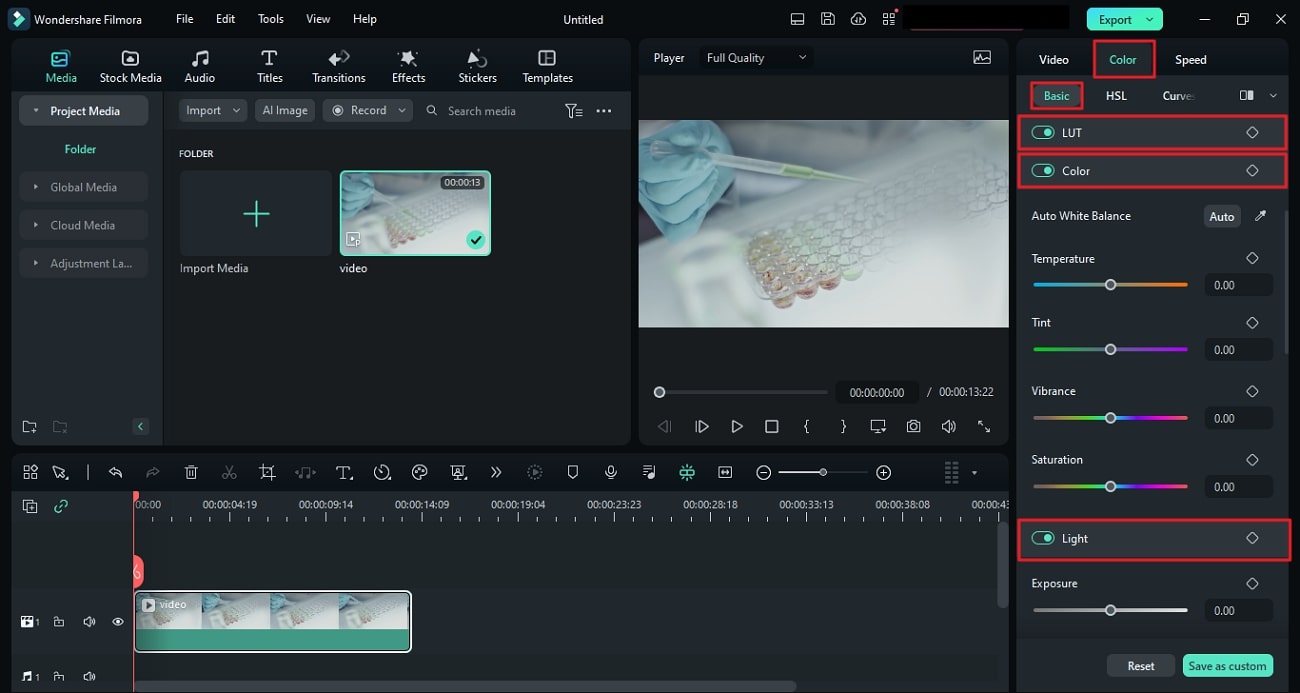
Step 2Select Basic Coloring Settings
You will see many options from the panel, but first, choose "Basic." Make simple and basic color adjustments by choosing the "Basic" tab from the panel. There you will find options like "Contrast," "Brightness," "Highlights," and more.
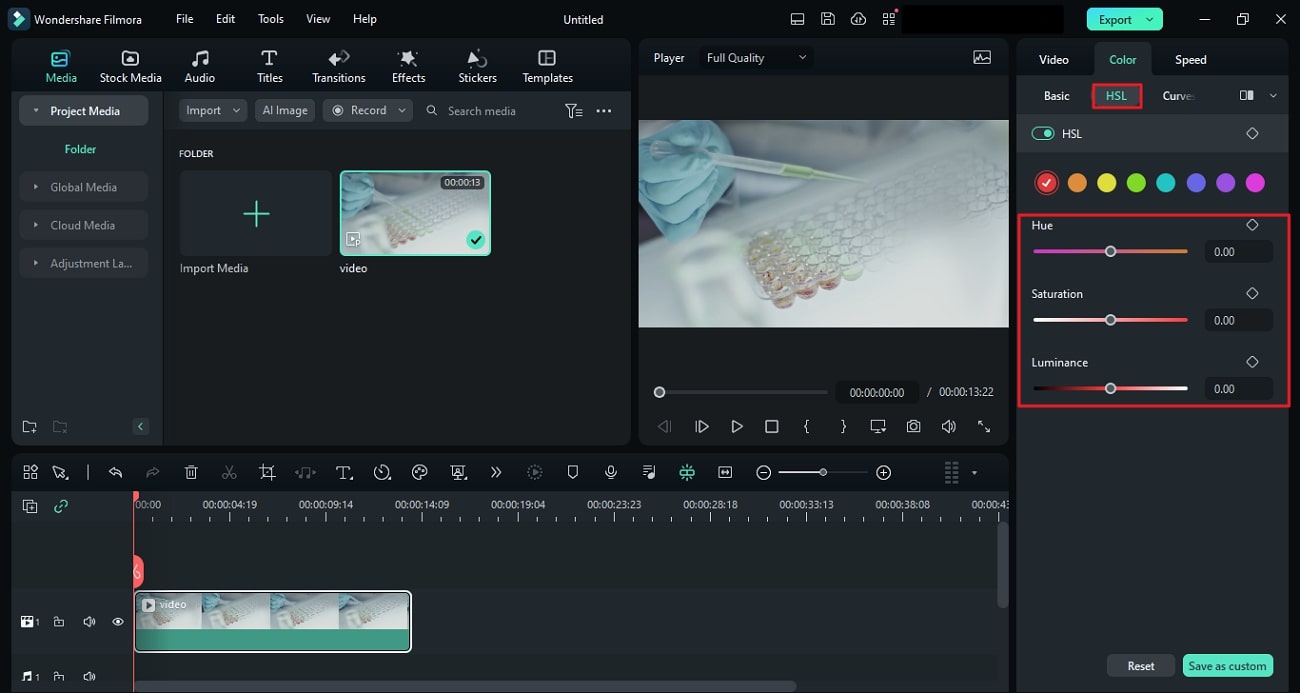
Step 3Enter HSL Settings
Choose HSL from the same panel and change the slider by moving right or left depending on the requirement. In this option menu, you will see "Hue," "Saturation," and "Luminance" for color adjustments.
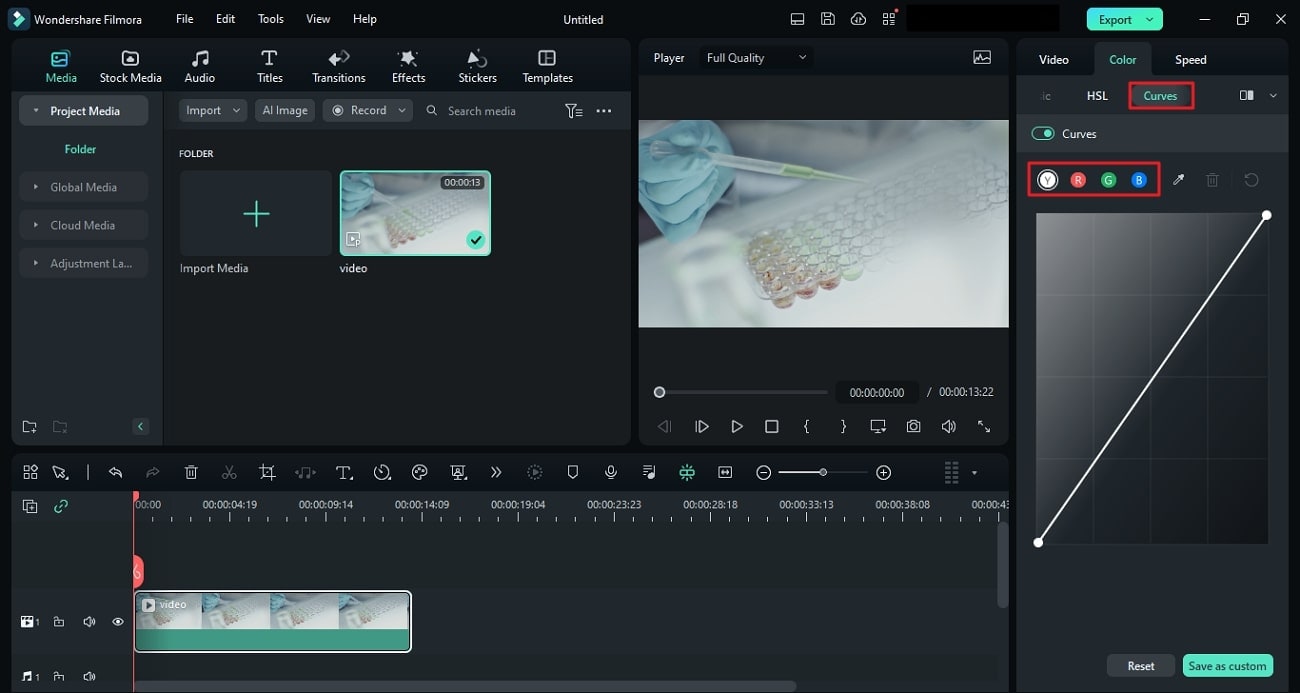
Step 4Manage Color Curves
Continue to "Curves" to change the RGB color channels of your video clip. There, you will also find the "Y" adjustment option to change the slider on the graph.
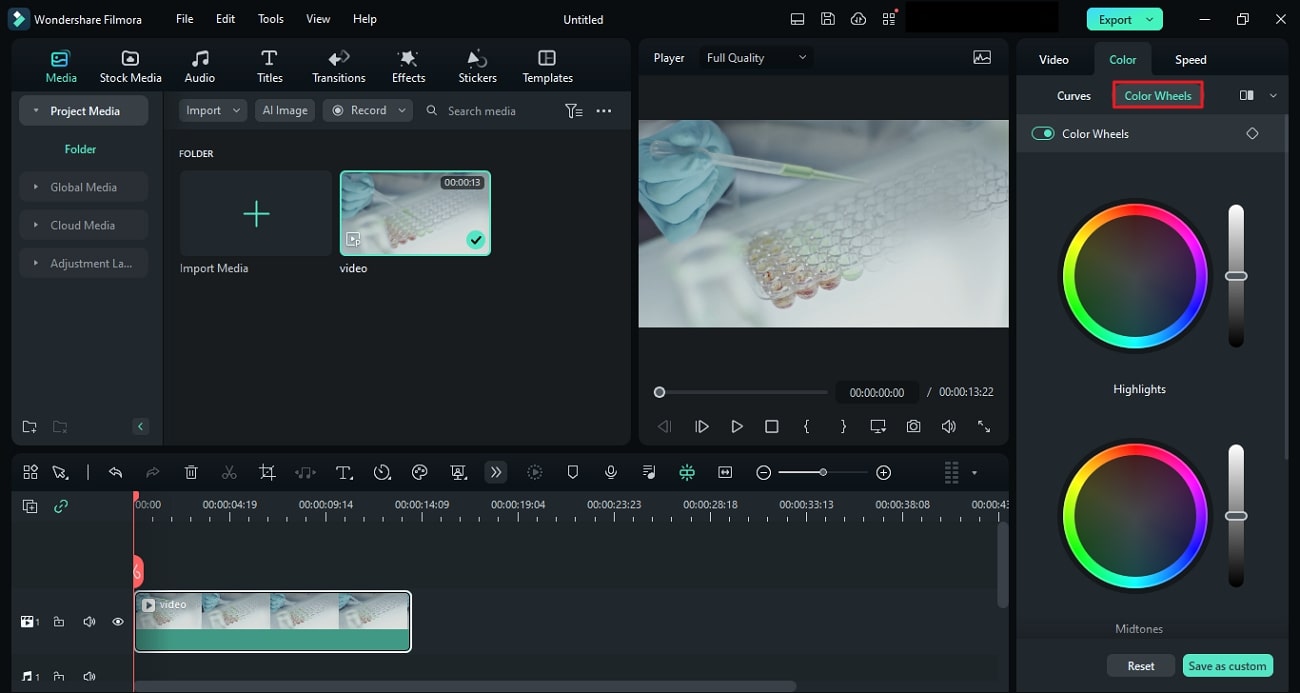
Step 5Click Color Wheels
Lastly, navigate further to click the "Color Wheels" tab from the panel. These color wheels help you to change the "Highlights," "Midtones," and "Shadows" according to the requirements of your video project.
Conclusion
Let's summarize everything in this article first with what you've learned. This article not only helped you to understand the term color grading but its important options as well. Additionally, you've learned how these three options of color correction can help you in your video editing. Wondershare Filmora has allowed you to use these options and more for video color grading.
