Looking for a way to slow down video for dramatic impact or learn how to speed up video in Filmora to save time? Whether you need a high-quality slow-motion in Filmora effect for YouTube or a quick video fast forward clip, this guide covers 4 easy ways to create fast forward video or fast motion video on Windows, Mac, and mobile.
Whether you want to watch YouTube videos in slow motion, or speed up and fast forward the long scenes on your Windows or Mac computer, you will find there are many video editing software available for slow down or speed up videos on your Windows or Mac computer, such as iMovie video editor.
While in this article, we are going to only show you how to speed up video with Filmora video editor and Ezgif online speed change tool. Follow these simple steps to make a video slow motion or create a fast forward video effect in minutes.
Part 1: How to Speed Up Video in Filmora on Windows and Mac?
In case that you want to know my solution for making a fast forward or slow-motion video, you can check the video tutorial below about how to change speed to add fast/slow motion video effects with Filmora. You can download Filmora now and have a try.
Wondershare Filmora is such a video editor that we'd like to introduce to you whether you are using a Windows or a Mac computer, with this simple video editor, you can quickly speed up and slow down videos. Read on to learn skills on how to speed up or slow down your creativeness.
Apart from the slow/fast motion video tutorial, you can follow the steps about how to speed up and slow down videos below and easily make slow-motion or fast-motion videos with Filmora.

Next, drag videos from the User's Album to the video track on the Timeline, and then right-click on it to click Speed and Duration. A pop-up window will appear. Speed numbers will indicate how fast or slow the motion effects will be. Then adjust the speed you want. You can view the effects in the preview window to make videos faster or slower. If you think it is too much, 0.5 speed is a good choice.
- 0.5: half of the original speed (Slow Down, Half)
- 1: The original speed
- 2: Double the original speed (Speed Up, Double)
- Other speed available to choose: 0.1 times, 0.2 times, 0.25 times, 0.33 times, 0.5 times, 2 times, 3 times, 4 times,5 times, 10 times etc.
Note: You can simply change the video speed by dragging the speed slider. Drag the slider to the right to speed up the video to make a fast motion effect. Drag the speed slider to the left to slow down the video to make a slow-motion effect. You can always drag the slider to set to an optional video speed rate.

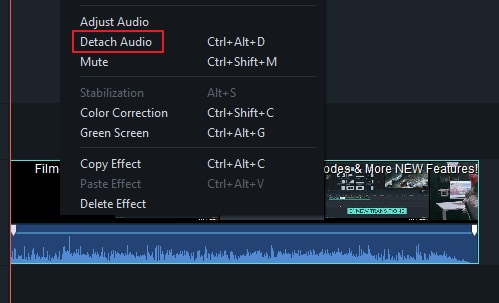
The video audio speed will change accordingly whenever you speed up or slow down the video playback speed. If you want to keep the original playback speed of the video audio, you can detach the audio from the video first and then do some editing to make a perfect pitch to the video. You need to double-click the audio clip to edit in the audio editing panel. You can edit fade in/out, remove background noise and more.

Besides, you can also add a new sound to the video to replace the original video audio, for the specific steps, check our guide about How to Replace Audio in Video.
When you have finished adjusting the video speed, click Export. You can save the video in any popular formats by clicking Format. If you want to play your new video creation on your iPod, iPhone, iPad, click Device, and select the icon for your devices. You can also share your videos on YouTube and Vimeo directly or burn video to DVD disc.

Keep in mind that when you adjust the video speed to speed up the video, there are some dos and don'ts that you should pay attention to. Our YouTube official channel has made a video about it, watch the video below and let's know if it is useful for you when making a video faster or slower.
How To Speed Up & Slow Down Videos With Filmora Mobile
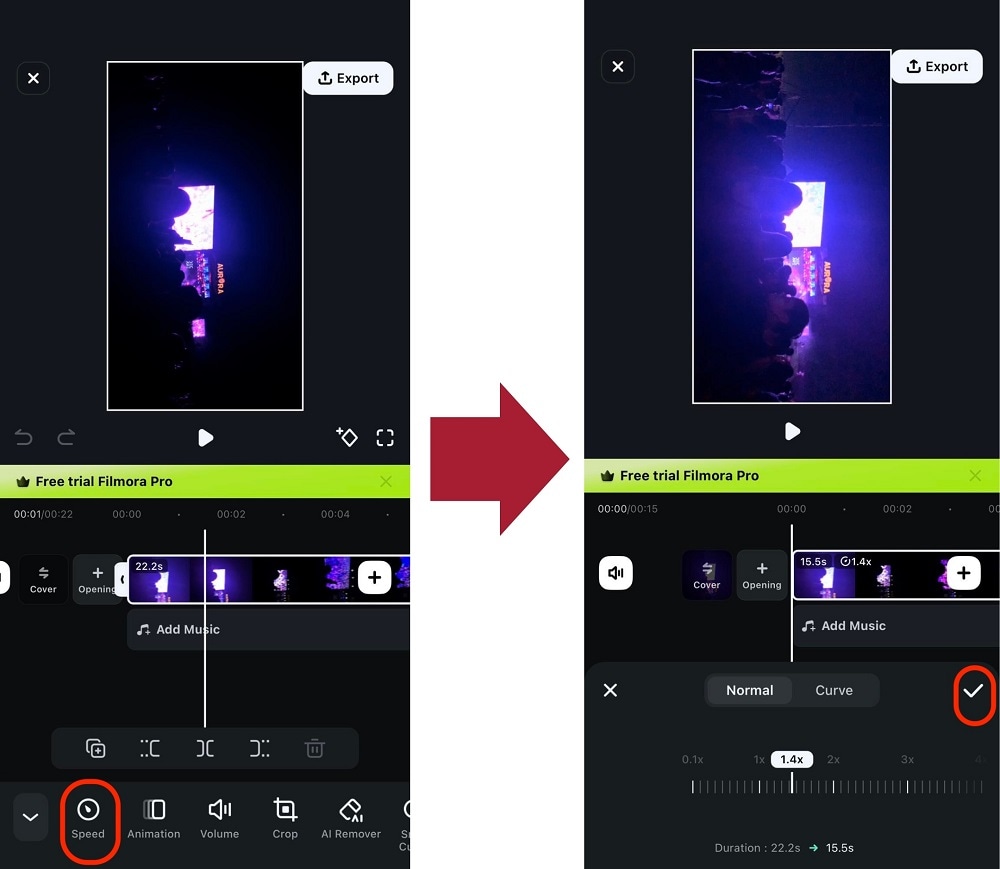
If you like watching videos on your phone, you might prefer speeding up and slowing down videos on it. After all, using a desktop to watch a video at your desired speed can be a hassle. So, if you’ve just watched a good video on YouTube, TikTok, or other platforms, try out Filmora’s mobile version to adjust its speed. It’s also a solution for making a fast-forward or slow-motion video on phones.
Just follow the steps given below:


With just two steps, your sped-up or slowed-down video is ready. Make sure to export it and watch them as is. Then, download Wondershare Filmora for more handy video editing tools!
Part 2: Speed up & Slow Down Videos by Video Duration Settings in Filmora [Much Intuitive]
Filmora also allows you to adjust the duration of the video clip to change the video speed. After importing the video clip to the timeline, right-click it and choose Speed and Duration to open the custom speed pop-up. Go to the Duration section and you will see the original duration of the video. Adjusting the duration of the video longer will add a slow-motion effect to the video. Changing the duration of the video to a shorter time will speed up the playback speed of the video. Just directly input the number in the field to speed up/slow down the video.

Preview the video to check if it gets the best fast motion or slow-motion effect and then saves and export it.
Part 3: Speed up & Slow Down Videos by Online Video Speed Changer
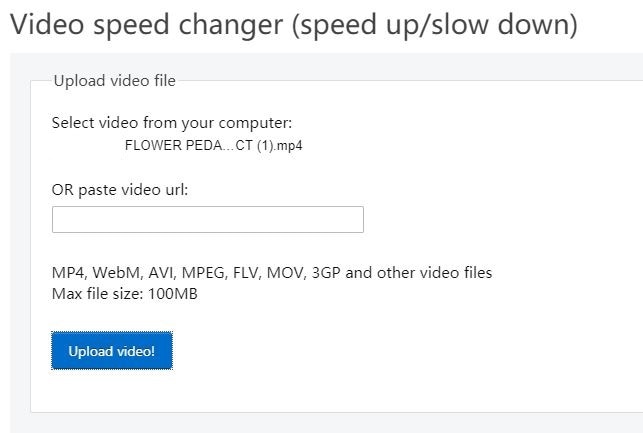
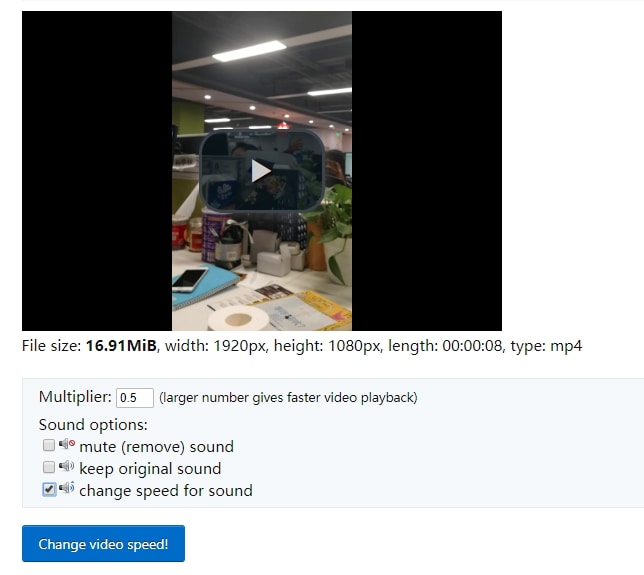
If you want to speed up videos online, Ezgif is an online tool that you can consider. You can import video from your PC or just paste a video URL. So easy to use. Below are the steps to change video speed.
There're many free online video editors that you use to change video speed, here I picked this free video speed editor Ezgif to show how to do that. Most of the steps are similar, and if you have any questions about changing video speed, leave a comment below.


Note: the max file size is 100MB. It supports MP4, WebM, AVI, MPEG, FLV, MOV, 3GP, and more. Plus, the importing speed is slow.
As you can see from here, if you want to have more options to change video speed and have a faster-importing speed, an online solution is not best for you.
Conclusion
Above are two ways to increase video speed and slow down a video playback. Besides fast motion and slow-motion video effects, you could also do some basic and advanced editing with Filmora, such as rotating, reversing, chroma-key, etc.. What's more, there are lots of preset video effects that you can use to give your video a Hollywood look. If you want to know more features that Filmora provides, check this introduction video below.
In fact, except for Filmora, many other video editing software can help you do this effect, including professional tools like Adobe Premiere, Sony Vegas, Final Cut Pro. Just choose one and get started. Let us know your opinions in the comments section below.
Frequently Asked Questions
Can I speed up video in Filmora without changing audio pitch?
Yes, in the Speed and Duration panel, ensure the 'Maintain Audio Pitch' checkbox is selected to keep the sound natural while fast forwarding.
What is the best speed for a slow motion video?
Generally, 0.5x (half speed) provides a standard cinematic slow-motion effect, while 0.25x is ideal for extreme action shots.


