


 100% Security Verified | No Subscription Required | No Malware
Looking for a way to master keyframes in DaVinci Resolve? Whether you're adjusting audio volume, animating titles, or using the DaVinci Resolve keyframe editor for complex motion, understanding these markers is essential. In this 2026 guide, we'll show you the fastest way to add, edit, and manage them efficiently.
In this article

Different Ways to Use Keyframes in Davinci Resolve

Davinci Keyframes are essential markers for instructing the video editing software to adjust and change specific audio and video parameters at pre-determined points. Thanks to that, you can use keyframes in Davinci Resolve to make dynamic changes to your video footage.
For example, a Davinci keyframe empowers you to gradually brighten a dark scene or create an effect of a moving image across the computer screen. Keyframes help Davinci users skip to specific locations on the timeline where alterations conclude or initiate.
Let's see the primary applications of keyframes in Davinci Resolve to help you understand why video editors rely on these critical markers to improve video quality:
- Zoom and pan – use Davinci keyframes to generate special effects by making it appear as if the camera zooms into or pans across a static image.
- Speed changes – apply variable speeds within a video to better manage playback.
- Text and titles – tap into keyframes to adjust different video settings like text, location, size, etc.
- Smooth transitions – Davinci keyframes let you create custom-tailored transitions between multiple videos by making sophisticated adjustments to video properties such as crop parameters and opacity settings.
- Special effects – create customizable visual effects by adjusting various parameters and settings like blur, color intensity, etc.
- Audio manipulation – use audio keyframes to manage and modify playback by adjusting an array of audio attributes like panning and volume levels.
- Color grading – manipulate color grading parameters by modifying colors, contrast, brightness, hue, and saturation dynamically throughout your content to accomplish consistency across multiple frames and scenes.
- Motion control – create modified object movement using keyframes to animate an object's rotation, scale, and position.
Davinci keyframes are an integral part of the video editing process in Davinci Resolve. They allow both beginners and professional video editors to construct custom-tailored audio/video effects.
How to Keyframe Color Correction in DaVinci Resolve
To keyframe color, go to the Color Page, right-click the node, and select Add Keyframe. This allows you to smoothly transition grading settings between different lighting conditions.
How to Add a Davinci Resolve Keyframe: Step-by-Step
Adding and viewing Davinci keyframes is a simple process thanks to the software's intuitive user interface.
Follow the steps below to learn how to add a keyframe in Davinci Resolve.
Step 1. Install Davinci Resolve on your computer;
Step 2. Launch the program and import your image, audio, and video assets;
Step 3. Drag and drop the files onto the timeline;
Step 4. Go to the Edit panel and open the Keyframe editor;
Step 5. Navigate to Preview > Transform;

Step 6. Make the preferred adjustments like rotation, scale, and position;

Step 7. Set the start keyframe by moving the playhead to the desired starting point on the timeline;
Step 8. Go to the Video > Inspector panel and rotate, scale, or position the video elements according to your requirements;
Step 9. In the Video section, click the diamond-shaped icon to add a keyframe for each Transform parameter you wish to animate;

Step 10. Set an end keyframe and adjust the ending rotation, scale, position, and other effects;

Step 11. Playback the timeline to preview the changes you've made;
Step 12. Use keyframe icons in the Inspector panel to fine-tune specific keyframes;
Step 13. Make additional adjustments in the Preview screen area.

How to Create an Animation Path in Davinci Resolve
After adding the start and end keyframes, you can create an animation path by adjusting the animation curve in Davinci Resolve.
Here's how to create animation within keyframes using Ease In/Out settings.
Step 1. Import your video and drag and drop it in the timeline;
Step 2. Position the playhead at the location of the keyframe you wish to animate;
Step 3. Open the Inspector panel;
Step 4. Right-click the keyframe diamond icon;
Step 5. Select Ease In or Ease Out to adjust the animation's pacing by providing smoother transitions between keyframes.

Following these steps allows you to create a basic animation path for a moving object, moving it from right to left or left to right while increasing its size.
How to Edit and Remove a Keyframe in Davinci Resolve
Davinci Resolve allows you to edit keyframes directly on the timeline by adjusting their positions. Let's see how to make different kinds of adjustments when keyframing in Davinci.
Step 1. Open Davinci and import your file;
Step 2. Drop the file onto the timeline;
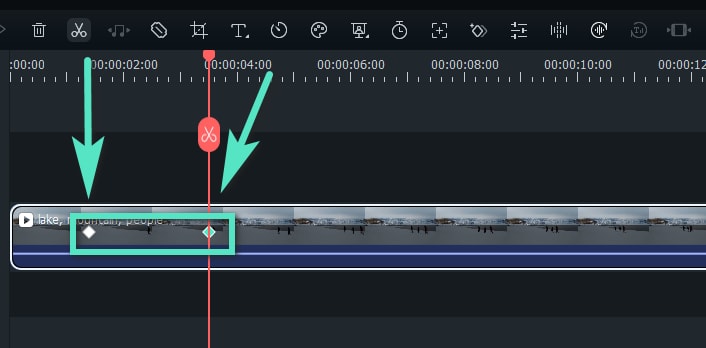
Step 3. Go to the Edit tab and set the timeline location where you wish to view keyframe data;
Step 4. Click the diamond icon in the lower right corner of the clip;
Step 5. Reveal keyframes, including the type of effect, such as Transform, position, etc.;

Step 6. Adjust the timing of the keyframes by clicking on the diamond icons to view the set keyframes;
Step 7. Drag the keyframes to change the timing and the speed of the animation;

Step 8. Click on the curve icon in the upper right corner to open the curve control panel;
Step 9. Add a gradient effect to your animation to make it smoother using animation effects;

Step 10. Use Ease In/Out options to smooth out animation transitions between keyframes;

How to remove keyframes in Davinci Resolve:
Step 1. Go to the preview screen and right-click the keyframe you wish to remove;
Step 2. Select Delete Keyframe;
Step 3. For batch keyframe removal, go to the Inspector panel and click the circular icon next to the keyframe diamond icons to remove all keyframes.

Pro Tips for Mastering Keyframes in Davinci Resolve
If you wish to enhance your video editing skills beyond your expectations, you can use advanced techniques to master keyframing.
These techniques include:
- Dynamic Keyframe Zoom – enabling this option allows you to set keyframes automatically, creating a more lifelike scaling effect. Dynamic Zoom applies a smooth zoom-in/zoom-out effect to your animation using Davinci keyframes to create specific footage highlights.
- Keyframe Color Changes – Davinci keyframes allow you to tap into dynamic color grading and make sophisticated changes to the footage colors over time, such as day/night transitions. These dynamic changes enable you to emphasize your storytelling by highlighting key moments and mood changes.
- Motion Tracking with keyframes – Davinci keyframes allows you to combine multiple motion-tracking keyframes to attach visual effects or creative assets to moving objects within your video content. Create dynamic interactions between different scene elements, apply visual effects to characters' movements, add text to moving objects, etc.
- Advanced audio keyframing – create custom-tailored sound effects by manipulating audio keyframes and levels over time.
In addition, here are some pro tips and practices to help you get started with Davinci keyframes:
- Experiment with Ease In/Out – Ease In/Out settings are an excellent option for enhancing animations, making them smoother. These settings help you make your content more lifelike by making fine adjustments to transition speeds.
- Zoom In for extra precision – zoom in on the timeline to get more control over keyframe positioning and ensure you place each keyframe more accurately. That can help with refining your effects while fine-tuning animations.
- Label and group keyframes – if you're working on a complex project, create groups of associated keyframes and label them for easier keyframe management and adjustment.
- Tap into keyframe navigation tools – keyframe navigation controls allow you to seamlessly navigate the Davinci keyframe interface and move back and forth between the previous and next keyframes.
- Get advanced control over your work using the Spline Editor – the Spline Editor is an advanced editing panel that provides full control over keyframe animation parameters. You can use it to make fine adjustments to the transitions between different keyframes and fine-tune the animation curves.
A Simpler Way: One-Click Keyframing in Wondershare Filmora
Though you don't need advanced technical skills or video editing knowledge to enhance the quality of your video content using Davinci keyframes, keyframing can get complicated at times. If you find Davinci's learning curve too steep for your tastes, you can try a more streamlined solution like Wondershare Filmora.
Wondershare Filmora is a beginner-friendly alternative to Davinci Resolve keyframing, empowering you to create mind-bending visual animations with a few clicks. Filmora's Keyframing lets you scale the subject of the clip according to your needs, make custom-made opacity adjustments to make each shot more concise and precise, customize animations for enhanced engagement, and more.
Here's how Filmora Keyframing can help you boost your content:
- Refine opacity using advanced keyframing settings;
- Make your content more visually appealing with advanced color grading;
- Turn your footage into professional content with adjustable color correction parameters;
- Modify the size and position of your content according to your requirements;
- Modify multiple keyframes simultaneously without disrupting your workflow or compromising video quality;
- Add keyframe animations to a split screen, customize multiple clips, and make dynamic changes over time;
- Enhance scene atmosphere by adjusting color tones over time, correcting color issues, tweaking 3D LUTs, and fine-tuning tint, temperature, and white balance;
- Create customizable text animations with adjustable animated fonts and creative effects;
- Create and save custom keyframe presets with custom-made colors and effects.
Adding animation keyframing in Filmora is a straightforward process. Download and install Filmora on your computer, then follow the steps below to add and edit keyframes in your footage.
Step 1. Launch Filmora and navigate to the main menu;
Step 2. Select New Project and import your media;
Step 3. Drag and drop your files on the timeline;
Step. 4. Double-click the clip on the timeline to open the Editor panel;
Step 5. Navigate to Video < Basic and open the Keyframing menu;
Step 6. Set a keyframe by clicking on the diamond icon;
Step 7. Use the progress slider to add a keyframe to the starting position, then click the diamond in the property panel to set it;

Step 8. Edit keyframes using Filmora's Video and Titles menus to adjust keyframe parameters using animations, AI tools, masks, auto-enhancements, compositing, etc.;
Step 9. Adjust audio keyframes by manipulating volume, pitch, and more;
Step 10. Go to the Titles menu to add animations according to your needs;
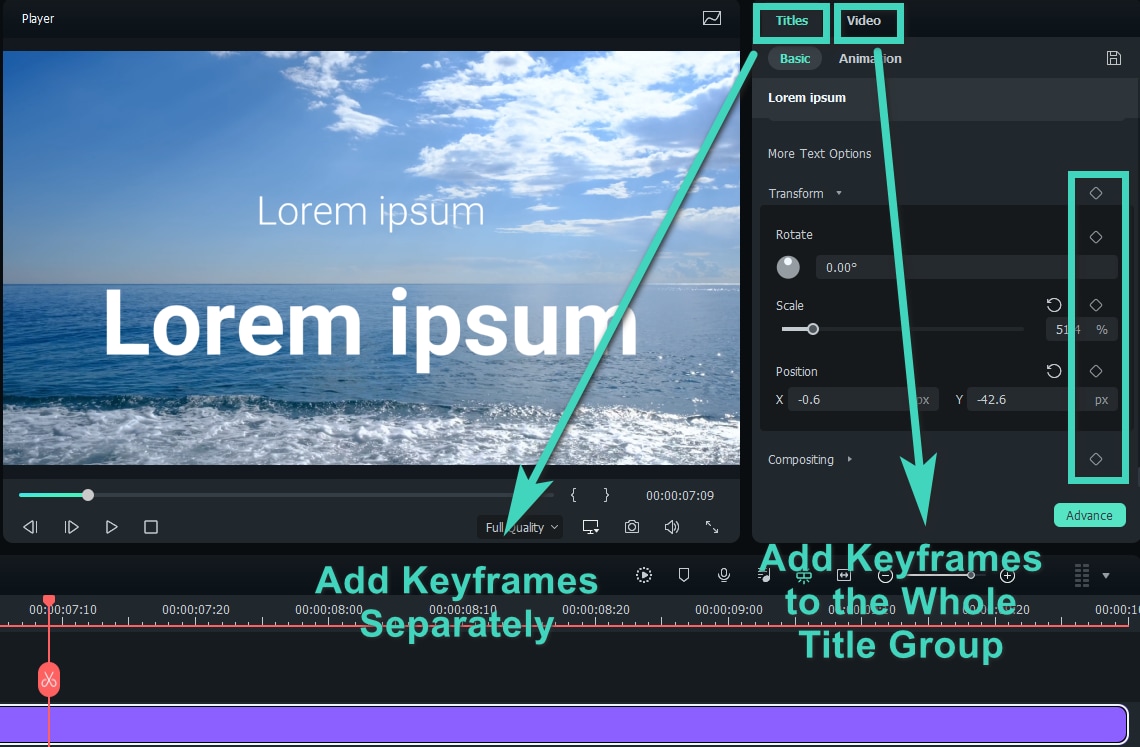
Step 11. Add other keyframes by dragging the progress slider to where you want to apply a new animation;
Step 12. Click Ok to save your changes.
Hot topics on keyframe
Conclusion
Davinci keyframes open the world of video editing and enhance opportunities. They make the entire process of boosting your video content simpler, faster, and more intuitive. Thanks to that, keyframes in Davinci Resolve let you create seamless transitions, apply various effects, and adjust sophisticated parameters to make your visuals more appealing and attractive.
Mastering Davinci keyframing empowers you to unlock your creative potential and apply tons of dynamic changes to your footage. From basic adjustments like color grading and motion control to advanced techniques like motion tracking, audio keyframing, and dynamic zoom, Davinci keyframes give you unprecedented control over the video editing and enhancement process.
However, Davinci keyframing may not be the most suitable option for people with no experience with working with keyframes. If that's the case with you, we recommend tapping into a more beginner-friendly alternative solution like Wondershare Filmora.
Filmora's intuitive navigation and user-friendly interface will help you streamline the keyframing process, allowing you to add customizable animations to your video content with a few clicks.
