


Does any video make you wonder how the pros create those dramatic speed changes?
A speed ramp for audio refers to the technique of adjusting the speed of an audio clip in conjunction with video footage to create a smooth transition between different playback speeds. This technique is commonly used in video editing to enhance the storytelling aspect by syncing audio changes with visual speed changes, such as slow-motion or fast-motion effects.
In this guide, we will find the magic of speed ramp for audio in Adobe Premier Pro/Adobe Rush. You will also learn how to create these amazing effects, from simple ramps to advanced techniques. Are you ready to elevate your video editing skills? let's get started!
In this article
How To Create a Simple Audio Speed Ramp in Premiere Pro/Adobe Rush
Creating smooth speed ramps in Premiere Pro can enhance your videos. This technique involves changing the speed within a single clip. It highlights important moments and adds excitement. Premiere Pro offers tools to make this process easy and precise.
Speed ramping is ideal for action scenes or emphasizing key moments. It's a simple yet powerful technique to elevate your video editing skills and create exciting content.
Steps to Create a Simple Speed Ramp in Premier Pro
Below are the steps to create a smooth speed ramp for audio in Premiere Pro.
Step 1. Import Your Footage
Start by importing your video and audio files into Premiere Pro. Drag your video clip onto the timeline.
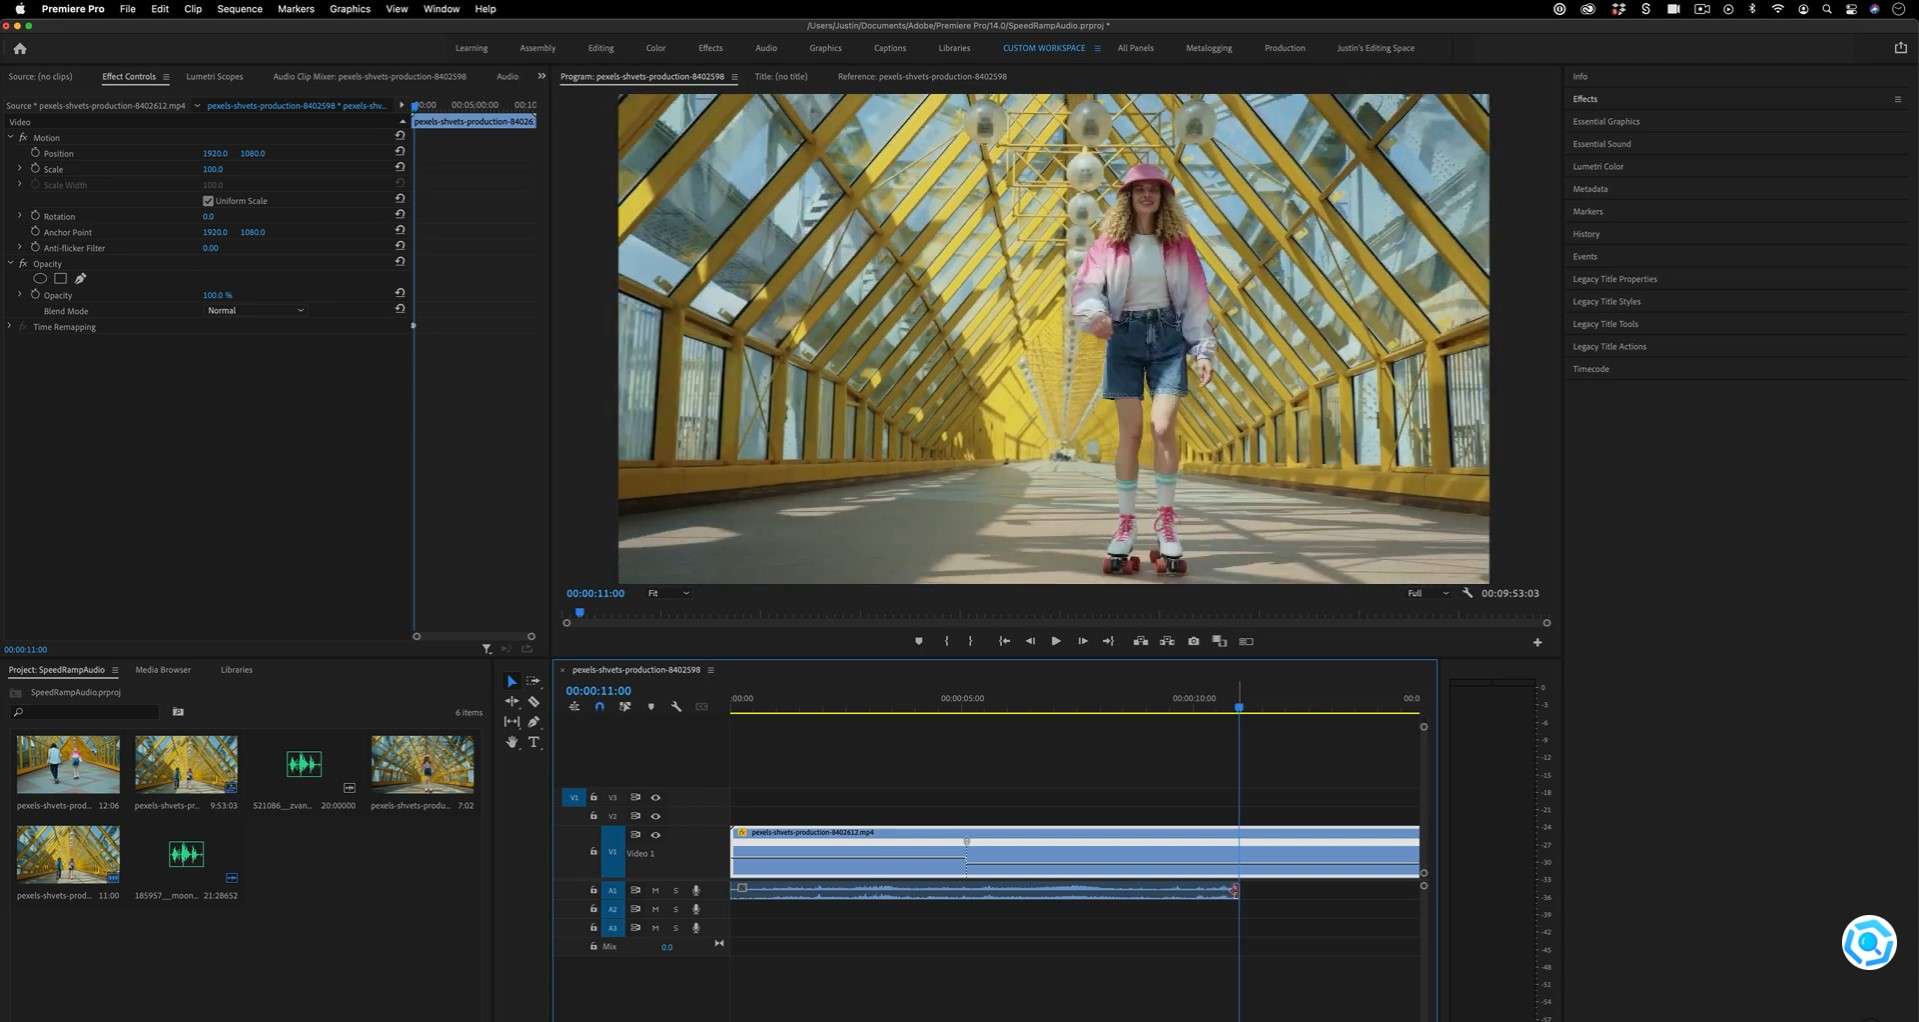
Step 2. Unlink Audio from Video
Right-click on the video clip in the timeline and select Unlink. This allows you to edit the audio and video separately.
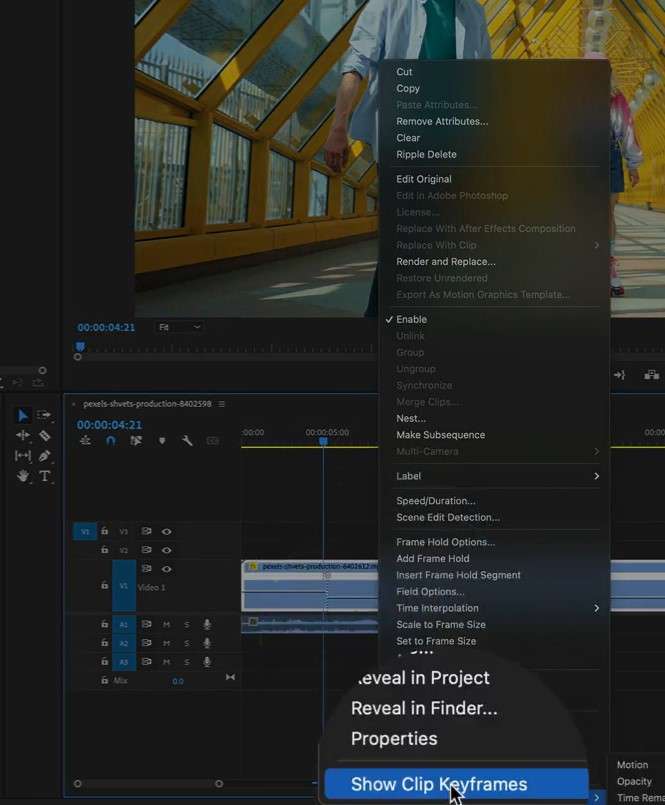
Step 3. Add Time Remapping
Right-click on the video clip again, go to Show Clip Keyframes, and select Time Remapping and Speed. This will display a speed line across the clip.
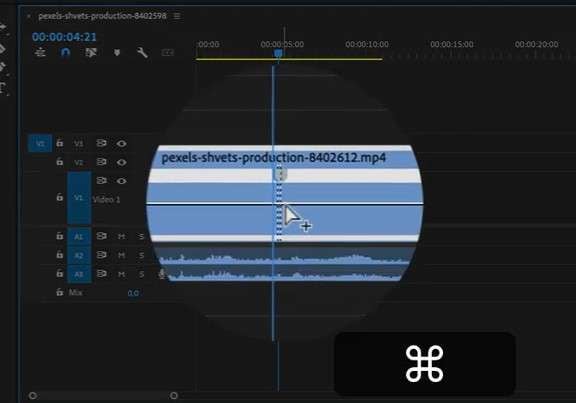
Step 4. Create Keyframes
By using the Command Key, you can add points on the speed line where you want the speed ramp to start and end, and just by dragging the line.
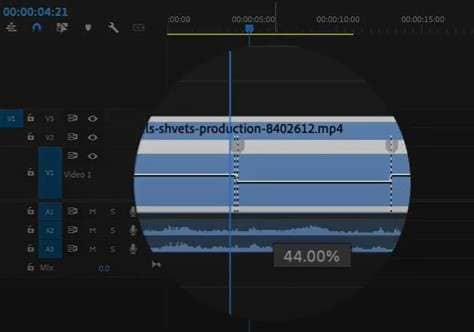
Step 5. Adjust Speed
Click and drag the line between the keyframes up to increase the speed (fast motion) or down to decrease the percentage to something like 50% speed (slow motion). However, whenever you adjust the speed of the clip, the duration of the clip changes, because fifty percent speed is going to take twice as long to play. However, the audio stays the same, it does not get ramped with the video in Premiere Pro.
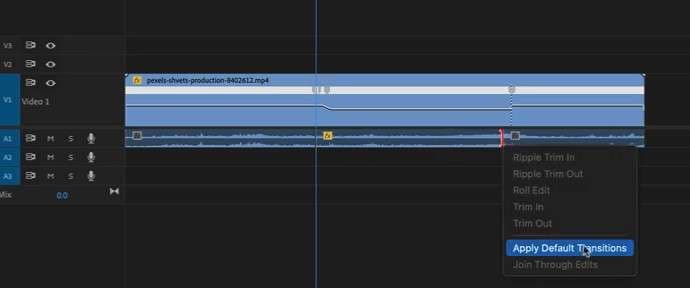
Step 6. Smooth Transitions
To create smoother transitions, click and drag the edges of the keyframes to adjust their position. This will create a gradual ramp effect rather than an abrupt change. Also, if you want to even smooth it out a little bit more, you can just make sure your selection tool is active and right-click ”Apply Default Transition” onto these audio clips, so it'll kind of cross-dissolve from the normal pitch to the slow motion pitch.
Step 7. Adjust Audio
Since the audio does not automatically adjust with the speed changes, you may need to cut the audio track at the same points as your video keyframes. Use the Razor Tool (C) to make cuts.
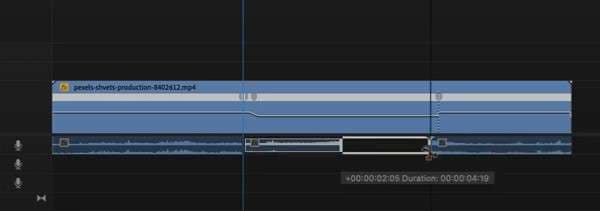
Step 8. Stretch Audio
Select the audio segment between the cuts, then hold Alt (or Option on Mac) and drag the edge of the audio clip to stretch it to match the duration of the speed ramp. This will help keep the audio in sync with the video.
Step 9. Preview Your Changes
Play back your timeline to see how the speed ramp and audio adjustments work together. Make any necessary tweaks to ensure synchronization.
Step 10. Export Your Project
Once you're satisfied with the speed ramp and audio, go to File > Export > Media to export your project.
Steps to Create a Simple Audio Speed Ramp in Adobe Rush
- Step 1. Import Your Clips: Open Adobe Rush and import your video and audio files.
- Step 2. Place Clips on the Timeline: Drag your video clip to the timeline.
- Step 3. Speed Adjustment: Select the video clip, then go to the Speed settings in the right panel. Here, you can adjust the speed of your clip.
- Step 4. Create Speed Changes: Rush has limited speed ramping capabilities compared to Premiere Pro. You can set the speed to slow or fast but might not have the same keyframe flexibility.
- Step 5. Audio Adjustments: For audio, similar to Premiere Pro, you may need to cut and stretch the audio segments to match the speed changes. Use the Razor Tool to cut the audio and then stretch it as needed.
- Step 6. Preview and Export: Preview your edits to ensure everything syncs well, then export your project by clicking on the Share button.
Additional Tips on Creating Time Remapping In Premiere Pro:
Follow the tips below for amazing results while creating time remapping in Premier Pro.
- Use for Slow or Fast Motion: Apply time remapping for slow motion, fast motion, or both. This can add dramatic effects and enhance storytelling.
- Experiment with Speeds: Try different speed values and transition lengths. This helps you find the best effect for your video.
- Add Sound Effects: Use sound effects to match speed changes. This enhances the overall impact and makes transitions smoother.
- Avoid Extreme Changes: Be careful with extreme speed changes. They can affect video and audio quality, leading to less professional results.
- Practice Makes Perfect: Practice to create smooth and effective speed ramps. The more you experiment, the better your results will be.
We have discussed everything about speed ramp Adobe Premiere Pro/Adobe Rush. Let's move to the next part of our discussion.
Part 2. Understanding Frame Rates When Working With Speed
When working with video speed, understand frame rates. Videos are usually shot at 24 or 30 fps. Slow motion is created by shooting at a higher frame rate, like 60 fps, and playing it back at 24 fps.
Time Remapping plays footage at a different frame rate than it was shot. But what if you want slow motion or a speed ramp and don't shoot at a high frame rate?
Adobe Premiere tries to fill in the missing frames, but artificial slow motion can look choppy. If you plan to use a speed ramp to highlight action, start with slow-motion footage for the best results.
Are you having some difficulty using time remapping Premiere? Let's share some advanced speed-ramping techniques.
Part 3. Advanced Speed Ramping Techniques
Speed ramping adds tension, emotion, or drama to a scene. Let's explore advanced techniques to attract more audiences.
-
Speed Ramp Transition
A speed ramp transition smoothly switches between two shots with different playback speeds. Video editing software like Final Cut lets you adjust the speed of individual clips. Use this transition to create continuity or highlight a specific moment.
Start with a shot at regular speed, then gradually reduce its speed as you change to the next shot. Gradually change the speed of the first shot over time, then match the speed of the second shot to the first. This results in a smooth transition between the two shots.
Alternatively, start with a shot at normal speed and slowly increase the pace as you transition to the next shot. This creates a sense of urgency or excitement in the scene.
-
How To Freeze Frame With Speed Ramp
The freeze-frame technique stops your video for a few seconds, creating a dramatic effect. Here's how to do it:
- Import your video into the editing software.
- Drag the video to the primary timeline.
- Select the "Tools" menu.
- Choose "Action Camera Center."
- Select "Freeze Frame" on the left side.
- Place the playhead where you want the freeze-frame to appear.
How To Make a Slow Motion Video With a Speed Ramp?
Slow motion stretches the time in a shot, making it appear slower. It adds intensity and keeps viewers engaged. Here's how to create slow motion:
- Import your footage and move it to the editing tracks.
- From the "Tools" menu, select "Action Camera Center.
- Click "Create Time Shift" under the "Effect" option.
- At the top of the timeline, the time shift border will appear.
- Move it to cover the part of the clip you want to slow down.
Have you tried Adobe Premiere Pro and Adobe Rush? If you are unsatisfied with the results, let's share the best alternative for time remapping in the next part.
Part 4. Can You Achieve an Easy Time Ramping Effect in Other Software?
Looking for an easier way to time remap your videos?
Wondershare Filmora is a perfect solution. Filmora is user-friendly video editing software with powerful features. Hence, making it a great alternative to Premiere Pro.
With Filmora, you can effortlessly create stunning slow-motion and fast-motion effects. Its intuitive interface lets beginners and pros edit videos with ease. And you don't need extensive training to use Filmora.
Filmora offers multiple editing tools. You can add transitions, effects, and music to enhance your videos. The software also supports 4K editing, ensuring high-quality output.
Key Features of Filmora's Speed Ramping
The following are the key features of Filmora's speed ramping.
- Effortless Speed Adjustment: Speed ramping lets you adjust the speed of your video clips easily. You can create both slow-motion and fast-motion effects with just a few clicks.
- Masking Transition: Filmora includes a masking transition feature. This allows for smooth transitions between clips. It adds a unique touch to your videos.
- High Frame Rate Support: For the best results, use footage with more than 50 frames per second (FPS). Higher frame rates make your videos look smoother and more professional.
- User-Friendly Presets: Filmora offers several speed ramping presets. These presets help you quickly apply different speed effects. You can also customize your speed ramps for unique effects.
- Easy Customization: Create custom speed ramps by dragging points on the speed ramping timeline. Adjusting the speed is simple and intuitive.
- Freeze Frame Effect: Filmora allows you to add a freeze-frame effect. Click the snow icon to freeze a moment in your clip. Adjust the freeze time to fit your needs.
Step-By-Step Guide On Time Remapping With Filmora
Follow the steps below to speed ramp using Wondershare Filmora.
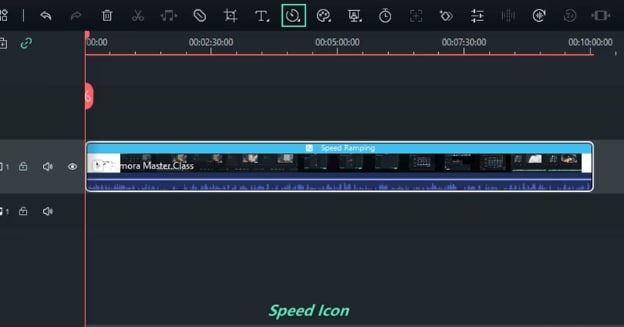
Step 1: Find the Speed Ramping Panel
Here are three ways to access the speed ramping tab.
- Double-click the video or audio clip. In the pop-up window, select Speed > Speed Ramping.
- Right-click the video or audio clip. Choose Speed Ramping.
- Click the Speed icon on the toolbar. Select Speed Ramping.
Step 2: Customize the Speed Ramp
In the Speed Ramping panel, you can change the speed or pick a preset. Options include Montage, Hero Moment, Bullet Time, Jumper, Flash In, and Flash Out. Choose a preset speed ramp or create your own custom speed.
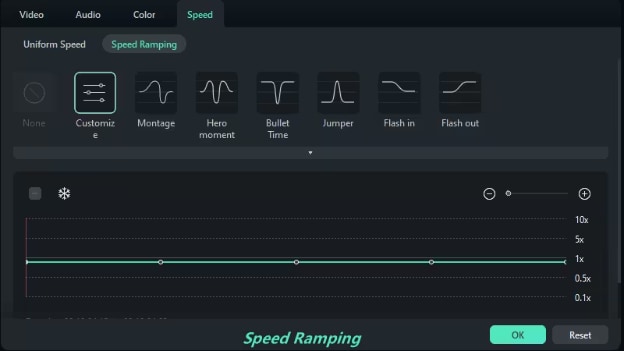
Place the playhead where you want to change the speed. Click the Add icon to add speed keyframes. Filmora will mark Speed Ramping on the clip. To adjust speed, drag the keyframe dot up or down. You can also keep the audio pitch the same when the video speed changes.
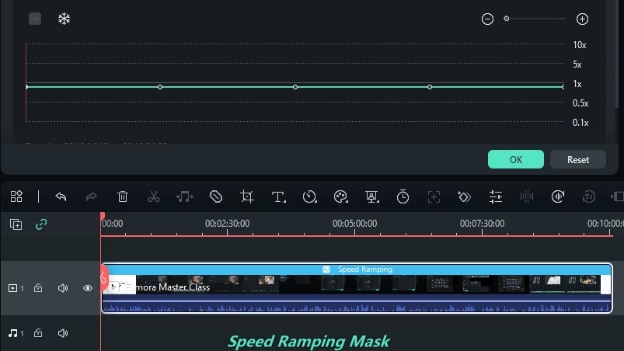
If you're happy with the adjustments, click OK to save. If not, click Reset to restore the previous settings.
Now that you know how simple it is to speed ramp using Filmora. Next, look at the best way to adjust speed ramps to fit different music tempos.
Make a Smooth Speed Ramp Every Time!
The Best Way To Adjust Speed Ramps To Fit Different Music Tempos
Want to match your video's speed with music tempos? Filmora's Auto Beat Sync feature can help. It automatically syncs your video cuts to the music beat. This makes your video smooth and engaging. Ideal for music videos or any project needing perfect timing, Auto Beat Sync simplifies the editing process.
Step-by-Step Guide to Auto Beat Sync
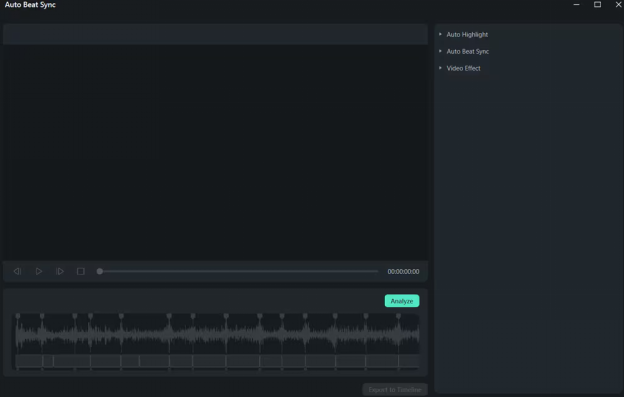
Step 1: Open Auto Beat Sync
To open the Auto Beat Sync panel, follow these steps:
- Open Filmora video editing software and find the Auto Beat Sync option in the startup window.

- If you're in the editing interface, right-click the imported files in Project Media, then select Auto Beat Sync.

- Select the imported files in Project Media. Then, click Tools > Auto Beat Sync in the navigation bar.

Step 2: Adjust the Settings
In the Auto Montage Panel, you will see three main adjustable parameters: Auto Highlight, Auto Beat Sync, and Video Effect.
Auto Highlight
You can add more video or audio clips in the Auto Highlight section. Adjust the order or delete any imported clips. You can also change the length of the generated video or audio clip.

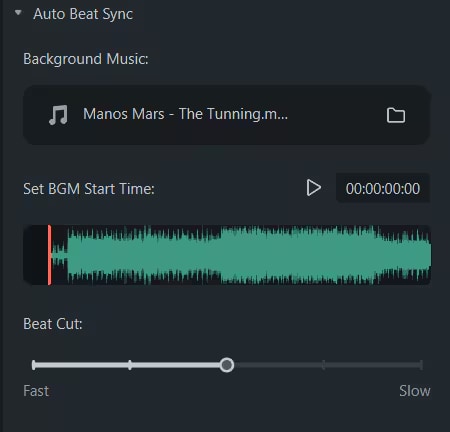
Auto Beat Sync
In the Auto Beat Sync interface, import background music and set the BGM start time. Preview the music to choose the start time. You can also select the beat cut speed, either fast or slow.
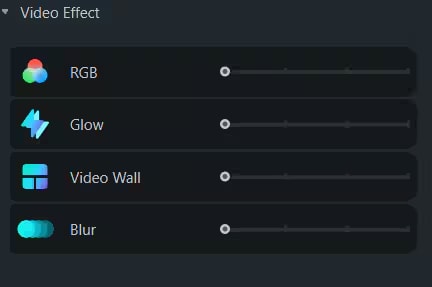
Video Effect
In the Video Effect section, set how often RGB, Glow, Video Wall, and Blur effects appear.
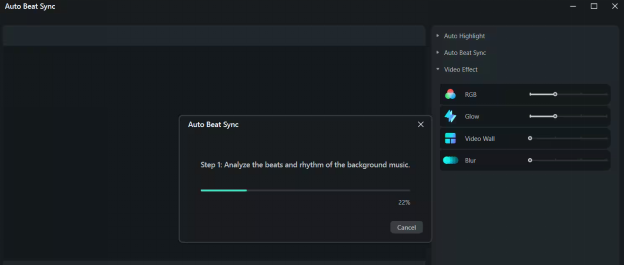
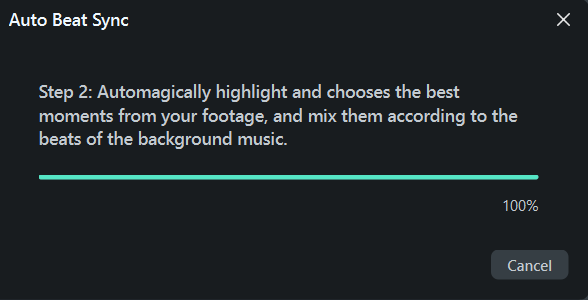
Step 3: Analyze
After finishing all the settings, click the Analyze button to start the automatic analysis. The process usually takes two steps. Please wait patiently.
- Analyze the rhythm and beats of the background music.
- Automatically highlight and select the best moments from the footage. Mix them to match the beats of the background music.
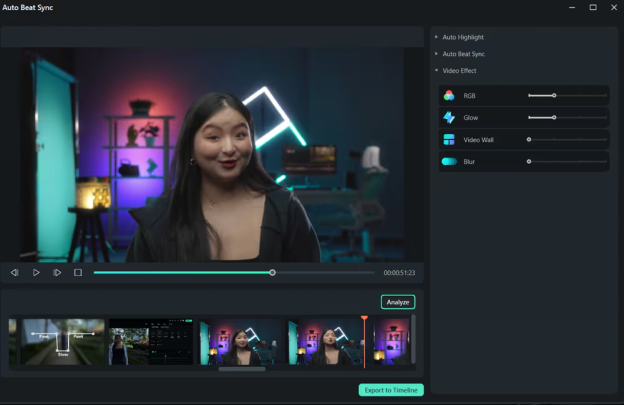
Step 4: Preview the Generated Video
Click the Blank button or the Play icon to preview the video. If satisfied, click Export to Timeline. If not, adjust the settings and click Analyze again.
We have covered everything about Filmora's auto-beta sync feature.
Still have some questions bulging in your mind about speed ramp Premiere Pro? Let's address them!
Final Words
Mastering speed ramp Adobe Premiere Pro/Adobe Rush can transform your videos. This technique adds drama and emphasis. It makes your content more engaging. Speed ramping is great for action scenes and key moments. It can elevate your video editing skills.
Experiment with different speeds. Add sound effects. Practice for the best results. For smoother transitions and advanced effects, try Filmora's video editor for all device. It has a powerful features and a user-friendly interface.
Filmora's presets, and Auto Beat Sync make it easy to match your video to the perfect tempo. This creates a professional look with ease. Start enhancing your videos today with Wondershare Filmora!
