Video content has a magical power to deliver messages and communicate certain emotions. Most of the time, the dialogue and the actual scene being portrayed do the job. But those are not the only factors that play a key role in this regard. In a way, visual effects also help a lot. Let’s say you wish to establish a gloomy and moody vibe. In this case, you can add a video filter that evokes this kind of emotion. Don’t worry. It’s indeed a piece of cake. All you have to do is choose and apply some moody LUTs.
In this article, we will talk about the highlights and benefits of moody LUTs. We will suggest some free moody LUTs you can download and use. Lastly, we will provide a short guide on how to apply one to your video projects. Continue reading below to learn more.
In this article
How to Add Moody LUTs to Your Videos Using Wondershare Filmora?
There is no denying that moody LUTs can certainly take your videos to another level. So long as you choose the perfect variant, the effect will surely fit the style of your content. That’s why you should explore this visual filter and apply it to one of your projects. Don’t worry. Wondershare Filmora is there to assist you every step of the way. Do you want to give it a shot? If that is so, check out the details below to learn more about this software.
Key Features
Wondershare Filmora has tons of useful features to offer to video editors. You can use all of them to apply moody LUTs and produce stunning video content. To know some of them, check out the list provided below.

- 3D LUT: It gives you access to a large collection of LUTs that you can easily apply to your video content. Of course, included on the list of options are free moody LUTs that you can download and use.
- Simple and advanced video editing: It is equipped with tons of features that can help you facilitate a variety of video editing techniques in a snap.
- High-quality creative assets: It provides numerous creative resources that you can access within the platform and insert into your video projects. Among them are stock images, video clips, audio bits, filters, effects, and many others.
- Ready-made video templates: It offers a variety of custom-tailored video templates that you can easily customize if you don’t wish to start from scratch.
- Artificial intelligence: It is home to a number of AI-powered tools that you can integrate into your creation process. Among them are AI Voice Enhancer, AI Smart Cut Out, AI Copywriting, AI Text-To-Video, AI Text-To-Speech, and many others.
- Flexible export options: It allows you to render and export your videos in different formats. Among the supported file types are MP4, WMV, AVI, MOV, F4V, MKV, 3GP, MPEG-2, WEBM, GIF, and MP3.
Step-By-Step Guide
Wondershare Filmora has a very responsive and intuitive interface. If you wish to apply some moody LUTs to your video content, you can surely do it in a snap. Do you want to try it? If that is so, then check out the tutorial below. Read the instructions very well and follow the indicated steps accordingly.
Step 1: Download the Wondershare Filmora application from its official website. Right after, install it on your computer.
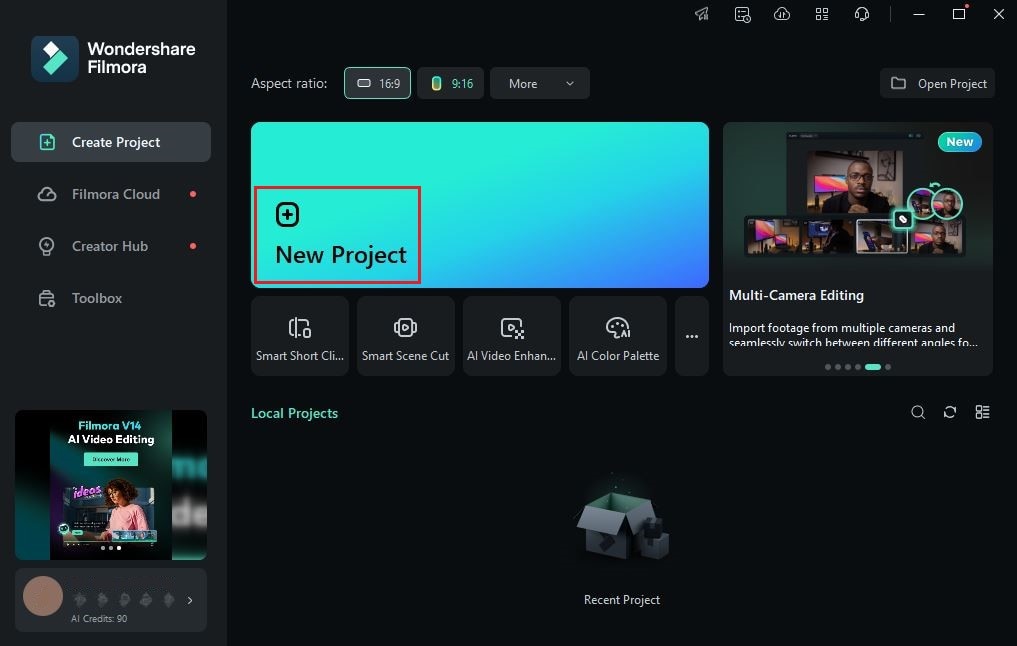
Step 2: Run the newly installed video editing software on your desktop afterward. Once it fully loads up, head over to the main dashboard and click New Project to start editing. Alternatively, scroll down a little to the Local Projects section and open an existing session if there is any available.

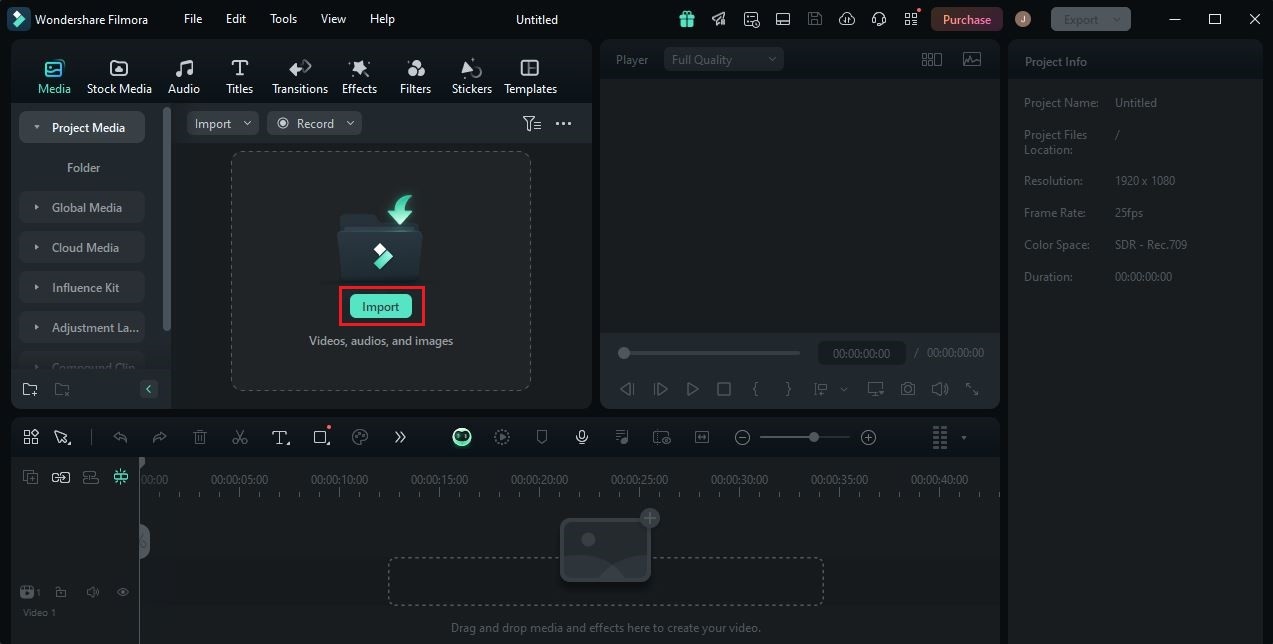
Step 3: After that, navigate to the Elements Panel and click Import under the Media tab. Select all the files you are going to use and then upload them to the platform. Once completed, grab the assets and drag them one by one from the Elements Panel to the Editor Timeline.

Step 4: At this point, you may now commence the actual video editing. Start by arranging the assets based on your preferred style and structure. At the same time, make all the necessary adjustments to your videos. For instance, you may trim or split the clips, fix the timing of the background music, and many others.

Step 5: Once done, you may now proceed with the application of color LUTs. Don’t worry. It’s indeed a piece of cake. You can surely apply some moody LUTs to your video content with just the snap of a finger. To get started, head back to the Editor Timeline and select a video clip.
Step 6: A new panel will immediately open on the right-side corner of your workspace. From there, click the Color tab to access the color modification settings. Examine the options listed under the Basic section and find LUT. Switch on the toggle button next to it to enable LUTs. By default, Wondershare Filmora offers tons of LUTs. You can use any of them if you wish to. Simply click the LUT menu and choose the effect you want to apply to your video content. On the one hand, tap the Add button next to the menu and upload it if you wish to apply moody LUTs from external sources.

Step 7: Don’t forget to make a few adjustments once the moody LUTs have been applied. Wondershare Filmora offers a couple of options that you can use to reconfigure the output. Simply drag the Strength and Protective Skin Tones sliders to your desired level or enter your preferred percentage into the provided input field.

Step 8: Finally, play and review the output. Check if the moody LUTs applied to your video content suit the style you wish to achieve. If you’re satisfied with the results, click the Export button right above the Preview Panel to render the video and save a copy to your computer. Otherwise, continue making adjustments until you obtain a desirable outcome.
Should You Use Moody LUTs in Your Video Content?
As previously indicated, moody LUTs have lots of wonderful benefits to offer. Aside from aesthetics, it can also elevate the technical quality of your video content. That’s why you should explore the power of this visual effect and try to apply it to one of your video projects. Don’t worry. You will surely get a lot in return. Do you want to know some of the benefits you can reap from using moody LUTs? If that is so, then check out the list below.
It can help you emphasize certain elements in your video content.
The dark colors present in most moody LUTs reduce certain distractions in the video. That said, this type of video filter works best if you wish to emphasize some elements in your video. Let’s say you want to show the face of your subject while crying. Then so, the moody LUT will block the other objects in the background and let the subject stand out.

It makes your video look extra dramatic.
Moody LUTs are often used to evoke emotions and express feelings. The ambience they create makes people feel that way. Hence, you should try to apply it to your video projects if you’re producing some dramatic and sentimental pieces. For sure, it can be of great help to you in this regard.
It helps you deliver the mood you want to establish.
In most cases, moody LUTs are always associated with sadness and misery. Well, the reason is pretty obvious. It’s primarily because this type of video filter looks gloomy and dark. However, take note that moody LUTs come with a variety. Each of them displays a unique style and appearance. That said, you can definitely use them to deliver a specific emotion or feeling. Just make sure that you choose your preferred option very well.

It increases the general quality and overall look of your video content.
Moody LUTs are incredibly beautiful. That is one thing for certain. Therefore, you can be sure that these video filters can improve the quality of your content in many ways. Once in a while, try to apply this visual effect to your content. Check how moody LUTs look when applied to your video content.
What is the Best Moody LUT For You?
Modern video editing apps nowadays offer a wide collection of moody LUTs to users. The selections come in various styles and forms that suit certain purposes. That’s why you should examine all your choices and pick the best variant that fits your preferences. Don’t worry. Wondershare Filmora has several moody LUTs that you can use and apply to your video content. Do you want to check some of them? If that is so, browse the list provided below.
Moody 03

First on the list is Moody 03. It is one of the cleanest and most decent moody LUTs that you can use on Wondershare Filmora. Dominantly, its color register is filled with a brown and red tint combined warmly across the video. It is best if you’re producing serious video content that tackles important topics.
Moody 06

Moody 06 is the next on the list. Compared to Moody 03, this one looks a lot brighter and more loose. But still, the emotional quality is there as its contrast and shadow settings remain high. If you’re fond of videos with a green-dominant hue, this moody LUT is indeed a great option for you.
Moody 01

Moody 01 is highly dominated by a dark blue color tone. Therefore, it appears darker compared to other available options. You can take this moody LUT into consideration if your video content features heavy drama and emotions. For sure, it’s going to give you the vibe you need for this type of content.
Moody 05

Last on the list is Moody 05. This one is great for content with low lighting conditions. Why so? Simply because Moody 05 has more loose contrast and shadow configuration than the others. Moreover, its hue is largely dominated by a yellow color tone. That being the case, the video appears to be brighter and clearer when this moody LUT is applied. Don’t worry. It still looks dramatic in a certain way. The emotional property you’re looking for remains intact.
Conclusion
Doubtlessly, moody LUTs are not always to go-to options of filmmakers and cinematographers. It still depends on the creative requirements of the video content. However, you should not ignore the existence of these LUTs. It’s really going to help you in specific ways. Don’t worry. If you decide to try one, you’ll not have a hard time finding some options. Video editing apps themselves offer some by default. Aside from that, you can also download from online sources and import it to your preferred video editor. To get you started, install Wondershare Filmora on your computer. It’s a powerful content-creation app that offers advanced tools and numerous resources to video editors. Explore this platform on your end and take advantage of the amazing benefits it has to offer.


 100% Security Verified | No Subscription Required | No Malware

