Have you ever used After Effects for professional video editing? Adobe After Effects is a significant video editing software that is used to add animating effects, transitions, intros, outros, and visual effects. You can launch this software on Windows and Mac effectively. Using this high-end software allows you to work on team projects as it consists of auto-saving features.
Moreover, you can add adjustment layers on After Effects to make your video editing more efficient. If you don’t know what the adjustment layer in After Effects is, this article will help you. By reading this article, you can easily learn how to create adjustment layers in your video clips using After Effects.
In this article
Part 1: What is the Adjustment Layer in After Effects?
The adjustment layer can save you time and energy from adding effects to multiple clips individually. It does not alter the composition of your video clip until you start applying the effects. Once you add the effect in the adjustment layer, it will replace the effect on all the layers under it.
You can add the adjustment layers in your timeline for creating visual effects such as film grain or color grading. Using the adjustment layer, you can produce transition effects by adding effects to shorter compositions. However, if you want to use the adjustment layer properly, you should select its position carefully in the layer’s stack.
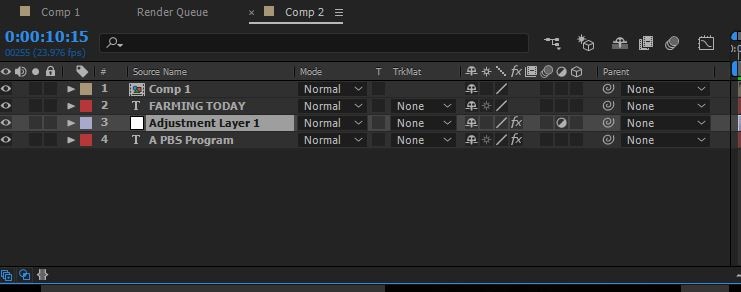
Moreover, always keep in mind that anything placed under the adjustment layer will have a direct effect. In contrast, anything above the adjustment layer won’t get affected. Hence, you can use adjustment layers in After Effects for your convenience to apply all kinds of effects from color to distortion.
Part 2: How to Add Adjustment Layers in After Effects?
Do you want to learn how to add an adjustment layer in After Effects? In this section, we will shed light on two ways through which you can add an adjustment layer to your video clips in After Effects:
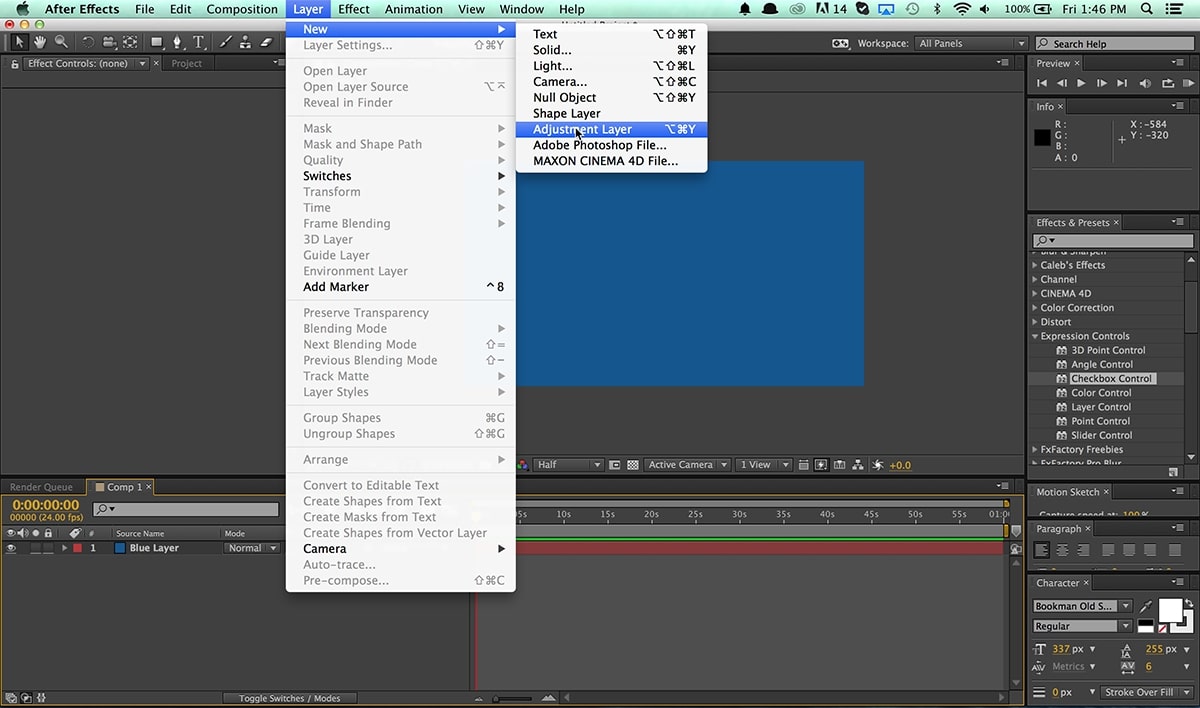
Way 1: After opening After Effects and uploading your project, go to the "Layers" tab. Tap on the "New" button and choose "Adjustment Layer."
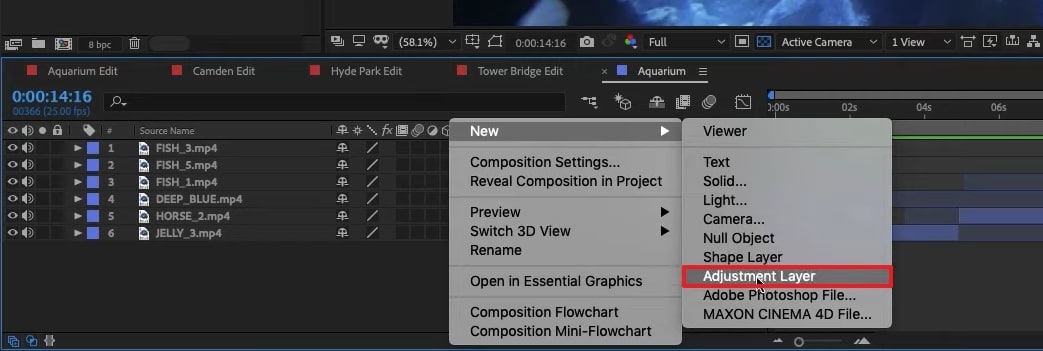
Way 2: Once done with uploading the project on After Effects, go to the blank space in the timeline section on the left side. Right-click using your mouse and select the option "New." Afterward, click on "Adjustment Layer" to proceed. This will add the adjustment layer on the top of your layers stack.
Tips – Keyboard Shortcuts of Adjustment Layers in After Effects
Do you want to save time while creating an adjustment layer in After Effects? Through the following table, you can learn the shortcuts that you can utilize to generate adjustment layers quickly.
| For Windows | For MacBook |
| Ctrl+Alt+Y | Command+Option+Y |
Part 3: Popular Effects You Can Try With Adjustment Layers in After Effects
In this section, you can find out different effects that you can try with the adjustment layer in After Effects. By applying these effects with an adjustment layer, you can transform your video drastically.
1. Animated Ink Text
Do you want to give a unique sense of style to your added text in the video? This particular effect can add animation to your text to produce engaging and distinctive visuals for your text. To make animated ink text illustrations efficiently, you can check the following steps:
Step1 Once you have uploaded the project on After Effects, you can begin with the process. First, open the composition settings and modify the width, height, frame rate, resolution, and background color according to your choice.
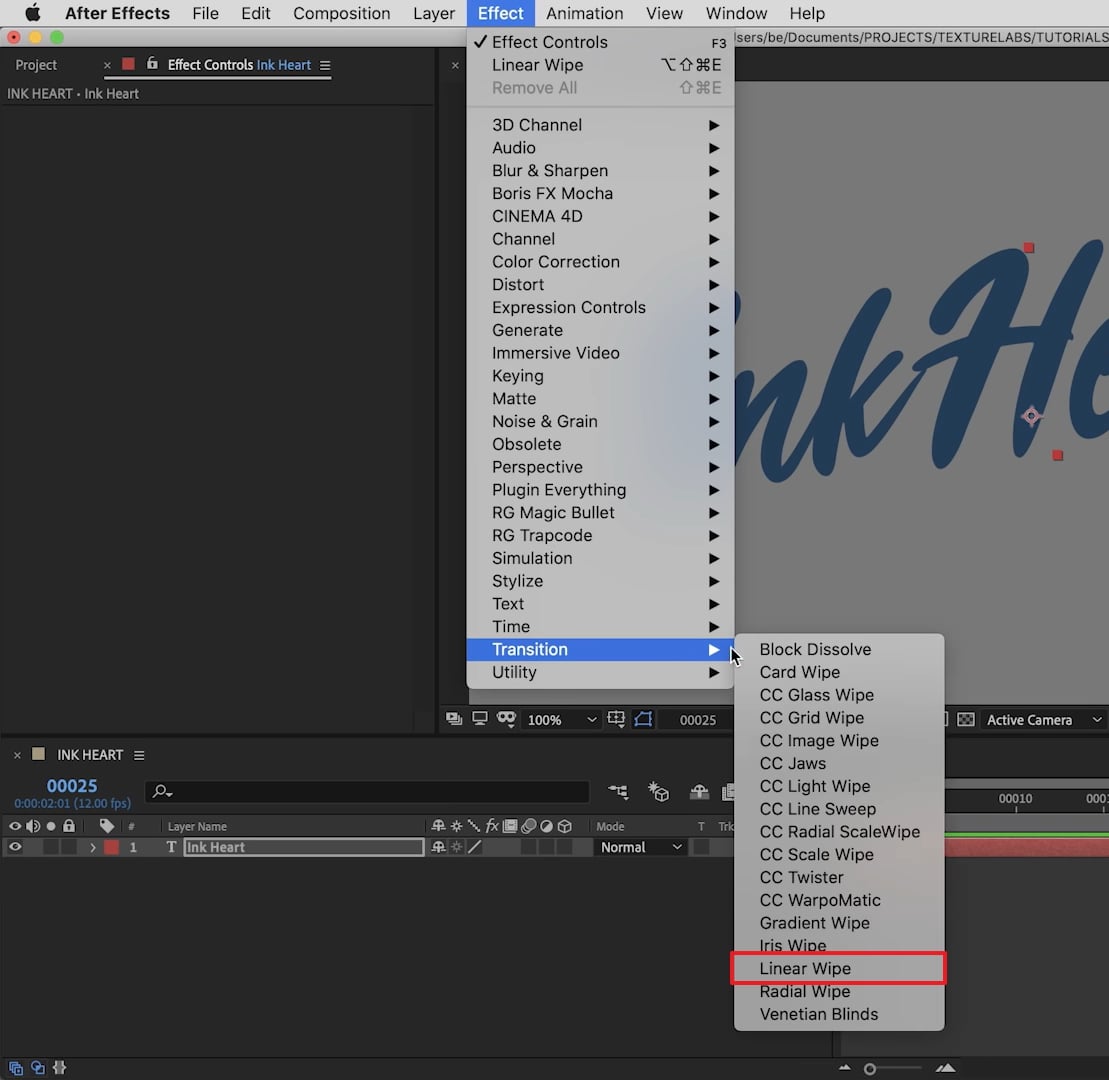
Step2 Make sure to select a suitable text font and color to craft a vibrant output. Afterward, head to the “Effect” tab and select tap on "Transition." From there, select "Linear Wipe." Now adjust the settings of the “Linear Wipe” effect from the left panel.
Step3 Now add an adjustment layer to your timeline and select “Distort” from the “Effect” tab. From the “Distort” drop-down menu, choose “Turbulent Displace." After making its settings, such as adjusting the evolution time, head back to the “Effects” tab and select "Blur and Sharpen." From there, click on "Fast Box Blur."
Step4 Manage the threshold value properly and then add a new effect called “Stylize." From its drop-down menu, click on "Roughen Edges." Afterward, you can add some elements, such as ink droplets, to create a more vibrant look. To ensure a flawless illustration, make sure to match the color of ink droplets with your text color.
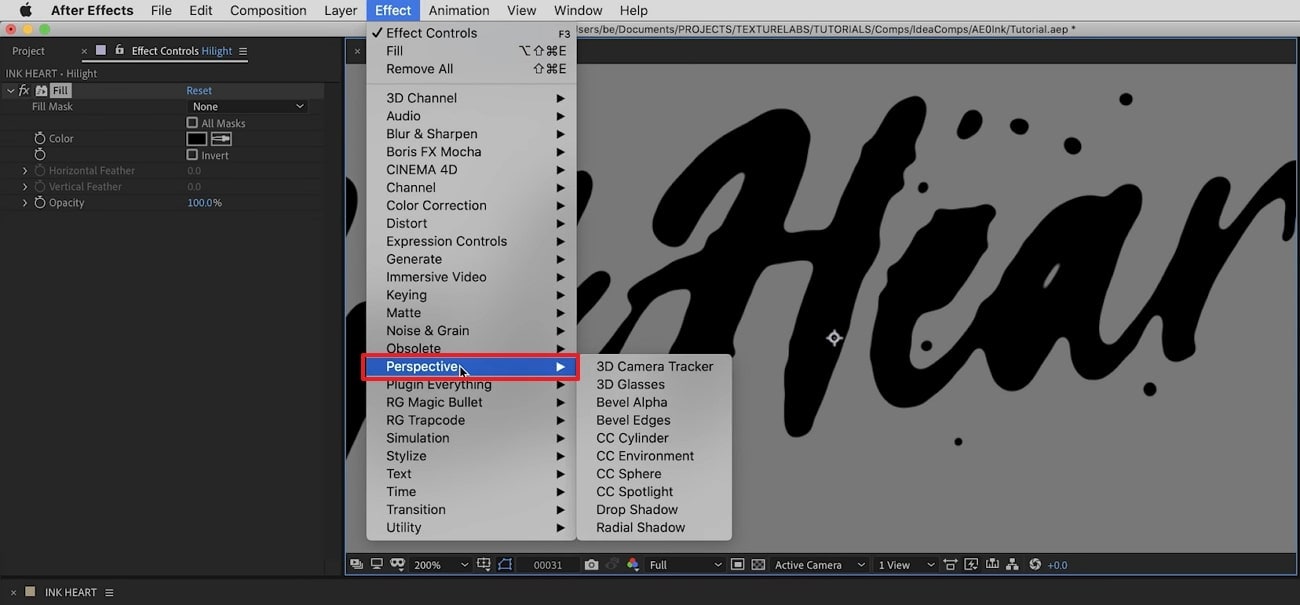
Step5 If you want to give a highlight effect to your animated text, you can add 2nd adjustment layer. Afterward, you can select a bold color for your text, such as black, and add a "Perspective" effect. You can adjust the light color and intensity to create compelling results.
Moreover, you can also add blur and matte effects for more modifications. You can use the blending mode to adjust all the colors. Also, you can apply noise and grain effects to eliminate all the harsh edges from the text.
2. Add Blur Effect
There are various blur effects, such as Gaussian blur, motion blur, radial blur, etc. You can add any of the blur effects in your video clip to craft a smoother look. In After Effects, you can find a variety of blur effects that can help you change your video's perspective. To use an adjustment layer for adding the blur effect, here are the accurate steps:
Step1 Once you have imported the video clip to the timeline of After Effects, add an adjustment layer. Afterward, go to the "Effects" tab and locate any of your preferred effects, such as Gaussian blur. After locating this effect, apply it to the adjustment layer.
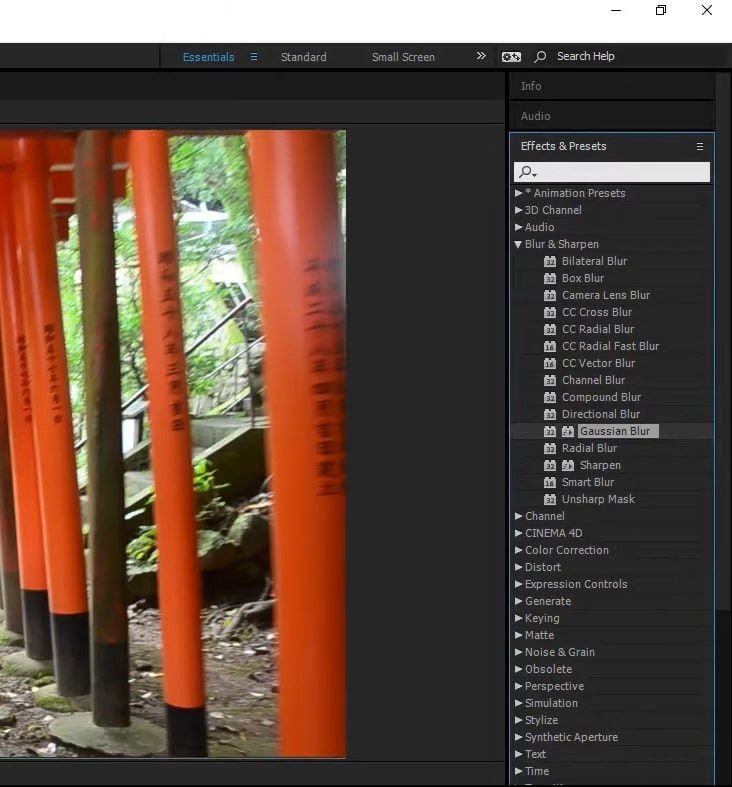
Step2 After applying the effect to the adjustment layer, you can change its settings from the left side. From the left panel, you can change the blurriness value and blur dimensions according to your choice.
3. Color Correction
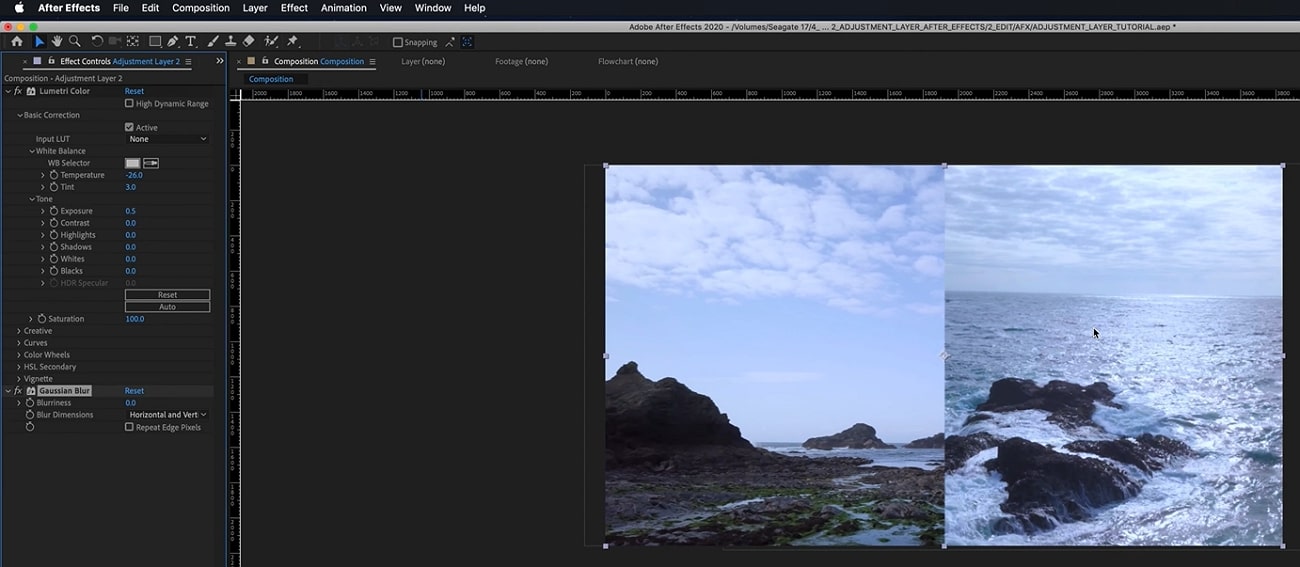
Color correction effects can add and manage the colors in your videos effortlessly. You can change the basic corrections of your video by adjusting the brightness, contrast, hue, exposure, highlight, and other elements. Here are the simple steps to use the adjustment layer for color correction:
Step1 After uploading the video on After Effects, go to the “Layer” tab and add an adjustment layer from there. Once done, you can search for the color correction effect on this tool.
Step2 Once you have found the suitable color correction effect, apply it to the adjustment layer. You can always change the settings of the applied effect from the left panel.
Conclusion
Many beginners are unaware of the term called adjustment layer in video editing. By reading this article, you can find out brief and authentic details about the adjustment layer. Moreover, we have also addressed how to add an adjustment layer in After Effects in simple and easy steps. You can also check about the common effects that people use in Adobe After Effects, using adjustment layers to enhance their videos.


 100% Security Verified | No Subscription Required | No Malware


